SET DE PROGRAMME:
COMPTE A REBOURS PHOTOCELLULE
1. Régler le jour de la semaine le programme appuyant sur
la touche “+” ou “-” boutons. Vous pouvez sélectionner
individuellement chaque jour, du lundi au vendredi,
samedi / dimanche, ou une semaine entière. Pour que
votre tour Minuterie marche et Dusk Off à la même heure
chaque jour de la semaine, n’oubliez pas de pousser “+”
jusqu’à ce que les 7 jours de la semaine sont éclairées à
la fois sur.
2. Appuyez sur “ON/OFF/AUTO” pour entrer dans le
réglage de l’heure. Appuyez sur la touche “+” ou “-”
pour régler:
3. Vous pouvez maintenant soit appuyer sur la
touche “PROG” pour accéder aux programmes
supplémentaires, ou appuyez sur le bouton «TIME» (ou
attendez 15 secondes) pour stocker votre programme.
Votrehorlogeafchedésormaisleréglagedel’heureet
est prêt à être utilisé.
PROGRAMME:
MINUTERIE NUMÉRIQUE + PHOTOCELLULE
1. Régler le jour de la semaine le programme appuyant sur
la touche “+” ou “-” boutons. Vous pouvez sélectionner
individuellement chaque jour, du Lundi au Vendredi,
Samedi / Dimanche, ou une semaine entière. Pour que
votre tour Minuterie marche et Dusk et Off à la même
heure chaque jour de la semaine, n’oubliez pas de
pousser “+” jusqu’à ce que l’ensemble des 7 jours de la
semaine sont éclairées à la fois sur.
2. Appuyez sur la touche “ON/OFF/AUTO” pour entrer
dans le réglage “OFF” heures de temps. Appuyez sur la
touche «+» ou “-” pour régler. Assurez-vous de parcourir
jusqu’àcequeAMouPMs’afchecorrectement.
3. Appuyez sur la touche “ON/OFF/AUTO” pour entrer
dans le réglage “OFF” minute de temps. Appuyez sur la
touche «+» ou “-” pour régler.
4. Vous pouvez maintenant soit appuyer sur la
touche “PROG” pour accéder aux programmes
supplémentaires, ou appuyez sur le bouton «TIME» (ou
attendez 15 secondes) pour stocker votre programme.
Votrehorlogeafchedésormaisleréglagedel’heureet
d’être prêt à l’emploi.
TÉLÉCOMMANDE MARCHE/ARRÊT MANUEL À
CONTOURNER: Vous pouvez manuellement contourner
le réglage de programmes et éteindre vos appareils avec
l’émetteurportablesanslinclus.Appuyezsimplement
sur le marche/arrêt manuel de la télécommande pour un
contrôle instantané. La minuterie restera allumé ou éteint
jusqu’au prochain réglage de programme.
COMMANDE MANUELLE: Appuyez sur la touche “ON/OFF/
AUTO” pour choisir l’état de la minuterie:
PAIRING:Pour jumeler la minuterie Tri-mode
avec la télécommande
1. Appuyez et maintenez le bouton “On/Off /
Auto”+”PROG” pendant 3 secondes simultanément
2. “PAr” clignotera continuellement sur l’écran.
3. Appuyez sur le bouton “On” avec la télécommande et
puis “PAr” disparaîtra.
4. Cette minuterie Tri-mode est maintenant jumelé avec
votre télécommande
Remarque: Lorsque vous réinitialisez la minuterie, vous
devez jumeler la télécommande une fois de plus.
AFFICHER EXPLACATION
ON En continu sur
OFF Permanence OFF
AUTO La minuterie activer / désactiver selon les
paramètres du programme
Cet appareil est conforme à la Partie 15 de la réglementation
FCC. Son fonctionnement est soumis aux deux conditions
suivantes: (1) cet appareil ne doit pas provoquer
d’interférences nuisibles, et (2) cet appareil doit accepter
toute interférence reçue, incluant toute interférence
pouvant causer un fonctionnement indésirable.
Avant la première utilisation, s’il vous plaît brancher votre
minuterie pendant au moins 1 heure pour recharger la
batterieinterne.Aprèsl’afchageLCDapparaît,votre
appareil sera prêt pour la programmation.
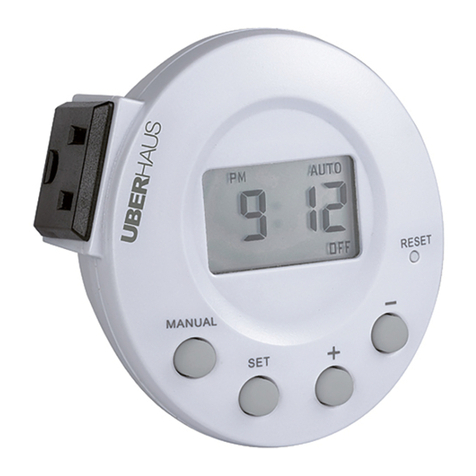
RESET: Appuyez sur la touche “+” et “-” boutons en même
temps pour réinitialiser la minuterie. Cela effacera tous les
réglages programmés.
RÉGLAGE DE L’HEURE
1. Appuyez et maintenez le bouton «TIME» pour entrer
l’heure actuelle. Tout d’abord, régler le jour de la
semaine: appuyez sur “+” ou “-” pour régler le jour
d’aujourd’hui.
2. Appuyez sur le bouton «TIME» pour entrer dans le
réglage de l’heure. Appuyez sur la touche “+” ou “-”
boutons pour régler l’heure actuelle. Assurez-vous que
AM ou PM apparaît correctement.
3. Appuyez sur le bouton «TIME» pour entrer dans le
réglage des minutes, appuyez sur la touche “+” ou “-”
pour régler les minutes.
4. Appuyez sur le bouton «TIME» pour terminer le réglage
del’heureetderetouràl’afchagenormal.
SET MODE: Appuyez et maintenez le bouton “MODE” pour
basculer entre les différents modes.
SET DE PROGRAMME: Après avoir choisi votre mode,
réglez le programme de minuterie en maintenant la touche
“PROG” pendant 3 secondes, puis à la section appropriée
ci-dessous.
SET DE PROGRAMME: MINUTERIE NUMÉRIQUE
1. Réglez l’ désiré jour de la semaine pour votre réglage
minuterie en utilisant les touches “+” ou “-” pour
fairedélerleschoix.Vouspouvezsélectionner
individuellement chaque jour, du lundi au Vendredi,
samedi / dimanche ou toute la semaine. Pour que votre
minuterie activer / désactiver à la même heure chaque
jour de la semaine, n’oubliez pas de pousser “+” jusqu’à
ce que tous les 7 jours de la semaine sont éclairées à la
fois sur.
2. Appuyez sur “ON/OFF/AUTO” pour entrer dans le
“PROG 1 ON” réglage de l’heure. Appuyez sur la touche
“+” ou “-” pour choisir l’heure souhaitée pour votre
minuterie pour allumer. Assurez-vous de parcourir
jusqu’àcequeAMouPMs’afchecorrectement.
3. Appuyez sur “ON/OFF/AUTO” pour entrer dans le
“PROG 1 ON” réglage des minutes. Appuyez sur la
touche “+” ou “-” Pour choisir la minute désirée pour
votre minuterie pour continuer.
4. Appuyez sur la touche “PROG” pour entrer dans le
“PROG 1 OFF”. Répétez les étapes 2 et 3 pour régler
l’heure désirée Off.
5. Vous pouvez maintenant soit appuyer sur la touche
“PROG” pour entrer dans d’autres programmes , ou
appuyez sur le bouton «TIME» (ou attendez 15 secondes)
pourstockervotreprogramme.Votrehorlogeafche
désormais le réglage de l’heure et est prêt à être utilisée
et est prêt à l’emploi.
AFFICHER EXPLACATION
dDu crépuscule à l’aube- Le coucher du soleil, au
lever du soleil Off
d:01 à d:12 Au crépuscule, Off 1 à 12 heures plus tard
S:01 à S:12 Sur immédiatement, Off 1 à 12 heures plus tard
AFFICHER MODE EXPLACATION
Minuterie Numérique Marche / Arrêt à vos
exactes heures
programmée
Cellule Photoélectrique
Compte à Rebours
Au crépuscule, Off 1 à
12 heures plus tard
Minuterie Numérique +
Photocellule
Au crépuscule, OFF
à vos exactes heures
programmées
