manuals.online logo
Brands
  1. Home
  2. •
  3. Brands
  4. •
  5. Westward
  6. •
  7. Jack
  8. •
  9. Westward 1MZK9 Instructions for use

Westward 1MZK9 Instructions for use

Operating Instructions & Parts Manual 1MZK7
Please read and save these instructions. Read carefully before attempting to assemble, install, operate or maintain the
product described. Protect yourself and others by observing all safety information. Failure to comply with instructions
could result in personal injury and/or property damage! Retain instructions for future reference.
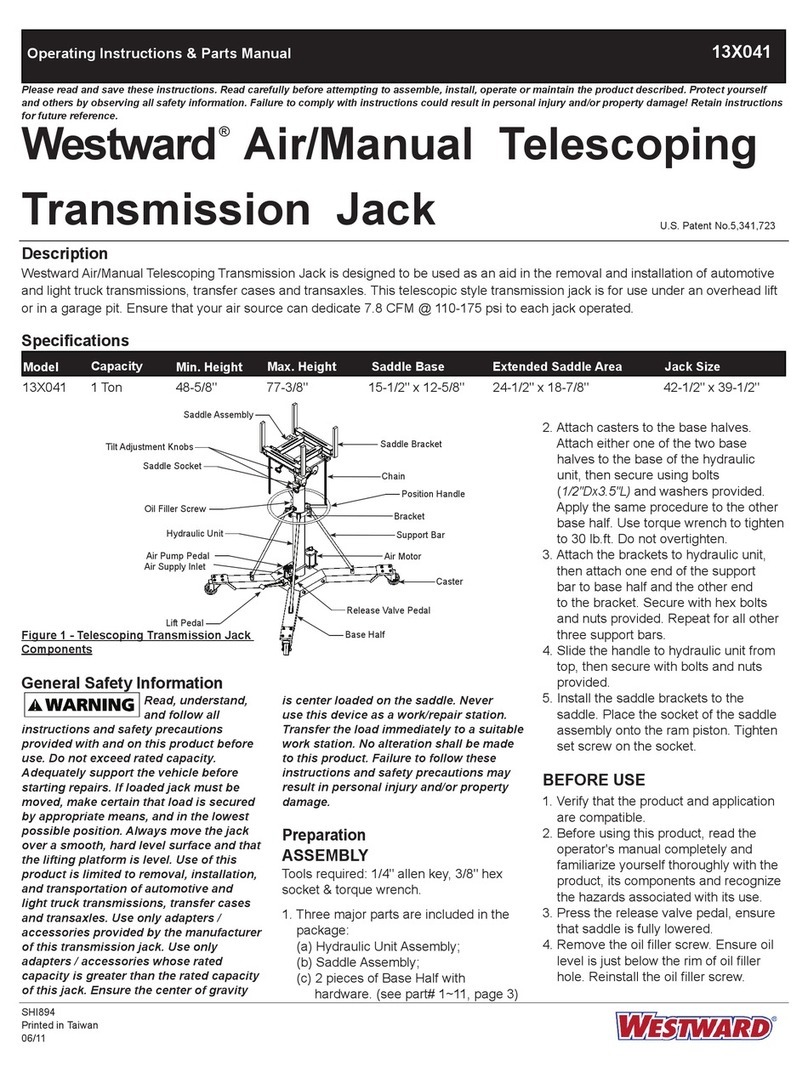
Hydraulic
2.5 Ton Spider Jack
Description
This Westward Hydraulic 2.5 Ton Spider Jack is designed for lifting, but not sustaining a lift. The Spider Jack (1MZK7) rotates 360° for
maximum maneuverability and easy placement. It is to be used in conjunction with jack stands. Intended use: To lift one axle of a vehi-
cle for the purpose of service and /or repair of vehicle components. After lifting, loads must be immediately supported by appropriately
rated jack stands. Check with vehicle manufacturer’s owners manual for proper lift points. This jack complies with applicable ASME /
ANSI Standards.
Specifications
ALT012
Printed in China
09/07
Chassis Handle Low Pick Up High Lifting
Model Capacity Length Length Height Point
1MZK9 2.5 Ton 21-1/2" 20-1/2" 5-1/2" 15-1/2"
Pump Socket
Release Valve
Fill Plug
Inspection Plate
Lift Arm
Lifting Saddle
Ram
Control Handle
Used to operate release valve
Carrying Handle
General Safety Information
Study, understand,
and follow all instructions before oper-
ating this lifting device. Intended use is
for lifting part of a total vehicle, only
one wheel or axle at a time.
Immediately after lifting, support the
vehicle with appropriate means. Do not
get under or allow anyone under vehi-
cle until supported by jack stands. Do
not exceed rated capacity. Use only on
hard, level surfaces capable of sustain-
ing rated capacity loads. Lift only on
those areas of the vehicle as specified
by the vehicle manufacturer.
Do not move or dolly the vehicle while
on the jack. Keep children away from
jack. Ensure that the lift point is proper-
ly centered on the jack saddle. Always
wear safety glasses when using this
equipment. Inspect jack before each
use. Do not use if bent, broken, leaking,
or damaged components are observed.
No alteration of this product is allowed.
Do not use this device for any purpose
other than that for which it was intend-
ed. Failure to heed any one or combina-
tion of these warnings may result in
severe personal injury and/or property
damage.
Assembly
1. Always secure the handle by pushing
the handle into the socket and turning
until the handle locks into place. Tighten
securely to prevent accidental removal
of handle while in use.
2. Before use, a visual inspection of the
jack should be made looking for bent,
worn or loose parts, or hydraulic leaks.
If any of these conditions exist, the jack
should be removed from service.
Operation
Operation
Off-centered loads
and loads lifted while jack is not level
may damage the jack or cause personal
injury.
RAISING VEHICLE
1. Make sure the jack and vehicle are on a
hard level surface.
2. Always set the vehicle parking brake
and block the wheels.
3. Consult the vehicle owners manual to
ascertain the location of lift points and
position the jack under the prescribed
lift point.
4. Turn the release valve clockwise to the
closed position. Do not over tighten!
5. To raise the vehicle to desired height,
place the handle into the socket and
pump up and down.
6. Place jack stands beneath the vehicle
at locations recommended by the vehi-
cle manufacturer. Do not get under the
vehicle without jack stands. Jacks are
not designed to maintain heavy loads
for long periods of time.
7. Turn release valve slowly counterclock-
wise to lower load onto jack stands.
This is a lifting
device only. The load must be support-
ed immediately by other appropriate
means. Keep hands, feet, and clutter
clear of ground area when lowering
the load.
LOWERING VEHICLE
1. Turn the release valve clockwise to the
closed position.
2. Pump the handle to lift vehicle off of
jack stands
3. Remove the jack stands. Do not get
under or let anyone else under the vehi-
cle while lowering.
4. Turn the release valve SLOWLY coun-
terclockwise to lower the vehicle onto
the ground.
Avoid shock loads
created by quickly opening and closing
the release valve as the load is being
lowered. Shock loads can create dan-
gerously high operating pressures
within the hydraulic system, causing
system failure and resulting in personal
injury and/or property damage.
Inspection
The product shall be maintained in accor-
dance with the product instructions. No
alterations shall be made to this product.
1. The product shall be inspected immedi-
ately if the jack is believed to have been
subjected to an abnormal load or shock.
It is recommended that this inspection
be made by an authorized customer
service representative prior to use.
2. Repair of this equipment requires spe-
cialized knowledge and facilities. If the
jack is subjected to abnormal load or
shock, remove from service and have it
examined by an authorized inspection
facility for parts or repairs. An annual
inspection of the product should be
made by a manufacturer’s authorized
repair facility. Any defective parts,
decals, or safety labels shall be
replaced with manufacturer’s specified
parts.
Maintenance
Monthly maintenance is recommended.
Lubrication is critical to jacks as they sup-
port heavy loads. Any restriction due to
dirt, rust, etc., can cause either slow
movement or extremely rapid jerks, dam-
aging the internal components. The follow-
ing steps are those designed to keep the
jack well lubricated:
1. Lubricate the ram, linkages, saddle and
pump mechanism with light oil. Grease
wheel bearings and axles.
2. Visually inspect for cracked welds, bent,
loose, missing parts or hydraulic oil
leaks.
3. If jack is subjected to abnormal load or
shock, remove from service and have it
examined by an Authorized Repair
Service.
4. Clean all surfaces and maintain all
labels and warnings.
5. Check and maintain the ram oil level.
IMPORTANT: Do not use brake or trans-
mission fluids, or regular motor oil as
they can damage the seals. Always pur-
chase and use products labeled
Hydraulic Jack Oil.
CHECKING OIL
1. Turn handle counterclockwise to allow
ram to fully retract. It may be necessary
to apply force to the saddle for lowering.
2. With jack in upright position remove oil fill
plug. Oil should be even with bottom of
hole. If not, top up. Do not overfill. Always
fill with new, clean hydraulic jack oil.
3. Replace fill plug.
4. Check jack operation.
CHANGING OIL
For best performance and longest life,
replace the complete fluid supply at least
once per year.
1. With saddle fully lowered and pump pis-
ton fully depressed, remove the fill plug.
2. Lay the jack on its side and drain the
fluid into a suitable container.
NOTE: Dispose of hydraulic fluid in accor-
dance with local regulations.
3. Fill with good quality hydraulic oil, rein-
stall the fill plug.
LUBRICATION
1. Applying a coating of light lubricating oil
to pivot points, axles and hinges will
help to prevent rust and assure that
wheels, casters and pump assemblies
move freely.
2. Periodically check the pump piston and
ram for signs of rust or corrosion. Clean
as needed and wipe with an oily cloth.
NOTE: Never use sandpaper or abrasive
material on these surfaces !
SYSTEM AIR PURGE
1. Turn release valve counterclockwise one
full turn to open.
2. Pump handle eight full strokes.
3. Turn release valve clockwise to close
valve.
4. Pump handle until the lift arm reaches
maximum height and continue to pump
several times to remove trapped air in
the ram.
5. Carefully and slowly pinch oil fill plug to
release trapped air.
6. Turn release valve counterclockwise one
full turn and lower lift arm to the lowest
position. Use force if necessary.
7. Turn release valve clockwise to closed
position and check for proper pump
action. It may be necessary to perform
the above more than once to assure air
is evacuated totally.
Storage
Always store your jack in the fully lowered
position. This will protect critical areas
from excessive corrosion.
Alterations
Because of the potential hazards associat-
ed with the misuse of this type of equip-
ment, no alterations shall be made to the
product without written authorization of the
manufacturer or supplier.
2
Operating Instructions & Parts Manual 1MZK7
HHyyddrraauulliicc22..55TToonnSSppiiddeerrJJaacckk
Operating Instructions & Parts Manual 1MZK7
HHyyddrraauulliicc22..55TToonnSSppiiddeerrJJaacckk
WESTWARD ONE-YEAR LIMITED WARRANTY:
Should this Westward product fail to perform satisfactorily due to defect or poor workmanship within ONE YEAR of purchase, return it
to your place of purchase and it will be replaced or repaired free of charge. Incidental or consequential damages are excluded from
this warranty.
Troubleshooting Chart
Jack will not lift to full height: Low oil level Check oil level
Jack will not hold load: Release valve not closing Call customer service
Hydraulic jack oil contaminated
Pump valves not sealing
Lift arm will not lower: Cylinder ram binding Call customer service
Parts worn
Internal damage
Broken return spring or unhooked
Lift arm linkage bent or binding
Jack feels spongy when lifting: See Air Purge section See Air Purge procedure
Problem Possible Cause(s) Corrective Action
3
Operating Instructions & Parts Manual 1MZK7
HHyyddrraauulliicc22..55TToonnSSppiiddeerrJJaacckk
1
2
34
5
6
9
8
10
11
3
7
12
13
14
15 16
14 15
16
11
10
9
8
17
18
19 20
21
22
23
24
25
26
Manufactured for Grainger International, Inc.
100 Grainger Pkwy., Lake Forest IL 60045 U.S.A.
DESCRIPTION
1 Saddle Pin 14 Washer
2 Saddle 15 Washer
3 Locking Washer 16 Nut
4 Saddle Bracket 17 Piston Rod Shaft
5 Locking Washer 18 Plastic Handle
6 Saddle Shaft 19 Return Spring
7 Shaft 20 Handle
8 Nut 21 Handle Cover
9 Washer 22 Power Unit
10 Bearing Plate 23 Locking Washer
11 Caster Unit 24 Inspection Plate
12 Locking Washer 25 Shaft
13 Frame 26 Nut
27 Nut
4
For Repair Parts, call 1-800-423-3598
8 AM - 5 PM PST., Monday through Friday
Please provide the following:
- Model Number
- Serial Number (if any)
- Part description and number as shown on parts list

Other Westward Jack manuals

Westward 1ZKX5A Service manual

Westward

Westward 1ZKX5A Service manual

Westward 3CFK6 User manual

Westward

Westward 3CFK6 User manual

Westward 3ZC66 Instructions for use

Westward

Westward 3ZC66 Instructions for use

Westward 1VW31 Instructions for use

Westward

Westward 1VW31 Instructions for use

Westward 5ML68A Instructions for use

Westward

Westward 5ML68A Instructions for use

Westward 5ML72A Instructions for use

Westward

Westward 5ML72A Instructions for use

Westward 5M460C Service manual

Westward

Westward 5M460C Service manual

Westward 1VW32 Instruction Manual

Westward

Westward 1VW32 Instruction Manual

Westward 5ML69B User manual

Westward

Westward 5ML69B User manual

Westward 5ML69C Service manual

Westward

Westward 5ML69C Service manual

Westward 5ML72B Service manual

Westward

Westward 5ML72B Service manual

Westward 5ML74A User manual

Westward

Westward 5ML74A User manual

Westward 1ZKX4 Instructions for use

Westward

Westward 1ZKX4 Instructions for use

Westward 1VW35 Instructions for use

Westward

Westward 1VW35 Instructions for use

Westward 5M451A Instructions for use

Westward

Westward 5M451A Instructions for use

Westward 3W929C Service manual

Westward

Westward 3W929C Service manual

Westward 1ZKY1A Service manual

Westward

Westward 1ZKY1A Service manual

Westward 15F197 Instruction Manual

Westward

Westward 15F197 Instruction Manual

Westward 13X041 Instructions for use

Westward

Westward 13X041 Instructions for use

Popular Jack manuals by other brands

Husky HD00107 Use and care guide

Husky

Husky HD00107 Use and care guide

Sealey 800GTA instructions

Sealey

Sealey 800GTA instructions

Lippert Basecamp owner's manual

Lippert

Lippert Basecamp owner's manual

Torin Big Red SJ05 Operator's manual

Torin

Torin Big Red SJ05 Operator's manual

Sealey Quality Machinery SJ50 instructions

Sealey

Sealey Quality Machinery SJ50 instructions

King Tony 9TY133 Operation manual

King Tony

King Tony 9TY133 Operation manual

TMG TMG-AJT10 product manual

TMG

TMG TMG-AJT10 product manual

Michelin 009556 user guide

Michelin

Michelin 009556 user guide

ADENDORFF GJACKB-010 Operator's manual

ADENDORFF

ADENDORFF GJACKB-010 Operator's manual

ELEVATE Sidewind-Jack-2000 instructions

ELEVATE

ELEVATE Sidewind-Jack-2000 instructions

Swivelpole F17 Installation & operation guide

Swivelpole

Swivelpole F17 Installation & operation guide

Pro-Lift B-033D Operating instructions & parts manual

Pro-Lift

Pro-Lift B-033D Operating instructions & parts manual

Clarke STRONG-ARM VPJ300 Installation and maintenance instructions

Clarke

Clarke STRONG-ARM VPJ300 Installation and maintenance instructions

Ranger Products Professional RFJ-3TP Installation and operation manual

Ranger Products

Ranger Products Professional RFJ-3TP Installation and operation manual

Performance Tool W1633 owner's manual

Performance Tool

Performance Tool W1633 owner's manual

CommScope MT- RJ 6278414 Series instruction sheet

CommScope

CommScope MT- RJ 6278414 Series instruction sheet

HEIN-WERNER AUTOMOTIVE HW93737A Operating instructions & parts manual

HEIN-WERNER AUTOMOTIVE

HEIN-WERNER AUTOMOTIVE HW93737A Operating instructions & parts manual

Husky HD4795-DIP Use and care guide

Husky

Husky HD4795-DIP Use and care guide

manuals.online logo
manuals.online logoBrands
  • About & Mission
  • Contact us
  • Privacy Policy
  • Terms and Conditions

Copyright 2025 Manuals.Online. All Rights Reserved.