Woosh Bikes Sant-Ana CD User manual

© 2012 Woosh Bikes Limited
Woosh Support:
Be sure to check the FAQ section on our website before call-
ing as the answers to the most common queries are there
and you may find that the solution to your problem is already
online. If you do need to get in touch, our contact details are
below.
It can sometimes be useful to see the issue you ha e, so if
possible, email a couple of photos illustrating the problem
and we’ll normally get back to you within a an hour or two (on
weekdays).
Support staff are not a ailable at the weekends, though if
you send an email, it will normally be responded to on the
following Monday morning.
Email: support@wooshbikes.co.uk
Woosh support telephone number : 01702 684444
Support staff are a ailable 10am to 5pm Monday to Friday.
Please note that if you purchased your bike from our
Cambridge branch and need support you should contact our
Southend office on the number abo e.
Sant-Ana CD Manual
Please read this manual
It contains important
information about your safety and
how to look after your bike properly
to a oid paying ser ice fees.
After sales support:
(01702) 684444
Tel 01702 435566 - E-mail: support@wooshbikes co uk

Thank you for buying a Woosh Santana CDL electric
bike
Our bikes are named mainly after winds and mountains
The Santana is a warm wind blowing across the east
coast of South America — just so you know!
Please read this manual completely before putting your
bike together and riding it As well as instructions on
assembly and maintenance it also contains essential
information that may affect your consumer rights
The Woosh Ethos
Our aim is to supply decent quality electric bikes but at ery
affordable prices.
This ine itably means importing from China, selling direct
rather than through dealers and working on much lower profit
margins than many of our competitors. It also means working
hard with our suppliers to constantly impro e quality and
ensure that each bike is checked before lea ing us - not
something all mail order electric bike companies do.
There is howe er only so much we can offer within our price
range. We would for example like our bikes finished to
German standards, with e ery nut and bolt fully tightened,
immaculate paintwork and superb quality plastic on things
like handlebars and battery cases. But this alas would also
push the prices up to those of German bikes - starting at
£1800 - which clearly we don’t wish to do,
That said, we are always happy with sensible comments for
future impro ements, so please do email me with feedback,
good or bad.
I look forward to hearing from you.
Hatti Lee
hatti@wooshbikes.co.uk
Cleaning and Maintenance:
Ensure the mechanical parts of the bike are kept suitably
lubricated in the same way you would lubricate a regular
bike.
We specify stainless steel fixings throughout our bikes but
occasional fixings such as clamps or rings may be chrome
and may rust. Applying rust treatment to these at an early
stage will preser e the life of the bike.
Washing: we ad ise against ‘hea y’ washing or using a hose
or power washer. as water may enter connector points and
damage the electrics. We ad ise simply using a damp cloth
and wiping dry afterwards.
Always take care when cleaning mud or debris from the
underneath of the bike, taking care not to dislodge cables or
connectors.

Riding Distance/Total Distance
To change the display between riding distance and total dis-
tance, press the Mode button. The current mode is indicated
by “Trip” for “Current Trip Distance” and by “Odo” for “Total
Distance”.
Control Module Battery
The “control module” itself has a battery. This battery should
last for around 2 years. The battery is a standard type and is
readily a ailable. If you need a battery in the future, contact
us and we can supply one or alternati ely you can buy from
outlets such as Maplins. Make sure you replace the battery
with the correct type to a oid causing damage to your mod-
ule. If you are not sure how to change the battery, contact us
for assistance.
Expectations: please read this before riding
Pedalling: E-bikes are designed to be pedalled, with use of the
throttle occasionally—to start off, or to help you to ride up a slope.
Using the throttle constantly may damage it and will run the battery
down ery quickly, wearing it out within just a few months.
Speed: Our bikes are designed for sensible use in accordance with
UK law. The motor will power you up to 15.5 mph and no faster,
though you can still pedal harder to achie e greater speeds.
Models: Some of our bikes are more suited for recreational use
rather than commuting. If you need a bike for commuting, you
should consider our chain-dri en (CD) ersions.
Care: Electric bikes need more regular maintenance than standard
bikes. Spokes and other mechanical fixings need tightening e ery 2
to 3 weeks and tyres need regular pumping. We also ad ise riding
as often as you can. Not riding your bike for se eral months may
cause the motor to seize up and could damage the battery.
Identical bikes: No two bikes are identical, e en if they are the
same model and purchased at the same time. One may be a little
quicker or one motor may be quieter than another.
This is normal. Please make allowances.
Hill climbing: If you are hea y, ha e steep hills or both, you may
ha e difficulty getting uphill, and in extreme cases the bike may not
get you up at all. The motor is limited by law to 250 watts and there
is only so much it can propel up an incline. Call us for ad ice before
you ride.
Distance and performance The distance you can co er on a
single charge will ary significantly. It is affected by your weight,
how much effort you put in, hills, headwinds, traffic etc. The bike
may cut out on steep hills and the battery will cut out when
exposed to extreme cold.
Paint quality: please see o erleaf
Costs: we ask you to contribute towards costs when returning the
bike or a part for repair and additional costs apply if you take your
bike abroad (see later).
If you are not happy with any of the above, please do not ride
your bike Call us to arrange return and a refund

Returning a bike — please read before riding
If you ha e purchased at a store, or ha e tried a bike at a store and then had
one sent to you, you are not a mail order customer. We will only refund you for
the bike if it has a serious fault within the first 28 days. We will not refund you if
you simply change your mind after a few days.
Mail order purchasers: A bike will be refunded if returned within 14 days if un-
suitable or 28 days if faulty. The bike MUST be packed in an identical way to that
in which it arri ed to a oid damage during return transit. We will email or post
you instructions on how to do this as it is not straight forward. After 28 days, if
faulty the bike will not be refunded but repaired and returned back to you.
Sending your bike back: you can send your bike back by using your own courier
or you can call us and we will collect it.
Costs: returning a bike for a refund
Return by you of a bike unridden within 14 days: refund less £30
Collection by us of a bike unridden within 14 days: refund less £45
Return of a bike unsuitable and ridden within 14 days: refund less £130
Collection of a bike unsuitable and ridden within 14 days: refund less £145
Return of a bike faulty within 28 days ridden or not: full refund*
Costs: returning a bike or part for servicing
Return of a bike or battery under warranty: no charge
Collection of a bike/ battery under warranty first 28 days: no charge
Collection of bike or battery under warranty months 2—11: £15
collection fee, labour parts and return free of charge
Return of a bike or battery outside warranty: parts at cost, labour £30 per hour
Collection by us of a bike for ser icing outside warranty: £45 collection and re-
turn fee, parts at cost, labour £30 per hour
Collection by us of a battery for ser icing outside warranty : £30 collection and
return fee, parts at cost, labour £30 per hour.
*Costs will be deducted from a refund for damage in return transit caused
by poor or inadequate packaging and missing items such as keys
Paint quality:
An electric bike has around 120 more parts than a standard bike and these are
added after the bike has been assembled and the frame sprayed.
It is ine itable that howe er well trained, factory workers ha e a difficult job trying
to a oid scratching the paint under these circumstances. You may see minor
scratches and pin hole dents. If you are not happy we suggest you pack the bike
up and return it for a refund as we will not able to pro ide a perfect paint finish.
Otherwise please call us and we shall arrange to send some touch up paint if
a ailable.
Warning:
The control module comes pre-configured specifically for
your bike. You don’t therefore need to alter the settings. In-
correct settings could cause damage to the bike components
and also result in a bike that is not UK road legal. Any modifi-
cations made to the controller configuration will oid your
warranty with immediate effect.
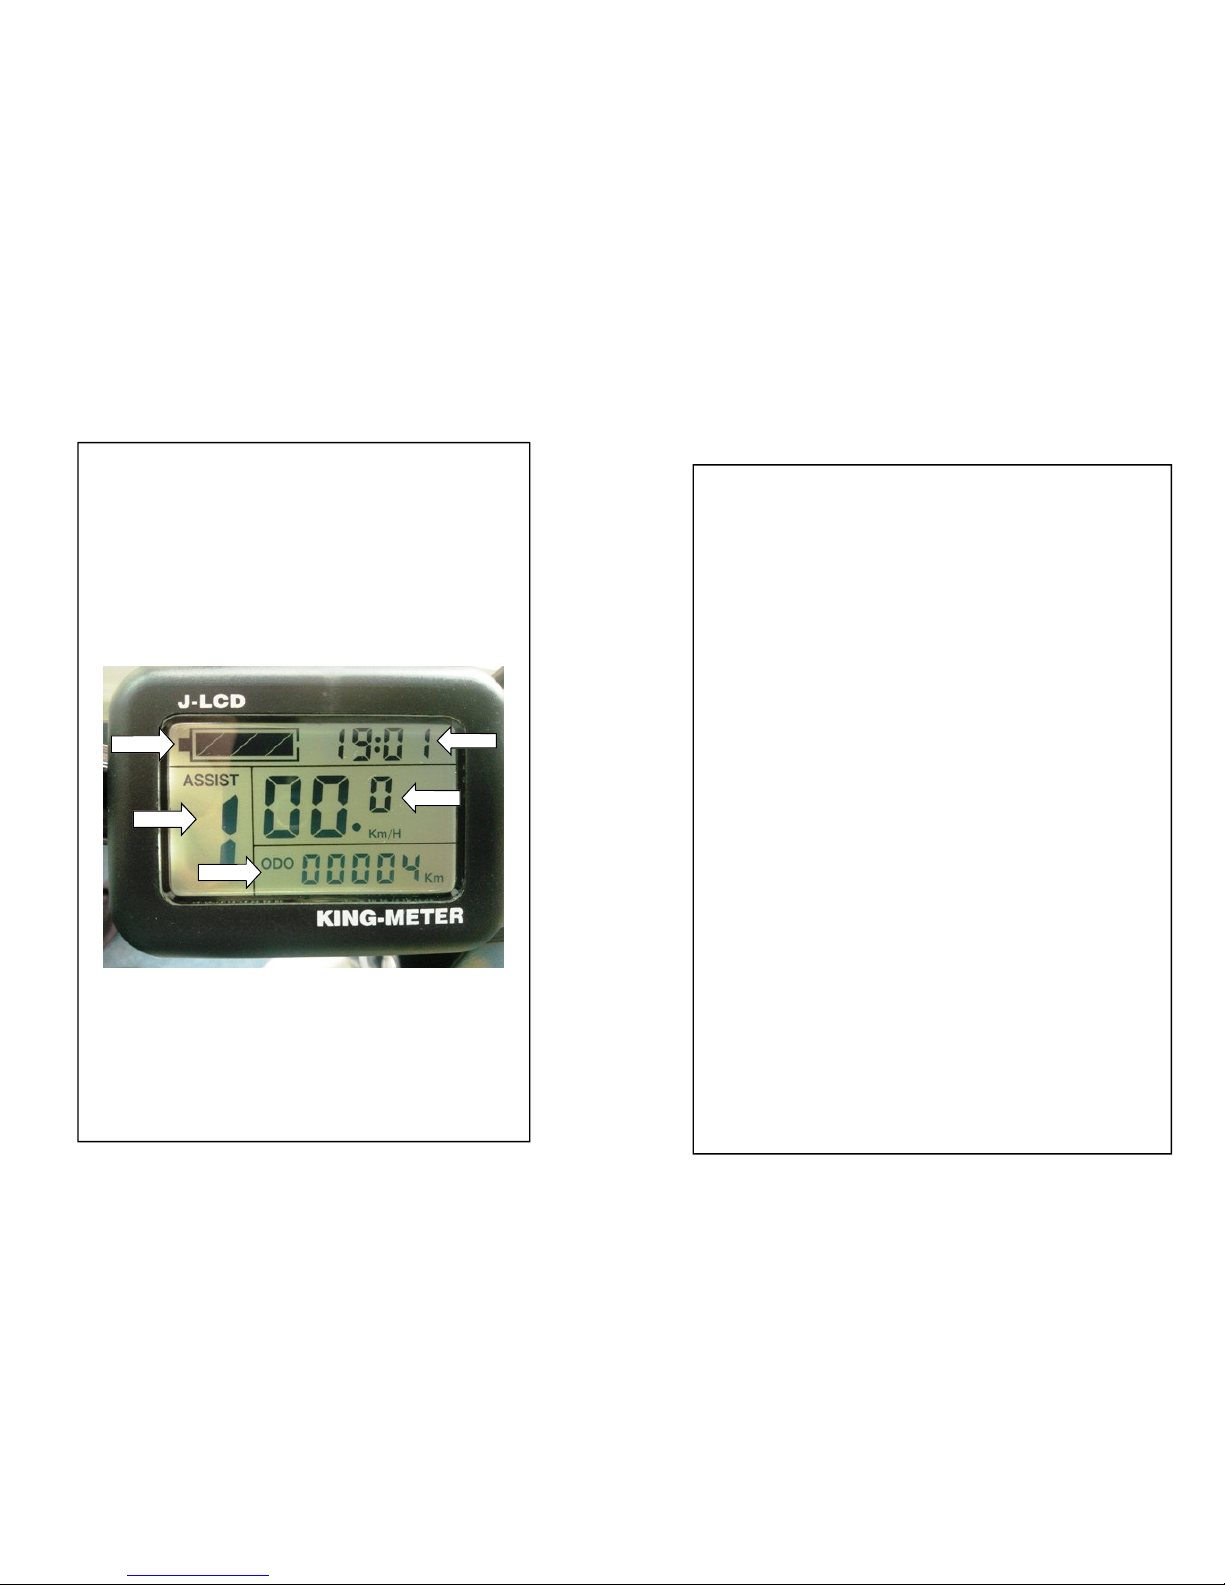
Turning Control Module On/Off
To turn on the control module press and hold the middle
(Mode) button. Press and hold the same button to turn off the
module and disable all electric features of the bike.
Turning Backlight On/Off
To turn on the display backlight, press and hold the “Mode &
Up” button, press and hold the same two buttons to turn it
off.
Varying Pedal Assist Level
To alter the le el of assistance pro ided simply press the Up/
Down arrows to cycle through the 5 le els of assistance.
Le el 1 offers the least assistance while le el 5 offers the
greatest assistance.
Speed Display Mode
There are three different modes for the speed display, these
are current speed, a erage speed and maximum speed. To
switch between these modes, press and hold the “Up” button
for approx. 1 second to cycle through the modes.
Walking Mode
The bike also supports a walking mode which is basically a
ery slow mode allowing you to walk next to the bike at
approx. 6Km/h. This is acti ated by pressing and holding the
“Down” button. As soon as the button is released, the bike
will stop.

Control Module—Advanced
The control module has many ad anced features and
modes, these include back-lit display (for night riding), indi-
cator options for max speed, a erage speed and current
speed, a digital clock and a battery power indicator. It also
features a walking mode which is used when you want to
wheel/push the bike, this is basically a ery low speed mode
which is acti ated by pressing and holding the button marker
with a ‘down-arrow’.
2.
3.
1.
5.
4.
1. Battery Le el Indicator
2. Assistance Le el (Pedal Assist)
3. Odometer
4. Digital Clock
5. Speed Indicator
The Woosh Electric Bike 12 month Warranty
This warranty covers:
Manufacturing defects causing electrical failure within the first year
Manufacturing defects causing major mechanical failure (frame and handlebars) within the
first year
Manufacturing defects causing minor mechanical failure (pedals, spokes etc.) within the
first 28 days.
Damage and cosmetic damage (deep gouges, chips, dents and scratches) caused through
poor transit to you.
This warranty does not cover:
Accidental damage caused through collision with an object or person or a s a result of
dropping the bike or the bike falling o er.
Negligence: damage caused as a result of failure to carry out initial and regular safety
checks, or failure to maintain the bike or its parts in accordance with the manual, the rec-
ommended rider weight being exceeded, or allowing weights hea ier than 5Kgs being
placed on the rear rack, of allowing people to ride on the rear rack, excessi e or constant
use of the throttle, riding under the influence of drink or drugs, riding in dusty/sandy en i-
ronments, riding on ery poorly maintained roads, off road, through deep
puddles or fords, in snow, or with a trailer, riding carelessly or stunt riding.
Consumable parts after the first 28 days: these include tyres, inner tubes, batteries for
lights if applicable, brake pads, bottom brackets, cranks, spokes and pedals.
Minor faults on arri al: loose fixings (nuts, bolts, screws,), loose spokes, loose cables
deemed resol able with minimal inter ention,
Minor cosmetic damage - hairline scratches or barely isible chips, marks or dents.
The warranty period applies to riding within the UK only, is strictly for 12 months and can-
not be extended under any circumstances, e en if you ha e ridden the bike ery little.
This warranty expressly excludes consequential loss, injury or hardship as a result
of electrical or mechanical breakdown, accident or collision or as the result of a
faulty part Our liability is limited strictly to repair or replacement of the bike or of
the part
This warranty is transferable to a second hand purchaser but our Ts and Cs will apply and
their weight should not exceed the limits for the bike.

Transit damage
If your bike appears to ha e suffered damage during transit to you—for
example a chain or mudguard are broken, a wheel is damaged or there
are ery deep dents or scratches to the paintwork, please call us within
one working day of recei ing the bike. Failure to do so may pre ent us
from claiming compensation form our insurers and thus from making
good to you.
Wheel useage:
We occasionally short-road-test a bike (300—400 metres) before
packing. If your tyres show useage it is because of this. Please be
assured that we ne er sell second hand bikes as new.
Using your Woosh electric bike abroad
Please note that whilst you are allowed to use your throttle in the UK,
its use is illegal in Europe. We highly recommend that you use the red
switch to deacti ate it when riding abroad.
Breakdowns abroad: for ob ious reasons, we are only able to co er
the costs of ser icing within the UK. Reco ery of a bike within the UK,
repairing it and returning it back costs us £45, some of which is borne
by customers sometimes and some by us sometimes. See the pre i-
ous page for details. If your bike breaks down abroad within the first 28
days of purchase and you wish us to retrie e it, repair it and return it,
we will co er the first £45 of our costs but no more. If you wish us to
send parts to a local electric bike shop or to you we will co er the first
£45 of labour charges and the cost of sending the parts but no more. If
your bike has been purchased more than 28 days pre iously we will
co er the first £15 and no more. Fewer than 2% of our bikes are
actually returned for ser icing under warranty so a breakdown is
unlikely but you should be aware of this.
Insurance and break down cover:
Whether from us or any other supplier, electric bikes get stolen and
break down. If you are going to be ery highly dependant upon your
bike because you are a commuter or ha e a health problem which
would pre ent you from riding the bike without power, we warmly
recommend you take out roadside rescue. This is a ailable from
Cycleguard from £18 per year, and they also offer insurance.
Visit their website: www.cycleguard.co.uk or call them on
0844 826 2297
Faults
If your bike has a fault on arri al or de elops a fault during
use, firstly please call us. We can resol e 90% of problems
reasonably quickly by telephone or email and usually by
sending a small replacement part or gi ing sensible ad ice.
Our email address is:
support@wooshbikes.co.uk
Mechanical wear and tear is not the same as a
manufacturing defect, and things like punctures, chain and
brake adjustments can be dealt with by a bike shop if
required. Mechanical wear and tear is not co ered by our
warranty so you will need to pay the bike shop a fee for their
ser ices.
If a se ere electrical fault has occurred and which requires
the bike to be returned (thankfully rare, in less than 2% of
cases currently), we will arrange to collect the bike, repair it
and return it to you. You may need to pay a fee to co er
carriage —please refer to the ‘Returning a Bike’ section ear-
lier in this manual.
We strongly recommend retaining your carton by folding flat
and storing in a dry area if possible in the rare e ent that you
might need to return the bike. Replacement cartons are £10
and sending one to you will cost £15 — so please bear this
in mind.
Spares
We keep in stock most of the parts necessary to maintain
your electric bike. To order any spares, just gi e us a call on
01702 435566.

Returns (UK Mainland)
If you do not like your electric bike or find it unsuitable and
have purchased it by mail order, we will refund the
purchase price subject to certain conditions. Full details of
these are shown earlier in this manual.
You should not ride the bike until you ha e read this as it
contains important information.
Please note that bikes purchased in store are not able to be
returned if not liked or found to be unsuitable without our
express agreement. If a bike is found to ha e a
manufacturing defect and a refund is required it must be
returned to the store within 28 days.
Quality control
E ery Woosh electric bike is taken from its carton and
checked before being despatched. These checks include but
are not limited to the following: checking the electrical
functions of the bike, checking/adjusting front/rear brakes,
adjusting/tightening spokes, tightening cranks/bottom
bracket, check/adjust gears to ensure they change smoothly.
We are not able to ride the bike before it is despatched and
you will find after a short time that some things will need to
be adjusted/ fine-tuned.
Please also note that although most aspects of the bike are
checked before despatch, you must also thoroughly check
the bike yourself before riding it to ensure your own safety.
DIY repairs
We sell to users willing and able to maintain their bike to a
good standard or with a colleague or local bike shop able to
do so. Many repairs are simple and can be done with help
from us by telephone or email, with replacement parts sent
free of charge during the warranty period.
If you prefer to get a small repair done by a bike shop please
note that labour charges will not be refunded unless a part
was clearly defecti e on arri al.
Important Safety Notice
Woosh Bikes Ltd checks all bikes before sale for electrical and
mechanical functions.
Our procedures are strict and our checking is thorough. Omissions or
o ersights can ne ertheless occur.
We strongly ad ise you to also carry out your own mechanical checks
before riding to ensure the full safety of your bike. These include:
• Checking that the brakes are set correctly and work
properly
• All wheel nuts, major fixings, carrier bolts, cranks are fully
• tightened.
• Spokes correctly adjusted.
• Pedals, saddle and handlebars are fully tight and
secured after installation.
If you are not experienced with bikes a local bike shop will do this for
you for a small charge.
These checks should be repeated after the first month and
regularly thereafter to ensure your safety.
Please note that failure to carry out these checks to your complete
satisfaction could result in serious injury for which Woosh Bikes Ltd will
not be held liable.

Unboxing and preparing your bike for use
Two people are needed when lifting/mo ing the carton and
also for remo ing the bike from the carton.
Your Woosh electric bike comes mostly assembled, but to
allow the bike to be flat-packed, some parts of the bike re-
quire a small amount of assembly to be completed. This
manual assumes you are reasonably competent with basic
tools and are able to cope with the maintenance of a bike
generally. If this is not the case, then you should seek assis-
tance from either a local bike specialist or an otherwise
suitably experienced person.
You are responsible for the correct assembly and on-going
maintenance of your bike. Woosh Bikes Ltd. accepts no re-
sponsibility for any incidents that may arise as a result of
bikes which ha e been poorly assembled/maintained by the
end user. This booklet must be read in its entirety and all
included steps must be completed to ensure trouble-free and
safe operation of your bike.
Keep the carton upright, remo e the shipping straps and cut
the tape seals. Lift the bike out of the carton with the aid of a
second person and rest the bike against a sturdy wall/
surface. It is essential to retain the carton as it will be re-
quired if the bike needs to be returned for any reason in the
future. If you do not keep your carton, but then need to return
the bike in the future, a carton can be shipped to you at a
cost of £15.
Safety warnings:
Do not allow anyone under the age of 14 to ride the bike
Never allow a small child to ride on the rear carrier
Their legs or feet could get trapped in the wheel
mechanism resulting in serious injury
Wear appropriate safety pads and helmet
Always ride more slowly and brake more gently in wet
Weather
Other warnings:
Do not ride the bike if you are o er the weight limit for the
model you ha e chosen.
Do not bump the bike up and down kerbs.
Slow down when riding o er bumpy/rough surfaces.
Do not use the throttle on full constantly.
It is illegal to use the throttle in mainland Europe.
Always obser e the highway code.
Do not ride through deep puddles or in snow.
Maintenance warnings:
Always ensure that power is switched off when performing
maintenance on the bike. If you are performing maintenance
on any of the electrical components on the bike, remo e the
battery completely before you begin.
Pay special attention to the “Maintenance” section of this
manual. It contains information that will help keep you safe
and prolong the life of your bike. Failure to keep your bike
maintained could result in safety issues for which Woosh
Bikes will not be held liable. You may also oid your
warranty if you do not take proper care of your bike.
Your bike should be stored in a cool dry location. In the win-
ter, you should ensure that the battery is not exposed to ex-
treme cold as this will shorten its life. If the bike is not going
to be used for long periods, you should gi e the battery a
half-hour charge e ery few weeks.

The Woosh Electric Bike Warranty
All Woosh electric bikes come with a standard one year
warranty.
Details of this are fully co ered in our separate Terms and
Conditions leaflet. If you ha e not recei ed this, please call
us.
Second hand buyers:
Please note that if you sell your bike second hand, the
balance of the warranty is transferable, but all aspects of our
sales conditions (such as weight and height restrictions) and
all warranty terms will apply to your new purchaser.
If you ha e purchased your bike second hand from one of
our customers, please note that we cannot accept
responsibility for the condition of the bike when it is sold to
you. and no refund can be offered to you under any
circumstances. We will do our best to support you as a
second hand purchaser but this may be limited at our
discretion.
Insurance and break down cover:
Whether from us or any other supplier, electric bikes get
stolen and break down. If you are going to be ery highly
dependant upon your bike because you are a commuter or
ha e a health problem which would pre ent you from riding
the bike without power, we warmly recommend you take
out roadside rescue. This is a ailable from Cycleguard from
£18 per year, and they also offer insurance.
Visit their website: www.cycleguard.co.uk
or call them on 0844 826 2297
Cut the cable ties and detach the wheel, pedals and handle-
bars from the bike. Immediately slide the handlebars into the
frame to a oid the frame getting scratched while the rest of
the bike is assembled. You can adjust the handlebars prop-
erly later, but for now, you just need them secured out of the
way. It may be necessary to tighten the three bolts shown
below to stop the handlebars mo ing around.
Front Wheel:
Before fitting the front wheel, it is necessary to remo e the
light, which has been fitted the wrong way around for trans-
portation purposes. Remo e the light and put it to one side
along with the nut/bolt. Now locate the skewer which is at-
tached to the wheel. The skewer is shown in the second of
the two pictures below. In some cases, this may already be
fitted to the wheel, in which case you can ignore the next
section which explains how to fit the skewer and proceed
directly to fitting the wheel to the bike.

Undo the black cap on the skewer but be careful not to lose
either of the springs
Ha ing remo ed the black cap, you now need to remo e one
of the springs from the skewer, this simply slides off. Now
slide the skewer through the wheel as shown. The “quick-
release” le er should be on the opposite side of the wheel to
the brake disc.
Re-fit the spring and black cap on the other side of the wheel
as shown. The smaller end of the spring should be closest to
the bike. Gi e the clamp and the black cap a few turns—just
enough to ensure that the clamp/cap aren’t going to fall off.
You can now fit the wheel to the bike by simply dropping the
front forks onto the wheel, ensuring that the brake-disc slides
into the correct position within the brake assembly. Tighten
the cap and clamp on either side of the wheel and then close
the clamp to secure the wheel in place.
Adjusting the Brakes
The Woosh Sant-Ana CD comes equipped with disc brakes
on the front and ‘V’ brakes at the rear . For instructions on
how to adjust your brakes, see the support section of our
website at www.wooshbikes.co.uk
If you are unsure about any of the adjustments that you may
need to make to your bike, take your bike along to your local
bike shop where they should be able to assist you.
Essential Maintenance
The Sant Ana CD is a low maintenance bike It is
however essential to carry out some maintenance regularly
and thoroughly.
If you do not know how to carry out this maintenance
yourself, you should ha e your local shop regularly check
your bike.
Your spokes should be checked regularly
Do this e ery 3 or 4 weeks by lightly ‘pinging’ each one like a
harp string. If one feels a little loose, use a spoke key.
This is sometimes supplied and can be found in the charger
box,. Insert it onto the spoke using slot 13 . You need to put
it onto the spoke ’nipple’, the small raised connector which
joins the spoke to the rim of the wheel.
Then gi e the key a quarter turn—no more.
Do not o ertighten. If you do so, you will distort your wheel.
If you do not ha e a spoke key, we can send one to you for
£4 including postage.
Check and tighten all fixings regularly.
Check brakes and brake pads regularly.

The display module also features a back-light which can be
turned on/off as needed. To switch this on press and hold
the “Mode and Up” buttons. Use the same buttons to turn it
off.
Operating the Lights:
To operate the front light and cycle through the a ailable
modes, press the black button on the top of the light, the op-
tions a ailable are Off, On, Flashing.
To operate the rear light, press the button as shown.
You can now use the stand to keep the bike upright.
Mudguard and Front Light:
With the wheel in position, you can now fit the mudguard and
front light. The mudguard bracket should be on the rear face
of the frame and the light should be mounted on the front
side as shown. If the mudguard rubs on the tyre, then it may
be necessary to fit the mudguard bracket on the front instead
(the same side as the light) to allow enough clearance.
With the light/mudguard now in position, loosen the screw on
the side of the light and adjust the light and reflector to the
desired angle, then retighten the screw to secure in place.

Handlebars:
You can now fine-tune and adjust your handlebars. Ensure
that the handlebars line up correctly with the front wheel and
adjust to the desired height and then tighten the allen bolt
shown below. Slide the co er into position when done.
You can now rotate the stem upwards/towards the rider.
Make sure that the arious cables aren’t pulled too tightly as
this may restrict the turning of the handlebars and/or damage
the cables. When you ha e adjusted the handlebars to the
desired position, tighten the locking piece and then retighten
the allen bolts to secure the handlebars in place.
To adjust the angle of your handlebars, you need to loosen
the allen bolts on the sides of the handlebar clamp, and you
will also need to undo the bolt on the underside of the han-
dlebar clamp to release the locking piece as shown.
Caution & Expectations
Your electric bike is not a motor bike. The electric features
are designed to assist you. This means that riding the bike is
easier than it otherwise would be, but it is not designed to
completely negate the need for effort from the rider. It will
also not cope with extremes.
Riding up slopes will require you to pedal—you will probably
not be able to rely on the throttle alone. On steeper hills, you
will need to pedal but it will still be far easier than it would be
on a standard bike.
A oid une en terrain. Your bike is not designed to be used
off-road.

Riding the bike cont
Your bike features 7 speed Shimano index shifting gears
which are changed using the thumb selector on the right side
of the handlebars. When the thumb stick is fully extended,
the bike is in first gear (the easiest to pedal). To mo e up
through the gears press the black (+) button as shown.
To mo e back down the gears, simply push the thumb selec-
tor again.
With this particular type of electric bike, you should
change the gears one at a time, waiting until the gear is
properly engaged before changing to another gear
Most of the time, you will likely use the bike in it’s highest
gear, but to get the best performance out of your bike on
hills, you should change down to the 3rd or 4th gear before
you start your ascent.
You may need to rotate the handlebars within the stem after
adjusting the height, to do this simply loosen the two bolts as
shown and then rotate the bar until it is in the desired posi-
tion and then re-tighten the bolts ensuring that the bar sits
centrally within the bracket.
Ensure that the cables are routed properly around the frame
when the handlebars are fitted, if the cables are not routed
properly, the gears and brakes will likely not work properly.
The cables to the handlebars should go around the frame as
per the photo below.
Pedals:
The pedals fit on a specific side of the bike Do NOT
attempt to fit the pedals on the wrong side of the bike
The pedals are marked ‘R’ (right) and ‘L’ (left) to indicate
which side of the bike the pedal should be fitted to. Fit each
pedal into position and hand tighten, then use the 15mm
spanner to fully secure the pedals in place.
Note:
The thread on the left pedal
is re ersed meaning the
pedal should be tightened
anti-clock-wise as opposed
to the usual clock-wise.

Saddle:
To adjust the height of the saddle, simply open the clamp
beneath the saddle, mo e the saddle to the desired height
and then close the clamp to lock the saddle into position. It
may be necessary to tighten the thumb screw a little to en-
sure that when the clamp is closed that the saddle is prop-
erly secured.
To get the most comfortable position it may be necessary to
adjust the angle of the seat, this is done by loosening the bolt
shown below and then simply rotating the seat-post forward/
backward a little and then retightening the bolt. You can also
slide the seat along the rails forward or backwards a little if
needed while this bolt is loosened.
Riding the Bike
Ensure the tyres are inflated to approx. 45psi and ensure the
brakes are working before riding the bike.
To begin using the bike, press (and hold) the ‘Mode’ button
to switch on the ‘Control Module’. The bike is now effecti ely
on, and if you ride it in this state, the motor will pro ide assis-
tance when pedalling and you will also be able to use the
throttle. To ary the amount of assistance pro ided from the
motor, use the up/down buttons to cycle through the 5 le els
There are se eral other features a ailable on this ‘control
module’ and these will be co ered later in the manual. The
information pro ided so far is just enough to get you up and
running as quickly as possible.
Important note about the maximum speed.
You cannot reach the maximum speed on throttle alone.
You can increase the maximum speed on throttle by setting
the assistance le el to high but to achie e the maximum
speed, you need to use pedal assist mode. Your maximum
speed will be then limited by your highest cadence or by the
motor.
The motor assistance will cut out in one of the two condi-
tions:
1. You reach the maximum legal speed of 15mph (26kph).
2. The current through the controller reaches 14A.

Controls and Indicators
The Sant Ana CD electric bike comes with a throttle control
to allow you to ary the amount of assistance from the motor.
The throttle is located on the right side of the handlebars as
shown below. When the throttle is pulled fully, the motor will
pro ide the most assistance. The throttle feature is enabled/
disabled by the red button as indicated below.
Mounted on the handlebars is the control module. This is
used to turn the motor on/off and also to increase/decrease
the amount of assistance gi en from the motor. This module
also indicates the current status of the battery.
To turn the control module on/off, press and hold the MODE
button (the middle button) as indicated abo e. The functions
of the control module will be co ered in more depth later in
the manual.
Charging the Battery:
The battery may not be fully charged when you recei e the
bike. You should fully charge the battery before initial
use. The battery can be charged on the bike or it can be re-
mo ed and charged separately. The socket used to charge
the battery is located at the left rear of the battery as shown
below. Simply open the weather proof co er to access the
charging socket. Before attaching the charger to the bike,
Ensure that the charger is switched OFF
You should keep the battery topped up to get the best out of
it and a oid running it completely flat.
To charge the battery, simply connect the charger to the
socket and plug the other end into a regular mains socket.
On the charger is a small light which is red while charging.
When charging is complete, this light will turn green.
The battery can be remo ed from the bike and charged in a
con enient location such as home or office when the bike is
not in use. To remo e the battery from your electric bike, use
the supplied key to unlock the battery by turning it anti-
clockwise. Once unlocked, remo e the key and then slide the
battery from the bike using the handle-grip at the rear of the
battery.

On the rear of the battery is an indicator which can be used
to gi e a rough guide as to how much power remains in the
battery. Press the small button shown below. The more
lights that illuminate either side of the button, the more
power remains.
The battery can switched on/off using the switch at the right-
rear of the battery as shown below.
To refit the battery, simply slide it back into place, and then
turn the key clockwise to lock it into position.
Battery Care
The Sant Ana CD electric bike comes with a modern light-
weight high performance 36 olt 15AH lithium polymer bat-
tery.
Some care is needed to get the best possible performance
from the battery. Assuming the bike is in regular use, charge
the battery once or twice a week as needed. Do not allow the
battery to regularly run completely down as this will shorten
the lifespan of the unit.
Do not charge the battery in extremely cold conditions i.e.
below 6 degrees. The battery can be easily remo ed from
the bike and charged indoors if its more con enient.
Remember to allow the battery to warm up to room
temperature before charging.
If the battery is not in regular use, try to keep the battery half
to two thirds charged and keep it in a cool dry location. If you
are not using your bike for a while, gi e the battery a half-
hour charge e ery two weeks. This will slow the ageing proc-
ess of the battery. All batteries age, but the abo e steps will
help the battery to last for as long as possible.
When the bike is to be put back into ser ice, charge the bat-
tery fully to prepare it for regular use once again.
General care:
Do not attempt to open the outer casing of the battery.
Do not attempt to repair the battery.
Keep the battery away from children.
Do not immerse the battery in water.
Ensure the battery is not exposed to temperatures abo e 55
degrees Celsius or extreme humidity.
Do not use the bike in an en ironment where temperatures
are less than –5 or greater than +45 degrees Celsius.
Do not drop, pierce or otherwise damage the battery.
Table of contents