Wynncom W104 User manual

1
Wynncom W104
User Manual
Note: The content of the manual is correct when it is released, but “Wynn
Telecom Limited” reserves the right to modify the technical specification
without additional notification. Some content in the manual may be different from
the mobile phone, as the accessory software, SIM card or service varies by
providers

2
Table of Contents
IMPORTANT SAFETY PRECAUTIONS..................................................................3
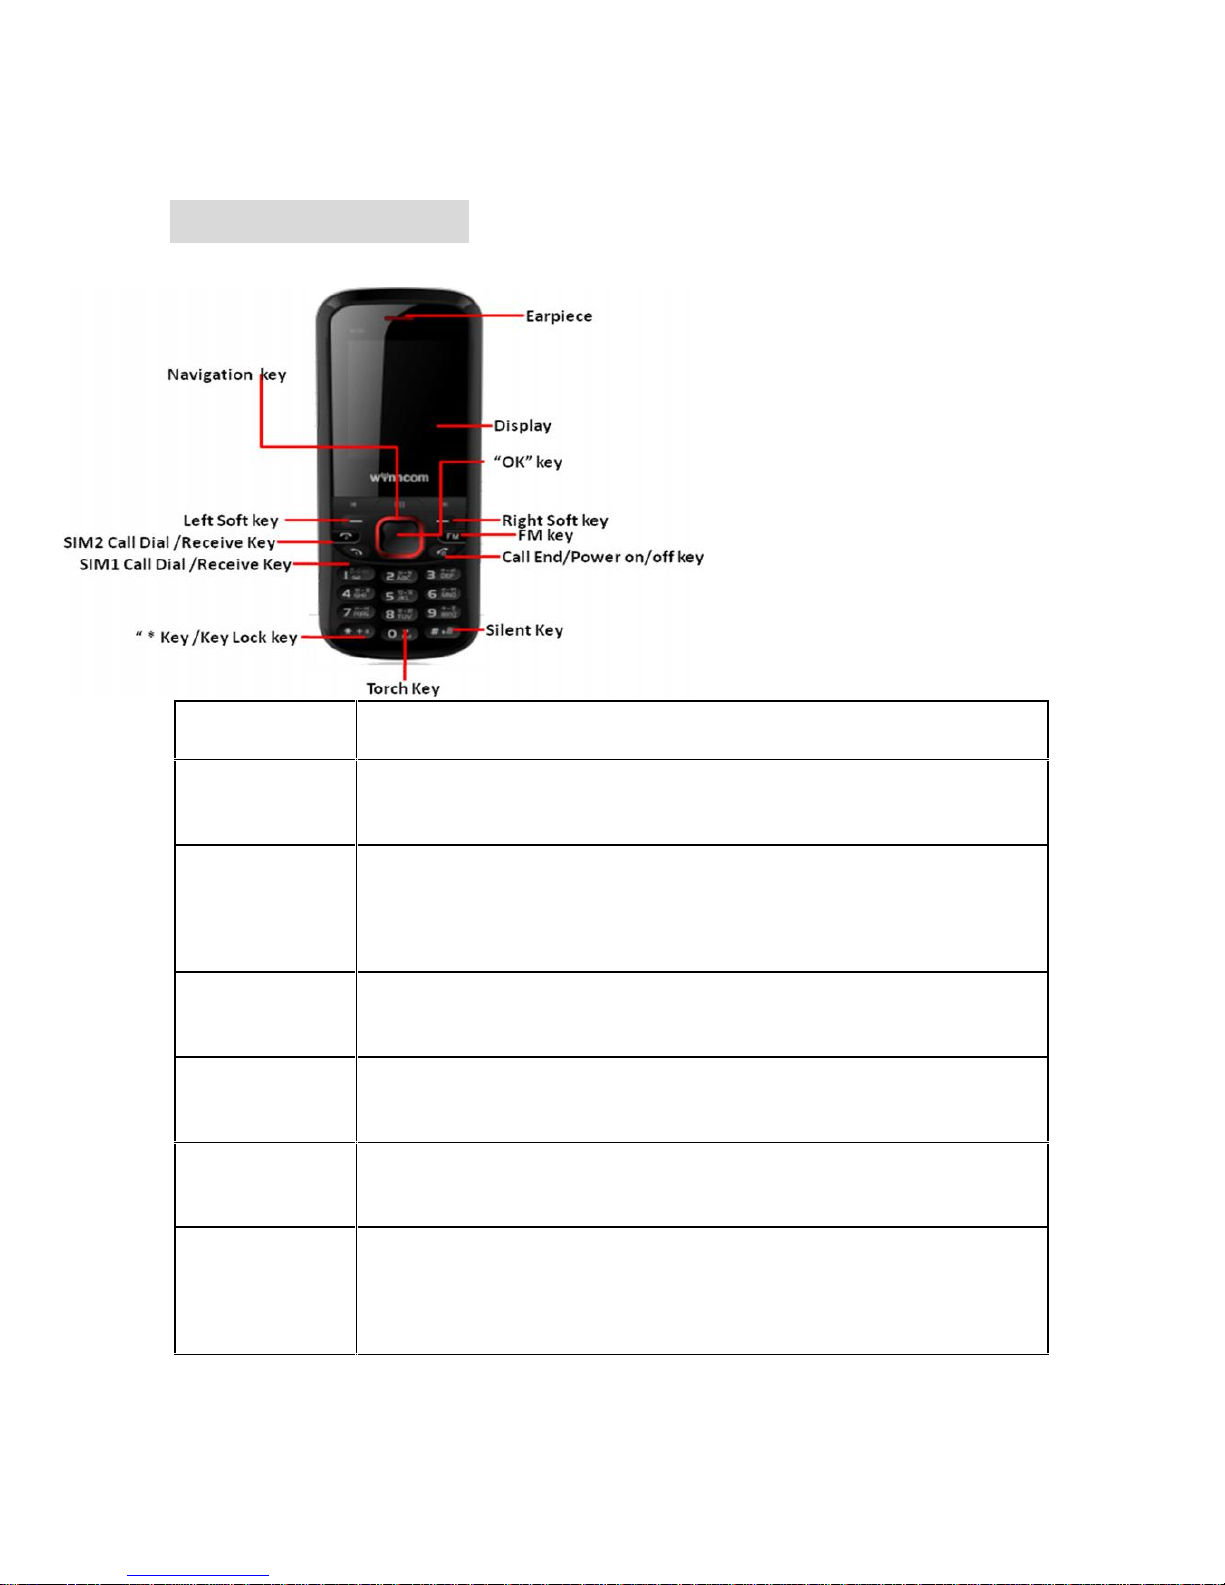
INTRODUCTION......................................................................................................10
1. PHONE DISPLAY.............................................................................................10
GETTING STARTED ...............................................................................................12
TEXT ENTRY............................................................................................................14
1. INPUT METHOD ..............................................................................................14
Changing the input modes ..............................................................14
Entering Symbols................................................................................14
3. MULTI TAPS INPUT.........................................................................................14
4. NUMERIC INPUT .............................................................................................15
CALLING ..................................................................................................................15
1. MAKING A CALL ............................................................................................15
2. ANSWERING A CALL .....................................................................................15
OVERVIEW OF MENU FUNCTIONS ....................................................................16
MENU FUNCTIONS.................................................................................................18
HOW TO USE......................................................................................................18
Select Menu...............................................................................................18
Main Menu..................................................................................................18
Messages....................................................................................................18
Phonebook..................................................................................................18
Call Center.................................................................................................18
Settings .......................................................................................................18
Y-Zone..........................................................................................................18
Multimedia ..................................................................................................18
Profiles ........................................................................................................18
File Manager..............................................................................................18
Organizer.....................................................................................................18
1. MESSAGES .....................................................................................................18
2. PHONEBOOK...................................................................................................20
3. CALL CENTER................................................................................................21
4 SETTINGS.........................................................................................................22
5. Y ZONE...........................................................................................................25
6. MULTIMEDIA....................................................................................................26
8. FILE MANAGER..............................................................................................29
9 ORGANIZER ....................................................................................................30

3
Important safety precautions
This section contains important information on the safe and efficient
operation of your mobile device.
For your safety, please refer to the guideline prior to using the phone.
Note: Failure to comply with the following precautions may be
dangerous or illegal.
Drive safely at all times
Do not use a hand-held phone while driving. Park the vehicle first.
Switch off the phone when refueling
Do not use the phone at a refueling point (service station) or near fuels or
chemicals.
Switch off in an aircraft
Wireless phones can cause interference. Using them in an aircraft is both
illegal and dangerous.
Switch off the phone near all medical equipment
Hospitals or health care facilities may be using equipment that could be
sensitive to external radio frequency energy. Follow any regulations or
rules in force.
Interference
All wireless phones may be subject to interference, which could affect
their performance.
Be aware of special regulations

4
Meet any special regulations in force in any area and always switch off
your phone whenever it is forbidden to use it, or when it may cause
interference or danger.
Water resistance
Your phone is not water-resistant. Keep it dry.
Sensible use
Use only in the normal position (held to the ear). Avoid unnecessary
contact with the antenna when the phone is switched on.
Keep your phone away from small children
Keep the phone and all its parts, including accessories, out of the reach
of small children.
Accessories and batteries
Use only approved batteries and accessories, such as headsets and PC
data cables. Use of any unauthorized accessories could damage you and
your phone and may be dangerous.
If jewelry, keys, beaded chains, or other conductive materials touch
exposed battery terminals, this could complete an electrical circuit (short
circuit), become very hot, and could cause damage or injury. Be careful
when handling a charged battery, particularly when placing it inside a
pocket, purse, or other container with metal objects.
Never use a charger or battery that is damaged in any way.
Use the battery only for its intended purpose.
If you use the phone near the network’s base station, it uses less
power. Talk and standby time are greatly affected by the signal
strength on the cellular network and the parameters set by the network
operator.
Battery charging time depends on the remaining battery charge, the
type of battery, and the charger used. The battery can be charged and
discharged hundreds of times, but it will gradually wear out. When the

5
operation time is noticeably shorter than normal, it is time to buy a new
battery.
If left unused, a fully charged battery will discharge itself over time.
Use only approved batteries, and recharges your battery only
approved chargers. Disconnect the charger from the power source
when it is not in use. Do not leave the battery connected to a charger
for more than a week, since overcharging may shorten its life.
Extreme temperatures will affect the charging capacity of your battery:
it may require cooling or warming first.
Do not leave the battery in hot or cold places because the capacity
and lifetime of the battery will be reduced. Try to keep the battery at
room temperature. A phone with a hot or cold battery may not work
temporarily, even when the battery is fully charged.
Do not short-circuit the battery. Accidental short-circuiting can occur
when a metallic object like a coin, clip or pen causes a direct
connection between the + and – terminals of the battery (metal strips
on the battery). For example, do not carry a spare battery in a pocket
or bag where the battery may contact metal objects. Short-circuiting
the terminals may damage the battery or the object causing the short-
circuiting.
Dispose of used batteries in accordance with local regulations. Always
recycle. Do not dispose of batteries in a fire.
To ensure while using the phone please do not get the battery charge.
During the course of charging, it is normal to find the battery and the
phone slightly heat-up. The Phone will automatically protect itself
when battery temperature rises so as to control temperature variation.

6
Note: This phone is just charged 50%. Please use up the power and
recharge it fully. This is the case with the second recharge. After three
repetition, the battery can achieve it’ s best performance condition.
Operating Environment
Remember to follow any special regulations in force in the area you are in,
and always switch off your phone whenever it is forbidden to use it, or
when it may cause interference or danger. When connecting the phone or
any accessory to another device, read its user’s guide for detailed safety
instructions. Do not connect incompatible products.
As with other mobile radio transmitting equipment, users are advised that
for the satisfactory operation of the equipment and for the safety of
personnel, it is recommended that the equipment should only be used in
the normal operating position (held to your ear with the antenna pointing
over your shoulder).
Extreme heat or cold, Avoid temperatures below -10°C/14°F or above
45°C/113°F
Electronic devices
Most modern electronic equipment is shielded from radio frequency (RF)
signals. However, certain electronic equipment may not be shielded
against the RF signals from your wireless phone. Consult the
manufacturer to discuss alternatives.
Pacemakers
Pacemaker manufacturers recommend that a minimum distance of 15 cm
(6 inches) be maintained between a wireless phone and a pacemaker to
avoid potential interference with the pacemaker. These recommendations
are consistent with the independent research and recommendations of
Wireless Technology Research. If you have any reason to suspect that
interference is taking place, switch you’re your phone immediately.

7
Hearing aids
Some digital wireless phones may interfere with some hearing aids. In the
event of such interference, you may wish to consult your hearing aid
manufacturer to discuss alternatives.
SIM AT Service
SIM Card provides several value-added services.
These functions will only display and work on the menu of the phone
when your SIM card is supported. The content and the terms of the
function lists will depend on your network service provider.
Please contact your network service provider (a network operator or the
service provider) in regards with availability of any services related to the
SIM card, application information and the costs.
Other medical devices
If you use any other personal medical devices, consult the manufacturer
of your device to determine if it is adequately shielded from external RF
energy. Your physician may be able to assist you in obtaining this
information. Switch off your phone in health care facilities when
regulations posted in these areas instruct you to do so.
Vehicles
RF signals may affect improperly installed or inadequately shielded
electronic systems in motor vehicles. Check with the manufacturer or its
representative regarding your vehicle. You should also consult the
manufacturer of any equipment that has been added to your vehicle.
Posted facilities
Switch off your phone in any facility where posted notices require you to
do so.
Potentially explosive environments
Switch off your phone when in any area with a potentially explosive
atmosphere, and obey all signs and instructions. Sparks in such areas

8
could cause an explosion or fire resulting in bodily injury or even death.
Users are advised to switch off the phone while at a refueling point
(service station). Users are reminded of the need to observe restrictions
on the use of radio equipment in fuel depots (fuel storage and distribution
areas), chemical plants, or where blasting operations are in progress.
Areas with a potentially explosive atmosphere are often but not always
clearly marked. They include the areas below decks on boats, chemical
transfer or storage facilities, vehicles using liquefied petroleum gas, such
as propane or butane, areas where the air contains chemicals or particles,
such as grain, dust or metal powders, and any other area where you
would normally be advised to turn off your vehicle engine.
Emergency calls
This phone, like any wireless phone, operates using radio signals,
wireless, and landline networks as well as user-programmed functions,
which cannot guarantee connection in all conditions. Therefore, you
should never rely solely on any wireless phone for essential
communications like medical emergencies. To make or receive calls, the
phone must be switched on and in a service area with adequate signal
strength. Emergency calls may not be possible on all wireless phone
networks or when certain network services and/or phone features are in
use. Check with local service providers.
To make an emergency call: (For India example: 112,911,100,101,102)
1. Key in the emergency number for your present location. Emergency
numbers may vary by location.
2. Press the Send Key.
3. Inform your location. Do not end the call until given permission to do so.
Certain features like Call Barring may need to be deactivated before you
can make an emergency call. Consult this document and your local
cellular service provider.

9
Other important safety information
Only qualified personnel should service the phone or install the phone
in a vehicle. Faulty installation or service may be dangerous and may
invalidate any warranty applicable to the device.
Check regularly that all wireless phone equipment in your vehicle is
mounted and operating properly.
Do not store or carry flammable liquids, gases, or explosive materials
in the same compartment as the phone, its parts, or accessories.
For vehicles equipped with an air bag, remember that an air bag
inflates with great force. Do not place objects, including installed or
portable wireless equipment, in the area over the air bag or in the air
bag deployment area. Improperly installed wireless equipment could
result in serious injury if the air bag inflates.
Switch off your phone before boarding an aircraft. It is dangerous and
illegal to use wireless phones in an aircraft because they can interfere
with the operation of the aircraft.
Failure to observe these instructions may lead to the suspension or
denial of telephone services to the offender, or legal action, or both.
Wynncom Authorized Care Centre
Only qualified service personnel may repair your phone.
It is highly recommended to have a repair service by qualified service
personnel. Use only the approved accessories and batteries.
Note: Please use the original components in order to achieve the best
use of effects, as the use of non-original components may cause damage
to the machinery, in such case company shall not be responsible.

10
Introduction
1. Phone Display
Key
Function
Dial/receiv
e key
Dial and receive calls via SIM1/SIM2 card.
View SIM1/SIM2 call history in idle mode.
Call End
Key/power
on/off key
Pressing and holding to turn the phone on/off.
End a call or reject an incoming call.
Return to the idle mode.
Left Soft
Key
Enter Shortcuts
Right Soft
Key
Access the phonebook list in idle mode.
Return to the previous menu.
OK Key
Enter the Main menu in idle mode.
*
Press and hold to toggle between *, +, (pause
character) P, and (wait character) W.
Press to enter symbol when editing text.

11
#
Press to switch input modes when entering text.
Press and hold to activate silent mode/Second time
Long press for bring the phone to Vibrator mode/third
time Long press Idle mode.
Navigation
Key
Press to access four functions in idle mode
(Up: Audio Player
Down:Camera
Left: Write Messages
Right: Profiles
Within a menu, press Up, Down, Left or Right to scroll
through menu options.
Note: “Press” in this manual, means to press and release the key; “press
and hold” means to press and hold the key for at least 3 seconds.
2. Icons & Symbols
The Icon shown on the display may vary depending on your country or
service provider. The number 1 and 2 in icons mean SIM1 and SIM2.
Status
Icons
1.SIGNAL
STRENGTH
2.SILENT MODE
3.VIBRATE
MODE
4.BATTERY
STATUS
5.INDOOR MODE

12
6.OUTDOOR
MODE
7.EARPHONE
Getting Started
Please read the safety instructions in the "Safety Information and Notices"
section before use.
1. Inserting the SIM Card and the battery
Remove the back cover
Make sure the phone is switched off. You need to remove the back cover
of your phone before you can insert the SIM card. Hold the phone with
the front facing downwards lift the cover upwards to remove it.
Remove the battery
Put your finger on the black holder located at the bottom of the battery
slot and lift the battery up to remove it.
Insert the SIM card
Make sure that the clipped corner of the SIM card is facing the correct
direction (clipped corner at top left) and the metallic contacts are facing
downwards. Slide the SIM card into the card slot until it stops.
Install the battery
With the metallic contacts of the battery facing the metallic contacts in the
battery slot, press the battery down until it locks into place.
2. Inserting a Micro SD (External Memory) Card
Slide the Micro SD card into the Micro SD card slot with the metallic pins
facing downwards.
3. Turning the phone on
To turn the phone on, press and hold the Call End key. If you have
already enabled the Sim Lock fucntion then enter the PIN code (the 4

13
to 8 digit code of your SIM card). It is preconfigured and provided to you
by your network operator or retailer. If you enter an incorrect PIN code 3
times in succession, your SIM card will be locked. To unlock it, you must
obtain the PUK code from your network operator and if you enter an
incorrect PUK code 10times in succession ,your need to change the SIM
card.
4. Charging the Battery
Ensure the battery is inserted in the handset. To charge the battery, plug
in the charger connector at the bottom of your phone (USB interface) and
then plug the other end into an AC power socket.
The battery symbol indicates the charging status. While charging, the
charge indicators will scroll. When all the scroll bars are steady, the
battery is fully charged. It takes about 4 hours to fully charge the battery.
Disconnect the charger from the phone.
Disconnect the charger from the AC power socket.
Note: If the battery is powerless, the battery icon will reappear after a few
minutes of charging.
5. Important Password
Phone lock password is set as 0000 by default.
6. Keypad Lock and Unlock
Go to Settings > Security > Auto keypad lock to select the time for keypad
lock.
In idle mode, if the time expires, the keypad will be locked automatically.
Press the Left Soft Key and then * Key in quick succession to lock/unlock
the keypad manually.
7. Transfer files to the Micro SD (External Memory) card
Insert your Micro SD card into a card reader, and then connect the card
reader to the USB port of a PC. The PC will auto detect the card reader

14
as a removable disk. You can access the Micro SD card memory now.
Download or upload the files to Micro SD card.
Finally, insert your Micro SD card into your cellular phone, you can view
the files in Menu > File Manager > Memory card.
Text Entry
1. Input Method
Your cellular phone supports several input methods, which include:
Multitap (ABC / abc / Abc)
Numeric (123)
Insert Symbol
Hindi Input
Changing the input modes
During text editing, you can press the # Key to switch input modes,
or press the Left Soft Key [Options] and choose Input method to select
different input modes.
Entering Symbols
In any input mode, press the * Key to open the symbols input screen. Use
the navigation key to choose the desired symbol and the OK key to select
it.
3. Multi taps Input
This method requires multiple key presses to reach the desired character:
the letter "h" is the second letter on the 4 key, so you must press 4 twice
quickly to enter "h". Using this mode requires you to press a key as many
times as needed to enter the desired letter.
Example:
To enter the word “home” in Multitap input mode “abc”, press key 4(GHI)
twice, press key 6(MNO) thrice, press key 6(MNO) once and key 3(DEF)
twice.

15
4. Numeric Input
Press the # Key to select "123" input option then you can enter the
numbers.
Calling
1. Making a Call
In idle mode, enter the phone number. Press the dial key to call the
number from SIM1 and SIM2.Press the Call End Key to end the call.
Note: During a call, press the navigation up and down key to adjust the
volume.You can press the Left Soft Key [Options] to choose Sound
Recorder to record.
In most countries, recording telephone conversations is subject to
legislation. We advise you to notify the caller if you intend to record your
conversation and only do so if they agree.
Making an International Call
1. Press the * Key twice quickly to enter "+".
2. Enter the country code.
3. Enter the area code (normally without the 0 before it) followed by the
phone number.
4. Press the Dial Key to call directly.
2. Answering a Call
Press the call receive key/Dial Key to answer calls.Press the Call End key
to reject it.

16
Overview of menu functions
To access Menu mode, press [Menu] in Idle mode.
* Some menus are operator-, network- and subscription-dependent
1. Messages
1.1 Write Message
1. 2Inbox
1.3 Outbox
1.4 Drafts
1.3 Sentbox
1.4 Schedule SMS
1.5 Message Blacklist
2. Phonebook
3. Call Center
3.1 Dialed Numbers
3.2 Received Calls
3.3 Missed Calls
3.4 Rejected Calls
4. Settings
4.1 Call
4.2 Phone
4.3 Display
4.4 Security
5. Y Zone
5.1 Hungama Radio
5.2 Smart Auto Call Record
5.3 Games
5.4 STK
6. Multimedia
6.1 Camera
6.2Video Recorder
6.3 Image Viewer
6.4 Audio Player

17
6.5 Video Player
6.6 FM Radio
6.7 Sound Recorder
7. Profile
8. File Manager
9. Organizer

18
Menu Functions
How to Use
Select Menu
Press the Left Soft Key [Menu] to enter main menu in idle mode.
Press the Navigation Key to choose desired operation and press the Left
Soft Key [Ok] to enter the selected operation.
You can exit a menu and return to idle mode by pressing the Right Soft
Key [Back] or the Call End Key.
Main Menu
Messages
Phonebook
Call Center
Settings
Y-Zone
Multimedia
Profiles
File Manager
Organizer
1. Messages
1.1 Write Message
You can write new message by using this function. When you input the
message to be sent, press left soft key to send, to insert the templates, to add
contact person information and symbol, and to save, etc.
-Send: Enter the interface of input number, you can dial the phone number
directly, or press left soft key to enter the Phonebook and choose the number
to send.
-Insert the templates: Enter the templates interface and you could insert the
template to the message.
-Add Contact Info: Enter the Phonebook interface and you could insert
the Phonebook information to the message.
-Add Phiz: Enter the symbol interface and add the symbols to the message.
-Save: Save this message to the drafts.
- Schedule SMS: Set the message for Schedule SMS.

19
1.2 Inbox
You can store the SMS. The icons before the message list means whether this
message is SMS and which is stored in SIM1, SIM2 or the phone.
Choose one SMS and press left soft key, then you will do several
operations, for example, reply the SMS, delete, Call, Lock and mark. Press OK
key directly you can read this SMS.
――Reply: You could choose to reply by SMS.
――Delete: Delete this message.
――Forward: Forward the message to any number.
――Dial: Call the addresser.
--Lock/unlock: Lock the message or unlock it.
――Mark: Choose this message or all messages in the inbox, or only choose
the messages saved in SIM 1 or SIM 2.
――Operate: To Copy or move the messages from SIM to Phone memory and
vice-versa.
――Sort: Sort the messages in the inbox by time, Name, Subject or message
type.
--Delete Repeated Numbers: You can delete the messages from the same
number.
---Add To Blacklist – To add the number to the blacklist, to restrict the
messages from certain number .
1.3 outbox
You can store the SMS you’ve sent in failure. The SMS could be
differentiated by different icons. The two icons before the message list means
whether this message is SMS ,and it is stored in SIM1, SIM2 or the phone.
Choose one SMS and press left soft key, you could send, delete, lock, mark,
sort, and so on.
--Send: Send this SMS .
--Delete: Delete this message.
--Lock/unlock: Lock the message or unlock it.
――Mark: Choose this message or all messages in the inbox, or only choose
the messages saved in SIM 1 or SIM 2.
――Sort: Sort the messages in the inbox by time, contact person, subject or
message type.
1.4 Draft box
You can store the SMS you’ve edited. The SMS could be differentiated by
different icons. The two icons before the message list means whether this
message is SMS, and it is stored in SIM1, SIM2 or the phone.
Choose one SMS and press left soft key, you could delete, edit, lock, mark,
sort, and so on.
--Delete: Delete this message.
--Edit: Edit this message.

20
--Lock/unlock: Lock the message or unlock it.
――Mark: Choose this message or all messages in the inbox, or only choose
the messages saved in SIM 1 or SIM 2.
――Sort: Sort the messages in the inbox by time, contact person, subject or
message type.
1.5 Sentbox
You can store the SMS you’ve sent successfully. The SMS could be
differentiated by different icons. The two icons before the message list means
whether this message is SMS, and it is stored in SIM1, SIM2 or the phone.
Choose one SMS and press left soft key, you could delete, forward, lock,
mark, sort, and so on.
--Delete: Delete this SMS.
--Forward: Forward this message to others.
--Lock/unlock: Lock the message or unlock it.
――Mark: Choose this message or all messages in the inbox, or only choose
the messages saved in SIM 1 or SIM 2.
――Sort: Sort the messages in the inbox by time, contact person, subject or
message type.
1.6 Schedule SMS
You can Schedule SMS for specified date and time.
1.7 Blacklist
Add the number to the blacklist to avoid the messages.
2. Phonebook
This function could help you browse the Phonebook, store, edit and delete
the names and phone numbers in the phone and SIM card. To facilitate the
management of the records, this phone sets the group function, collecting the
similar items into a group. The storage capacity of the SIM card varies.
On the standby interface, press right soft key to enter the interface of the
Phonebook. When the record of the Phonebook is not empty, press left so
ft key for the following operation
The Options are as follows:
1. New- Add New Contact to Phone/SIM1/SIM2.
2. Edit – To edit the contact name and number.
3. Search: Search Contact.
4. Write SMS: You Can Write SMS/.
5. Call – To dial call directly on selected number.
6. Send vCard: Send vCard by SMS.
7. Delete – To delete the selected number.
8. Mark – To Mark Selected number/Mark all number.
9. Copy to-To Copy the number to SIM1/SIM2, Phone, Copy
Table of contents
Other Wynncom Cell Phone manuals

Wynncom
Wynncom G60Q User manual

Wynncom
Wynncom W716 User manual

Wynncom
Wynncom W720 User manual

Wynncom
Wynncom W156N User manual

Wynncom
Wynncom G41 User manual

Wynncom
Wynncom W415 User manual

Wynncom
Wynncom w520 User manual

Wynncom
Wynncom W304 User manual

Wynncom
Wynncom W711 User manual

Wynncom
Wynncom W550 User manual