Yaesu WIRES-X HRI-200 User manual

Wide-Coverage Internet Repeater Enhancement System
WIRES-X Connection Kit HRI-200
Instruction Manual

2
Introduction
Contents
Introduction............................................................................................................ 3
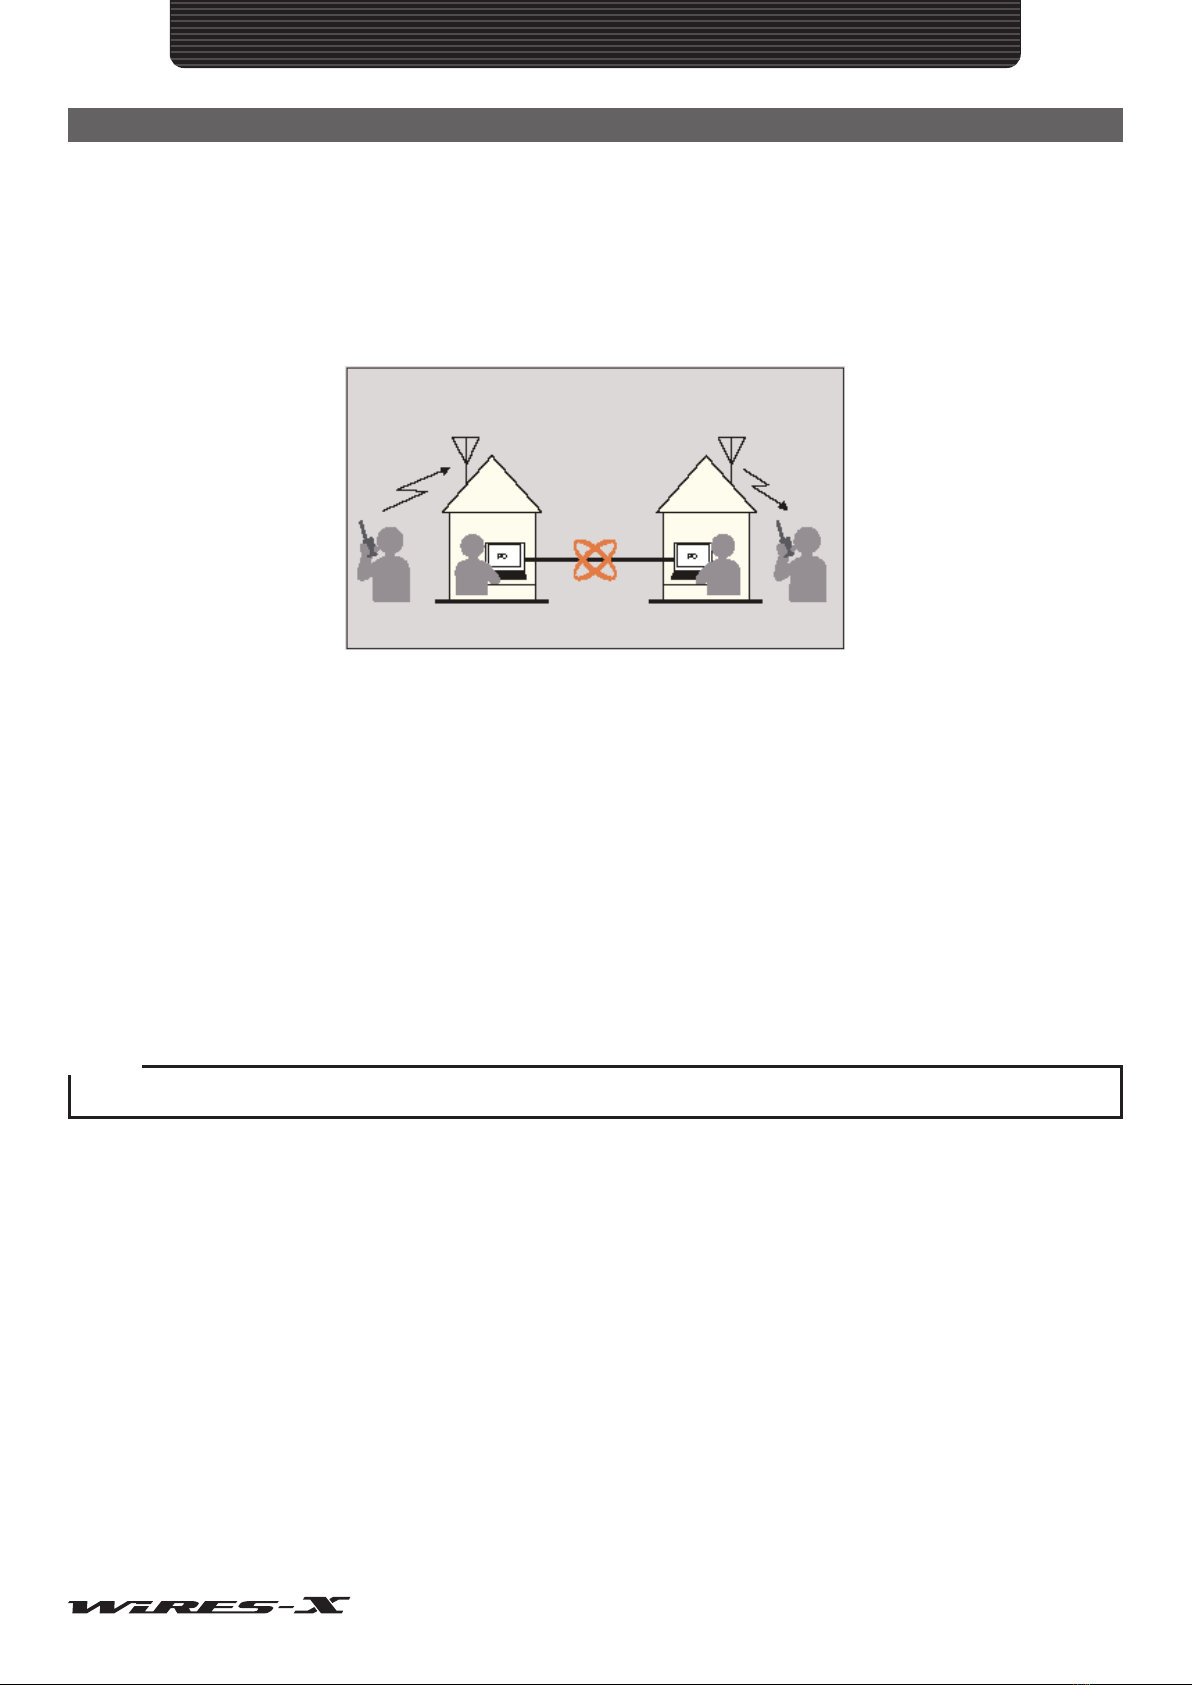
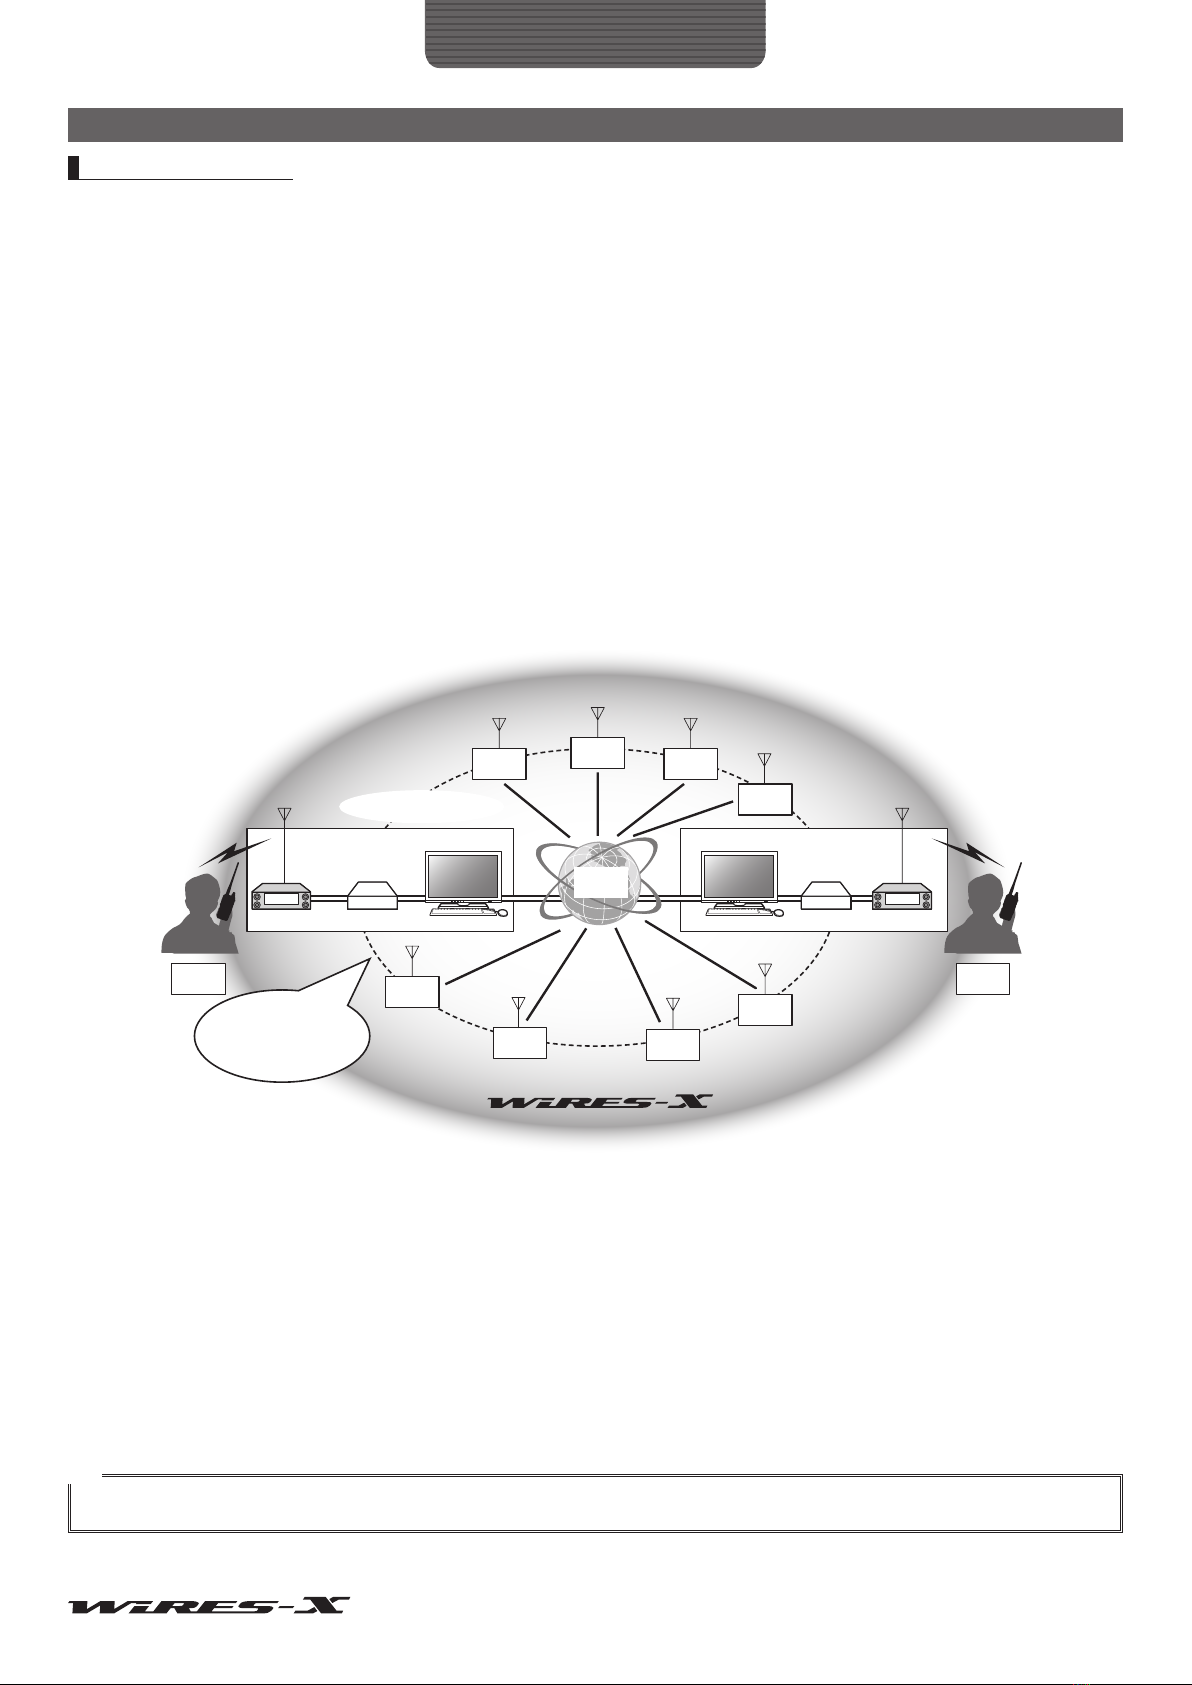
What is WIRES-X? .................................................................................................. 3
How WIRES-X works ..................................................................................... 4
Opening a WIRES-X node station ...................................................................... 5
Establishing a WIRES-X node station............................................................ 5
Opening and running a WIRES-X node station.............................................. 5
About WIRES-X Connection Kit .............................................................................. 6
Before use........................................................................................................... 6
Package contents ............................................................................................... 8
Option ................................................................................................................. 8
About This Manual................................................................................................... 8
Preparation............................................................................................................. 9
Registration with the WIRES-X Server (applying to obtain an ID number).............. 9
Connecting Devices............................................................................................... 10
HRI-200 interface box....................................................................................... 10
Front panel ................................................................................................... 10
Rear panel.................................................................................................... 10
Connecting HRI-200 to a PC .............................................................................11
Connecting HRI-200 to transceivers................................................................. 12
Installing WIRES-X Software................................................................................. 13
Installing a USB device driver for HRI-200................................................... 13
Installing WIRES-X software ........................................................................ 13
Preparing an Internet Environment........................................................................ 15
Setting the PC and the router ........................................................................... 15
Why is the setting required?......................................................................... 15
Setting an IP address on the PC.................................................................. 15
Opening the router ports .............................................................................. 17
Taking security measures ................................................................................. 19
How to Use........................................................................................................... 20
Basic Operations ................................................................................................... 20
Starting the WIRES-X software......................................................................... 20
Setting the Internet access security ............................................................. 20
Getting the WIRES-X server certificate........................................................ 20
WIRES-X software main screen................................................................... 22
Setting the WIRES-X node information............................................................. 23
Configuring the transceiver settings............................................................. 23
Basic setting................................................................................................. 25
Volume adjustment....................................................................................... 27
Connecting using WIRES-X.............................................................................. 29
Connecting to a node on the Internet........................................................... 29
Connecting to a room on the Internet........................................................... 29
Notes on the node operation........................................................................ 30
Useful functions............................................................................................ 31
Closing the WIRES-X software......................................................................... 32
Advanced Operations............................................................................................ 33
Using preset search channel ............................................................................ 33
What is preset search channel?................................................................... 33
Setting the preset search channel................................................................ 33
Setting the preset search channel................................................................ 34
Opening a room ................................................................................................ 35
What is a room (Round QSO Room)? ......................................................... 35
Opening a room ........................................................................................... 35
Setting the room........................................................................................... 36
Quitting the running of a room...................................................................... 38
Important Room Operating Considerations.................................................. 39
Convenient functions.................................................................................... 39
Using the GM function ...................................................................................... 42
What is the GM function?............................................................................. 42
Before operating in the GM mode ................................................................ 42
Starting operation as a GM node ................................................................. 42
Opening and organizing a GM room on your station ................................... 45
Quitting the GM operation ............................................................................ 47
Operating the WIRES-X software remotely ...................................................... 48
What you can do with the remote monitor function ...................................... 48
Operating the WIRES-X software remotely.................................................. 48
Before starting remote-control operations.................................................... 49
Operating the WIRES-X software remotely.................................................. 51
Adjusting analog sound..................................................................................... 52
Adjusting analog sound volume ................................................................... 52
Useful Functions.................................................................................................... 54
Using the news function.................................................................................... 54
What is the news function? .......................................................................... 54
Organizing your news station....................................................................... 55
Viewing news data of a node or room on the Internet.................................. 60
Viewing the news data of the WIRES-X server............................................ 61
Displaying a QSL card image ........................................................................... 62
Displaying QSL card images ........................................................................ 62
Transmitting the QSL card image of your station ......................................... 63
WIRES-X Software............................................................................................... 65
Main Screen .......................................................................................................... 65
Active list ...................................................................................................... 65
Status indicators........................................................................................... 69
User monitoring window............................................................................... 70
Log window .................................................................................................. 71
Chat window................................................................................................. 71
Function window .......................................................................................... 72
Main Menu............................................................................................................. 73
“File” menu........................................................................................................ 73
Exporting/importing the settings................................................................... 73
Initializing the settings and updating the user information ........................... 74
Settings for the transceiver .......................................................................... 75
Updating the active lists ............................................................................... 76
Node information settings ............................................................................ 77
Finishing the WIRES-X software.................................................................. 88
“View” menu...................................................................................................... 89
Fonts used in the active lists ........................................................................ 89
Displaying the operating instructions ........................................................... 90
Displaying the nodes connecting to a room ................................................. 90
Changing the content displayed in the group window.................................. 91
Setting your node ......................................................................................... 91
Checking the list of nodes connecting to your room .................................... 92
Changing the content displayed in the log window ...................................... 93
Adjusting the input/output sound volume ..................................................... 93
Managing the news data of your station ...................................................... 94
Checking stations that used your station ..................................................... 94
“Connect” menu ................................................................................................ 95
Transmitting a connection request to a node/room on the Internet.............. 95
Specifying the connection destination directly ............................................. 95
Severing the connection............................................................................... 96
Connecting to a GM room automatically ...................................................... 96
“Tool” menu....................................................................................................... 97
Confirming the Internet connection .............................................................. 97
Confirming the plug-in tool ........................................................................... 97
“Help” menu ...................................................................................................... 98
Displaying the online help ............................................................................ 98
Short-cut for the WIRES-X website.............................................................. 99
WIRES-X software information .................................................................... 99
Uninstalling the WIRES-X Software .................................................................... 100
Appendix ............................................................................................................ 102
Differences from WiRES-II .................................................................................. 102
DTMF Commad List ............................................................................................ 103
Specifications of HRI-200.................................................................................... 104
Inquiries............................................................................................................... 104
FCC ..................................................................................................................... 105

3
Introduction
What is WIRES-X?
WIRES (Wide-coverage Internet Repeater Enhancement System) is an Internet communication system which expands the range of
amateur radio communication.
WIRES-X uses local nodes (stations connected to the Internet via PCs) as access points to relay communications of conventional
amateur radio stations. Mobile stations using WIRES-X can communicate with amateur stations all over the world by using a local
node operating within an amateur band.
WIRES-X supports the new C4FM digital communications mode, enabling C4FM digital signals to be repeated without deterioration
of the communication quality. In addition, several new functions making use of digital formats are also made available.
Local node Local node StationStation
Internet
●Features
• Supports C4FM digital communications
• Adopted the user ID system using alphanumeric characters
• Supports user ID search and connection functions using the digital communication system
• Stores and reads digital data such as text, images and audio data (News function)
• Allows establishing a dedicated channel to search a local node (Preset-search-channel function)
• Repeats signals from stations operating in the GM (Group Monitoring) function
• Supports FM analog communications similar to WIRES-II (access with a DTMF command)
• Allows communications between C4FM digital stations and FM analog stations via WIERS-X
• More useful and additional functions when compared to WIRES-II:
The connection kit (HRI-200) and your PC can be connected with a USB cable. Power the device from the PC through the USB
connection. Installation is completed in a few simple steps.
The connection kit (HRI-200) has a built-in USB audio device that optimizes the analog audio level and sound quality.
The kit is equipped with the port check function to verify the Internet connection status, i.e. port opening status.
Caution
Since the WIRES-X and the WIRES-II are different network systems, connections or communications are not possible between these two systems.

4
Introduction
What is WIRES-X?
How WIRES-X works
The WIRES-X system is composed of the following components:
• WIRES-X server
YAESU manages and operates the WIRES-X server for Internet connection of the WIRES-X system and for managing users
(nodes).
• WIRES-X nodes
This refers to stations which serve as access points and are connected to the Internet through use of a PC and a WIRES-X
connection kit.
The customer selects and sets up either a C4FM digital operating station or an FM analog operating station.
A node also enables the user to open and operate a communication space (room) that can connect simultaneously with
multiple nodes.
Also, if a digital transceiver is used, the users can utilize a data exchange feature (News function) with both nodes and rooms.
• Station (mobile or fixed)
Stations may accesses a local node within communication range and establish contacts with stations worldwide via WIRES-X
nodes on the Internet.
• A digital transceiver compatible with WIRES-X is required in order to access a C4FM digital operating node station.
• A FM analog transceiver capable of transmitting DTFM signals is required in order to access an analog FM operating node
station.
Local
node
Local
node
Local
node
Local node Local node
Local
node
Local
node
Local
node
Local
node
Local
node
Station Station
WIRES
server
HRI-200
PCPC
Internet connection
HRI-200
As long as local nodes
connect to the Internet, stations
can communicate each other
when stations connect to a
local node
With the WIRES-X system, voice communication is carried out in the following manner:
1Set up an amateur radio station and WIRES-X node
2Use a mobile or fixed station to search for a node station
3The mobile or fixed station indicates a connectable destination on the Internet and establishes a connection
4The mobile or fixed station transmits an audio voice signal
5The WIRES-X node receives the transmission and repeats it to the connected destination node
6The connected destination node transmits the repeated data by means of the amateur radio transceiver
7The mobile or fixed station receiving on the channel of the connected destination node station, receives the data
Tip
For details on how to use WIRES-X with a mobile or a fixed station, refer to the YAESU product (FTM-400DR/DE, FT1DR/DE) WIRES-X Edition Instruction
Manual (downloadable from the YAESU website).

5
Introduction
What is WIRES-X?
Opening a WIRES-X node station
Establishing a WIRES-X node station
Obtain the following:
●Transceiver
• To set up a C4FM digital node station
C4FM digital transceiver (FTM-400DR (as of June 2014)) with a 10-pin Mini-DIN data
• To set up an FM analog node station
Either a C4FM digital transceiver with a 10-pin Mini-DIN data port, or an FM analog transceiver (use of a FTM-400DR is
recommended (as of June 2014)) with a 6-pin Mini-DIN data port
• Station-related components such as an antenna, power source, etc
●PC
• OS: Microsoft Windows Vista 7/8/8.1
• Processor Clock Frequency: 2.0 GHz or faster
• HDD: 1 GB or more of available space
• RAM: 2 GB or more
• USB port: Full-speed USB
• Display resolution: 1366 x 768 or higher
16-bit high color or higher (32-bit true color is recommended)
• LAN port: 100BASE-TX/1000BASE-T
●Internet connection
• ADSL 8 Mbps or faster (high-speed connection recommended)
• Global IP address (dynamic or static address usable)
A unique IP address is necessary for each WIRES node
• All of the following 6 UDP (user datagram protocol) ports must be connectable:
46100, 46110, 46112, 46114, 46120 and 46122
• When using a router: a network address and port translation (NAPT) is necessary
• One of the TCP ports must be connectable (when using the remote control function)
• When using a router: a network address and port translation (NAPT) is necessary
Cautions
zWhen running a firewall on your router, it is necessary to open the above ports to allow communication with the WIRES-X server.
zWhen using an internet connection for multiple concurrent applications, you may experience audio interruptions or an unstable connection with
WIRES-X.
●WIRES-X connection kit
This product
Opening and running a WIRES-X node station
Perform the following procedures.
●Register the node with the WIRES-X server (apply to obtain an ID number)
Register the WIRES-X node with YAESU. Once registration is completed, you will be issued an ID number from YAESU. For details,
refer to page 9.
●WIRES-X software installation
Use the supplied CD-R to install the software onto your PC. For details, refer to page 13.

6
Introduction
About WIRES-X Connection Kit
Before use
The WIRES-X software can be used only by the purchaser under the end-user license agreement.
Specifications, functions, contents and information of this manual are subject to change without notice.
WIRES™ is a trademark of YAESU MUSEN.
Microsoft®, Windows®and Windows Vista®are either registered trademarks or trademarks of Microsoft Corporation in the United
States and/or other countries.
All other product and company names mentioned in this manual are trademarks or registered trademarks of their respective holders.
Caution
WIRES-X software is protected by copyright law and international copyright treaties. Unauthorized reproduction or distribution of this software and this
manual, whether full or partial, is strictly prohibited.
Safety precautions (make sure to read these)
Note beforehand that the company shall not be liable for any damages suffered by the customer or any third parties in using this
product, or for any failures and faults that occur during the use or misuse of this product, unless otherwise provided for under the
law.
Type and meaning of the marks
DANGER This symbol indicates the possibility of death or serious injury being inflicted on the user and the
surrounding people when these instructions are ignored and the product is mishandled.
WARNING This symbol indicates the possibility of death or serious injury being inflicted on the user and the
surrounding people when these instructions are ignored and the product is misused.
CAUTION This symbol indicates the possibility of physical impediments occurring or impediments being inflicted
on the user and the surrounding people when these instructions are ignored and the product is misused.
Type and meaning of symbols
Prohibited actions, these must be avoided in order to use this radio safely.
For example, signifies that disassembly is prohibited.
Precautions that must be adhered to in order to use this radio safely. For example, signifies that the power supply is
to be disconnected.
DANGER
Do not use the device in “regions or aircraft and vehicles
where its use is prohibited” such as in hospitals and
airplanes.
This may impact the operation of electronic and medical devices.
Do not use this device where flammable gases occur.
Doing so may result in fire and explosion.

7
Introduction
About WIRES-X Connection Kit
WARNING
Do not use voltages other than the specified power supply
voltage.
Doing so may result in fire and electric shock.
Do not dismantle or modify the device.
This may result in injury, electric shock or equipment failure.
Do not handle the plug and connector etc. with wet hands.
This may result in injury, electric shock or equipment failure.
If smoke or an unusual odor comes from the device, turn off
your PC connected to the device and unplug the connection
cable.
This may indicate a fire, liquid leak, overheating, damage,
ignition or equipment failure. Please contact Yaesu Technical
Support or the retail store where you purchased the device.
Do not place the device in areas that may get wet easily
(e.g. near a humidifier).
This may result in fire, electric shock or equipment failure.
Do not bend, twist, pull, heat and modify the connection
cables in an unreasonable manner.
The cables may be cut or damaged and result in fire, electric
shock or equipment failure.
Do not pull on the cable when plugging and unplugging the
connection cables.
Hold the plug or connector when unplugging. Tugging on the
cable may result in fire, electric shock or equipment failure.
Do not use the device when the connection cables are
damaged, or when the connector cannot be plugged in
tightly.
Please contact Yaesu Technical Support or the retail store where
you purchased the device as this may result in fire, electric
shock or equipment failure.
Do not allow metallic objects such as wires, or liquids such
as water to get inside the product.
This may result in fire, electric shock or equipment failure.
Refrain from using headphones and earphones at a loud
volume.
Continuous exposure to loud volumes may result in hearing
impairment.
If there is thunder or lightning, turn off the PC connected to
the device and remove the power plug from the wall outlet.
This may result in fire, electric shock or equipment failure.
CAUTION
Do not place this product near a heating appliance or in a
location exposed to direct sunlight.
This may result in deformation and discoloration.
Do not place this product in an environment of dust and
humidity.
Doing so may result in fire or equipment failure.
Do not wipe the case using thinner and benzene etc.
Use only a soft dry cloth to wipe stains from the case.
When the device will not be used for a long period of time,
unplug the connection cable for safety.
Disconnecting the power cable may prevent electrical damage,
fire or overheating.
Do not throw or subject the device to strong impact forces.
This may result in equipment failure.
Do not place magnetic cards or video tapes near this
device.
The data on the cash card or video tape etc. may be erased.
Keep out of the reach of small children.
Mishandling this device may result in injuries to children.
Do not place heavy objects on top of the connection cables.
The connection cables may be damaged, resulting in fire or
electric shock.
Do not operate the device near a radio or TV.
This may result in electromagnetic interference.
Do not use optional products other than those specified by
Yaesu company.
Use of non-specified products may result in equipment failure or
damage.
Do not place the device on an unsteady or sloping surface,
or in a location where there is strong vibration.
The device may fall over or drop, resulting in fire, injury or
equipment failure.
Do not stand on top of the product; do not place heavy
objects on top or insert objects inside it.
This may result in damage or equipment failure.
Do not open the case of the product.
This may result in injury, electric shock or equipment failure.

8
Introduction
About WIRES-X Connection Kit
Package contents
Please confirm that the package contains the following items. If any items are missing, please contact your dealer.
• HRI-200 unit
• USB cable (type A - type B)
• Mini-DIN 10 pin to 10 pin data cable CT-174
• Mini-DIN 10 pin to 6 pin data cable CT-175
• WIRES-X software Setup disk (CD-R)
• WIRES-X User Registration Guide
• Warranty Card
[HRI-200 unit]
Option
•CT-174 ........ Mini-DIN 10 pin to 10 pin data cable
•CT-175 ........ Mini-DIN 10 pin to 6 pin data cable
About This Manual
• The information in this manual is written specifically for the Windows 7 OS.
Depending on your OS version, the naming that appears in the provided screenshots and in various parts of the screen, as well as
terminology indicating functions and operations (such as “click”) may differ.
• The following notations are used throughout this manual.
[GM], [Close] .......................................................Indicate the device keys and switches or buttons on the PC screen.
“Setting”, “Basic Operational Information” ............Indicate the headings and menu selection item names on the PC screen.
• Please be aware that the contents of this manual, including the illustrations, may be different from the product due to product
upgrades.

9
Preparation
Registration with the WIRES-X Server (applying to obtain an ID number)
1Access the WIRES-X website (https://www.yaesu.com/jp/en/wires-x/index.php)
2Click “New Member Registration”
3Input your email address and submit it
You will promptly receive an email with an address for the website to complete your member registration.
4Visit the website and select “Apply for WIRES-X new ID (membership registration)”
5Click [I Agree] on the “WIRES END-USER LICENSE AGREEMENT” screen
6Fill in the essential fields and submit
Once registration is completed, you will receive an email containing further details about obtaining an ID.
Tip It takes 2-3 business days for registration to be processed.
Caution
If YAESU MUSEN management judges, in the future, that technological advancements or regulatory changes make it unfeasible for YAESU to continue
hosting the WIRES server, it may be necessary to discontinue the management of the WIRES server.

10
Preparation
Connecting Devices
HRI-200 interface box
Front panel
POWER indicator
Lights green when the power is on.
Rear panel
MONITOR jack
Connecting an earphone or speaker plug allows monitoring the sound transmitted by the node.
RADIO 2 jack (Only for C4FM digital operation)
Connect the plug of a 10 pin to 10 pin Mini-DIN cable. Use to connect a C4FM compatible digital transceiver for preset search
channels.
RADIO 1 jack
Connect the 10 pin plug side of a 10 pin to 10 pin Mini-DIN cable (for C4FM compatible digital transceivers) or a 10 pin to 6 pin
Mini-DIN cable (for FM analog transceivers).
USB jack
Connect the supplied USB cable type B plug. Use to connect to a PC.

11
Preparation
Connecting Devices
Connecting HRI-200 to a PC
USB
RADIO 1
RADIO 2
MONITOR
USB cable
(supplied with
HRI-200)
HRI-200
(rear panel)
Type B
plug
Type A
plug
LAN cable
(sold separately)
To the Internet
When the HRI-200 is connected to the PC properly, the HRI-200 will turn on automatically when the PC is turned on.
Tip
When using a router to connect the PC to the Internet, refer to the instruction manual supplied with the router for information about attaching the PC to the
router, and the router to the Internet using LAN cables.
Also, refer to the instruction manual supplied with your router to perform the initial router configuration. Users generally access the IP address of the router
using a web browser to configure various settings on the displayed setup screen.

12
Preparation
Connecting Devices
Connecting HRI-200 to transceivers
Cautions
zTurn off the transceiver before connecting cables.
zProvide a DC 13.8 V transceiver power supply separately.
●When operating with a transceiver
Mini-DIN digital cable
(supplied)
USB cable
(supplied)
Coaxial cable
(sold separately)
C4FM digital transceiver
(such as FTM-400DR)
HRI-200
(rear panel)
10 pin
plug
Type B
plug
To antenna To a PC
USB cable
(supplied)
Type B
plug
To a PC
To antenna
Coaxial cable
(sold separately)
10 pin
plug
6 pin
plug
10 pin
plug
Mini-DIN digital cable
(supplied)
FM analog transceiver
(such as FT-8900)
HRI-200
(rear panel)
●When operating with 2 transceivers
Mini-DIN digital cable
(supplied)
Coaxial cable
(sold separately)
C4FM digital transceiver
for operation channels
(such as FTM-400DR)
HRI-200
(rear panel)
10 pin
plug
10 pin
plug
To antenna
10 pin
plug
Mini-DIN digital cable
(such as CT-174)
Coaxial cable
(sold separately)
C4FM digital transceiver
for preset search channels
(such as FTM-400DR)
To antenna
10 pin
plug
USB cable
(supplied)
Type B
plug
To a PC
Tips
• When using an FM analog transceiver, set the data communication port rate to 1,200bps on the transceiver. For details, refer to the instruction manual
supplied with the transceiver.
• When using a YAESU FTM-400DR/DE transceiver as a node, turn on the transceiver while pressing [D/X] and [GM] keys. This sets the transceiver to the
connection-only mode, and menu settings including the port rate setting will not be required. [HRI-200] will appear on the FTM-400DR/DE screen.

13
Preparation
Installing WIRES-X Software
Installing a USB device driver for HRI-200
1Start up the PC, then use an administrator authorized user account to log in
Tip When another application opens, close it before going to the next step.
2Browse the supplied CD-R to find and execute the “Install.exe” file
The “WIRES-X installer” window will appear.
3Click [HRI-200 Device Driver Setup]
The “Command Prompt” window will appear and the USB
device drive setup will start.
Tip If the “Connect HRI-200 to USB.” message dialog box appears,
reconnect the HRI-200 USB cable to the USB port, then click [OK].
4If the “Windows security Alert” window appears, click [Install]
Setup will start.
When setup completes, the “Ready to use the device” pop-up
message will appear, then the “Command Prompt” window will
close.
Installing WIRES-X software
1Browse the supplied CD-R and execute the “Install.exe” file
The “WIRES-X installer” window will appear.
2Click [WIRES-X Software Setup]
The “Welcome to the WIRES-X Setup Wizard” window will appear.
3Click [Next]
The “License” window will appear.
4Put a check-mark in the “I accept the terms in the License
Agreement” check box, then click [Next]
The “Destination Folder” window will appear.
Tip If you do not put a check-mark in the “I accept the terms in the License
Agreement” check box, installation will abort.

14
Preparation
Installing WIRES-X Software
5Confirm the destination where the WIRES-X software will install
and click [Next]
The “Ready to install WIRES-X” window will appear.
Tip If you put a check-mark in the “Enable WIRES-X Auto Start.” check
box, the WIRES-X software will run automatically when Windows
starts.
Even when the WIRES-X software is terminated for some reason, it
will reboot automatically.
6Click [Install]
Program installation will start.
Tips • To confirm or change the installation setting, click [Back].
• To exit the wizard, click [Cancel].
When installation completes, the “Completed the WIRES-X
Setup Wizard” window will appear.
7Click [Finish]
The “Completed the WIRES-X Setup Wizard” window will close.
When WIRES-X software installation has been completed
properly, the [Wires-X] icon will appear on the Windows
desktop.
8Click [Close] in the “WIRES-X installer” window

15
Preparation
Preparing an Internet Environment
Since the protocol UDP (user datagram protocol) is used for WIRES-X communications via the Internet, some menu settings are
required depending on the Internet connection method.
Setting the PC and the router
Why is the setting required?
●Opening communication port
The WIRES-X server communicates with the PC used as a node station via specified ports (46100, 46110, 46112, 46114, 46120 and
46122).
When using a router to connect the PC to the Internet, the UDP port must go through the router as well; however, communications
using these ports are generally prohibited on commercially available routers in the default setting.
Therefore, if you are using a router, make sure that the UDP ports are “open” for passing UDP traffic.
Tip
If you do not use a router, this setting is not required. In this case, after installing the WIRES-X software, perform the internet access permission setting
(See page 20) to use WIRES-X immediately.
●Assigning a static IP address
Generally, the DHCP (Dynamic Host Configuration Protocol) function of the router assigns an IP address automatically because of
the Internet connection setting on Windows PCs by default. In this setting, every time you start the PC, a new IP address may be
assigned.
If a new IP address is assigned automatically to the node PC when starting the PC, the address may be different from the one
specified on the router. It disables communications with the WIRES-X server.
On the other hand, when ports are open on the router, the communication destination of the port (a PC) is specified with an IP
address.
To enable communications, assign an IP address to the node PC and specify this address when opening ports on the router.
Setting an IP address on the PC
●Selecting an IP address
The IP address set on the node PC differs depending on the router.
The steps are shown as follows:
1Click the Windows Start button
2Click [Control Panel]
3Click [Network and Internet], then [Network and Sharing Center]

16
Preparation
Preparing an Internet Environment
4Click [Local Area Connection]
Tip Depending on the OS or connection environment, “Ethernet” may
appear.
The “Local Area Connection Status” dialog box will appear.
5Click [Details]
The “Network Connection Details” dialog box will appear.
6Write down the “IPv4 Address” and “IPv4 Subnet Mask” values
The “IPv4 Address” value is the IP address you set on the PC.
7Click [Close]
The “Local Area Connection Properties” dialog box will appear
again.

17
Preparation
Preparing an Internet Environment
●Changing the IP address
1In the “Local Area Connection Status” dialog box, click
[Properties]
The “Local Area Connection Properties” dialog box will appear.
2Select “Internet Protocol Version 4 (TCP/IPv4)”, then click
[Properties]
The Internet protocol property setting dialog box will appear.
3Select “Use the following IP address”
4Enter the IP address you wrote down in step 6 of “Selecting an
IP address”
5Enter “255.255.255.0” as the sub-net mask address
6Enter the router IP address as the default gateway address
7Enter the router IP address as the priority DNS server address
8Click [OK] and [Close] in each dialog box
Tips
• The ddd part of an IP address (aaa.bbb.ccc.ddd.) can be set depending on the router range. See the router setup screen.
• When connecting several devices to the router, make sure the IP addresses do not overlap with each other.
Opening the router ports
First, refer to the instruction manual supplied with the router to make sure the router has the UPnP (Universal Plug and Play)
function.
On the router with the UPnP function, ports can be opened with the WIRES-X software.
On the router without the UPnP function, ports must be opened from the router setup screen.

18
Preparation
Preparing an Internet Environment
In case you cannot open ports using the WIRES-X software on the router with the UPnP function, open ports from the router setup
screen.
●When using a router without the UPnP function
In advance, in the “NAT” or “Port mapping” setting on the router, set the address in “Setting an IP address on the PC” (page 15)
as the LAN address and register the following 6 ports:
46100, 46110, 46112, 46114, 46120 and 46122 (UDP ports)
For the detailed procedure, refer to the instruction manual supplied with your device.
●When using a router with the UPnP function
1On the router setup screen, make sure that the UPnP function is enabled on the router
Tip For details, refer to the instruction manual supplied with the router.
2On the Windows desktop, double-click the [Wires-X] icon
The WIRES-X software starts.
Tip The software can also be started by clicking the Windows Start button, then “Wires-X”.
Then, the Internet security alert will appear depending on the settings of Windows and the firewall software (refer to “Setting the
Internet access security” (page 20) for details).
3Click [Allow access]
Tip Depending on the OS or firewall software, click [Unblock] instead.
The “WIRES ID Activation” window will appear.
4Click [Port check]
The “Port check” window will appear.
5Put a check-mark in the “Automatic UPnP” in the “Port Check”
area
6Click [Start] in the “Port Check” area
The communication status will be checked for each of the 6
ports.
When checking is complete, the “OK” or “NG” will appear on the
right side of each port name.
If there is one or more “NG” messages, registrations of the 6
ports will start.
Tip While checking, the operational status of the WIRES-X software
(such as registering) will appear in the bottom half of the “Port check”
window.

19
Preparation
Preparing an Internet Environment
When the port registration is complete, the communication
status will be checked again.
When checking completes, the “OK” or “NG” will appear on the
right side of each port name.
7When “OK” appears for each port, click [Close]
The “WIRES ID Activation” window will appear again.
Caution If “NG” still appears, ports cannot be opened using the WIRES-X
software.
Tip
To remotely control a node station using the remote monitor function, the TCP port 46190 (default value) must be open. For details, refer to “Operating the
WIRES-X software remotely” (page 48).
Taking security measures
Make sure to take security measures against interception and unauthorized access using a security service provided by the internet
provider or a firewall program for the router and PC.

20
How to Use
Basic Operations
Starting the WIRES-X software
1On the Windows PC desktop, double-click the [Wires-X] icon
Tip The software can also be started by clicking the Windows Start button, then [Wires-X].
Setting the Internet access security
When the WIRES-X software starts up, the Internet security alert
window, as shown on the right, may appear; depending on the
settings of Windows and the firewall software.
In this case, release the block, and allow the WIRES-X software to
access the internet.
Getting the WIRES-X server certificate
When starting the WIRES-X software for the first time, the “WIRES ID Activation” window will appear.
1Follow the steps in “Opening the router ports” (page 17) to check the WIRES-X communication ports
2Enter the provided node and room DTMF IDs (both are 5-digit
numbers)
3Click [ID Entry]
If the entered IDs are authorized, all the information that was
registered when applying for IDs will appear in the “User ID”,
“Call Sign”, “City”, “State”, and “Country” boxes on the “WIRES
ID Activation” window.
4Click [OK]
The WIRES-X user information will be stored on the PC, and now the PC can be used as a valid node.
The “Settings” window will appear.
Other manuals for WIRES-X HRI-200
1
Table of contents
Other Yaesu Repeater manuals

Yaesu
Yaesu DR-2X Manual

Yaesu
Yaesu VXR-7000U User manual

Yaesu
Yaesu DR-1X FR User manual

Yaesu
Yaesu WIRES-X HRI-200 User manual

Yaesu
Yaesu DR-1 User manual

Yaesu
Yaesu FTR-710A User manual

Yaesu
Yaesu DR-1X User manual

Yaesu
Yaesu WIRES-X TM-400FT5D Installation and operation manual

Yaesu
Yaesu WIRES-X FT3D User manual

Yaesu
Yaesu DR-1 User manual