Zeki TB782B User manual

USER’S GUIDE
V: 625-01
For the most up-to-date version of this User’s Guide, go to
www.zekitablet.com
TB782B
7” Capacitive Multi-touch Tablet

Customer Support: 1-888-999-4215 2
• WARNING:The battery, batteries, and battery pack
shall not be exposed to excessive heat such as sunshine,
re, or the like.
• WARNING:Lithium batteries, like all rechargeable
batteries are recyclable and should be recycled or
disposed of in normal household waste. Contact your
local government for disposal or recycling practices in
your area. They should never be incinerated since they
might explode.
• WARNING: Shock hazard - Do Not Open.
• AVIS: RISQUE DE CHOC ÉLECTRIQUE - NE PAS
OUVRIR
Mains Plug or Direct plug-in adapter is used as disconnect
device and it should remain readily operable during intended
use. In order to disconnect the apparatus from the mains
completely, the Mains Plug or Direct plug-in adapter should
be disconnected from the mains socket outlet completely.
La che d’alimentation ou adaptateur de courant est utilisé
comme dispositif de déconnexion et doit rester accessible
pendant l’utilisation. Pour mettre l’appareil hors tension, la
che ou adaptateur de courant doit être débranché de la prise
de courant.
Do not mix old and new batteries.
Do not mix alkaline, standard (carbon-zinc), or rechargeable
(ni-cad, ni-mh, etc) batteries.
No mezcle baterías viejas y nuevas.
No mezcle baterías alcalinas, estándar (carbono-zinc) o
recargables (ni-cad, ni-mh, etc.).
• CAUTION: TO PREVENT ELECTRIC SHOCK,
MATCH WIDE BLADE OF PLUG TO WIDE SLOT,
FULLY INSERT.
• WARNING:To reduce the risk of re or electric shock,
do not expose this apparatus to rain or moisture.
• AVERTISSEMENT: Pour réduire le risque d’incendie
ou de choc électrique, ne pas exposer cet appareil sous la
pluie et l’humidité.
• CAUTION: Use of any controls or adjustments or
performance of procedures other than those herein
specied may result in hazardous radiation exposure.
• WARNING: Changes or modications to this unit
not expressly approved by the party responsible for
compliance could void the user’s authority to operate the
equipment.
• WARNING: Do not place the unit on top of any soft,
porous, or sensitive surfaces to avoid damaging the
surface. Use a protective barrier between the unit and
surface to protect the surface.
• WARNING: Use of this unit near uorescent lighting
may cause interference regarding use of the remote. If
the unit is displaying erratic behavior move away from
any uorescent lighting, as it may be the cause.
• CAUTION:Danger of explosion if battery is incorrectly
replaced. Replace only with the same or equivalent type.
• PRÉCAUTION: Danger d’explosion si les piles sont
remplacées de façon incorrect. Remplacer les piles
seulement par le même type de pile ou l’équivalent.
Warnings and Precautions
The lightning ash with arrowhead symbol,
within an equilateral triangle, is intended to
alert the user to the presence of uninsulated
"dangerous voltage" within the product's
enclosure that may be of sufcient magnitude to
constitute a risk of electric shock to persons.
WARNING: TO REDUCE THE RISK
OF ELECTRIC SHOCK, DO NOT
REMOVE COVER (OR BACK).
NO USER-SERVICEABLE PARTS
INSIDE. REFER SERVICING TO
QUALIFIED SERVICE PERSONNEL.
ATTENTION
RISQUE D' ÉLECTROCUTION
NE PAS OUVRIR
CAUTION
RISK OF ELECTRIC SHOCK
DO NOT OPEN
The exclamation point within an equilateral
triangle is intended to alert the user to
the presence of important operating and
maintenance (servicing) instructions in the
literature accompanying the appliance.

Customer Support: 1-888-999-4215 3
13. Unplug this apparatus during lightning storms
or when unused for long periods of time.
14. Refer all servicing to qualied service personnel.
Servicing is required when the apparatus has
been damaged in any way, such as power-supply
cord or plug is damaged, liquid has been spilled
or objects have fallen into the apparatus, the
apparatus has been exposed to rain or moisture,
does not operate normally, or has been dropped.
• The apparatus shall not be exposed to dripping or
splashing and that no objects lled with liquids,
such as vases, shall be placed on apparatus.
L’appareil ne doit pas être exposé aux écoulements
ou aux éclaboussures et aucun objet ne contenant de
liquide, tel qu’un vase, ne doit être placé sur l’objet.
• Battery shall not be exposed to excessive heat
such as sunshine, re or the like.
Les piles ne doivent pas être exposées à de forte chaleur, tel qu’à
la lumière du soleil, au feu ou autres choses de semblable.
• Caution marking is located at the rear or bottom of the apparatus.
Attention marquage est situé sur le paneau
arrière ou inférieur de l’unité.
• The marking information is located at the
rear or bottom of apparatus.
Le marquage est situé sur le paneau arrière ou inférieur de l’unité.
Additional Warnings
1. Read these Instructions.
2. Keep these Instructions.
3. Heed all Warnings.
4. Follow all instructions.
5. Do not use this apparatus near water.
6. Clean only with a dry cloth.
7. Do not block any ventilation openings. Install in
accordance with the manufacturer’s instructions.
8. Do not install near any heat sources such as
radiators, heat registers, stoves, or other apparatus
(including ampliers) that produce heat.
9. Do not defeat the safety purpose of the polarized
or grounding - type plug. A polarized plug has two
blades with one wider than the other. A grounding
type plug has two blades and a third grounding
prong. The wide blade or the third prong are
provided for your safety. When the provided plug
does not t into your outlet, consult an electrician
for replacement of the obsolete outlet.
10. Protect the power cord from being walked on or
pinched particularly at plugs, convenience receptacles,
and the point where they exit from the apparatus.
11. Only use attachments/accessories
specied by the manufacturer.
12.
Important Safety Instructions
This symbol indicates that this
product incorporates double insulation
between hazardous mains voltage
and user accessible parts.
Use only with a cart, stand, tripod,
bracket, or table specied by the
manufacturer, or sold with the apparatus.
When a cart is used, use caution when
moving the cart/apparatus combination to
avoid injury from tip-over.
Special note: When placing your unit on a
lacquered or natural nish, protect your furniture
with a cloth or other protective material.

Customer Support: 1-888-999-4215 4Customer Support: 1-888-999-4215 4
Table of Contents
7” Capacitive Multi-touch Tablet .................................................... 6
Features
Included
Setup ............................................................................. 7
Power
Charging
Features Introduction ............................................................. 8
Basic Introduction ................................................................. 9
WiFi .............................................................................10
Connecting to WiFi
Getting to Know Your Tablet ......................................................11
Touch Screen
Notications
On-Screen Introduction ...........................................................12
Icons You Should Know
Basic Use ........................................................................13
Unlocking the Screen
Customizing the Lock Screen
Orienting Your Tablet
Screen ...........................................................................14
Changing the Background
Changing Screens
Viewing Open items
Apps. . . . . . . . . . . . . . . . . . . . . . . . . . . . . . . . . . . . . . . . . . . . . . . . . . . . . . . . . . . . . . . . . . . . . . . . . . 15-16
Accessing the App Menu
Adding Apps to the Home Screen
Removing Apps from the Home
Managing Apps
Adding Apps
Removing Apps

Multimedia ......................................................................17
Using the Camera
Using the Video Camera
Multimedia ......................................................................18
Using Panorama Mode
Accessing Saved Photos and Videos
Transferring Files .................................................................19
Transferring Files with a Computer
Connectivity .....................................................................21
Connecting to a TV
Connecting a Micro SD card
Removing a Micro SD card
Support & FAQ ...................................................................22
How do I....?
Troubleshooting
Support & FAQ ...................................................................23
Company Information ............................................................24
International Support
Contact Information
Warranty
Green Initiative
Customer Support: 1-888-999-4215 5
Table of Contents

Customer Support: 1-888-999-4215 6Customer Support: 1-888-999-4215
• 7” TFT LCD display
• Capacitive touchscreen
• 4.0.3 Android Operating System
• 1 GHz Processor
• 1GB RAM
• 800 x 480 native resolution
• Built-in WiFi
• G-Sensor for screen rotation
• 0.3MP Camera
• Digital video: MOV, MKV, AVI, RM,
RMVB, FLV, WMV, MP4, VOB
• Digital audio: MP3, WMA
(non-DRM), WAV
• eBooks: PDF, PDF DRM,
TXT, EPUB DRM, HTML
• Expandable memory
• 8GB installed ash memory
• Built-in speaker
• Micro-SD memory card reader:
supports JPEG, MP3
• Mini-USB port for battery recharge
• Mini-HDMI output (1080p)
• Battery life: ~3.5 hours
• DC battery power: 2800 mAH battery
• DC battery power: built-in
rechargeable battery
• Mini-USB to USB cable
• One set of stereo earbuds
• AC/DC power adapter
7” Capacitive Multi-touch Tablet
Features
Included

Customer Support: 1-888-999-4215 7
Requires an AC/DC power
adapter (included)
Power
SERIAL NO.:
MODEL NO. : TB782B INPUT : DC5V 2.0A
MADE IN CHINA FID : BN
SERIAL NO.:
MODEL NO. : TB782B INPUT : DC5V 2.0A
MADE IN CHINA FID : BN
Setup
When the Battery Indicator signals
that the power is running low, connect
the tablet to a power source using the
included Mini-USB to USB charging cable.
A warning will also display on the
screen stating that the battery is low.
Connect the tablet to an AC outlet using
the included adaptor, or connect the
included Mini-USB to USB to the USB port
on a powered on computer to charge.
Charging
Customer Support: 1-888-999-4215 8
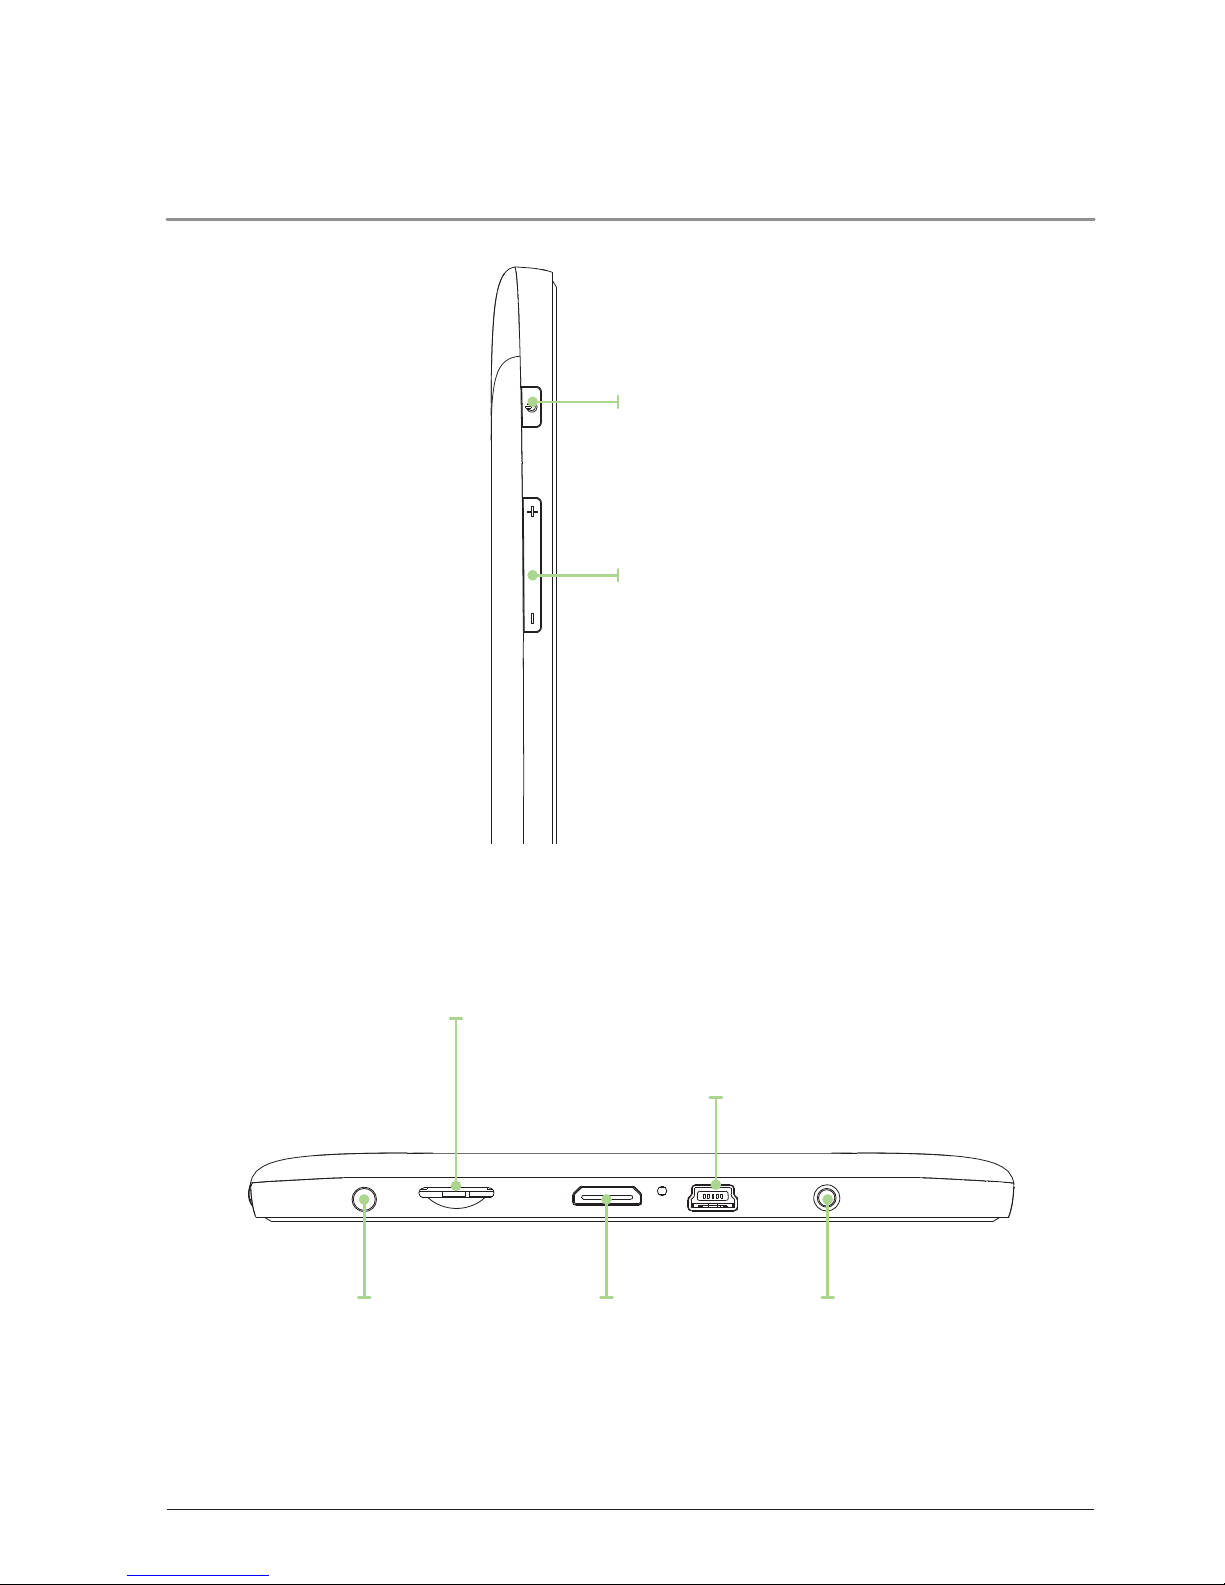
Introduction
Power
Press to put
the device into
standby mode.
Press and hold to
completely power
the unit on or o.
Volume
Press to turn the
volume up or down.
Mini-USB Port
Connect the
included cable to
begin charging.
Card Slot
DC Power input
Stereo Headphone
Jack
HDMI Port
Used to connect a TV.

Customer Support: 1-888-999-4215 9
Introduction
Tablet front w/screen
Camera
Back
Press to return to the
previous screen.
Home
Press to return to
the home screen.
Menu
Press to access
the menu.

Customer Support: 1-888-999-4215 10
Connecting to the Internet
1. Press the Settings Icon.
2. Locate the Wi-Fi icon and
slide it to the On position.
3. Select a network from the list
of available networks.
To refresh the list of available
networks, press the Scan button.
To manually add a network, select
the Add Network button.
4. Select Connect from the pop up menu.
5. If the network is secured
with a password, enter the
password to continue.
6. Once nished connecting, the
display will show Connected
under the name of the network.
To conserve battery life, turn
o Wi-Fi when not in use.
Connecting to Wireless Internet
Other manuals for TB782B
1
Table of contents
Other Zeki Tablet manuals

Zeki
Zeki TBDV986-1576-01 User manual

Zeki
Zeki TBQW895NB-1424-01 User manual

Zeki
Zeki TBDC1093B User manual

Zeki
Zeki TBDV986 User manual

Zeki
Zeki TB782B User manual

Zeki
Zeki TBQG855B User manual

Zeki
Zeki TBDB763B User manual

Zeki
Zeki TB1082B User manual

Zeki
Zeki TB1082B User manual

Zeki
Zeki TBDG774B User manual


Popular Tablet manuals by other brands

Laser
Laser MID-1060 Quick operation guide

MUNBYN
MUNBYN IRT09J Easy setup guide

Motorola
Motorola MC3090R - Win CE 5.0 Professional 520 MHz quick start guide

Dell
Dell Latitude ST Setup and features information

Lenovo
Lenovo IdeaTab S6000L Hardware Maintenance Manual

Venturer
Venturer WT9L11 quick start guide


