manuals.online logo
Brands
  1. Home
  2. •
  3. Brands
  4. •
  5. Zenith
  6. •
  7. Bathroom Fixture
  8. •
  9. Zenith 33941 User manual

Zenith 33941 User manual

IS33941-I8
Pg 1of 8 ©2012 Zenith Products Corp.
MCS 1/03/2012
Before You Begin:
Thank you for purchasing this product. Please identify all parts and hardware pieces before you begin. When laying
out parts, place them on a soft surface to prevent scratching.
If any pieces are missing, call our Toll Free Number 1-800-892-3986 between 8:00AM-5:00PM EST Monday
through Friday or contact our website at www.zenith-products.com for more information.
Antes de que empiece:
Muchas gracias por comprar este
producto.
Identifique todas las piezas y las piezas de ferretería antes de comenzar.
Al distribuir las piezas, colóquelas sobre una superficie suave para evitar que se rayen.
Si faltaran piezas, llame a nuestro número gratuito 1-800-892-3986 entre las 8:00 a.m.- 5:00 p.m., hora del
este, de lunes a viernes o contáctenos a través de nuestro sitio web en www.zenith-products.com para
solicitar mas información.
Avant de commencer :
Merci d’avoir acheté ce produit. Veuillez identifier toutes les pièces et les accessoires de montage avant de commencer.
Lorsque vous déballez les pièces, placez-les sur une surface non rugueuse afin d’éviter les éraflures.
S’il venait à vous manquer des pièces, appelez notre numéro sans frais 1.800.892.3986 entre 8 h et 17 h
(heure de l’Est des États-Unis), du lundi au vendredi, ou contactez notre site Web à www.zenith-products.com
pour de plus amples informations.
Assembly Instructions - Model 33941 (Wrap Around Shower Rod)
Instrucciones de Instalación - Modelo 33941 (Tubo Para Cortina Envolvente de Regadera)
Instructions de montage - Modèle 33941 (Tringle de rideau de douche circulaire)
IS33941-I8
Pg 2of 8
(D) 2 small screws
2 tornillos pequeños
2 petites vis
(F) 8 mounting screws
8 tornillos de montaje
8 vis de montage
(G) 8 wall anchors
8 Anclas para pared
8 chevilles murales
(A) 1 bent tube
1 tubo encorvado
1 tube recourbé
List of Parts:
Lista de Partes:
Liste des pièces :
(B) 2 straight tubes
2 tubos rectos
2 tubes droits
Tools Needed:
Herramientas Necesarias:
Outils nécessaires :
(E) 4 set screws
4 tornillos de fijación
4 vis de réglage
(C) 2 end caps
2 cubiertas terminales
2 embouts
(H) 1 allen wrench for use with set screw (E)
1 llave tipo allen para uso con los las tornil
los de fijación (E)
1 clé hexagonales pour les vis de réglage (E)
IS33941-I8
Pg 3of 8
1. This shower rod is 68” long and 28” deep.
Measure your bath tub from back wall to
approximate center of bath tub lip as shown.
Measure bath tub from side wall to approximate
center of bath tub lip as shown. Compare
your bath tub measurements to the shower
rod measurements.
Este tubo para regadera tiene 68" de largo y
28" de profundidad. Mida la bañera desde la
pared posterior hasta aproximadamente el
centro del labio o borde de la bañera como
se muestra. Mida la bañera desde la pared
lateral hasta aproximadamente el centro del
labio de la bañera como se muestra.
Compare las mediciones de su bañera con
las mediciones del tubo para regadera.
Cette tringle de douche mesure 173 cm (68
po) de long par 71 cm (28 po) de profondeur.
Mesurez votre baignoire entre le mur arrière
et le centre approximatif du rebord de la
baignoire, comme indiqué. Comparez vos
mesures à celles de la tringle.
28”
68”
IS33941-I8
Pg 4of 8
2. Using a hacksaw, cut off any extra length of
tube as shown below. IMPORTANT:Be sure
to cut on the non-tapered end of straight
tube (B) with only one hole. Be sure to cut
on the longer side of the curved tube (A).
Utilizando una sierra para metales, corte
cualquier porción extra del tubo, como se
muestra más adelante. IMPORTANTE:
Asegúrese de cortar el extremo sin
ahusamiento del tubo recto (B) que tiene
un solo orificio. Recuerde que debe cortar el
lado más largo del tubo curvo (A).
À l'aide d'une scie à métaux, sectionnez la
longueur de tube superflue, comme indiqué
ci-dessous. IMPORTANT : assurez-vous de
sectionner l'extrémité non conique du tube
droit (B) percé d’un seul trou. Assurez-vous
de sectionner le tube recourbé (A) du côté le
plus long.
A
If shortening the length of the shower rod:
Be sure to cut on the non-tapered end of straight tube (B) with only
one hole. (This end of the tube will go into the end cap.)
Si desea acortar el tubo para la regadera: asegúrese de cortar el
extremo sin ahusamiento del tubo recto (B) que tiene un solo orificio.
(Este extremo del tubo debe entrar en la cubierta terminal.)
Si vous sectionnez la tringle sur la longueur : assurez-vous de
sectionner l’extrémité non conique du tube droit (B) percé d’un seul
trou. (Cette extrémité du tube va s’insérer dans l’embout.)
If shortening the depth of the shower rod:
Be sure to cut on the longer side of the curved tube (A).
(This end of the tube will go into the end cap.)
Si se corta la profundidad del tubo para regadera:
Asegúrese de cortar el lado más largo del tubo encorvado (A).
(Este extremo del tubo irá en la cubierta terminal).
Si vous sectionnez la tringle sur sa profondeur :
assurez-vous de sectionner le tube recourbé (A) du côté le plus
long. (Cette extrémité du tube va s'insérer dans l'embout.)
B
B
IS33941-I8
Pg 5of 8
Insert the tapered ends of the tubes into the
non-tapered ends as shown and line up the
holes (by turning one of the tubes). Fasten
the 3 tubes together. DO NOT OVERTIGHTEN!
Inserte los extremos con ahusamiento de los
tubos en los extremos sin ahusamiento como
se muestra y alinee los orificios (girando uno
de los tubos). Asegure los 3 tubos juntos.
¡NO LOS APRIETE DEMASIADO!
Introduisez les extrémités coniques des
tubes dans les extrémités non coniques,
comme indiqué, puis alignez les trous (en
faisant pivoter l'un des tubes). Fixez les 3
tubes les uns aux autres. NE SERREZ PAS
TROP.
3.
4. Slide end caps (C) onto the ends of the tube
assembly as shown.
Deslice las cubiertas terminales (C) sobre
los extremos del ensamble de tubos como
se muestra.
Enfilez les embouts (C) à l'extrémité des
tubes, comme indiqué.
A
B
C
C
D
B
Pg 6of 8
5. Mount the rod approximately 78” above the
floor. This will make the curtain fall 8” above
the floor. If this is not acceptable, adjust the
height to the desired location. Draw a light
horizontal line at the desired location at both
ends of the tub. The rod will be installed at
that height and centered over the tub rim.
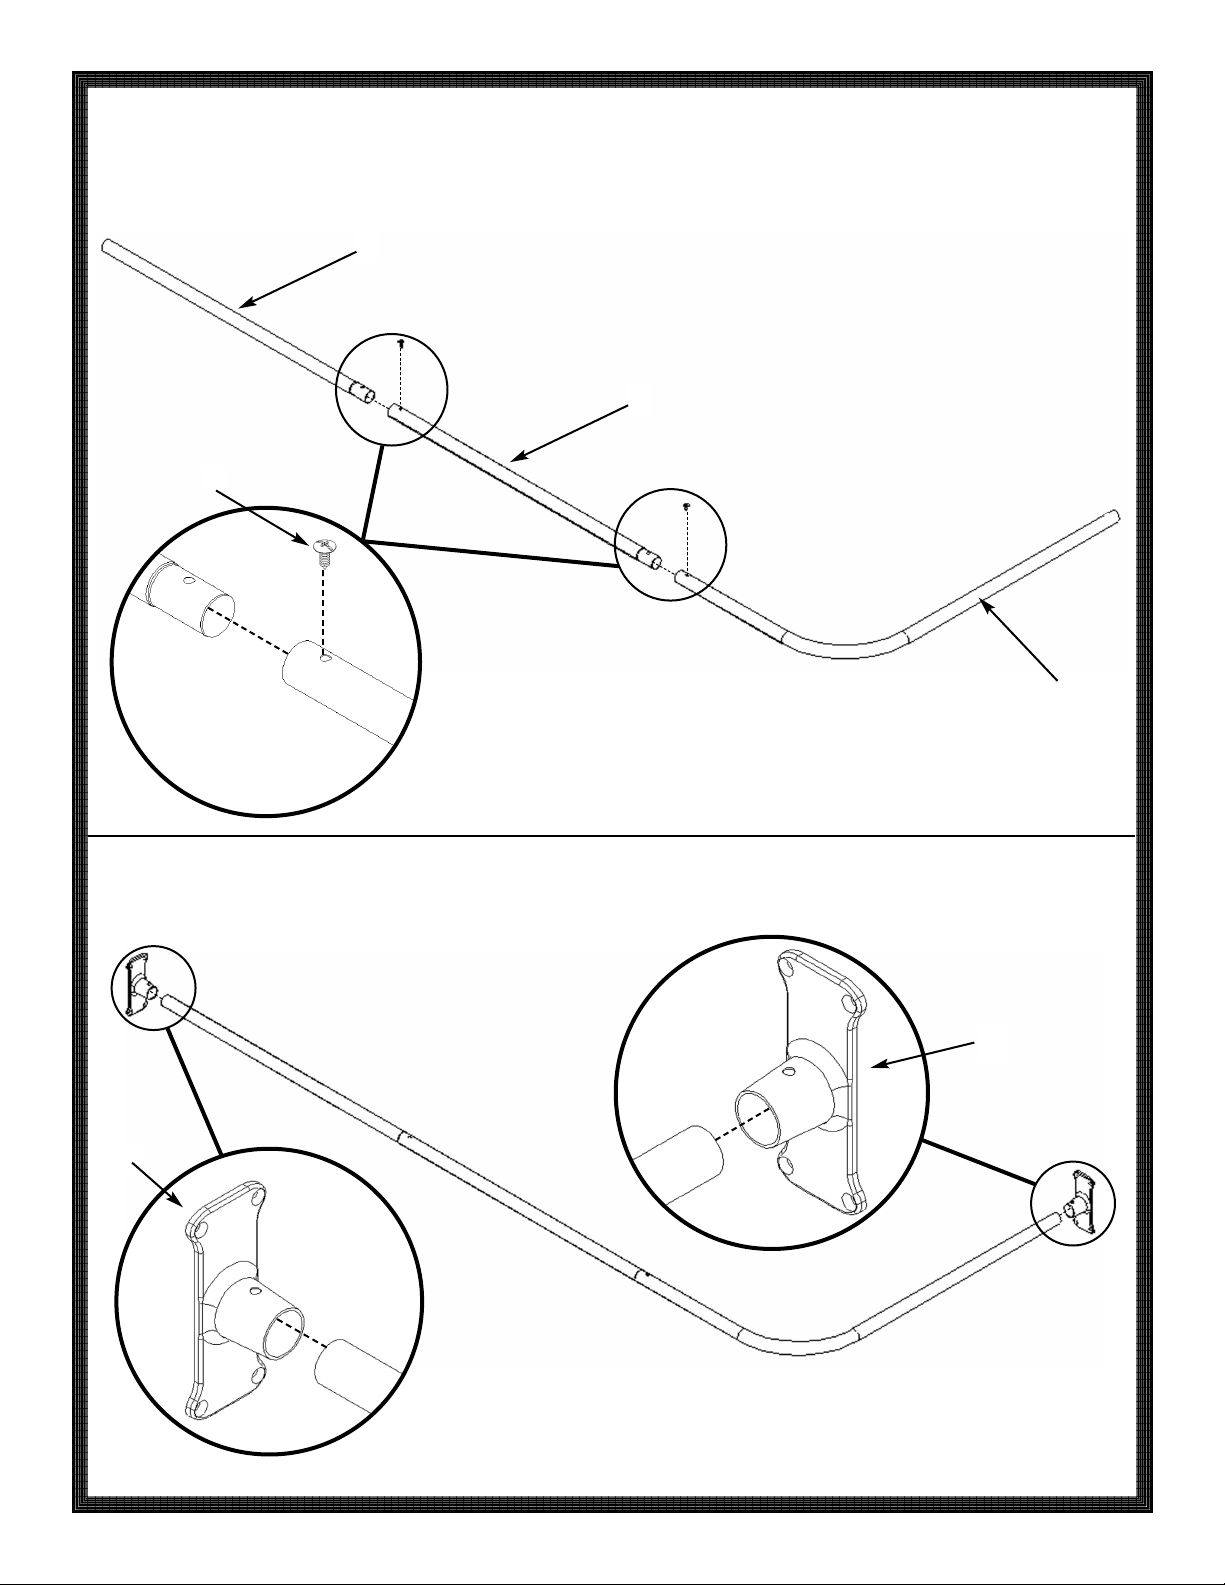
Hold the shower curtain rod assembly in
desired location. Turn the end caps (C) into
the upright position with the screw hole
closest to the wall in the “neck” of the end-
cap is on top, as shown. Line up the bottom
of each end cap (C) with the line you drew.
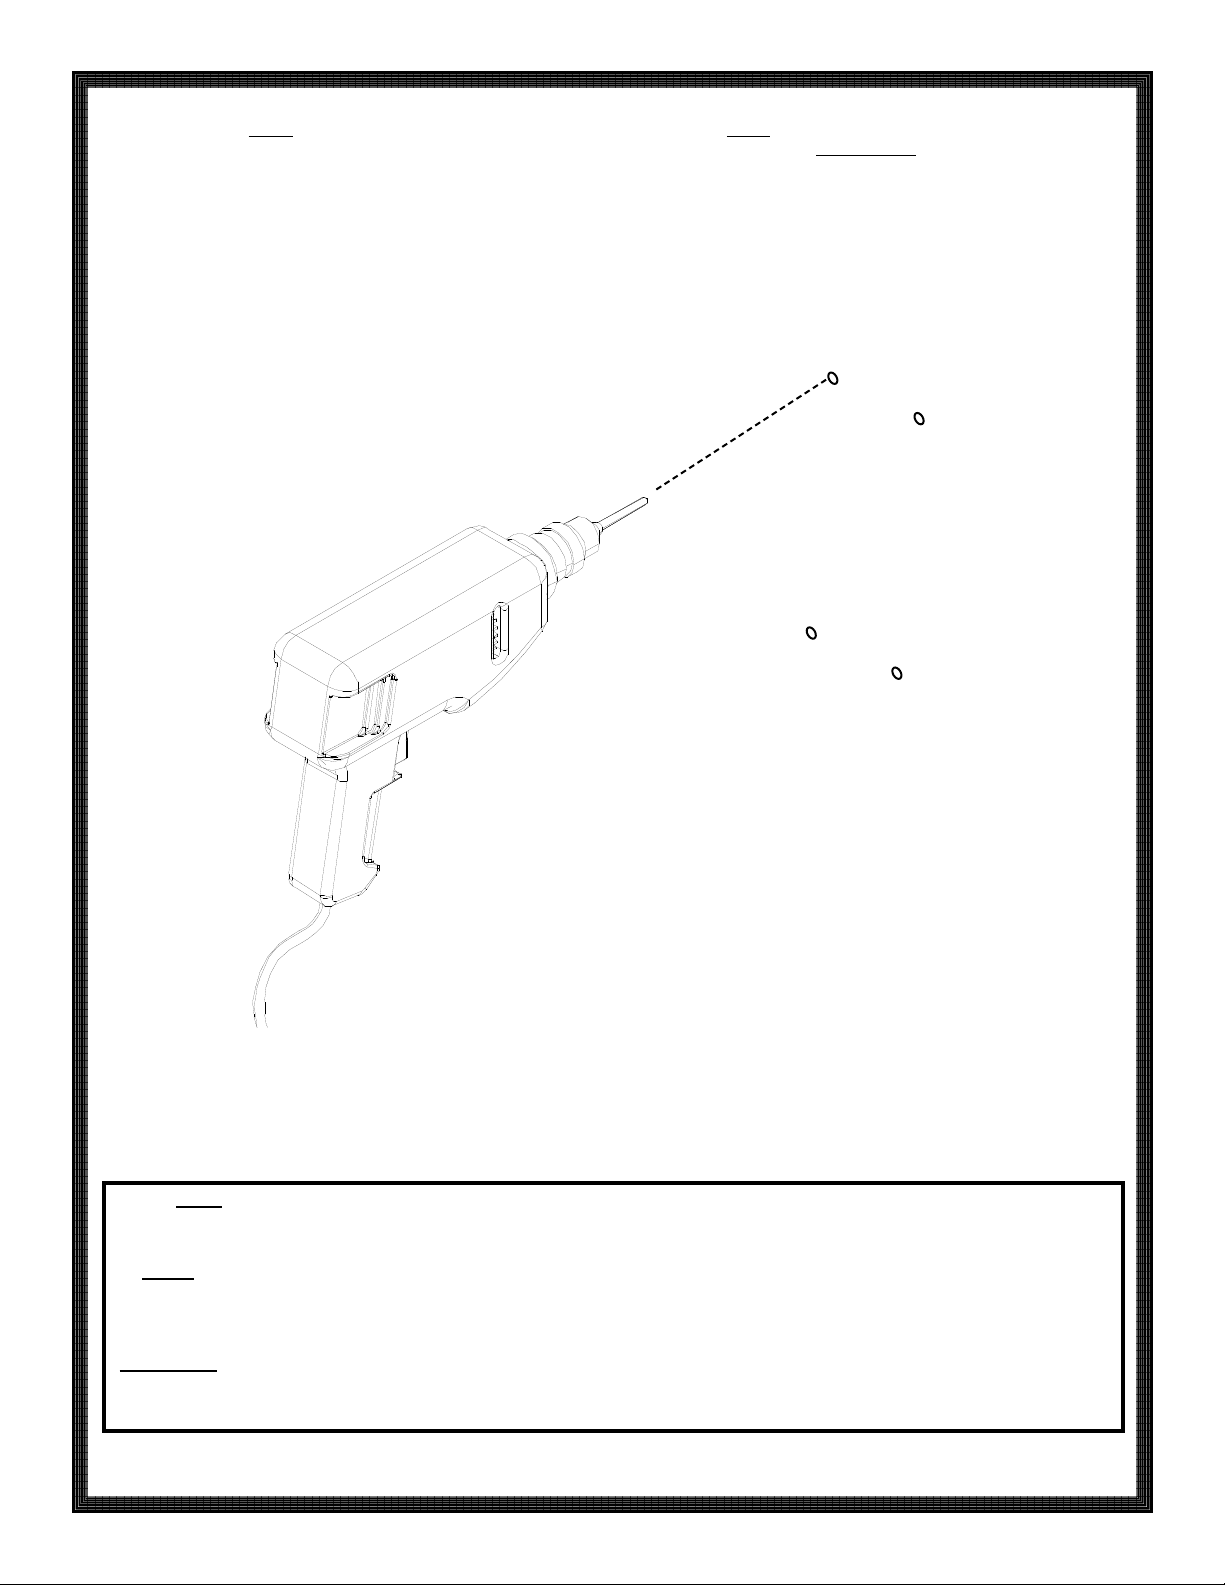
Mark the locations for the mounting screws
(F) on the wall through the holes.
Monte el tubo aproximadamente 78" por
encima del piso. Esto hará que la cortina
caiga a 8" por encima del piso. Si esto no es
aceptable, ajuste la altura a la ubicación
deseada. Trace levemente una línea horizontal
en la ubicación deseada en ambos extremos
de la bañera. El tubo estará instalado a esa
altura y centrado sobre el borde de la
bañera.
Sujete el ensamble de tubo para cortina de
regadera en la ubicación deseada. Gire las
cubiertas terminales (C) en la posición vertical
con los orificios para tornillos en el "cuello"
de la cubierta terminal orientados hacia el
interior de la bañera. Alinee la parte inferior
de cada cubierta terminal (C) con la línea
que trazó. Marque las ubicaciones para los
tornillos de montaje (F) en la pared a través
de los orificios.
Montez la tringle à environ 2 m (78 po) du
sol. À une telle hauteur, le rideau tombera à
20 cm (8 po) du sol.
Si ces mesures ne
conviennent pas à votre installation, modifiez
la hauteur en conséquence. Tracez une
ligne horizontale à l'endroit désiré des deux
côtés de la baignoire. La tringle sera installée
à cette hauteur et centrée par rapport au
rebord de la baignoire.
Placez la tringle de rideau de douche à
l'endroit désiré. Tournez les embouts (C) en
position verticale en plaçant les trous des
vis se trouvant dans la « gorge » des
embouts sur le dessus, comme indiqué.
Alignez le bas de chaque embout (C) sur la
ligne que vous avez tracée. Indiquez
l'emplacement des vis de montage (F) sur
le mur, au travers des trous.
IS33941-I8
C
78”
78”
Screw hole closest to the wall in the “neck” of
the endcap is on top, as shown.
El orificio del tornillo más cercano a la pared
en el «cuello» de la cubierta terminal está en
la parte superior, como se ilustra.
Le trou de vis dans la « gorge » de l’embout le
plus près du mur se trouve sur le dessus,
comme indiqué.
Mark the locations
of the screw holes
Marque las ubicaciones de
los orificios para tornillos
Indiquez l'emplacement
des trous de vis
Pg 7of 8
Drill holes in the marked locations and insert
wall anchors (G). (NOTE:Awall anchor is
not necessary if the screw will be going
directly into a stud.)
Taladre orificios en las ubicaciones marcadas
e inserte las anclas para pared (G). (NOTA:
No se necesita un ancla para pared si el
tornillo irá directamente en un soporte de pared).
Percez les trous aux endroits indiqués, puis
introduisez les chevilles murales (G).
(REMARQUE :il n'est pas nécessaire
d'utiliser une cheville murale si la vis est
insérée directement dans un poteau mural.)
6.
IS33941-I8
NOTE:Use a 9/32” (7mm) drill bit for drywall anchor installation. Use a 1/8” (3mm) drill bit for direct stud installation.
If installing into a material other than drywall or into stud, consult a professional for proper installation.
NOTA: Utilice una broca de 9/32” (7mm) para instalar puntos de soporte en la mampostería (drywall.) Utilice una broca de 1/8”
(3mm) para instalar directamente los travesaños metálicos. Consulte con un profesional para instalaciones en materiales diferentes a
mampostería (drywall) o en travesaños.
REMARQUE :utilisez un foret de 7 mm (9/32 po) si des chevilles sont installées dans une cloison sèche. Utilisez un foret de 3 mm
(1/8 po) s’il s’agit d’un poteau mural. S’il s’agit d’un matériau différent (autre qu’une cloison sèche ou un poteau mural), consultez
un professionnel pour garantir une bonne installation.
IS33941-I8
Pg 8of 8
C
C
C
F
7. Making sure the end cap (C) is in the upright
position with the screw hole closest to the
wall (in the neck of the endcap) is on top,
fasten the endcap (C) to the side wall.
NOTE:Screw hole closest to the wall in the
“neck” of the endcap is on top, as shown.
Repeat for the other end cap (C).
Asegurándose de que la cubierta terminal (C)
esté en la posición vertical con el orificio del
tornillo (en el cuello de la cubierta terminal)
en la parte superior, fije la cubierta terminal (C)
a la pared lateral. NOTA: El orificio del tornillo
más cercano a la pared en el «cuello» de la
cubierta terminal está en la parte superior,
como se ilustra. Repita el mismo paso para
la otra cubierta terminal (C).
En vous assurant que l’embout (C) est en
position verticale, le trou de vis (dans la
gorge de l’embout) se trouvant sur le
dessus, fixez l’embout (C) au mur latéral.
REMARQUE :le trou de vis dans la « gorge
» de l’embout le plus près du mur se trouve
sur le dessus, comme indiqué. Répétez
l’opération pour l’autre embout (C).
Then fasten the tube asembly to the
endcaps (C) using allen wrench (H),
as shown.
Asegure el ensamble de tubos a las cubiertas
terminales (C) con una llave allen (H), del
modo ilustrado.
Fixez les tubes assemblés aux embouts (C) à
l’aide de la clé hexagonale (H), comme indiqué.
8.
E
E
E

Other Zenith Bathroom Fixture manuals

Zenith 2423WW User manual

Zenith

Zenith 2423WW User manual

Zenith 2114S User manual

Zenith

Zenith 2114S User manual

Zenith 2132HB User manual

Zenith

Zenith 2132HB User manual

Zenith HydroTap User manual

Zenith

Zenith HydroTap User manual

Zenith 2120BC User manual

Zenith

Zenith 2120BC User manual

Zenith MMV1032 User manual

Zenith

Zenith MMV1032 User manual

Zenith 2104W User manual

Zenith

Zenith 2104W User manual

Zenith 2626NN User manual

Zenith

Zenith 2626NN User manual

Zenith W24 User manual

Zenith

Zenith W24 User manual

Zenith 8665SWP User manual

Zenith

Zenith 8665SWP User manual

Zenith 2131NNWIL User manual

Zenith

Zenith 2131NNWIL User manual

Zenith 35603BN06 User manual

Zenith

Zenith 35603BN06 User manual

Zenith Designer Series User manual

Zenith

Zenith Designer Series User manual

Zenith 2131NN User manual

Zenith

Zenith 2131NN User manual

Zenith 700L User manual

Zenith

Zenith 700L User manual

Zenith 7803STBB User manual

Zenith

Zenith 7803STBB User manual

Zenith 9006BN User manual

Zenith

Zenith 9006BN User manual

Zenith 9070BN User manual

Zenith

Zenith 9070BN User manual

Zenith 5804B User manual

Zenith

Zenith 5804B User manual

Zenith 35601BN06 User manual

Zenith

Zenith 35601BN06 User manual

Zenith 2501W User manual

Zenith

Zenith 2501W User manual

Popular Bathroom Fixture manuals by other brands

Hans Grohe Versostat 15345000 Instructions for use/assembly instructions

Hans Grohe

Hans Grohe Versostat 15345000 Instructions for use/assembly instructions

Nova 8341-R manual

Nova

Nova 8341-R manual

Tavistock SIREN TSN32 INSTALLATION & CARE INSTRUCTIONS

Tavistock

Tavistock SIREN TSN32 INSTALLATION & CARE INSTRUCTIONS

Hans Grohe 14445180 Instructions for use/assembly instructions

Hans Grohe

Hans Grohe 14445180 Instructions for use/assembly instructions

Toto TRADITIONAL COLLECTION B Series Installation and owner's manual

Toto

Toto TRADITIONAL COLLECTION B Series Installation and owner's manual

AM.PM AWE manual

AM.PM

AM.PM AWE manual

Signature Hardware BERWYN 953647 manual

Signature Hardware

Signature Hardware BERWYN 953647 manual

NORMBAU Inox Care 2050 010 Fixing instructions and directions for use

NORMBAU

NORMBAU Inox Care 2050 010 Fixing instructions and directions for use

Hans Grohe Raindance Select Showerpipe 27286000 Instructions for use/assembly instructions

Hans Grohe

Hans Grohe Raindance Select Showerpipe 27286000 Instructions for use/assembly instructions

Toto TC392V Installation instructions manual

Toto

Toto TC392V Installation instructions manual

Kinedo Kinemagic Royal 2 DES1307NG-A installation instructions

Kinedo

Kinedo Kinemagic Royal 2 DES1307NG-A installation instructions

OVE TOLEDO 60 TD installation manual

OVE

OVE TOLEDO 60 TD installation manual

Presto 55081 Installation and startup

Presto

Presto 55081 Installation and startup

Lefroy Brooks CW-1020 Installation, operating,  & maintenance instructions

Lefroy Brooks

Lefroy Brooks CW-1020 Installation, operating, & maintenance instructions

Gessi 48112 manual

Gessi

Gessi 48112 manual

Glacier bay 20203-9010H Use and care guide

Glacier bay

Glacier bay 20203-9010H Use and care guide

Peak 9346376020114 user manual

Peak

Peak 9346376020114 user manual

Ronbow E012427 Installation and care guide

Ronbow

Ronbow E012427 Installation and care guide

manuals.online logo
manuals.online logoBrands
  • About & Mission
  • Contact us
  • Privacy Policy
  • Terms and Conditions

Copyright 2025 Manuals.Online. All Rights Reserved.