ZOJE AM-5770A-410 User manual

OPERATION MANUAL
ZJ-AM-5770A(H)-410
AUTOMATIC MOLD SEWING MACHINE

目录
Contents
I、规格
....................................................................................................................... 1
Specifications........................................................................................................1
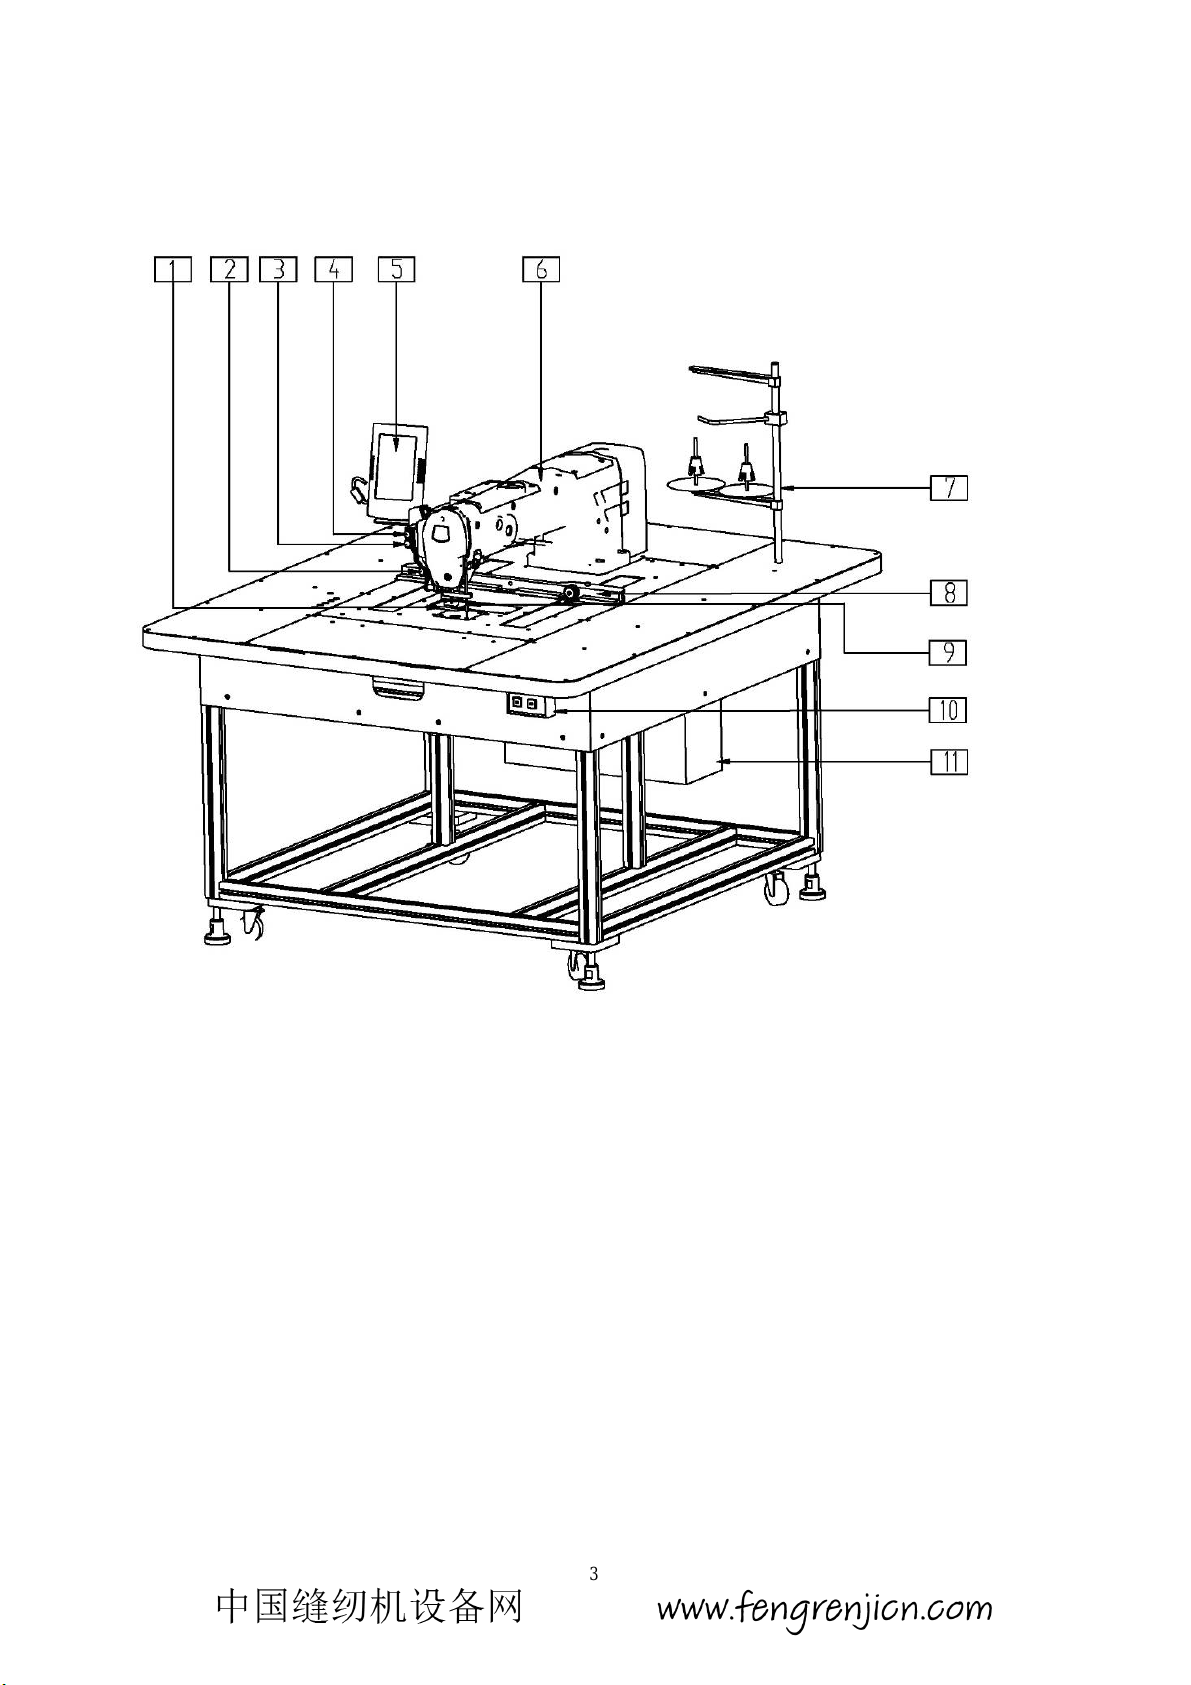
II、 各部的名称........................................................................................................... 3
Names of parts.......................................................................................................3
III、拆箱........................................................................................................................4
Unpacking.............................................................................................................. 4
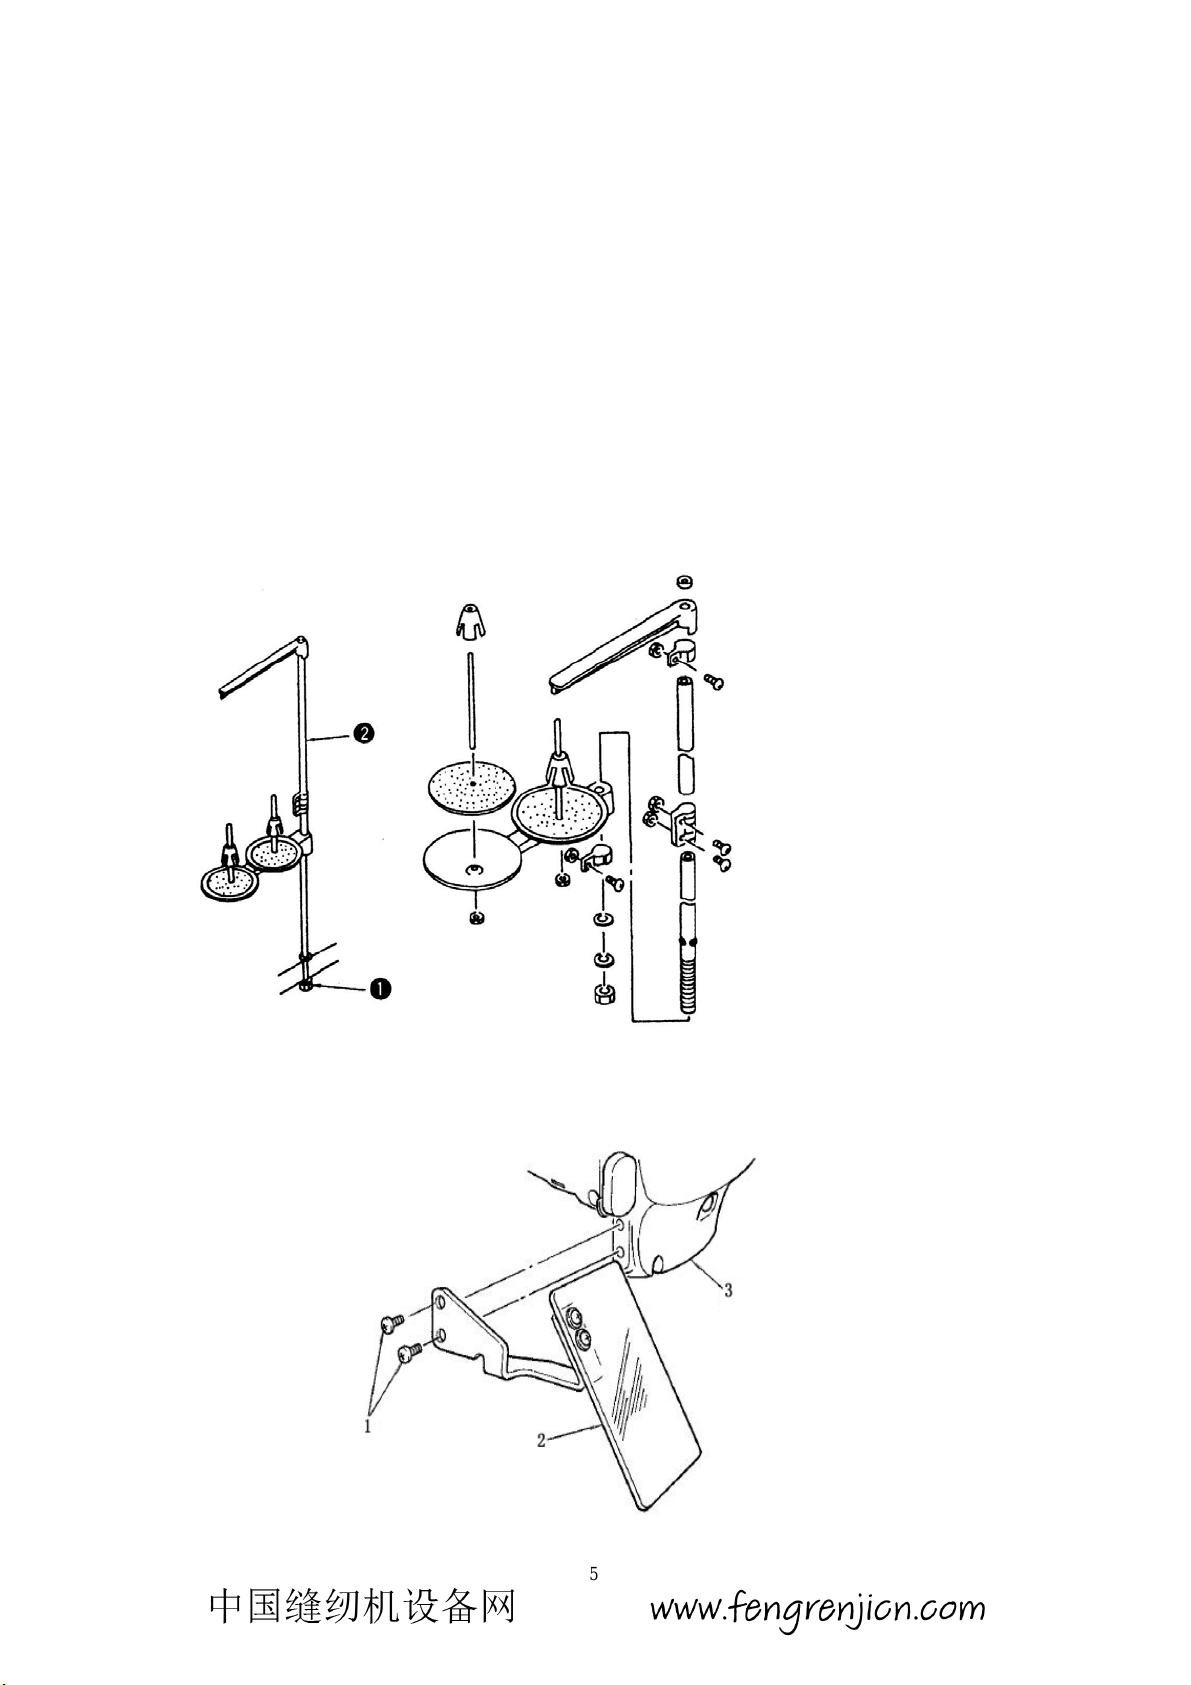
IV、安装.......................................................................................................................5
Installation..............................................................................................................5
V、 模板的制作...........................................................................................................6
Making of Template............................................................................................... 6
VI、缝纫准备................................................................................................................8
Sewing Preparation................................................................................................ 8
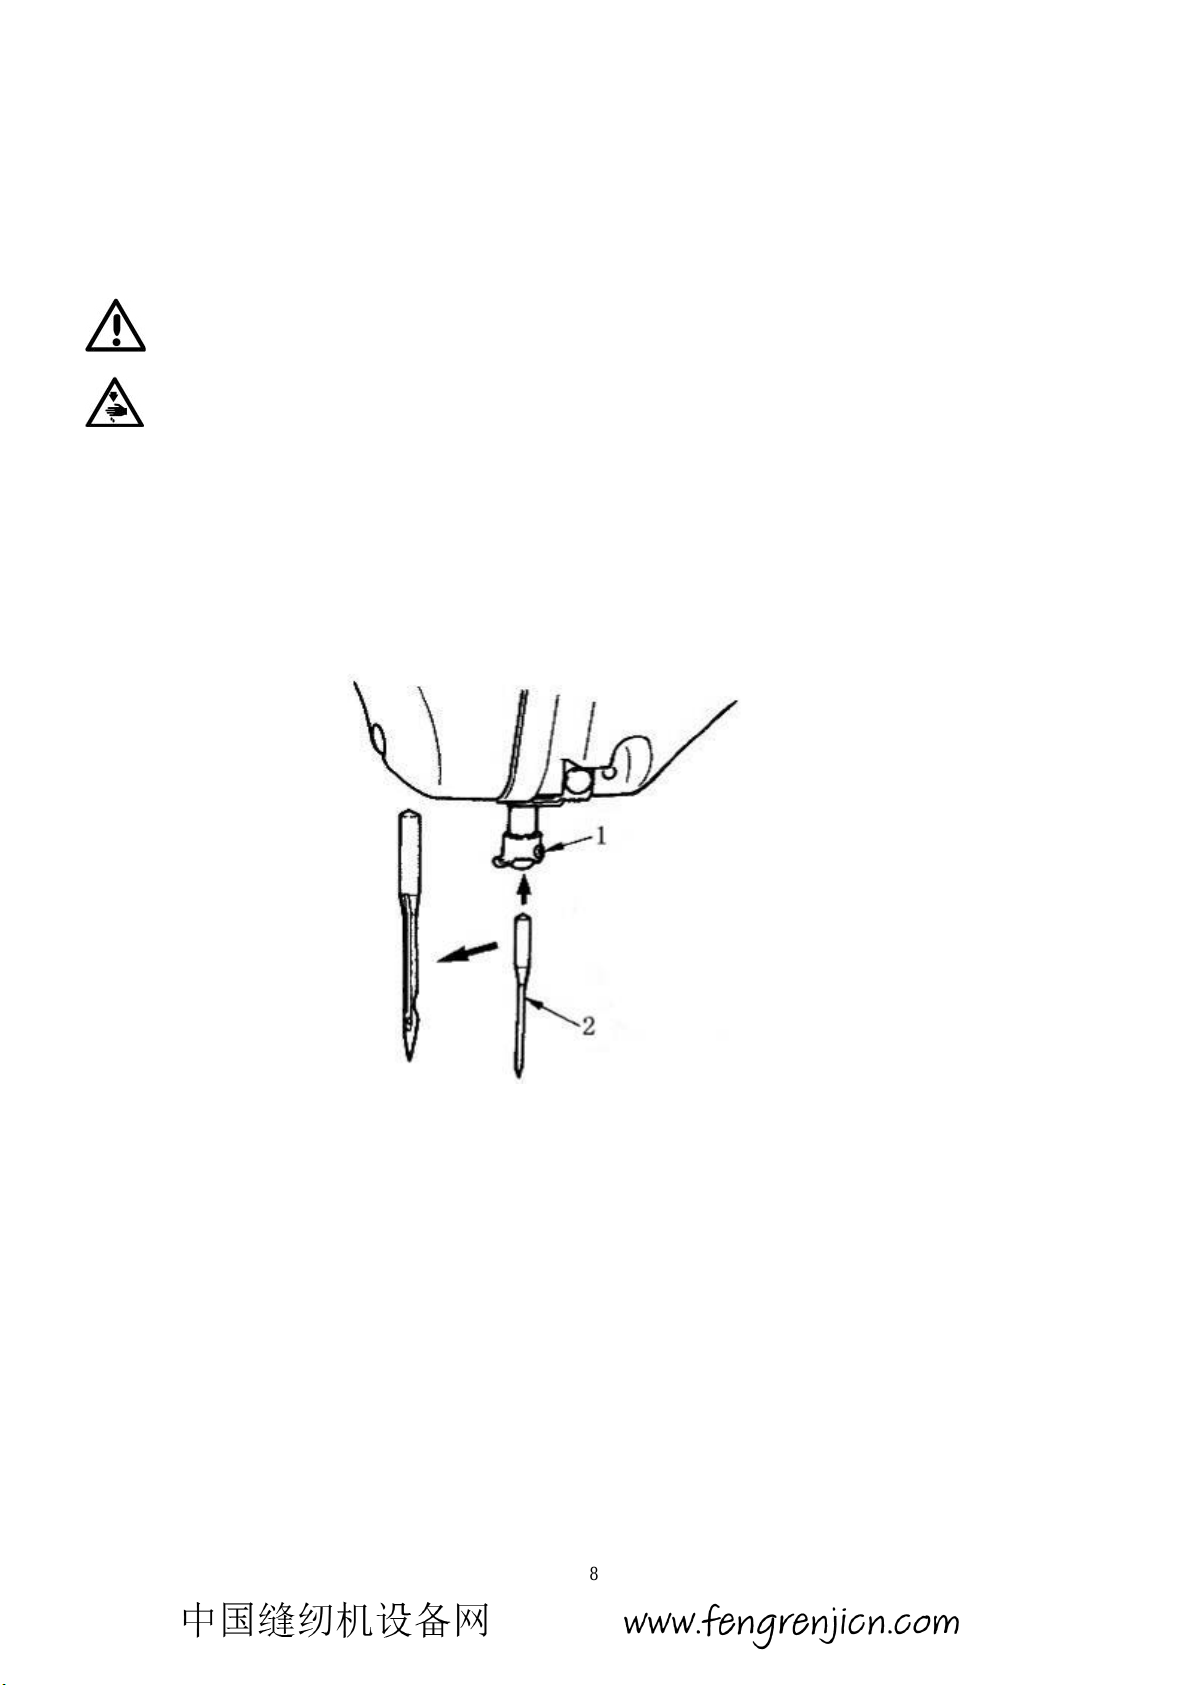
1、 机针的安装方法..............................................................................................8
Attaching the needlel........................................................................................8
2、 上线的穿线方法.............................................................................................. 8
Threading the machine head............................................................................ 8
3、 梭芯的安装方式.............................................................................................. 9
Installing the bobbin.........................................................................................9
4、 线张力的调整方法........................................................................................ 10
Broken stitching pickup plate.........................................................................10
5、 挑线弹簧的调节............................................................................................ 11
Adjusting the take-up spring.......................................................................... 11
6、 中压脚高度的设置........................................................................................ 11
Setting up the height of middle presser foot...................................................11
7、 压脚压力的调节............................................................................................ 12
Presser foot pressure...................................................................................... 12
8、辅助压脚的调节............................................................................................13
Adjusting the auxiliary presser foot...............................................................13
9、中压脚的上下行程调节................................................................................13
Adjusting the vertical stroke of the intermediate presser...............................13
VII、保养方法............................................................................................................ 14
Maintenance Method............................................................................................14
1、 针杆、压杆部润滑脂补充............................................................................ 14
Needle bar, pressure lever grease replenishing.............................................. 14
2、 中压脚提升部润滑脂补充............................................................................ 15
Presser foot lifting parts grease replenishing..................................................15
3、X、Y向齿轮部润滑脂补充..........................................................................15
Adding grease to gears (directions X, Y).......................................................15
4、 花键轴、导向轴润滑脂补充........................................................................ 16
Adding grease to the spline shaft and guiding axle........................................16

1
I、规格
规格 AM-5770A-410 AM-5770AH-410 AM-5770A-750 AM-5770AH-750
缝制范围 X向无限,Y向410mm X 向无限,Y向750mm
最高缝纫速度 2200rpm(间距在 3.5mm 以内)
缝迹长度 0.1~12.7mm
压脚模板送布 间断送布(脉冲马达双轴驱动方式)
针杆行程 38mm 40mm 38mm 40mm
旋梭 1倍旋梭 2倍旋梭 1倍旋梭 2倍旋梭
机针 DP×5 7#~10#
压框高度 10mm
辅助压脚高度 10mm
中压脚行程 标准 4mm(0~10mm)
中压脚上升量 20mm
可以变更中压脚上
下位置 0~7mm
供油方式 面部:润滑脂 旋梭:10 号白油微量供油 齿轮箱:壳牌 22 号液压油
花样存储 最大存储 999 个花样
模板识别功能 可识别 255 个模板
暂停功能 可以在缝纫途中停止
缝纫速度 600~2200rpm
花样选择功能 图案 NO.选择方式(1~999)
底线计数器 加数计数/减数计数方式(0-9999)
缝制计数器 加数计数/减数计数方式(0-9999)
存储器后备 切断电源时,自动地记忆使用的图案
主轴电机 550W 伺服电机
外形尺寸 1530×1250×1320
重量 400kg 530kg
消费电力 0.5KW
使用温度/湿度范围 温度:5℃~40℃ 湿度:20%~80% (无结露)
电源电压 额定电压±10%50 /60 Hz
使用气压压力 0.5~0.55 MPa
气压消耗量 1.8dm3/min
针杆上死点停止功能 缝制结束后,可以让针杆回到上死点位置

2
Specifications
Specifications AM-5770A-410 AM-5770AH-410 AM-5770A-750 AM-5770AH-750
Sewing range X direction unlimited Y direction410mm X direction unlimited Y direction750mm
Max. sewing speed 2200rpm(spacing within 3.5mm)
Stitching length 0.1~12.7mm
Presser-foot template
cloth feeding Intermittent cloth feeding (double-shaft drive mode by pulse motor)
Need bar stroke 38mm 40mm 38mm 40mm
Shuttle Standard hook Large hook Standard hook Large hook
Needle used DP×5 7#~10#
Ascent of pressure frame 10mm
Ascent of auxiliary
presser foot 10mm
Intermediate presser
stroke 4 mm (Standard)(0~10mm)
Lift of intermediate
presser 20mm
Intermediate presser
down position variable 0~7mm
Oil used Appearance:Lubricating grease Hook:10#while oil Gear Box:Shell 22#
Pattern data memory Capable of storing 999 patterns at most
Template recognition
function Capable of recognizing 255 template at most
Pause function Stop the sewing machine in process of sewing
Sewing speed limitation 600~2200rpm
Pattern selection
function Pattern-number selection mode (1~ 999)
Bottom thread counter Count-up/down mode (0-9999)
Sewing counter Count-up/down mode (0-9999)
Memory back-up Capable of store the patterns used in case of power cut
Sewing machine motor 550W servomotor
Overall dimensions 1530×1250×1320
Weight 400kg 530kg
Power consumption 0.5KW
Operating
temperature/humidity
range
Temperature:5℃~40℃Humidity:20%~80% ((No dew condensation)
Line voltage Rated voltage ±10%50 / 60 Hz
Air pressure 0.5~0.55 MPa
Air consumption 1.8dm3/min
Top-dead-center
needle-rod stopping
function
Capable enabling the needle rod to return to its top dead center position when sewing is over

3
II、 各部的名称
Names of parts
图1Figure1
1、辅助压脚 Auxiliary presser foot
2、急停开关 Emergency stop switch
3、启动按钮 Start button
4、压框按钮 Pressure frame button
5、操作屏 Operation panel
6、缝纫机机头 Sewing machine head
7、二线架及辅助线架 Two-thread stand and auxiliary thread stand
8、压框 Pressure frame
9、记号笔 Marking pen
10、电源开关 Power switch
11、电控箱 Electric cabinet

4
III、拆箱
Unpacking
步骤 1、撬开板扣①,卸下 4块围板②;
Step 1: pry open board buckle ①, and remove 4 lateral plates ②;
⑤
③
④
⑥
①
②
齿轮箱油量加油口
Oil filling port of
gear case oil

5
步骤 2、松开固定板③,敲出支撑条④;
Step 2: Unclamp retaining plate ③, and knock out support rod ④;
步骤 3、将脚座⑥拧离托盘⑤,然后将机器推下托盘;
Step 3: Screw off foot stand ⑥on pallet ⑤, and move the machine out of the pallet;
IV、安装
Installation
1. 线架装置的安装方法/Installing the thread stand
组装线架装置,将它安装在台板的右上方的孔内。
Assemble the thread stand, and put it in the hole in the top left corner of the machine table.
2. 眼睛防护罩的安装/Installing the eye protection cover
请一定要用螺钉 1将眼睛防护罩 2安装到缝纫机面板 3之后再使用缝纫机。
Use eye protection cover 2 after securely attaching it on face plate cover 3 with screw 1.

6
V、 模板的制作
Making of Template
1、模板识别块的制作尺寸/The making size of template identification
2、 模板的制作尺寸/Template making size

7
装配模板导轨后的尺寸/The size of assembled template guide rail
注意:装配后请勿小于此尺寸,否则会造成模板的损坏。
Note:Not allowed smaller size after assembled,

8
VI、 缝纫准备
Sewing Preparation
1、 机针的安装方法/ Attaching the needle
注意:为了防止缝纫机的意外启动,请关掉电源之后再进行操作。
Warning: Turn OFF the power before starting the work so as to prevent accidents caused by abrupt
start of the sewing machine.
松开螺钉 1,把机针 2的长沟朝向面前,放进针杆的深处,然后拧紧固定螺钉 1。
Loosen setscrew 1 and hold needle 2 with the long groove facing toward you. Then fully insert it into the
hole in the needle bar, and tighten setscrew 1.
*注意:为了防止机器突然启动造成人身事故,请一定关掉电源后进行操作。
*WARNING: Turn OFF the power before starting the work so as to prevent accidents caused by
abrupt start of the sewing machine.
2、 上线的穿线方法/ Threading the machine head
缝纫前请按图所示穿好线。
Before the machine work thread the machine head as shown in the figure.

9
*注意:为了防止机器突然启动造成人身事故,请一定关掉电源后进行操作。
*WARNING: Turn OFF the power before starting the work so as to prevent accidents caused by
abrupt start of the sewing machine.
3、 梭芯的安装方式/ Installing the bobbin
注意:为了防止缝纫机的意外启动,请关掉电源之后再进行操作。
Warning: Turn OFF the power before starting the work so as to prevent accidents caused by abrupt
start of the sewing machine.
1) 把梭心 1按图示的方向装入梭壳 3中。
Set the bobbin 1 into bobbin case 3 in the direction shown in the figure.
2) 把线穿过梭壳 3的穿线口 2,然后拉线,把线从线张力弹簧下面的过线口 4穿出来。
Pass the thread through thread slit 2 of the bobbin case 3, and pull the thread as it is. By so doing, the
thread will pass under the tension spring and be pulled out from thread hole 4.
3) 拉底线时,梭芯应按箭头向转动。
Check that the bobbin rotates in the direction of the arrow when thread is pulled.

10
*注意:若梭心装入的方向相反,缝制过程中底线会不稳定。
*Caution: If the bobbin is installed in the bobbin case orienting the reverse direction, the bobbin
thread pulling out will result in and inconsistent state.
4、 线张力的调整方法/ Adjusting the thread tension
用1调节面线张力,用 2调节底线张力。
Adjust needle thread tension with 1 and bobbin thread tension with 2.

11
5、 挑线弹簧的调节/Adjusting the thread take-up spring
1) 移动量的调节松开螺钉 1,转动夹线器向右转动,动作量变大,拉线量变多。
Adjusting the stroke loosen setscrew1,and turn thread tension asm. 2. Turning it clockwise will
increase the moving amount and the thread drawing amount will increase.
2) 强度的调节改变挑线弹簧 3的强度时,请在螺钉 1在锁紧的状态下,用螺丝刀调节线张力杆 4,
向右转动,挑线簧强度变强,向左转动之后,强度变弱。
Adjusting the pressure to change the pressure of the thread take-up spring 3, insert a thin screwdriver
into the slot of thread tension post 4 while screw 1 is tightened, and turn it. Turning it clockwise will
increase the pressure of the thread take-up spring. Turning it counterclockwise will decrease the
pressure.
6、 中压脚高度的设置/Intermediate presser height
按中压脚设定按钮 ,使机针到达最低点时,请用十数字键把中压脚下端与布料的间隙调整为
0.5mm。(中压脚的设定最大范围标准为 7mm。)
Press INTERMEDIATE PRESSER SETTING button and adjust with TEN keys so that the
clearance between the button end of intermediate presser and the cloth is 0.5 mm (max. 7 mm).

12
7、 压脚压力的调节/Presser foot pressure
注意:为了防止缝纫机的意外启动,请关掉电源之后再进行操作。
Warning: Turn OFF the power before starting the work so as to prevent accidents caused by abrupt
start of the sewing machine.
1)旋松调压螺母②顺时针(即 A方向)转动压力脚调节螺钉,压力将增强;
Loosen nut ②,as you turn presser spring regulator ①clockwise(in direction A), the presser foot pressure will be
increased.
2)逆时针(即 B方向)转动压力脚调节螺钉,压力将减弱;
As you turn the presser spring regulator counterclockwise(in direction B), the pressure will be decreased.
3) 调节后旋紧调压螺母②;
After adjustment, tighten nut ②.
4) 对一般布料而言,压脚调节螺钉的标准高度为 32~34 毫米(4.5Kg)。
For general fabrics, the standard height of the presser foot spring regulator is 32 to 34 mm(4.5Kg).

13
8、辅助压脚的调节
Adjusting the auxiliary presser foot
将辅助压脚的底部调整到能把夹有缝料的模板压实为宜。辅助压脚的气压调整到 0.2Mpa。
Adjust the bottom of auxiliary presser foot such that the template with clamped sewing materials may
be held down securely. Adjust the air pressure of auxiliary presser foot to 0.2Mpa.
9、中压脚的上下行程调节\Adjusting the up/down strokes of middle presser foot
1) 取下面罩。
Remove face cover.
2) 转动皮带轮,把针杆移动到下死点。
Turn hand wheel to make the needle bar come down to its lowest point.
3) 拧松平头螺丝 ,把平头螺丝 的位置向 A方向移动,行程变大。
Loosen hinge screw and move it to the direction A to increase the stroke.
4) 刻点 与垫片 的外周右侧一致时行程为 4mm,与刻点 一致时行程为 7mm。
When marker dot is aligned with the right side of the outer periphery of washer , the vertical
stroke of the intermediate presser becomes 4 mm. And, when marker dot is aligned with the
right side of the outer periphery of the washer, it becomes 7 mm
(工厂出货时调节为 3mm。)
(The vertical stroke of the intermediate presser is factory-set to 4 mm at the time of delivery.)

14
VII、保养方法
Maintenance Method
请定期(建议不超过 2个月)向指定部位补充润滑脂。由于清扫缝纫机等原因造成润滑脂减
少时,请立即加以补充。
Regularly add grease to the designated site (usually no more than three months). Reduced grease
which is caused by cleaning sewing machines, please supplemented immediately.
1、 针杆、压杆部润滑脂补充\Needle bar, pressure lever grease replenishing
打开面板,拆下中压脚辅助弹簧 1。向针杆 2四周涂抹润滑脂。然后请用手转动手轮让润滑
脂涂满整个针杆四周。向箭头 A方向转动针杆上轴套润滑脂护罩 3,从注入口充填润滑脂。
充填完毕后,向箭头 B方向转动针杆上金属部润滑脂护罩,返回到原来的位置。
Open the panel; remove the medium presser foot auxiliary spring 1. Apply grease to the needle bar
2. Then please turn the hand-wheel to grease all the needle bar. Roll the cover 3 on needle bar axis
guide in the direction A, filling grease from the sprue. After the completion of filling, Roll the
cover on needle bar axis guide in the direction B, returning to its original position.
卸下针杆下轴套润滑脂孔固定螺丝 4,向 孔 5里注入润滑脂,然后拧紧固定螺丝 4,让润滑脂
充填到轴套内。向针杆滑块槽 6也涂抹润滑脂。向压杆四周 7上也涂抹润滑脂。卸下压杆轴
套润滑脂孔固定螺丝 8,向 孔 9里注入润滑脂。然后拧紧固定螺丝 8,让润滑脂充分填到轴套
内。
Unload screw 4 on needle bar lower axis guide, injected grease to hole 5, then tighten the screw 4,
let the grease filling in the sleeve. Apply grease to the needle bar slip plate slot 6 and also the
pressure lever 7; Unload screw 8, injected grease to hole 9. Then tighten the screw 8, let the grease
full fill in the sleeve.

15
2、中压脚提升部润滑脂补充\Presser foot lifting parts grease replenishing
打开机头面板,请向毡垫部(3 处)及其四周的平头螺丝、支点 1~7和导向槽 8里补充润
滑脂。
Open head panel, add grease to the felt pad (3 part), the grub screws around, fulcrum 1 to 7 and the
guide slot 8.
3、X、Y向齿轮部润滑脂补充\Adding grease to gears (directions X, Y)
打开后挡板,用针筒将润滑脂打入齿轮处,并轻轻转动,保证能够均匀的涂在齿轮表面。
Open the back board, use a needle cylinder to inject grease onto the gears, and turn the gears gently

16
to guarantee that the grease may be applied onto the gears evenly.
4、花键轴、导向轴润滑脂补充\Adding grease to the spline shaft and guiding axle
打开黑色滑移板,在花键轴②沟槽及导向轴①表面涂上适量润滑脂,同时前后拉动送料组件,
保证能够均匀的涂在轴的表面。
Open a black sliding board, apply right amount of grease into the groove of the spline shaft and
onto the surface of guiding axle, and push the material feeding subassembly backwards and
forwards simultaneously to guarantee uniform application.
注:分布在机头对称的两边。
Note: It is symmetrically distributed on both sides of the machine head.
Direction-Y motor gear Direction-X motor gear
This manual suits for next models
3
Table of contents
Other ZOJE Sewing Machine manuals