manuals.online logo
Brands
  1. Home
  2. •
  3. Brands
  4. •
  5. ZOJE
  6. •
  7. Sewing Machine
  8. •
  9. ZOJE ZJ-M6-GS900-SF-LK2-V2 User manual

ZOJE ZJ-M6-GS900-SF-LK2-V2 User manual

General Introduction Template machine - Touch screen E2
1
1 General Introduction
1.1 General
Automatic template machine series industrial sewing machine computer control system, spindle motor
with the world's advanced level of ac servo control technology drive, with large torque, high efficiency, speed
stability and low noise characteristics. The diversified design of operation panel can meet the matching
requirements of different customers; The system adopts German structure design, easy to install and
maintain, the system control software can be upgraded through remote communication, convenient for users
to improve the product performance.
Template machine - Touch screen E2 General Introduction
2
1.2 Functions & Specifications
NO.
Type of Controller
ASC400 Computerized Control System for Pattern Sewing Machine
1
Sewing Range
X(Left/Right) YFront/Back¥
1300 x 800
2
Max Sewing Speed
3200rpmwhen sewing pitch is below 3mm¥
3
Stitch Length
0.1Ǩ12.7mmMin. Resolution : 0.05mm¥
4
Presser Feeding Motion
Intermittent Feed (2-shaft drive by stepping motor)
5
Stroke of Needle Bar
41.2mm
6
Needles
DP×5)DP×17
7
Lift of Feeding Frame
Max 25mmPneumatic type: Max 30mm¥
8
Intermediate Presser Stroke
Standard 4mm0Ǩ10mm¥
9
Lift of Intermediate Presser
20mm
10
Shuttle
Double-capacity semi-rotary hook
11
Memory of Pattern Data
U Disk
12
Pause Function
Used to stop machine during the sewing
13
Scale Function
Enable a pattern to be enlarged or reduced in X or Y direction
individually when sewing a pattern
Scale: 1ǺǨ400Ǻadjust 0.1Ǻin each step¥
14
Scale Method
Method for changing the length of each sewing stitch
15
Limitation of Sewing Speed
200Ǩ3200rpmchange 100rpm in each step¥
16
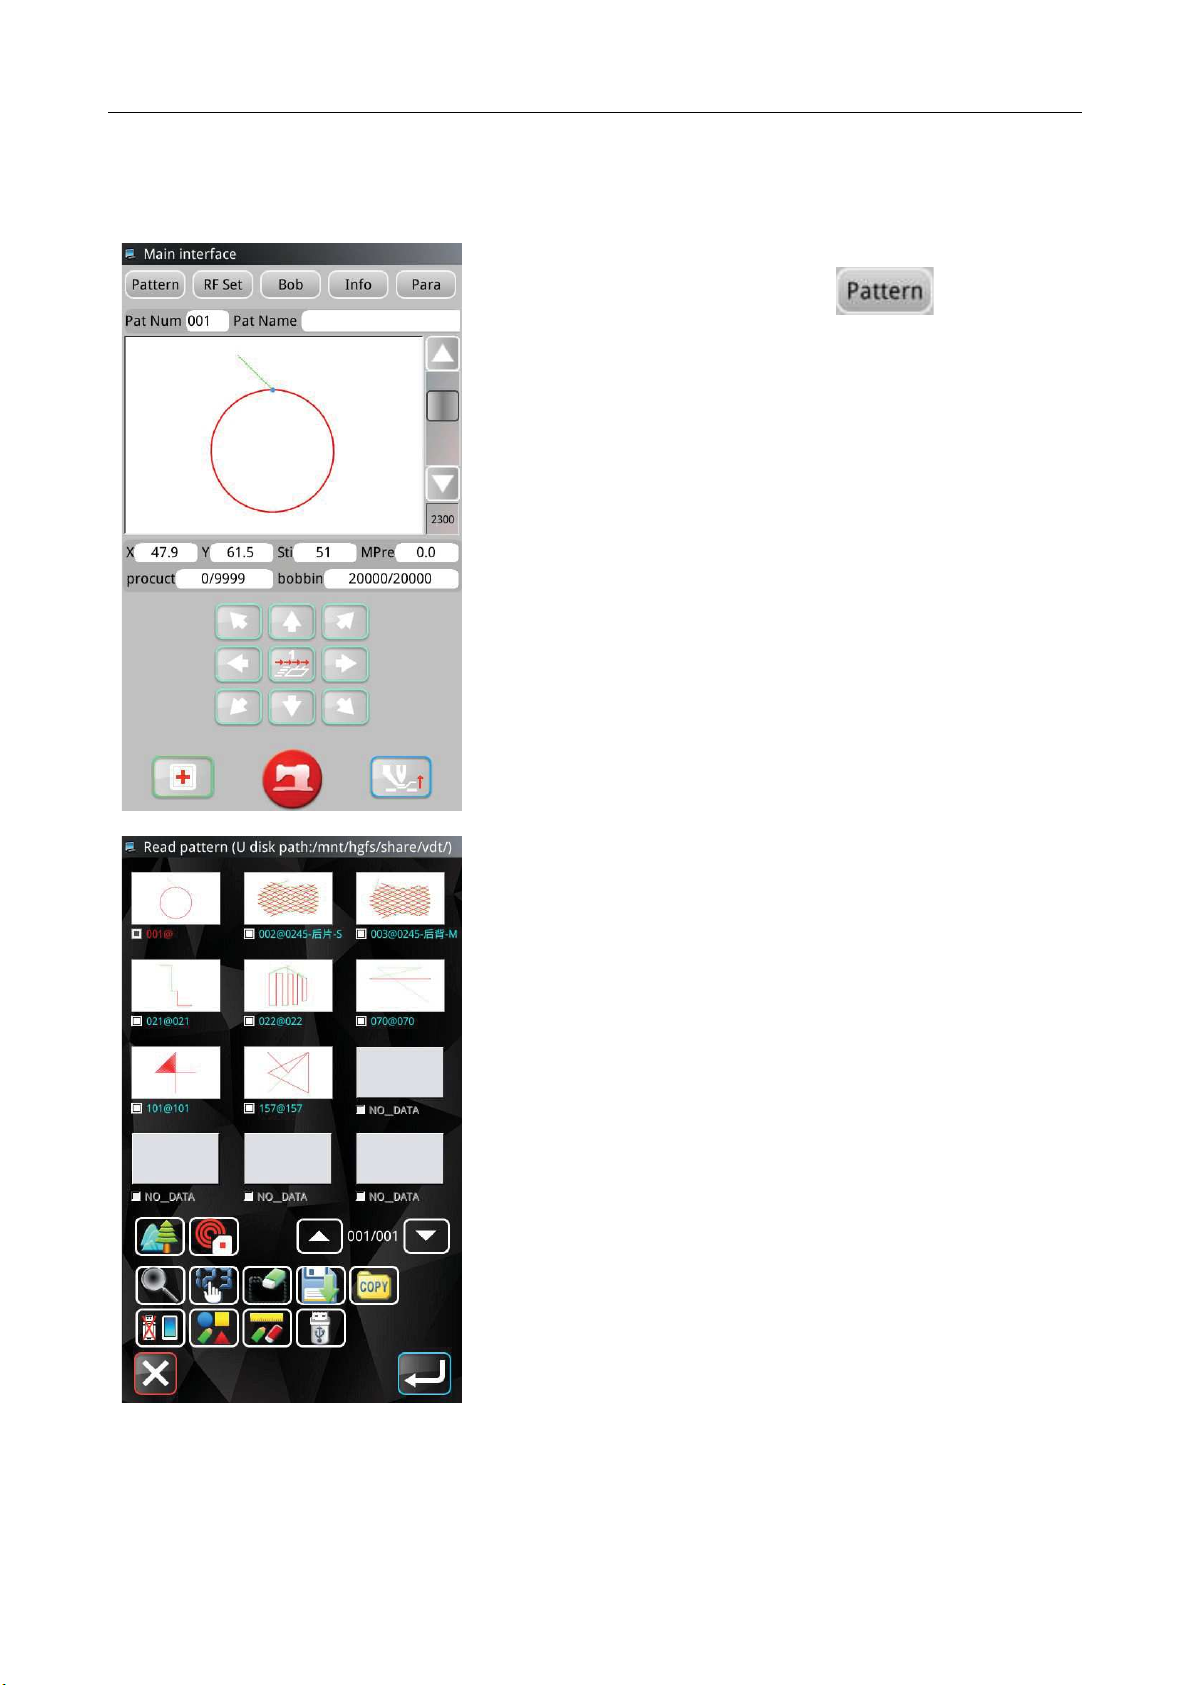
Function for Selecting
Pattern
Pattern Number Selection Method
17
Bottom Thread Counter
Up/Down Method0Ǩ65535¥
18
Sewing Counter
Up/Down Method0Ǩ9999¥
19
Setting of 2nd Origin
Use manual switch to move the needle to a random position within
the sewing range and set that position as 2nd origin.
20
Sewing Motor
Servo Motor
21
Function of stopping needle
at highest position
After the completion of sewing, the needle can be brought up to its
highest position.
22
Power Consumption
600W
23
Operation Temperature
Range
0éǨ45é
24
Operation Humidity Range
35%Ǩ85% No Dew Condensation¥
25
Line Voltage
AC 220V ± 10%ǘ50/60Hz
Effective standard for product:QCYXDK0004—2016ȎComputerized Control System for Industrial Sewing
MachineȐ.
General Introduction Template machine - Touch screen E2
3
1.3 The main interface
After starting up, the machine will directly enter the interface of pattern selection. Click to enter the
interface of pattern sewing.
Pattern selection interface
Pattern sewing interface
Template machine - Touch screen E2 General Introduction
4
1.4 Operation Method
The touch screen operation panel adopts the advanced touch operation technology in the industry,
integrates the pressing frame of the pedal, the solid buttons of the start and emergency stop switch functions,
and the friendly interface and convenient control all bring revolutionary changes to the daily use of users.
The user can touch the screen with a finger or other object to complete the corresponding operation. Users
should pay attention to avoid using sharp objects to touch the screen in the process of use, so as to avoid
permanent damage to the touch screen
General Introduction Template machine - Touch screen E2
5
1.5 Quick introduction to sewing
Boot will be directly into the [pattern selection] interface.
Click the "pattern management" key in the interface
of "pattern selection" to enter the interface of "pattern reading".
In the "read pattern" interface, you can select the pattern you
want to sew
Template machine - Touch screen E2 General Introduction
6
Click the pattern you want to sew in the "read pattern" interface
and select the pattern.
Click enter to confirm the pattern and return to the
pattern selection screen automatically.
In the "pattern selection" interface, click to enter the
"pattern sewing" interface.
General Introduction Template machine - Touch screen E2
7
In the interface of pattern sewing, the pattern parameters can be
set.
After setting the pattern parameters, put the corresponding
template in place, first press the "press box" button on the
operation head, and then press the "start" button. After
confirming the correct position of the sewing point, press the
"start" button for the second time to start sewing.
Template machine - Touch screen E2 Pattern selection interface
8
2 Pattern selection interface
After booting, it will directly enter the interface of pattern selection and display basic parameters of pattern.
No.
Function
Description
A
Design
management
Can choose, set pattern parameters, etc
B
The RF
registration
The current pattern can be written to the RF card
C
Winding.
Enter winding mode
D
information
You can view the action header statistics class information
E
Set up the
User parameters can be set
F
Figure no.
Displays the current pattern number
G
Pattern name
Displays the current pattern name
H
Pattern
preview area
Click the pattern preview area to view basic pattern information and
preview patterns
I
X-direction
range
Displays the current pattern X direction range
J
Y-direction
Displays the current pattern Y direction range
Pattern selection interface Template machine - Touch screen E2
9
range
K
Needle
numerical
Displays the total number of current pattern drop points
L
Medium
pressure foot
value
Displays the height of the current pattern middle pressure foot
M
Production
count
Displays the current/set value of the production counter
N
Bottom line
count
Displays the bottom line count
O
Move the box
Movable frame
P
detection
Can enter detection mode, detect input and output and other signals
Q
switch
The pattern sewing interface and pattern selection interface switch to
each other
R
Medium
pressure foot
Lift or lower middle pressure foot
Template machine - Touch screen E2 Pattern selection interface
10
2.1 Pattern preview
In the interface of "pattern selection" or "pattern sewing", click
the pattern preview area to enter the interface of "pattern
preview" and display the following information:
pattern name
②the figure number
③X size
④Y size
⑤pin number
⑥medium pressure foot height
⑦pattern coordinates
Pattern selection interface Template machine - Touch screen E2
11
2.2 Test Mode
In the interface of "pattern selection", click "detect"
to enter the interface of "detect" and turn the page through the
up and down page turning key.
15¥input signal detection
16¥output signal detection
17¥spindle motor calibration
18¥speed detection
19¥XY motor origin detection
20¥medium pressure foot motor detection
21¥detection of wire cutting motor
22¥Continuous operation
9) wire grasping motor detection
10) RFID setting
11) extended function detection
12) multi-function IO detection
13) touch screen calibration
14) liquid crystal detection
Template machine - Touch screen E2 Pattern selection interface
12
2.2.1 Input signal detection
In the interface of "detection", click "input signal detection"
to enter the interface of "input signal detection". You can
observe the changes of input signals of various switches and
sensors by pressing down the switch or blocking sensor.
ON: means open
OFF: means close
0: represents the number entered by barcode scanning. The
default value is 0
Display current input signal status:
(01) start button
(02) push box button
(03) emergency stop button
(04) broken line detection
(05) X origin sensor
(06) Y origin sensor
(07) grab wire origin sensor
(08) grab the line position sensor
(09) middle pressure foot origin sensor
(10) safety switch
(11) triple pedal test
(12) Enter 1
Pattern selection interface Template machine - Touch screen E2
13
(13) Enter 2
(14) Enter 3
(15) Enter 4
(16) Enter 5
(17) Enter 6
(18) Enter 7
(19) Enter 8
(20) barcode scanning and detection
(21) self-starting signal 1
(22) self-starting signal 2
2.2.2 Output signal detection
In the [detection] interface, click "output signal detection"
to enter the [output signal detection] interface, under
which the output status of electromagnet and air valve can be
detected:
(01) dial the line
(02) air shear line
(03) electric wire cutting
(04) frame pressing
(05) medium pressure foot
(06) loose thread
(07) supporting foot presser
(08) air valve output 1
Template machine - Touch screen E2 Pattern selection interface
14
(09) air valve output 2
(10) air valve output 3
(11) air valve output 4
(12) air valve output 5
(13) air valve output 6
(14) flip the foot
(15) auxiliary air valve
2.2.3 Spindle motor correction
Click "spindle motor correction" on the interface of
"test", and the system will prompt you to enter the password. If
the password is entered correctly, you can enter the interface of
"spindle Angle installation test".
Pattern selection interface Template machine - Touch screen E2
15
Under the interface of spindle Angle installation and test, remove
the spindle motor, rotate the hand wheel to swing the needle rod
to the highest point, reinstall the spindle motor, confirm that the
electrical value displayed is within 0-30 ° or 330-360 °, and then
press ok . Otherwise, remove the spindle and repeat the
above operation.
2.2.4 Speed test
In the [detection] interface, click "speed test" to enter
the [speed test] interface.
+Display the current spindle motor "target speed" and
"actual speed"
②The spindle motor speed can be set by clicking "speed
minus" and "speed plus" . After clicking "start"
, the spindle motor will run at the set speed. At this
point, the actual measured speed will be displayed in the "actual
speed" column.
Click stop , and the machine stops running.
Template machine - Touch screen E2 Pattern selection interface
16
Click exit to return to the previous interface.
2.2.5 XY motor origin detection
In the "detection" interface, click "XY motor origin detection"
to enter the "XY origin detection" interface and display
the sensor status and coordinate information:
X origin: display the current ON/OFF state of X origin sensor
according to the state of X origin sensor.
②Y origin: according to the state of the Y origin sensor, display
the current state of the Y origin sensor ON/OFF.
③X absolute coordinates: display X absolute coordinates, the
value will change according to the motor movement
④X relative coordinates: display X relative coordinate value, the
value will change according to the motor movement
⑤Y absolute coordinates: display Y absolute coordinates, the
value will change according to the motor movement
⑥Y relative coordinates: display Y relative coordinate value, the
value will change according to the motor movement
⑦drive motor direction keys: drive motor movement, the top
will follow the absolute value of X/Y and X/Y relative value
⑧Back to the origin
Pattern selection interface Template machine - Touch screen E2
17
Under the "XY origin detection" interface, the "detection" and
"deviation" interfaces can be selected.
The default interface of the system is the [detection] interface,
and the "detection" icon in the interface is shown in blue
, with the following contents:
⑨Installation position of X origin sensor: click "right"
or "left" to switch installation
position of X origin sensor.
⑩X positive direction: click the right "negative"
or "positive" to switch the direction of X positive
direction.
⑪Y positive direction: click the right "positive" or
"negative" to switch the direction of Y positive
direction.
⑫X step Angle fine-tuning: display the current X step Angle
fine-tuning value. Click the value on the right side
to enter the parameter setting interface of U40 X step Angle
fine-tuning:
Enter the value through the number key below the interface, click
"confirm" to confirm the value, and return to the "XY
origin detection" interface, click "back" to cancel the
operation, and return to the "XY origin detection" interface.
In the interface of "XY origin detection", click "restore"
on the right side of X step Angle fine-tuning to restore the value.
⑬Y step away from the Angle of fine-tuning: show the current
step Y values from the Angle of fine-tuning, but by clicking the
right number , enter the interval Angle fine-tuning
U41 Y parameter Settings interface, parameter setting method
and interval Angle of fine-tuning ȒX step Angle fine-tuning.ȓ
Template machine - Touch screen E2 Pattern selection interface
18
In the "XY origin detection" interface, click "offset" to
enter the "offset" interface. The "offset" icon on the interface
shows blue color , and the X-axis origin offset and
Y-axis origin offset are displayed on the interface.
The absolute value of X/Y and relative value of X/Y will be
displayed along with the movement at the top. After the
movement is completed, click "confirm" and the origin
deviation of X/Y axis will be displayed at the value on the right
side of the origin deviation of X axis and the value on the right
side of the origin deviation of Y axis.
X-axis origin offset: display the current X-axis origin offset.
Click the value on the right side to enter the
parameter setting interface of [K189 X-axis origin offset] :
Enter the value through the number key below the interface, click
"confirm" to confirm the value, and return to the "XY
origin detection" interface, click "back" to cancel the
operation, and return to the "XY origin detection" interface.
In the "XY origin detection" interface, click "restore" to
the right of the origin deviation of the X-axis to restore the value.
②Y-axis origin deviation: display the current Y-axis origin
deviation value. Click the value on the right side to
enter the parameter setting interface of [K01 Y-axis origin
deviation]. The parameter setting method is the same as
X-axis origin deviation.
Pattern selection interface Template machine - Touch screen E2
19
2.2.6 Origin detection of middle pressure foot
In the [detection] interface, click "middle pressure foot origin
detection" to enter the [middle pressure foot origin
detection] interface.
Under the interface of "origin detection of middle pressure foot",
the interface of "detection" and "position" can be selected.
The default interface of the system is the [detection] interface,
and the "detection" icon in the interface is shown in blue
, with the following contents:
① medium pressure foot origin state: according to the original
state of medium pressure foot, display the current ON/OFF state
of medium pressure foot origin sensor
② medium pressure foot motor steering: click the right side of
the "positive" or "reverse" , can
switch medium pressure foot motor steering.
③ click "move up" , medium pressure foot move up
④ click "move down" , the foot of the medium pressure
move
Click "origin" and return to the origin
⑤ Click "origin" and return to the origin
Template machine - Touch screen E2 Pattern selection interface
20
Under the interface of "middle pressure foot origin detection",
click "position" to enter the interface of "position".
After entering the interface, the icon is shown as blue .
The interface display is as follows:
Origin state of medium pressure foot: according to origin state
of medium pressure foot, the current ON/OFF state of origin
sensor of medium pressure foot is displayed
②Click "origin" to return to origin
③Click base point and descend to base point
④Medium pressure foot servo height: show the current medium
pressure foot height of follow-up, click the "up" , can
increase the medium pressure foot servo height values, click the
"down" , can reduce the medium pressure foot servo
height value, set up is completed, click the "ok" to
determine the medium pressure foot height of follow-up, click the
"restore" , restore the default medium pressure foot
servo height.

Other ZOJE Sewing Machine manuals

ZOJE ZJ1900DSS-3-04-V4-TP User manual

ZOJE

ZOJE ZJ1900DSS-3-04-V4-TP User manual

ZOJE ZJ9800 User manual

ZOJE

ZOJE ZJ9800 User manual

ZOJE A9200L-D4S-W-CP-Z User manual

ZOJE

ZOJE A9200L-D4S-W-CP-Z User manual

ZOJE ZJ600 User manual

ZOJE

ZOJE ZJ600 User manual

ZOJE ZJ8800A User manual

ZOJE

ZOJE ZJ8800A User manual

ZOJE ZJ2842-BD User manual

ZOJE

ZOJE ZJ2842-BD User manual

ZOJE ZJ20U93 User manual

ZOJE

ZOJE ZJ20U93 User manual

ZOJE ZJ5820 User manual

ZOJE

ZOJE ZJ5820 User manual

ZOJE ZJ-M3-S500-SF-V2 User manual

ZOJE

ZOJE ZJ-M3-S500-SF-V2 User manual

ZOJE ZJ1414 User manual

ZOJE

ZOJE ZJ1414 User manual

ZOJE ZJ2628 User manual

ZOJE

ZOJE ZJ2628 User manual

ZOJE ZN90 User manual

ZOJE

ZOJE ZN90 User manual

ZOJE ZJ-M3-S500-SF-V2 User manual

ZOJE

ZOJE ZJ-M3-S500-SF-V2 User manual

ZOJE WR580 User manual

ZOJE

ZOJE WR580 User manual

ZOJE ZJW663A User manual

ZOJE

ZOJE ZJW663A User manual

ZOJE ZJ9700 User manual

ZOJE

ZOJE ZJ9700 User manual

ZOJE A6000-G User manual

ZOJE

ZOJE A6000-G User manual

ZOJE ZJ5300 User manual

ZOJE

ZOJE ZJ5300 User manual

ZOJE ZJ-AM-5775AH User manual

ZOJE

ZOJE ZJ-AM-5775AH User manual

ZOJE 5780BS User manual

ZOJE

ZOJE 5780BS User manual

ZOJE ZJ-M3-S350-SF User manual

ZOJE

ZOJE ZJ-M3-S350-SF User manual

ZOJE ZJ5600N User manual

ZOJE

ZOJE ZJ5600N User manual

ZOJE ZJ9600 User manual

ZOJE

ZOJE ZJ9600 User manual

ZOJE ZJ24028-1 User manual

ZOJE

ZOJE ZJ24028-1 User manual

Popular Sewing Machine manuals by other brands

ELNA Carina instruction manual

ELNA

ELNA Carina instruction manual

Janome MYEXCEL 18W-MW3018 manual

Janome

Janome MYEXCEL 18W-MW3018 manual

Singer 691UTT Operator's guide

Singer

Singer 691UTT Operator's guide

Strobel VEB100-6 Mechanic's instructions

Strobel

Strobel VEB100-6 Mechanic's instructions

Necchi Creator quick start guide

Necchi

Necchi Creator quick start guide

Singer 466K parts manual

Singer

Singer 466K parts manual

Singer 6-2 instructions for timing and adjusting

Singer

Singer 6-2 instructions for timing and adjusting

Singer 740 manual

Singer

Singer 740 manual

JUKI DU-1181N instruction manual

JUKI

JUKI DU-1181N instruction manual

Pfaff Tipmatic 1014 Instruction book

Pfaff

Pfaff Tipmatic 1014 Instruction book

Bernina L460 Workbook

Bernina

Bernina L460 Workbook

JUKI LK-1850 Series instruction manual

JUKI

JUKI LK-1850 Series instruction manual

KANSAI SPECIAL WX Series instruction manual

KANSAI SPECIAL

KANSAI SPECIAL WX Series instruction manual

JUKI LH-3500A series instruction manual

JUKI

JUKI LH-3500A series instruction manual

Janome Continental M17 Instruction book

Janome

Janome Continental M17 Instruction book

Singer 29K71 Service manual and parts list

Singer

Singer 29K71 Service manual and parts list

Singer 410W1 Instructions for using and adjusting

Singer

Singer 410W1 Instructions for using and adjusting

Singer 52-52 parts list

Singer

Singer 52-52 parts list

manuals.online logo
manuals.online logoBrands
  • About & Mission
  • Contact us
  • Privacy Policy
  • Terms and Conditions

Copyright 2025 Manuals.Online. All Rights Reserved.