Zte Z079584505806 User manual

Mobile Hotspot
Z250G
www.zteusa.com
Z079584505806
USER MANUAL

Getting Started................................................................................................... 3
Introduction ........................................................................................................ 3
Outline and Parts................................................................................................ 3
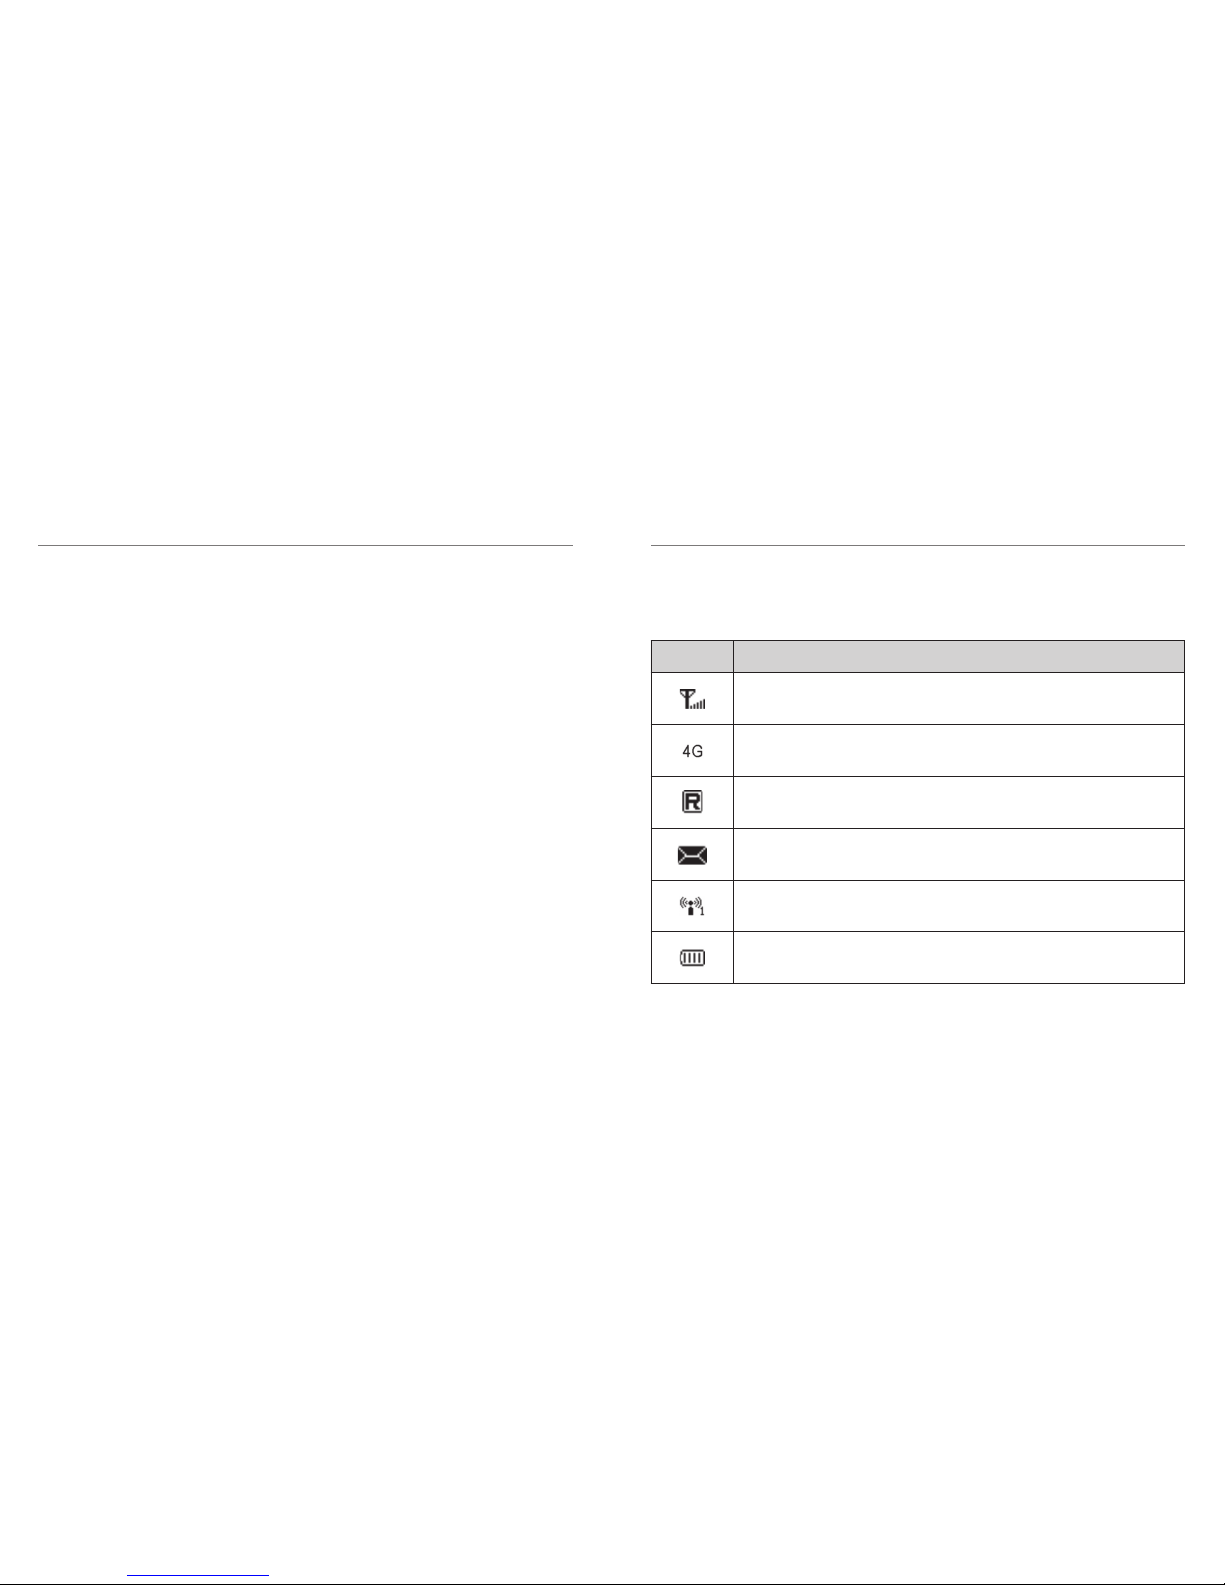
Indicators............................................................................................................ 5
Setting Up Your Device ...................................................................................... 6
Powering On/Off Your Device............................................................................. 7
Sleep Mode ........................................................................................................ 8
Charging Your Device......................................................................................... 8
Internet Access .................................................................................................. 9
Connection Scenario.......................................................................................... 9
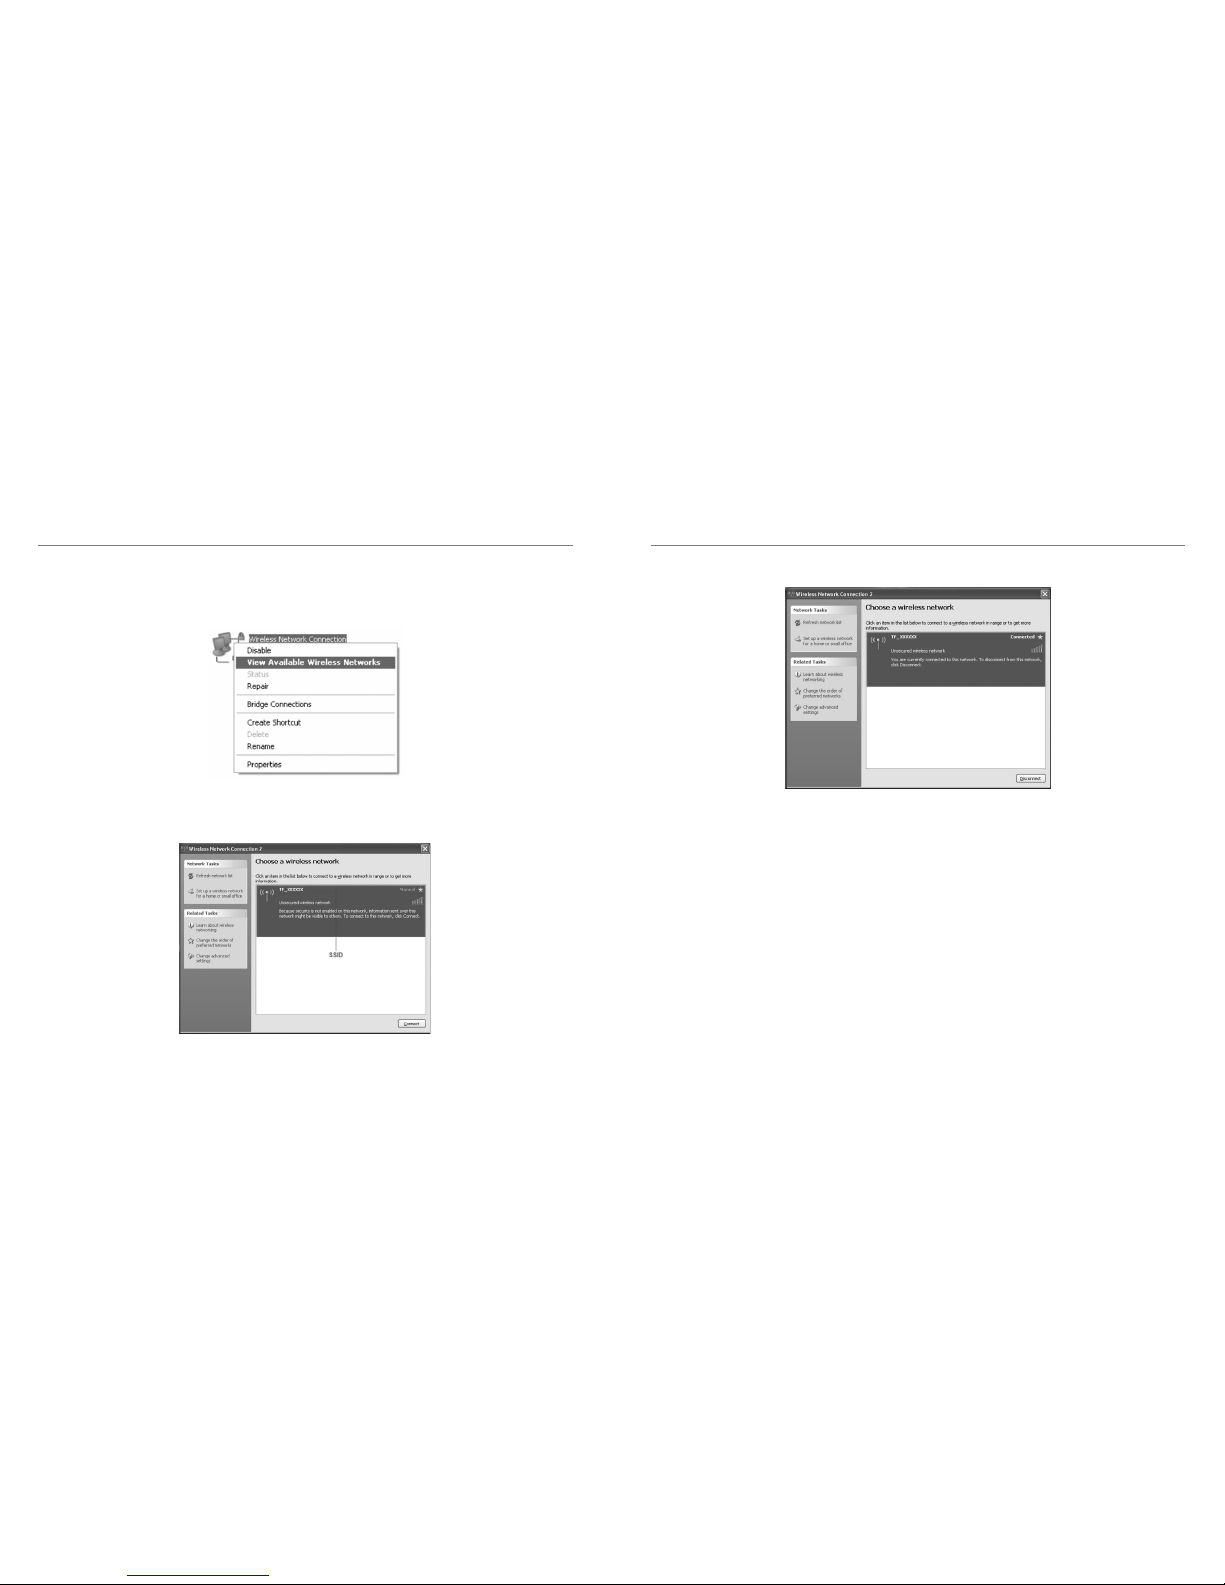
Conguring Your PC..........................................................................................10
Connecting to Your Device................................................................................12
Accessing the Internet.......................................................................................14
Congure Your Device on the Web............................................................15
Accessing the Conguration Page....................................................................15
Login..................................................................................................................16
Settings................................................................................................................17
Verifying the PIN Code ......................................................................................17
Quick Setup.......................................................................................................18
Wi-Fi®Settings................................................................................................. 20
Device Settings ................................................................................................ 23
Firewall ............................................................................................................. 27
Router Settings ................................................................................................ 29
1
Copyright © 2014 ZTE CORPORATION
All rights reserved.
No part of this publication may be excerpted, reproduced, translated or utilized in any form or
by any means, electronic or mechanical, including photocopying and microlm, without the
prior written permission of ZTE Corporation.
The manual is published by ZTE Corporation. We reserve the right to make modications on
print errors or update specications without prior notice.
microSDHC and the microSDHC logo are trademarks of SD-3C, LLC.
Other trademarks and trade names are the property of their respective owners.
Version No.: R1.0
Edition Time: February 2014
NOTE:
Do not use the device in an enclosed environment or where heat dissipation is poor. Prolonged
work in such space may cause excessive heat and raise ambient temperature, which may lead
to automatic shutdown of the device for your safety. In the case of such event, cool the device
in a well-ventilated place before turning on for normal use.
Table of Contents

Getting Started
3
Table of Contents
2
Introduction
ZTE Z250G is a 4G mobile hotspot device, working on GSM/GPRS/EDGE/WCDMA/
HSPA/HSPA+ networks. You can connect your devices to it via Wi-Fi. The device
supports data services, enabling you to communicate anytime and anywhere.
Outline and Parts
The following gure shows the appearance of the device. It is only for your reference.
The actual device may be different.
Information......................................................................................................... 30
Messages........................................................................................................... 31
Operating Messages in Inbox .......................................................................... 31
For Your Safety................................................................................................. 32
To the Owner .................................................................................................... 32
Using Your Device ............................................................................................ 32
Battery Handling............................................................................................... 33
Limited Warranty .............................................................................................. 34
Limitation of Liability ........................................................................................ 34
Radio Frequency (RF) Energy........................................................................... 35
FCC Compliance.............................................................................................. 36
Disposal of Your Old Device............................................................................. 37
Troubleshooting................................................................................................ 38
Right Side Front Left Side Bottom
1. Power Button
2. microSDHC™ Card Slot
3. WPS Button
4. OLED Screen
5. For manufacturing
use only
6. Charger/USB Port
➊
➋
➌
➍➎
➏

Getting Started
4
Getting Started
5
➊Power Button: Press and hold the Power Button to switch the device on
or off.
➋microSDHC Card Slot: Insert a microSDHC card.
➌WPS Button: Start the Wi-Fi Protected Setup authentication process. Press
and hold it for 3 seconds to activate the WPS function.
➍OLED Screen: Indicates the signal type, signal strength, battery, Wi-Fi, etc.
➎For manufacturing use only
➏Charger/USB Port: Charge your device.
NOTE:
RESET YOUR DEVICE: Press the WPS and Power buttons simultaneously until
the OLED screen turns off, and then release the buttons. The device will restart
automatically and revert to the factory default settings.
Indicators
When the device is powered on, the following icons will appear on the OLED
screen. The corresponding indicators are listed in the table below.
ICON INDICATION
Network signal strength
Network type: 3G/4G icon will appear on the OLED screen
according to the network being registered
Roaming network indication
New message received
Wi-Fi status and number of connected users
Battery power indication

Setting Up Your Device
Inserting the Battery
1. Remove the back cover.
2. Insert the battery as shown, with
the contacts located against the
metal springs, and press the
battery down into the case.
3. Close the back cover.
Getting Started
Getting Started
6 7
Inserting a microSDHC Card
1. Pull the microSDHC card cover out of the card slot.
NOTE: Pull the cover gently, as it is connected to the device.
2. Insert a microSDHC card into the microSDHC slot. The following picture shows
the correct inserting direction. You will hear a click when the microSDHC card
locks in place.
3. Close the microSDHC card cover.
Powering On/Off Your Device
Press the Power Button to switch the device on or off.
NOTE: The device is powered on when the OLED screen lights up.

Internet Access
9
Getting Started
8
Connection Scenario
The following picture is an example of device connection. All of these devices can
surf the Internet at the same time.
NOTE: You can only use Wi-Fi to connect to the Z250G device. Make sure the
devices you wish to connect to the Z250G support Wi-Fi.
Sleep Mode
If you enable the Wi-Fi function, use the battery to supply power to the device, and
do not connect to the device within the specied time, the device will enter sleep
mode. In sleep mode, the Wi-Fi function will be disabled. Press the Power or WPS
button to wake up the device and enable the Wi-Fi function.
NOTE: With USB connection, if no Wi-Fi user connects to the device within
the specied time, only the Wi-Fi function will be disabled. Press the Power or
WPS button to enable this function.
Charging Your Device
You can charge your device by using the USB cable or adapter.
NOTE: The plug only ts one way to connect your device. Do not use excessive
force to insert the plug.

3. Select Internet Protocol (TCP/IP), and then click Properties.
4. Select Obtain an IP address automatically and Obtain DNS server address
automatically, and then click OK to nish the conguration.
Internet Access
Internet Access
10 11
Conguring Your PC
Follow the following steps and gures for Windows®XP to congure the Wireless
Internet Protocol for your connection. Steps may vary if you have a different
operating system.
NOTE: Wireless Network Connection is used for Wi-Fi connection.
1. Right-click My Network Places, and then select Properties.
2. Right-click Wireless Network Connection, and then select Properties.

4. Your computer will then connect to the Z250G device.
Using the WPS (Optional)
If your computer or other Wi-Fi enabled device supports WPS, you don’t have to
input the password manually.
1. Power on the Z250G device and the device you wish to connect.
2. Enable Wi-Fi on the device you wish to connect to the Z250G device.
3. Press and hold the WPS Button on the Z250G device to start the Wi-Fi
Protected Setup authentication process.
4. Enable the WPS function on the device you wish to connect to respond to this
authentication process.
5. Follow the system prompts on your device to nish the connection.
NOTE:
If the current security mode of the device is OPEN, the WPS function will
be disabled.
Internet Access
Internet Access
12 13
Connecting to Your Device
1. Power on your device. It will take 1-2 minutes to initialize.
2. Use your normal Wi-Fi application to search for available wireless networks.
NOTE: To obtain an IP address automatically, refer to the section “Conguring
Your PC.”
3. Select the SSID of your device, and then click Connect.
NOTE: Please check the label on your device to get the default SSID.

For the detailed operations about your device, please refer to the device’s
instruction manual.
Accessing the Internet
1. Power on the Z250G device.
2. Connect your computer or other Wi-Fi enabled device to the Z250G device.
3. After the devices are successfully connected, you can access the Internet
automatically.
NOTE: To change the Z250G device’s settings, log in to the conguration page at
http://192.168.0.1 or http://mobile.hotspot.Check the label on the device to get
the default password.
Accessing the Conguration Page
1. Make sure your device is connected to the Z250G device.
2. Launch the Internet browser and enter http://192.168.0.1 or
http://mobile.hotspot in the address bar.
NOTE: It is recommended that you use Internet Explorer®(7.0 or later), Firefox®
(15.0 or later), Opera™ (10.0 or later), Safari®(4.0 or later), or Google™ Chrome™
(10.0 or later).
3. The login page appears as follows. The following gure is only for your
reference.
Congure Your Device on the Web
Internet Access
14 15

Login
On the conguration page, select the desired language and input the password
(check the label on the device to get the default password). Click Login to log in to
the device.
The interface is divided into three parts. Related functions can be executed by
operation in the related areas.
Index area: Shows the conguration list for your device.
Content area: Shows the detailed conguration.
System Information area: Shows the system status and different kinds of tips.
Do not modify any settings unless instructed by your service provider.
Verifying the PIN Code
If the PIN code of your SIM card is enabled, you will need to input the PIN code
when you log in the rst time.
NOTE: The SIM card will be locked if you enter the wrong PIN code three
consecutive times.
If you want to modify the PIN Status, select Settings > Device Settings >
PIN Management.
Congure Your Device on the Web
16 17
Battery
indicator
Shows the battery level;
4 stages from none to high .
Signal strength Shows the network signal intensity;
5 stages from none to strong .
Internet status
Connected to the Internet.
Disconnected from the Internet.
Wi-Fi strength Wi-Fi status and number of connected users.
The maximum number is 5.
Settings

Quick Setup
1. In the main interface, click Settings > Quick Settings.
2. Read the guide carefully, and then click Next.
3. Set SSID Conguration as shown in the following gure.
Service Set Identier (SSID) is used to uniquely identify your wireless local area
network (WLAN). If you enable Broadcast Network Name (SSID), the Z250G
device will broadcast the SSID, and other devices can detect and connect to it.
4. Set Security Conguration as shown in the following gure.
Encryption will keep your trafc from being monitored and accessed without
authorization. Select an encryption mode from the list, and then set a password
for it.
5. The conguration will look as shown in the following gure.
Make sure that all the parameters shown in the gure are correct, and then
click Apply.
Settings
Settings
18 19

Wi-Fi Settings
Basic
Select Settings > Wi-Fi Settings > Basic Settings. The wireless network basic
parameters are shown in the following gure.
Network Name (SSID): Service Set Identier (SSID). Enter a string of fewer than
32 characters as the name for your WLAN.
Broadcast Network Name (SSID): Disable or Enable (Default) this function.
If Enable is selected, the device broadcasts the SSID, and other devices can
nd and connect to it. When you select Disable, other devices cannot nd the
SSID. If you want someone to connect, tell them the SSID and let them set
up manually.
Security Mode: The security modes are described below:
Encryption Type: Select an encryption type from the drop-down list.
Max Connections: Choose the maximum number of the stations which connect
the AP simultaneously.
Click Apply to conrm your conguration.
20 21
Mode Description
OPEN
Authentication and encryption won’t be performed.
There are risks that private information will be
intercepted or unauthorized individuals will use
the network.
WPA2(AES)-PSK A more secure version of WPA with implementation
of the 802.11i standard.
WPA-PSK/WPA2-PSK Apply both the WPA-PSK and WPA2-PSK scheme.
Settings
Settings

WPS
Select Settings > Wi-Fi Settings > WPS. The WPS conguration is shown in the
following gure.
PIN: Enter the PIN for the device you wish to connect.
PBC:
1. Select PBC in the WPS UI of the device you wish to connect.
2. Select PBC in the WPS page of the device and click Apply.
3. Press the Power Button on the Z250G device to turn on the screen.
4. Once the words “WPS Active Waiting” appear on the Z250G device screen,
select Next in your device’s WPS UI. After a few seconds your device can
access the WLAN, and the result will be shown in your device’s WPS UI.
Device Settings
Account Management
Select Settings > Device Settings > Account Management. The administrator
settings information is shown in the following gure.
You can change the administrator’s password. Click Apply to conrm your
conguration.
Settings
Settings
22 23

PIN Management
Select Settings > Device Settings > PIN Management. The PIN management is
shown in the following gure.
PIN Status: Show the current PIN status.
Current PIN: Type the PIN code.
If you select Change PIN, you will see the following modication parameters.
Type the old PIN code, and then type the new PIN code twice. Click Apply to
conrm your conguration.
NOTE:
Entering the wrong PIN code three consecutive times will lock the SIM card.
After you change the PIN code, you don’t need to input the PIN code again. It is
required after the device is reset.
Power Save
Select Settings > Device Settings > Power Save. You can set Wi-Fi performance
and Wi-Fi sleep to save power.
Wi-Fi Performance Settings
– Short Wi-Fi Range: Increases battery life.
– Medium Wi-Fi Range: Balances battery life and Wi-Fi range.
– Long Wi-Fi Range: Extends coverage of mobile hotspot, which will decrease
battery life.
Settings
Settings
24 25

Wi-Fi Sleep Settings
– Sleep Time: Select a time from the drop-down list. When there’s no Wi-Fi
connection made within the specied time, Wi-Fi will be unavailable and the
system will turn to sleep mode to save power.
Reset
Select Settings > Device Settings > Reset. Click Reset > Yes to set all the
settings to their factory default values. The device will restart automatically.
Firewall
You may set up rewall rules to protect your network from viruses and other
malicious activity on the Internet.
Port Forwarding
You can set up virtual servers to provide services on the Internet. Select Settings >
Firewall > Port Forwarding. The virtual server settings are shown in the following gure.
Settings
Settings
26 27

If you select Enable, the following Virtual Server Settings will appear.
IP Address: Set IP address for the virtual server.
Port Range: Set port numbers for the virtual server.
Protocol: Set protocol for the virtual server.
Comment: Type comment for the virtual server settings.
Click Apply to add a new rule.
Select a rule and click Delete > Yes to delete it.
Router Settings
Select Settings > Router Settings. The router information is shown in the
following gure.
IP Address: IP address for LAN interface.
Subnet Mask: Subnet mask for the IP address.
DHCP Server: Enable or disable DHCP Server function.
DHCP IP Pool: Allocate beginning and ending IP addresses for IP pool.
DHCP Lease Time: Dene how long the leased IP address will be expired. The
new IP address will be relocated after the IP address is expired.
Click Apply to conrm your conguration.
Settings
Settings
28 29

This function allows you to receive messages from your ISP.
Operating Messages in Inbox
You can check the messages saved in your device.
Inbox
Select Marketing Msgs. > Inbox to access the following gure.
All the received messages saved in your device will be displayed here.
Select a message and click Delete > Yes to delete it.
31
This function allows you to check system information.
30
Messages
Information

33
To the Owner
susceptible to electromagnetic interference sent by your device if inadequately
shielded. Please consult the manufacturer of your device before using if
necessary.
pacemakers. Please always keep them more than 20 centimeters away from
such medical devices when they are turned on. Turn your device off if necessary.
Consult a physician or the manufacturer of the medical device before using your
device.
warehouses or chemical factories, where there are explosive gases or explosive
products being processed. Turn off your device if required.
stations, and in hospitals. Please observe and obey all warning signs and switch
off your device in these conditions.
performance.
if used as a toy.
Using Your Device
unauthorized accessories may affect your device’s performance, and violate
related national regulations about telecom terminals.
can emit electromagnetic waves; it may inuence signal reception.
place.
such case, it will produce moisture inside and outside your device. Wait until it
becomes dry.
get damaged.
undertake repair work.
are recommended.
Battery Handling
store it in a cool, dry place.
container. Do not put it in your regular house trash.
WARNING!
If the battery is broken, keep away from it. If it touches your skin, wash your skin
with abundant fresh water and ask a doctor for help if necessary.
32
For Your Safety
For Your Safety

Limited Warranty
i. Reasonable abrasion.
ii. End User’s failure to follow ZTE’s installation, operation or maintenance
instructions or procedures.
iii. End User’s mishandling, misuse, negligence, or improper installation,
disassembly, storage, servicing or operation of the Product.
iv. Modications or repairs not made by ZTE or a ZTE-certied individual.
v. Power failures, surges, re, ood, accidents, actions of third parties or other
events outside ZTE’s reasonable control.
products provided that such defects are due to the combined usage.
vii. Any other cause beyond the range of normal usage intended for the Product.
for the Product from ZTE under the above-mentioned situations.
nonconforming items, and is in lieu of all other warranties, expressed, implied or
statutory, including but not limited to the implied warranties of merchantability
and tness for a particular purpose, unless otherwise required under the
mandatory provisions of the law.
Limitation of Liability
ZTE shall not be liable for any loss of prots or indirect, special, incidental or
consequential damages resulting from or arising out of or in connection with
using of this product, whether or not ZTE had been advised, knew or should have
known of the possibility of such damages, including, but not limited to lost prots,
interruption of business, cost of capital, cost of substitute facilities or product, or any
downtime cost.
Radio Frequency (RF) Energy
This model device meets the government’s requirements for exposure to radio waves.
This device is designed and manufactured not to exceed the emission limits for
exposure to radio frequency (RF) energy set by the Federal Communications
Commission of the U.S. Government:
The exposure standard for wireless devices employs a unit of measurement known
as the Specic Absorption Rate, or SAR. The SAR limit set by the FCC is 1.6 W/kg.
Tests for SAR are conducted using standard operating positions accepted by the
FCC with the device transmitting at its highest certied power level in all tested
frequency bands. Although the SAR is determined at the highest certied power
level, the actual SAR level of the device while operating can be well below the
maximum value. This is because the device is designed to operate at multiple
power levels so as to use only the position required to reach the network. In
general, the closer you are to a wireless base station, the lower the power output.
The highest SAR value for the model device as reported to the FCC when
worn on the body, as described in this user guide, is 1.13 W/kg (Band4) (Body-
worn measurements differ among device models, depending upon available
enhancements and FCC requirements.)
While there may be differences between the SAR levels of various devices and at
various positions, they all meet the government requirement.
The FCC has granted an Equipment Authorization for this model device with
all reported SAR levels evaluated as in compliance with the FCC RF exposure
guidelines. SAR information on this model device is on le with the FCC and can
be found under the Display Grant section of http://www.fcc.gov/oet/ea/fccid/ after
searching on FCC ID: Q78-ZTEMF61.
34 35
For Your Safety
For Your Safety

FCC Compliance
following two conditions: (1) This device may not cause harmful interference, and
(2) this device must accept any interference received, including interference that
may cause undesired operation.
Caution: Changes or modications not expressly approved by the manufacturer
could void the user’s authority to operate the equipment.
NOTE: This equipment has been tested and found to comply with the limits
for a Class B digital device, pursuant to part 15 of the FCC Rules. These limits
are designed to provide reasonable protection against harmful interference in a
residential installation. This equipment generates, uses, and can radiate radio
frequency energy and, if not installed and used in accordance with the instructions,
may cause harmful interference to radio communications. However, there is
no guarantee that interference will not occur in a particular installation. If this
equipment does cause harmful interference to radio or television reception, which
can be determined by turning the equipment off and on, the user is encouraged to
try to correct the interference by one or more of the following measures:
— Reorient or relocate the receiving antenna.
— Increase the separation between the equipment and receiver.
— Connect the equipment into an outlet on a circuit different from that to which the
receiver is connected.
— Consult the dealer or an experienced radio/TV technician for help.
Disposal of Your Old Device
For this product’s recycling information based on WEEE directive, please send an
For Your Safety
For Your Safety
36 37
to a product, it means the product is covered by the
European Directive 2002/96/EC.
disposed of separately from the municipal waste
stream via designated collection facilities appointed by
the government or the local authorities.
prevent potential negative consequences for the
environment and human health.
Table of contents
Other Zte Wireless Router manuals
Popular Wireless Router manuals by other brands

Edimax
Edimax BR-6258nL Brochure & specs

Tenda
Tenda AC19 Quick installation guide

Asante
Asante SmartHub AWRT-300N quick start guide

D-Link
D-Link DI-524 - AirPlus G Wireless Router Quick installation guide

Tsunami
Tsunami 5054 (MP.11a) Installation and management guide

Gemtek Systems
Gemtek Systems T-316 user guide