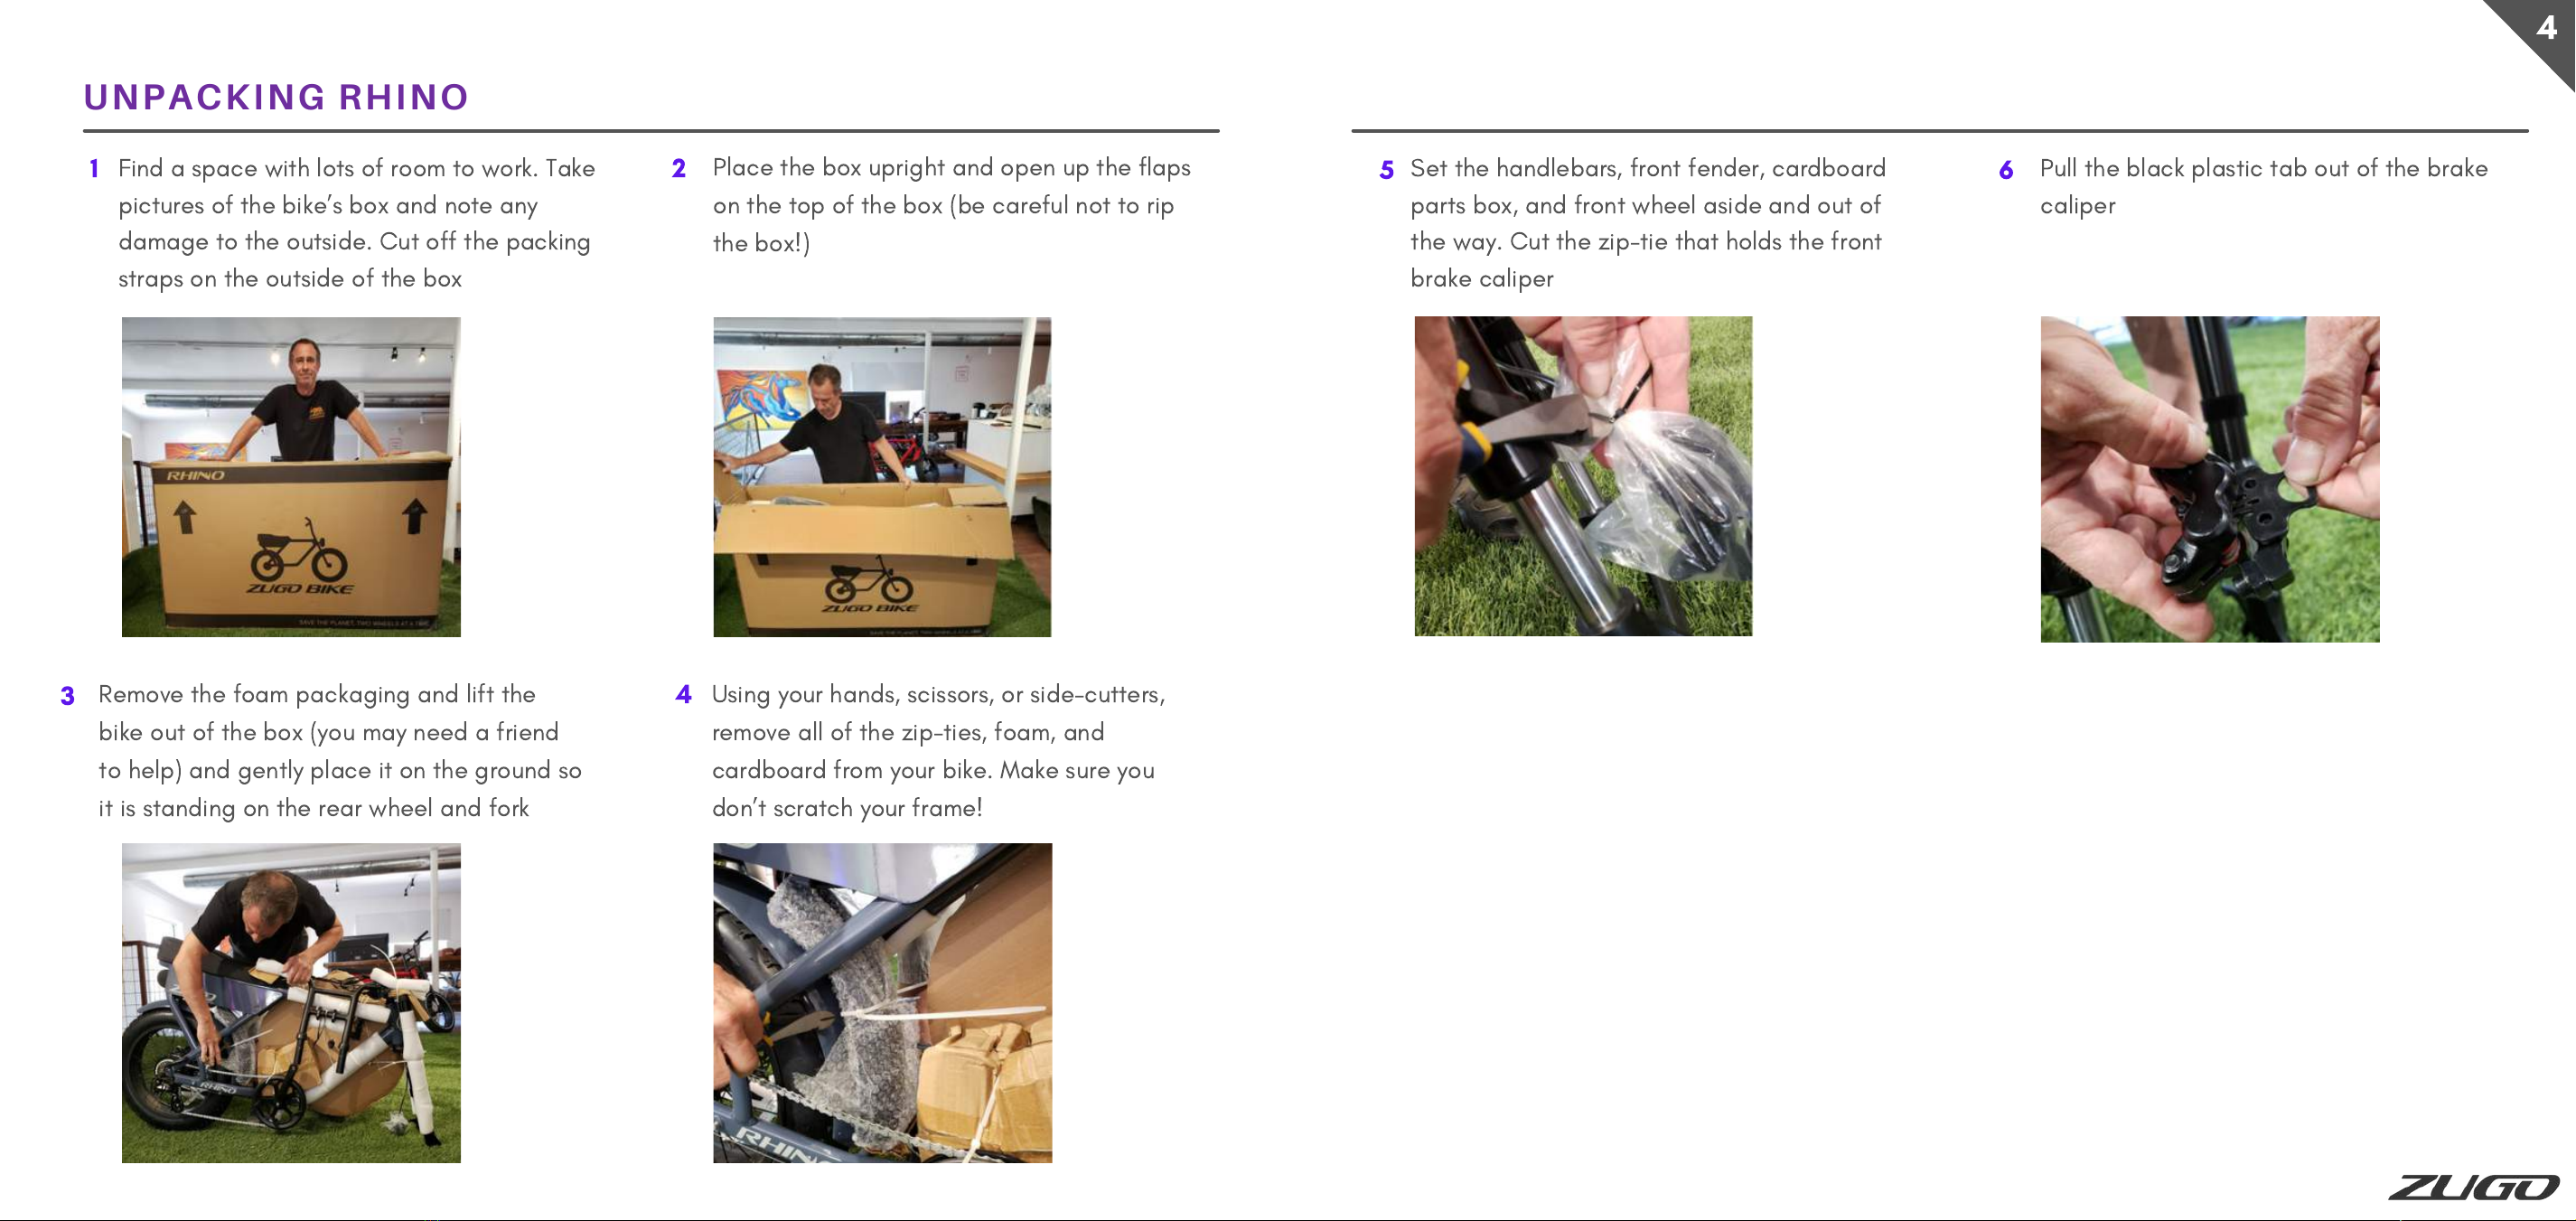
ZUGO Rhino User manual

Save the Planet, Two Wheels at a Time
Rhino Electric Bike
User Manual

WELCOME
TO
THE
ZUGO
A
MILY
Now
that
you
’
re
a
proud
owner
of
your
very
own
Rhino
we
want
to
keep
you
safe
while
you
’
re
out
on
the
roads
and
trails.
We
’
ve
created
this
user
manual
to
share
important
safety,
assembly,
and
service
information
with
you.
Please
read
through
it
before
you
take
your
first
ride
and
keep
it
for
future
reference.
Save the Planet, Two Wheels at a Time

USING
THIS
M
A
NU
A
L
This
manual
contains
some
warnings
and
cautions
concerning
the
safe
operation
of
your
Rhino.
These
notes
are
marked
by
a
caution
symbol
and
should
be
given
extra
attention.
Any
riding
tips
will
be
denoted
by
a
tip
symbol.
This
user
manual
contains
information
on
the
assembly,
operation,
and
maintenance
of
your
Rhino.
Please
read
this
manual
carefully
and
familiarize
yourself
with
your
Rhino
before
using
it
to
ensure
safe
use
and
prevent
accidents,
and
please
keep
it
for
future
reference.
While
Zu o
Bike
makes
every
effort
to
ensure
the
accuracy
of
this
user
manual,
it
assumes
no
responsibility
or
liability
if
it
contains
any
errors
or
inaccuracies.
GETTING
HELP
If
you
have
questions
after
reading
this
manual,
please
visit
our
online
help
center
or
get
in
touch
with
our
team.
We
’
d
love
to
help
you
out!
If
you
have
questions
after
reading
this
manual,
please
visit
our
online
help
center
or
get
in
touch
with
our
team.
We
’
d
love
to
help
you
out!
Website and Help Center: www.zugobike.com
Email: support@zugo.bike
Phone: 1-888-375-0041, Monday-Friday, 10AM to 5PM (Central)
1

IMPORT
A
NT
IN ORM
A
TION
This user manual contains information on the assembly, operation, and maintenance of
your Rhino. Please read this manual carefully and familiarize yourself with your Rhino
before using it to ensure safe use and prevent accidents, and please keep it for future
reference.
When choosing to ride a bicycle, there is always a risk of injury and damage.
These risks are the sole responsibility of the rider. Damage caused by
improper bike assembly, improper maintenance, or failing to follow
instructions is not covered under warranty and could result in personal injury
to your or others as well as damage to personal or third party property.
ZuGo Bike is not responsible for any loss, injury, or damage resulting from
improper use of your e-bike or failure to follow State and local laws. Please
see Zugo Bike’s Terms and Conditions at www.zugobike.com for more
information.
DISCLAIMER
Maximum rider size
Correct assembly is essential to ensuring your safety and Rhino’s performance. While
you can assemble Rhino yourself, ZuGo Bike always recommends having a certified
bike mechanic check the bike before riding. If you do not have the necessary skills to
assemble your bike, please have a certified bike mechanic assemble and adjust it for
you.
Assembly and fit
The use of any accessory, component, or spare part that has not been approved by
ZuGo Bike may jeopardize the safety and performance of your Rhino, void your
warranty, and result in damage to your bike or significant injury. Doing so is at your
own risk.
Non-ZuGo Approved Accessories and Components
Please consult your State and local e-bike laws regarding any minimum age
requirements, maximum speeds, required safety equipment like helmets, and specific
road rules.
State and local laws
Always check the condition of your Rhino before you ride using the ZuGo Pre-Ride
Safety Checklist. Ensure you perform regular maintenance activities in accordance
with the suggested maintenance schedule outlined in this manual (see section 7:
Maintenance)
Safety checks and maintenance
Your Rhino is fitted with a powerful electrical system to help give you the best riding
experience on and off the road. Please familiarize yourself with all aspects of your
Rhino’s electrical system to include the battery, the display, the throttle, lights, and the
brakes. If any of these components are not functioning properly, please stop using
your Rhino immediately and contact ZuGo Customer Happiness Team.
Electrical system
2

BE ORE
YOUR
IRST
RIDE
Rhinos are powerful e-bikes and they need to be operated with the same level of care and
attention as a motorized vehicle. Please do not ride your bike until you have obtained
adequate knowledge of your bike’s controls and functions. We want to make sure you ride
safely and have the best experience out there on the roads and trails!
Ensure you have completed all of the assembly steps in this manual
Double check your handlebars to ensure they have been pushed down to the insertion
line and the bolts are very tight
For your first ride, choose an open flat area with no obstacles or pedestrians. Start with
your setting as PAS 2, then apply a little throttle before starting to pedal (remember to
never push the throttle to full power from a complete stop!) . Play around with the different
ride modes, speeds, and turns. Once you are comfortable with the bike, there's no limit to
your adventures!
Refer to your state and local laws related to operating e-bikes (especially if you have
unlocked your bike to a Class 3 or 4) and ensure you have all of the recommended and
mandatory safety equipment (e.g. a well-fitting helmet) and meet any state and local
minimum age requirements
With the bike off, familiarize yourself with the bike’s features and components,
especially the battery, keypad, display, brakes, and throttle
Conduct a pre-ride safety check of your bike using ZuGo’s Safety Checklist
Tips for your very first ride
1
2
3
4
5
What to check before your first ride
2
LIGHTS
Check front and rear light
are working
Check the following:
bolts are tight, wheels,
kickstand, headlamp, rear
rack, and fenders
Make sure it's securely
locked, is no longer
attached to the charger,
and is sufficiently charged
BATTERY
BRAKES
Gently squeeze brake levers
to ensure they engage and
release. Make sure wheels
don't rub when spinning
WHEELS
Make sure the quick
release lever and/or
main axle bolts are tight
and at no risk of loosening
NUTS
AND
BOLTS
HANDLEBARS
Check height is comfortable
and that bolts on the fork
crown are very tight
Inflate to 25 psi, ensure
they are not bulging, and
have no signs of damage
TIRES
THROTTLE
When the bike is OFF, lightly
press the throttle to test it
presses and releases easily
Check if your chain is free
of any dirt and rust.
Lubricated if needed
CHAIN
S
A
ETY
CHECKLIST
What to check before EVERY ride
Always remember to ride safely, follow local traffic laws, and wear a helmet!

RIDING
S
A
ELY
2
Familiarize yourself with your local traffic laws. Abide by these laws and respect traffic lights
and signs
Always wear a helmet and any other necessary safety equipment
While on the bike and at a complete stop, you only need to gently press the throttle to
accelerate. If you push the throttle to full, you run the risk of injury
When braking, apply more pressure to the rear brake than the front brake. When braking on a
steep incline, squeeze the back and feather the front. The front is more likely to cause an error if
over-braked
Remain alert and look around for any hazards, including vehicles, cyclists, and pedestrians.
Respect pedestrians right-of-way
Ride single-file in the direction of traffic and avoid vehicle blind spots. If you need to pass
another cyclist or pedestrian, alert them before doing so
Use hand signals when turning and use extra care at intersections
Do not drink alcohol or take drugs before operating your bike
Using your phone or listening to music while riding is discouraged
Be considerate when parking by not blocking paths and building entrance points
Secure any loose clothing and wear reflective clothing if riding at night or in bad weather
Avoid riding in salt water or off of jumps to avoid damaging your bike’s components
Always carry identification, a phone, cash, as well as any emergency repair supplies
Tips on keeping yourself safe while riding

Important information
Assembling your Rhino
Battery care and use
Operating your Rhino
Maintaining your Rhino
Troubleshooting
Warranty and other resources
SECTIONS
Bike parts and components
Using this manual
1
3
4
5
6
8
9
2
7
Maintenance record
10

1
2
3
4
5
6
7
8
9
10
11
12
13
14
15
16
17
18
19
20
Handlebar
Shift lever
Brake levers
Display
Headlight
Front fender
Front fork
Front suspension
Front brake calliper
Front disc rotor
Quick release arm (or axle bolt)
PAS sensor
Chain
Derailleur and derailleur guard
Rear brake calliper
Motor
Rear fender
Battery
Seat
Drink bottle holder (step thru only)
Aluminium Alloy 6061 Frame
48V 750W Geared Hub Motor
Hydraulic Brakes - Class Leading 4-Piston stopping force
Up to 21Ah (1008 watt hours) Lithium Removable Battery
Electronic Pedal Assist System (7 levels)
Shimano Altus 7 Speed Trigger Shifter Drivetrain
Large Platform Forged Aluminum Pedals
All-Terrain 20" x 4" Fat Tires - street tires available
Thumb throttle
USB Phone Charging Port on keypad
IP67 water and dustproof electronics and connectors
STANDARD COMPONENTS
INTRODUCING YOUR RHINO: BIKE PARTS AND COMPONENTS
3

4
A
SSEMBLING
YOUR
RHINO
Your Rhino is already 95% assembled and only needs a few simple steps to be fully functional. You can
watch our 11 minute assembly video in our online help center or follow the step-by-step instructions below.
GETTING STARTED
WHAT YOU'LL NEED
A friend to help carefully lift the bike out of the box
A knife or scissors to open the top of the box and cut the zip-ties
Your Rhino parts box, which contains:
Pedals
Charger and cord
Toolkit (contains all the tools you need for assembly)
Touch-up paint
Footpegs
Miscellaneous screws
While assembling your Rhino should take no longer than 30 minutes, please take your time with each
step. We want to make sure your Rhino is ready to ride as soon as you’ve assembled it!
If you don't want to assemble your bike yourself, you can also take it to a local bike shop where they
can easily assemble it for a small fee.

Find a space with lots of room to work. Take
pictures of the bike’s box and note any
damage to the outside. Cut off the packing
straps on the outside of the box
Set the handlebars, front fender, cardboard
parts box, and front wheel aside and out of
the way. Cut the zip-tie that holds the front
brake caliper
UNPACKING RHINO
1 2
34
5 6
Place the box upright and open up the flaps
on the top of the box (be careful not to rip
the box!)
Remove the foam packaging and lift the
bike out of the box (you may need a friend
to help) and gently place it on the ground so
it is standing on the rear wheel and fork
Using your hands, scissors, or side-cutters,
remove all of the zip-ties, foam, and
cardboard from your bike. Make sure you
don’t scratch your frame!
Pull the black plastic tab out of the brake
caliper
4

4
Slide the rubber boot down to the top of the
crown
INSTALLING THE HANDLEBARS
Pick up the handlebars and find the minimum
insertion line
Slide your handlebars into the two forks until
the minimum insertion line is just covered
With a 5mm allen key tighten the two allen
key bolts on the side of the fork. To tighten,
turn each bolt 1-2 circles to the right,
alternating bolts
Make sure you tighten the bolts until the two
“pinch bars'' almost touch and you cannot
tighten them anymore. Repeat on the other
fork
With your hands on the handlebars, without
squeezing the brakes, check if the levers are
the right height. Adjust them to a more
comfortable position with a 5mm allen
Make sure there is enough space next to the
throttle so it can be pressed to its full range
Do not squeeze the brake levers until your
front brake is installed
Make sure your bike is off when testing
the throttle
Don't leave the rubber boot up!
1 2
3 4
5
67
5

4
Flip your bike upside down so it’s resting on
the seat and the handlebars
INSTALLING THE HANDLEBARS
9
10
12
3 4
To adjust the throttle’s position use a 3mm
allen on the backside to get the bolt
Make sure there is sufficient space between
the throttle and the brake lever so the
throttle does not get stuck!
Remove the plastic fork protector. Set aside
for disposal
Remove the plastic spacer in the brake handle
(if it is present). Set aside for disposal
Locate the front brake caliper. Remove the
colored plastic piece from between the brake
pads. Do not squeeze your brake lever until
after the brake caliper is installed
INSTALLING THE FRONT WHEEL
(continued)
8
To adjust the keypad’s position, use a 2.5mm
on the backside of the keypad. Tighten (ignore
the strange sound!)

Find your quick release bolt in the packaging
(often attached to the wheel or frame)
9
10
12
Unscrew the end off the quick release bolt to
remove the cap and the spring
On the non-disc side of the wheel, slide the
quick release bolt through the middle of the
wheel
Flip the wheel around, and on the disc side,
slide the spring onto the bolt with the larger
part of the spring facing towards the cap end
of the bolt. Screw the cap on
INSTALLING THE FRONT WHEEL
5 6
With the 4mm wrench, remove the two rotor
adapter bolts that run along the base edge
of the caliper
Put the bolt and washer in from the outside
of the fork and then into the adapter, with
the logo facing the bolt
7 8
With your 4mm wrench, tighten the two rotor
adapter bolts
Locate the two caliper adjustment bolts.
Loosen them a little in preparation for
installing the front brake caliper
11
(continued)
Steps 9-15 relate to models that have a
quick release bolt on the front wheel. If
your bike has a bolt-on front wheel, the
process for inserting and tightening the
front wheel is the same, the bolt will just
look a little different!
4

With the bike still upside down, lightly press
down the front brake handle with your foot
to center the calipers on the brake before
tightening
12
3
While still holding down the brake lever,
tighten the two caliper adjuster bolts until
they are snug (not over-tight). Once they are
tight, you can release the brake
Spin the wheel to test if the wheel spins freely
and does not rub on the brake pads
If it sounds like the wheel is rubbing
, loosen
the caliper adjuster bolts and try squeezing
the brake lever again to center the calipers. If
it looks like the disc is not centered between
the calipers, you can gently push the caliper
over with your thumb or finger until it is
centered over the disc. Tighten the caliper
adjuster bolts and release the brake lever
INSTALLING THE FRONT WHEEL
13 14
Screw the quick release cap onto the bolt so
it’s only attached by a thread (it should be
loose)
Slide the wheel with the rotor on the brake
side between the front forks and hook the
tabs at the bottom of the forks onto the
quick release bolt on either side of the wheel
15
While holding the non-lever end of the quick
release bolt steady with one hand, screw the
quick release lever to the right with your other
hand. Tighten it until it is HARD to close. Flip
the lever into the “close position”
Note: if your bike has a bolt-on front wheel, make
sure the nut and washer are on both ends of the
bolt and tighten them with a 15mm wrench
WARNING: An improperly secured front wheel can
cause loss of control, accidents, serious injury, or
death. Check that the front wheel is properly
secured to the bike during assembly and before
each ride.
ATTACHING THE FRONT BRAKE
(continued)
4

4
With the mounts moved in closer, it should
then fit snugly against the fork crown. If not,
no worries, you can always bend it in a little
more!
1 2
3
Insert the bolt and the washer into the front
side of the fender
Place the nut on the back by hand
INSTALLING THE FRONT FENDER
Stand the bike right side up on its kickstand.
Unscrew and remove the small bolt, washer,
and nut that sit at the top of the wheel fork.
Set aside
Find the front of the fender, which is the
shorter end
Bend the front mount slightly with a pair of pliers
to bring it away from the headtube of the bike,
so that it doesn’t try and scratch the paint
Squeeze the back mount closer to the front by
hand or using the corner of a table or bench.
When you’re done, it should look like this:
4
5 6
7 8
Don’t angle the fender with the nose down!

4
Remove your keys attached to the main wire
harness at the front of the bike
10
11
Insert the key into the lock cylinder located
on the left side of the bike under the battery
tray
Turn the key to the right to unlock the battery With the key turned, use the handle under the
bottom of the battery to pull it out
INSTALLING THE FRONT FENDER
Using the 8mm hex and the 4mm allen to
tighten the nut onto the back of the bolt until
it is really tight
You're all done!
1 2
3 4
(continued)
SETTING UP YOUR BIKE'S ELECTRONICS
9
Angle the fender so it is nice and even over
the tire

Check the brake sensor cable with the red
plugs on the front of your bike is plugged in
5 6
If unplugged, connect the cables - red to
red. Make sure the pins and notches are
lined up, arrow to arrow
SETTING UP YOUR BIKE'S ELECTRONICS
If the display is not connected, make sure the
cables run from the bottom up through the
handlebar
Pull them up just like in the picture, will let it
freely move and have a good amount of
cable for mobility!
9 10
(continued)
Connect the display cables - green to green.
Make sure the pins and notches are lined up,
arrow to arrow
Now connect the blue pins the same way.
Make sure the pins and notches are lined up,
arrow to arrow
7 8
Never force a cable together Never force a cable together
Never force a cable together
4

4
Next, gently screw the LEFT pedal to the axle
in a COUNTER CLOCKWISE direction
towards the front of the bike!
1 2
Tighten the LEFT pedal with a 15mm wrench
by pushing it counter-clockwise towards the
front of the bike. Tighten until snug
INSTALLING YOUR PEDALS
The two pedals (left and right) come inside
of the box included with the charger and
tool kit
To determine which pedal is right or left, if
you’re sitting on the bike, you should be able
to read the pedal's brand “wellgo” up the
right way on the pedal
5 6
With your fingers, gently screw in your RIGHT
pedal to the axle in the a CLOCKWISE
direction towards the front of your bike
Take your 15mm wrench and gently tighten the
RIGHT pedal by pushing the wrench handle
clockwise towards the front of the bike.
Tighten until snug
3 4
If you encounter any resistance, stop and
make sure you’re screwing the pedal into
the correct side. If you thread the pedal
onto the wrong side, it will damage the
threads and render the pedal useless

Bend the passenger peg and insert the bolt
and washer
1 2
Insert the bolt into the frame and attach nut
on the back side with hands
INSTALLING THE PASSENGER FOOTPEGS
Using a box cutter or scissors, open the bag
with the footpegs
The passenger foot pegs come with extra
hardware that isn’t needed. Just set them
aside for a future project!
5 6
Using the 4mm allen and 8mm hex, remove the
bolt that is pre-installed into your frame
Pull the bolt and washer out from the frame
and keep the nut ready
3 4
Using an 8mm hex and 4mm allen tighten
the pegs down
Make sure it is REALLY snug! Oriented as
such in the photo, where it folds down
7 8
4

Make sure your Rhino is turned off before
starting this step
9 10
Find the box with your headlight. Remove all
of the packaging and protective film
INSTALLING THE PASSENGER FOOTPEGS
Repeat on the other side of the bike with the
other footpeg
Fold down when you’re ready to use, or
retract when not in use
1
Remove the 2 screws, washers, and nuts
from the bracket part of the headlight and
set aside
Line up the holes on the light and the mount
2 3
(continued)
INSTALLING THE HEADLIGHT
Make sure you keep the washers in the
same order when you take them off
4
Table of contents