3M 6000 User manual

Fully loosen all four head straps.
Pull hair back with one hand.
Bring facepiece up to face with
other hand.
1
While holding the facepiece in
place, pull the straps over your
head.
2
Tighten the two bottom straps.
3
Tighten the two top straps.
4
Make sure the back of the
harness is centered on the back
of the head.
5
Always read and follow User Instructions.
Positive Pressure User Seal Check
Place the palm of your hand over the opening in
the exhalation valve cover and exhale gently. If
facepiece bulges slightly and no air leaks are
detected between the face and the facepiece, a
proper seal has been obtained. If faceseal air
leakage is detected, reposition the respirator on
your face and/or readjust the tension ofthe
straps to eliminate leakage and recheck seal. If
you cannot achieve a proper seal, DO NOT
enter the contaminated area. See your
supervisor.
Using Particulate Filters
Place your thumbs onto the center portion of the
filters, restricting airflow through filters and inhale
gently. If you feel facepiece collapse slightly and
pull closer toyour face with no leaks between the
face and the facepiece, a proper seal has been
obtained. If faceseal air leakage is detected,
reposition the respirator onyour face and/or
readjust the tension of the straps to eliminate
leakage and recheck seal. If you cannot achieve a
proper seal, DO NOT enter the contaminated area.
See your supervisor.
Using Cartridges
Place palms of hands to cover face of cartridge or
open area of 3M™ Filter Retainer 501 and inhale
gently. If you feel facepiece collapse slightly and
pull closer to your face with no leaks between the
face and facepiece, a proper seal has been
obtained. If faceseal air leakage is detected,
reposition the respirator onyour face and/or
readjust the tension of the straps to eliminate
leakage and recheck seal. If you cannot achieve a
proper seal, DONOT enter the contaminated area.
See your supervisor.
Negative Pressure User Seal Check
Perform a User Seal Check
Before assigning any respirator to be worn in a contaminated area, a qualitative or quantitative
fit test must be performed per U.S. OSHA standard 29CFR 1910.134 or local requirements.
Wearing your 3M
TM
Full Facepiece
Reusable Respirator 6000 Series
Helping You Wear it Right

Inspection, Cleaning and
Storage Procedures for
3M Reusable Respirators
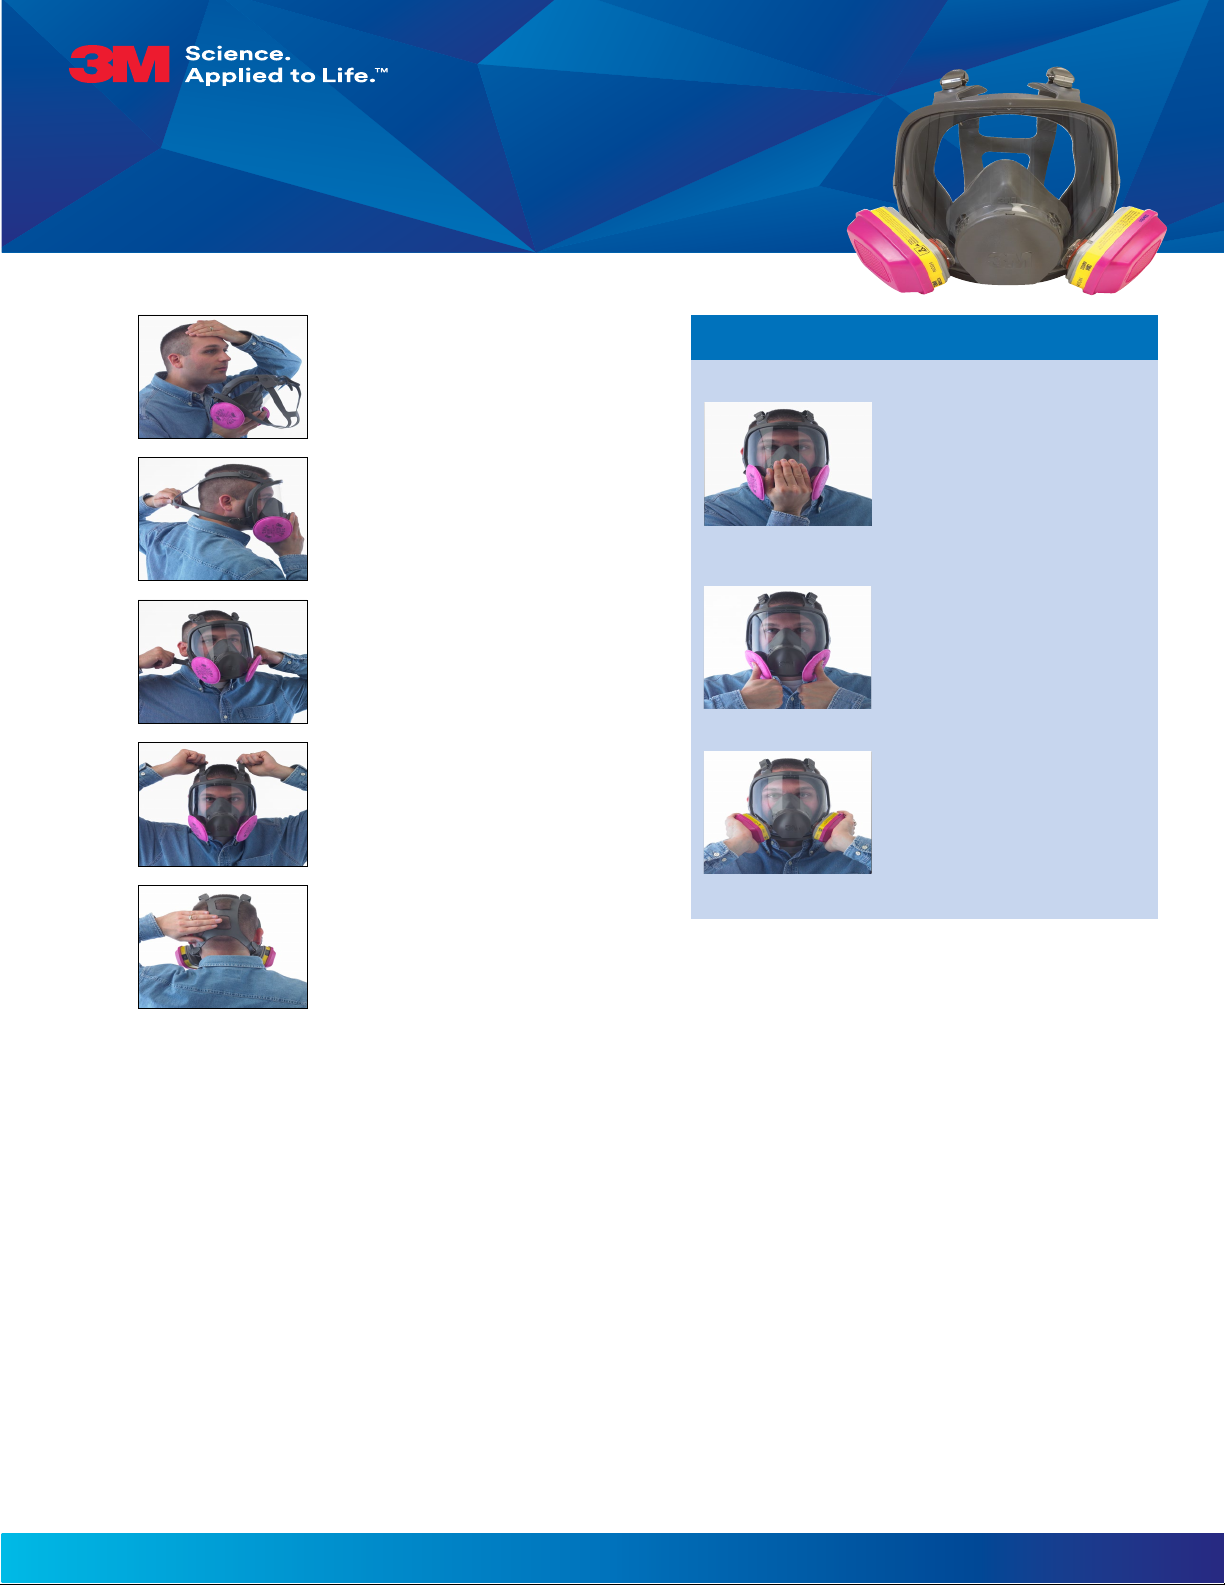
Inspection
3MTM 6000 and 7000 Series
Respirators must be inspected
before each use to ensure good
operating condition. The facepiece
must be repaired or replaced if
there are damaged or defective
parts. The following inspection
procedure is suggested:
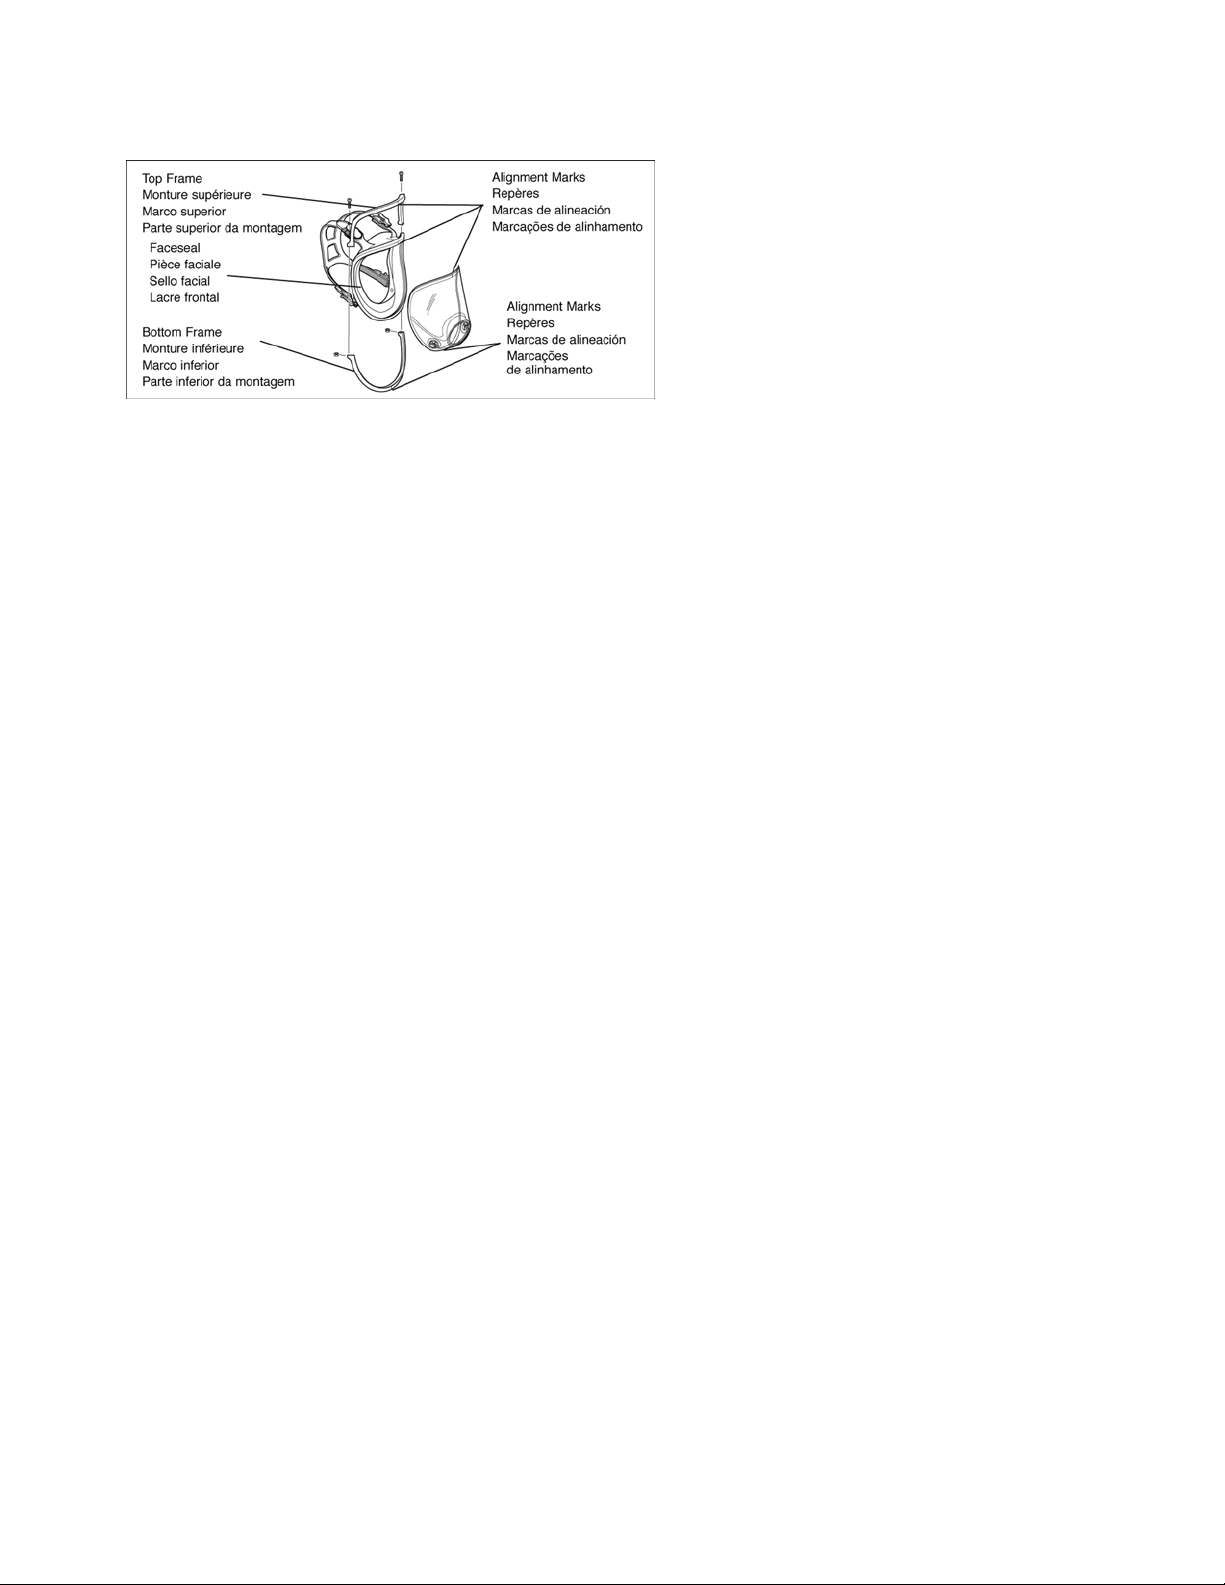
1. Check facepiece for cracks, tears
and dirt. Be certain facepiece,
especially faceseal area, is not
distorted.
2. Examine inhalation valves for
signs of distortion, cracking or
tearing.
3. Make sure that head straps are
intact and have good elasticity.
4. Examine all plastic parts for
signs of cracking or fatiguing.
Make sure filter gaskets or seal
areas are in good condition.
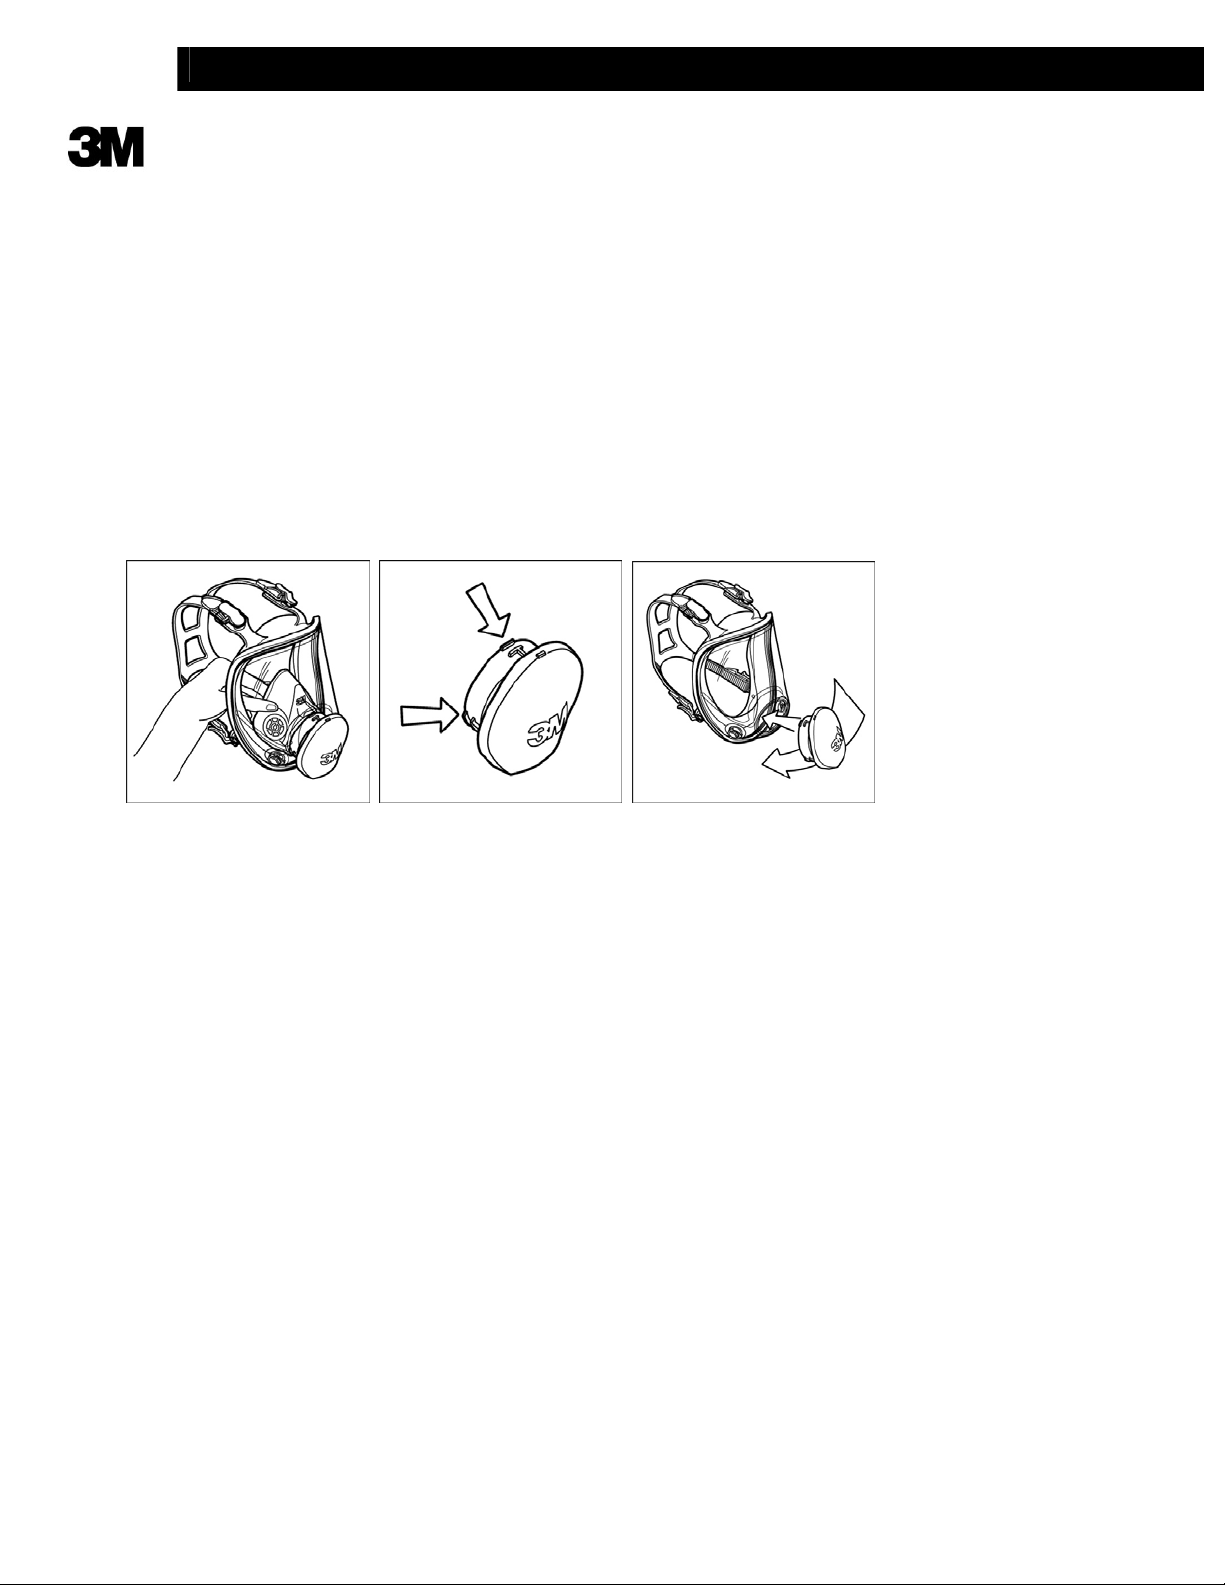
5. Remove exhalation valve cover
and examine exhalation valve and
valve seat for signs of dirt,
distortion, cracking or tearing.
Replace exhalation valve cover.
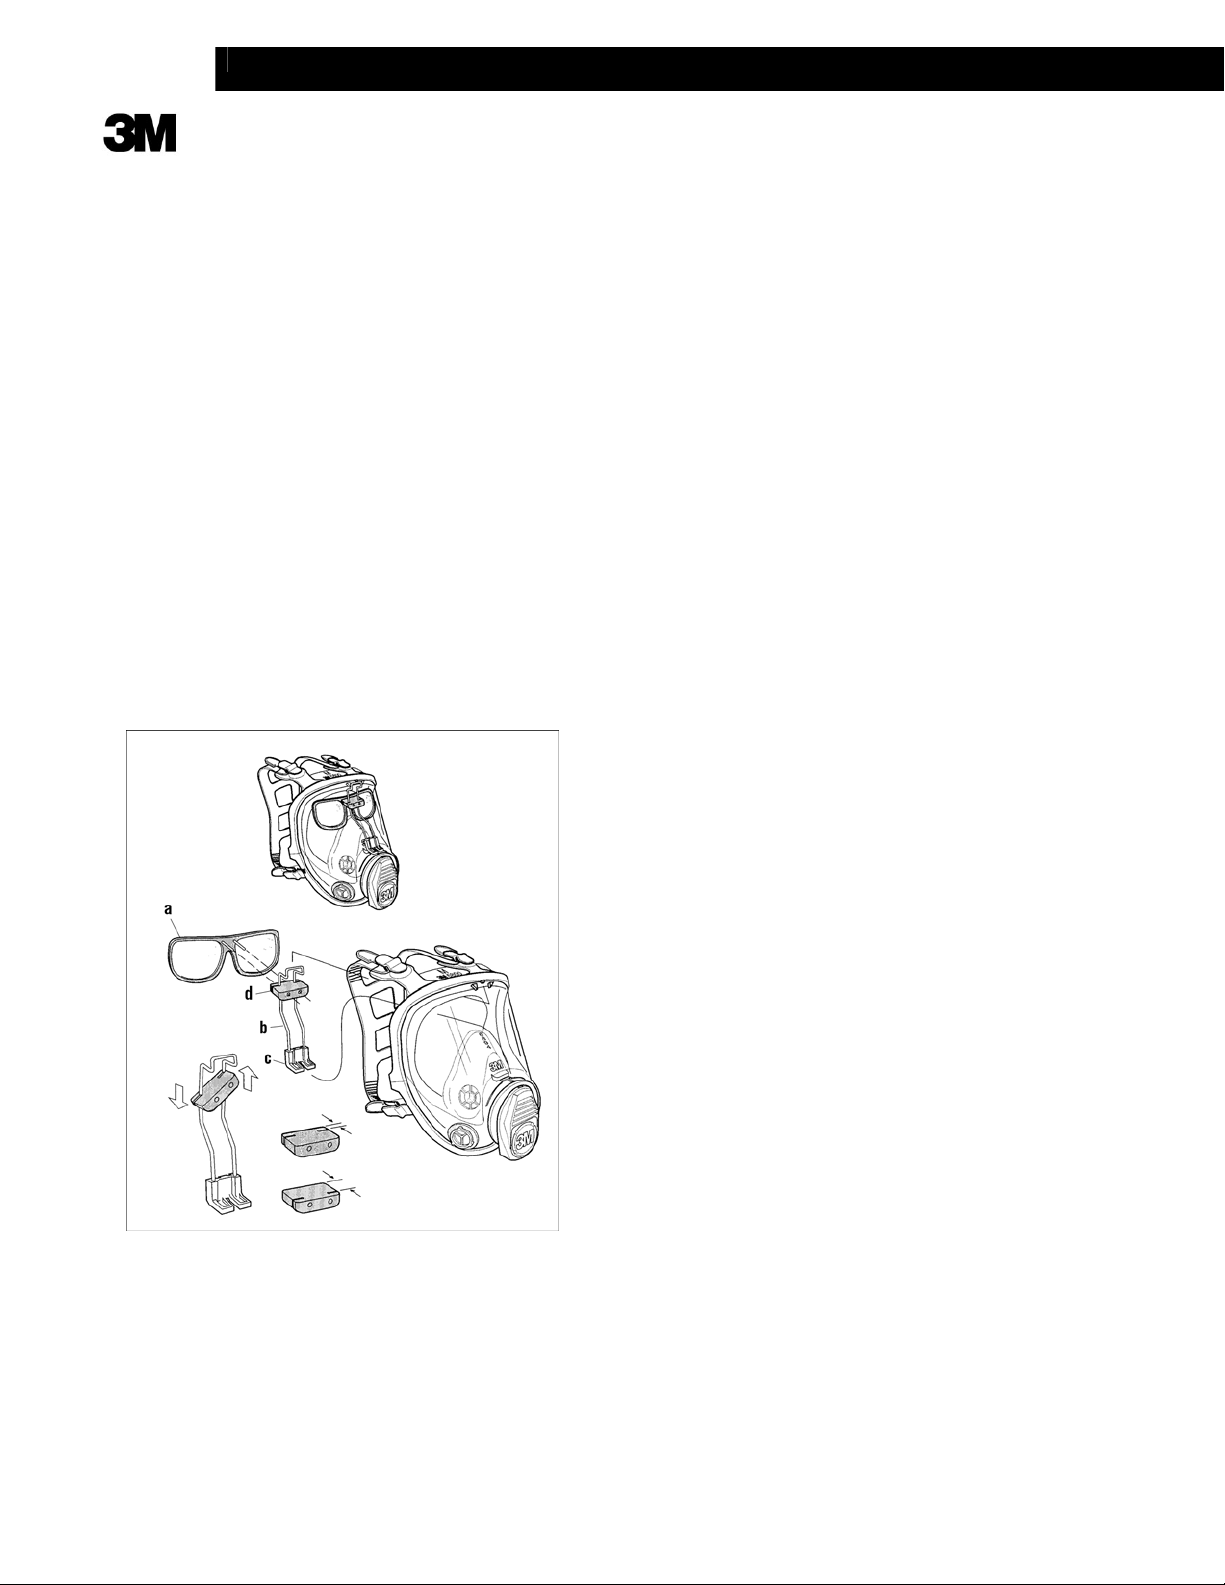
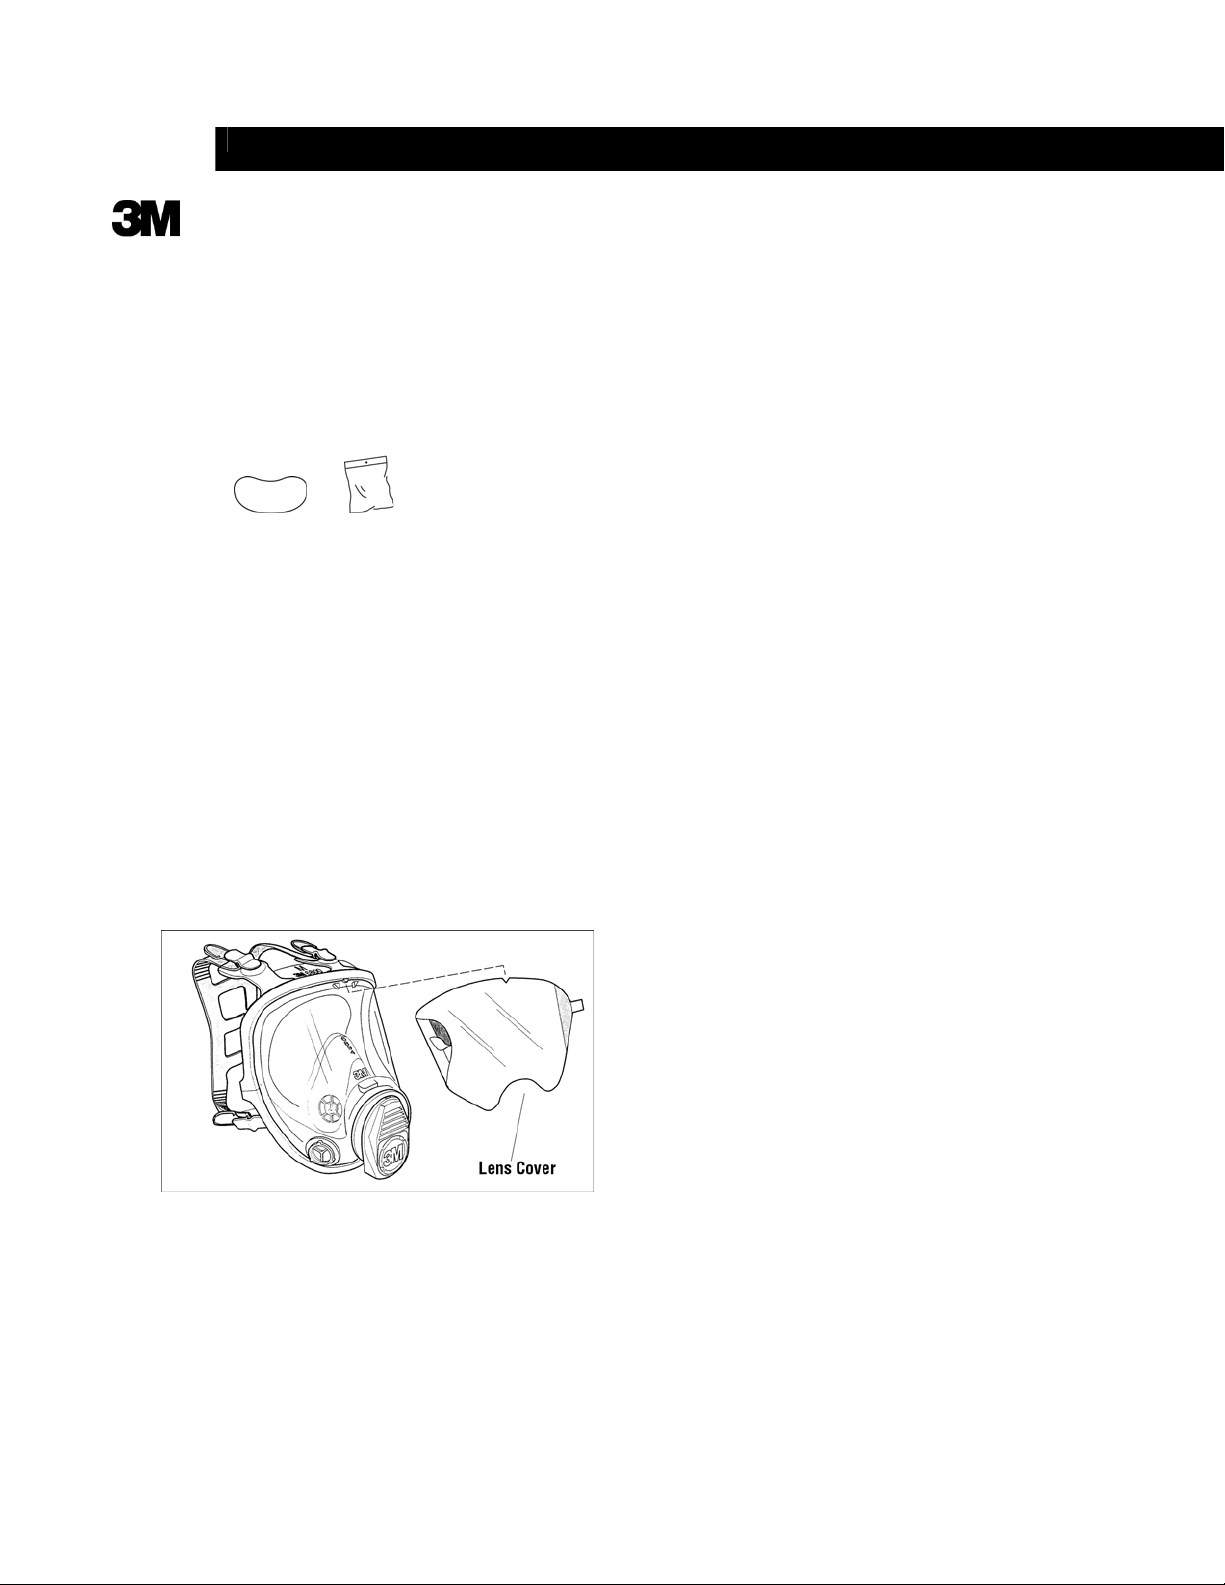
6. Inspect lens of full facepiece for
any damage that may impair
respirator performance or vision.
Cleaning and Storage
Cleaning is recommended after
each use. 3MTM Respirator
Cleaning Wipes 504 may be used
as an interim method in the cleaning
schedule for individually assigned
respirators, but they must not be the
only method in place. During fit-
testing, wipes may also be used
between employees being tested.
However, these respirators must be
thoroughly cleaned at the end of
each day, using procedures in
appendix B-2 of 29 CFR 1910.134.
1. Remove cartridges and filters.
2. Clean facepiece (excluding
filters and cartridges) by
immersing in warm cleaning
solution, water temperature not to
exceed 120º F (49º C), and scrub
with soft brush until clean. Add
neutral detergent if necessary. Do
not use cleaners containing lanolin
or other oils.
3. Disinfect facepiece by soaking
in a solution of quaternary
ammonia disinfectant or sodium
hypochlorite (1 oz [30 ML]
household bleach in 2 gallons [7.5
L] of water), or other disinfectant.
4. Rinse in fresh, warm water and
air dry in noncontaminated
atmosphere.
5. Respirator components must be
inspected prior to each use. A
respirator with any damaged or
deteriorated components must be
repaired or discarded.
6. The cleaned respirator should
be stored away from contaminated
areas when not in use.
NOTE: The above information
is also outlined in the users
instructions. Additionally, see
specific product user instructions
packaged with each respirator
facepiece for additional
information.
3
Technical Data Bulletin
#150, September, 2001 — Reusable Respirators
4058
Issue Date 11/01/01
WARNING
Do not clean with solvents.
Cleaning with solvents may
degrade some respirator
components and reduce
respirator effectiveness.
Inspect all respirator
components before each
use to ensure good
operating condition. Failure
to do so may result
in sickness or death.

Fig. 1 Fig. 2 Fig. 3
The 3M™ Center Adapter Assembly 6864 consists of a center adapter base, cover, exhalation valve and
adapter gasket. It is secured to the center port of the lens on the 3M™ Full Facepiece 6000 Series with a
bayonet style twist lock connection and sealed with a gasket.
To remove the center adapter from the facepiece:
1. Remove the nose cup assembly by pulling away from center adapter base inside facepiece. (Fig. 1)
2. Grasp center adapter at cover and twist counter-clockwise 1⁄4 turn to disengage bayonet from facepiece
lens.
3. Withdraw center adapter from lens center port.
To install center adapter assembly:
1. Align tabs on center adapter base with notches in center port of facepiece lens. (Fig. 2)
2. Slide adapter into lens port. (Fig. 3)
3. Grasp center adapter at cover and twist clockwise 1⁄4 turn to stop. Be certain center adapter gasket is
properly in place and sealed and that the adapter assembly is fully engaged. (Fig. 3)
4. Replace nose cup assembly.
6864/37000*
Center Adapter Assembly
User Instructions
Important: Keep these User Instructions for reference
*37000 is a catalog number only. NIOSH approved as 3M™ Center Adapter 6864. See the 3M™
Full Facepiece 6000 User Instructions for approval label.

6894/37004*
Nose Cup Assembly
Replacement Instructions
Important: Keep these User Instructions for reference
* 37004 is a catalog number only. NIOSH approved as 3MTM 6894 Nose Cup Assembly.
Fig.
1 Fig.
2
The 3MTM 6894 Nose Cup Assembly consists of a nose cup and inhalation valves. It is designed to
install onto the center port adapter of the 3MTM 6000 Series Full Facepiece and comfortably fit over the
respirator wearer’s nose and mouth to aid in purging exhaled breath and prevent lens fogging.
1. Remove the nose cup assembly by pulling away from center adapter base inside facepiece. (Fig. 1)
2. Position nose cup assembly onto center port adapter as shown, aligning 3 tabs in notches. (Fig. 2)

The 3MTM 6878/07141 Spectacle Kit consists of a frame assembly and a rail assembly. The frame
assembly is the holder for the corrective lenses. The rail assembly supports the frame assembly
in the facepiece and allows for up and down, in and out positioning of the frame assembly.
1. Install rail assembly into facepiece as shown with plastic foot positioned on the center port adapter. (The
slot in foot is positioned over ridge on adapter as shown.)
2. Install frame assembly onto rail assembly by inserting pins into holes in rubber slide as shown. The top
of rail is centered between nubs at top of faceseal. (The rubber slide can be removed from the rail
assembly and reversed for additional in and out movement of the frame assembly.)
3. Spectacles can now be moved up, down, in or out to obtain optimal fit and vision.
a) Frame Assembly
b) Rail Assembly
c) Rail Foot
d) Rubber Slide
6878/07141
Spectacle Kit
User InstructionsUs
(Important: Keep these User Instructions for reference)

6885/07142
Lens Cover
User Instructions
(Important: Keep these User Instructions for reference)
25 /
UPC code 0 51131 07142
The 3MTM Lens Covers are designed to provide a replaceable protective covering for the lens
of the 3MTM 6000 Series Full Facepiece Respirator.
1. Remove release liner from adhesive at each side of 6885/07142 lens cover.
2. Position lens cover over the 6000 Series Facepiece lens and adhere in place.
3. Remove used lens cover by lifting tab away from facepiece.

6898/37006*
Lens Assembly
Replacement Instructions
Important: Keep these User Instructions for reference
*37006 is a catalog number only. NIOSH approved as 3MTM Lens Assembly 6898.
See the 3MTM Full Facepiece 6000 User Instructions for approval label.
38-9018-9555-7 (Supersedes 38-9018-7177-2)
Fig. 1 Fig. 2
The 3MTM 6898 Lens Assembly consists of a hard coated polycarbonate lens with installed bayonet
attachment inhalation port fittings, inhalation valves and inhalation port filter/cartridge gaskets.
The lens is replaceable by following these steps:
1. Remove nose cup assembly from inside facepiece. (Fig. 1)
2. Remove center adapter assembly by turning counter-clockwise 1⁄4 turn and withdrawing from lens center
port. (Fig. 2)
Fig. 3
3. Remove the (2) phillips screws from the lens/faceseal frame. Pull the frame top and bottom away from
faceseal.
4. Remove faceseal from lens.
5. Place new lens and faceseal together aligning marks at top and bottom. Position top and bottom frame,
again aligning marks top and bottom. (Fig. 3) Install and securely tighten screws. Make certain
alignment marks are properly aligned top and bottom with all components.
6. Install center adapter assembly.
7. Replace nose cup assembly.
Other manuals for 6000
13
This manual suits for next models
2
Table of contents
Other 3M Respiratory Product manuals