manuals.online logo
Brands
  1. Home
  2. •
  3. Brands
  4. •
  5. 3One data
  6. •
  7. Media Converter
  8. •
  9. 3One data 7210 Series User manual

3One data 7210 Series User manual

MODEL7210 Series
Ethernet /4E1 Protocol Converter
Quick Installation Guide
3onedata Co., Ltd.
Address:
3/B, Zone 1, Baiwangxin High Technology
Industrial Park, Xili, Nanshan District,
Shenzhen
Website:
www.3onedata.com
Te l :
+86 0755-26702688
Fax:
+86 0755-26703485
【Package Checklist】
Please check whether the package and accessories are intact
while using the converter for the first time.
1.
Protocol converter
2.
AC power cord
3.
Quick installation guide
4.
Certification
5
Warranty card
If any of these items are damaged or lost, please contact our
company or dealers, we will solve it ASAP.
【Product Overview】
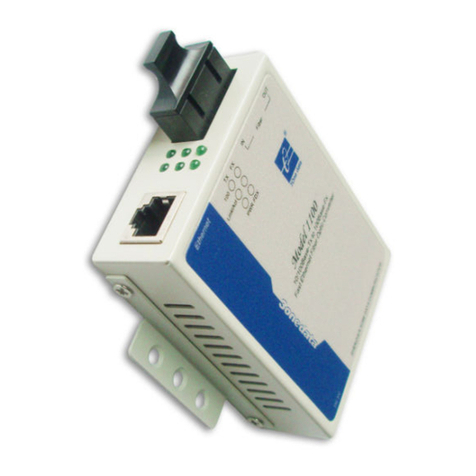
The series products are 1-way Ethernet to 4-way E1 protocol
converters, including the following models:
Model I MODEL7210 (1-way 10/100M copper port + 4-way
E1 BNC port)
Model II MODEL7210-1U (1-way 10/100M copper port +
4-way E1 BNC or RJ45 port)
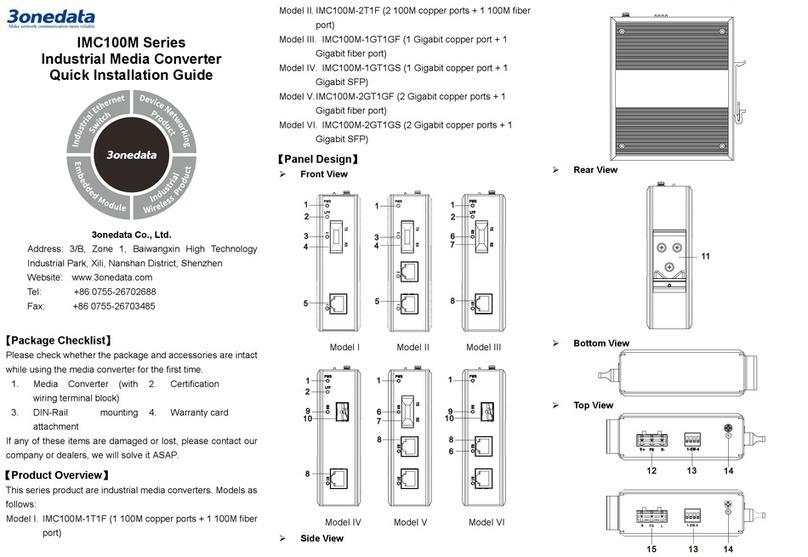
【Panel Design】
Front view (Rack-mounted)
Rear view (Rack-mounted)
Front view (Desktop)
Rear view (Desktop)
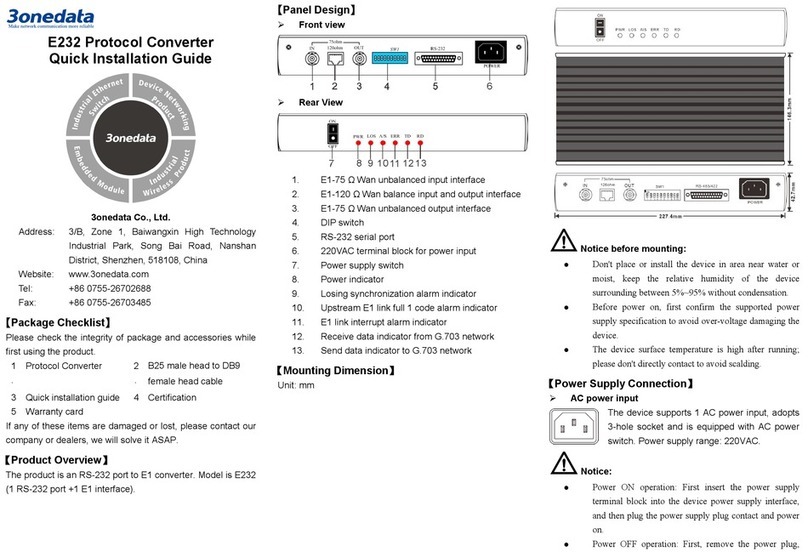
1. Power indicator
2. Ethernet connection status indicator
3. Ethernet duplex mode indicator
4. Ethernet 10M speed status/active indicator
5. Ethernet 100M rate status/live indicator
6. E1-E4 port operating status indicator
7. E1-E4 port signal interruption alarm indicator
8. Pseudorandom test status indicator
9. E1 loopback test status indicator
10. DIP switch
11. Rack-mounted locating hole
12. 220VAC power input socket
13. 220VAC power switch
14. -48VDC power input terminal
15. E1 input BNC port
16. E1 RJ45 port
17. E1 output BNC port
18. 10/100M Ethernet copper port (MDI)
19. 10/100M Ethernet copper port (MDI-X)
Note:
Ethernet port is connected to PC host through crossover
cable, connected to switch through straight through
cable.
【Mounting Dimension】
Unit (mm)
Rack-mounted
Desktop
Note before mounting:
Don't place or install the device in area near water or
moist, keep the relative humidity of the device
surrounding between 5%~95% without condensation.
Before power on, first confirm the supported power
supply specification to avoid over-voltage damaging the
device.
The device surface temperature is high after running;
please don't directly contact to avoid scalding.
【Rack-mounted】
Mounting the device
Step 1 Select the device mounting location to ensure
enough size.
Step 2 Place the device on the rack surface plate; adopt 4
screws to mount the right and left mounting lugs on
the rack.
Step 3 Check and confirm the product is mounted firmly on
the rack, mounting ends.
Device disassembling
Step 1 Device powers off.
Step 2 Unscrew the fixed mounting lug screw on the rack.
Step 3 Shift out the device from rack, disassembling ends.
【Power Supply Connection】
AC power supply input
The device supports 1-way AC power
supply input. It provides 3-hole socket and AC
power supply switch. Power supply input range:
220VAC
DC power supply input
The rack-mounted device supports 1-way
220VAC power supply input or 1-way -48VDC
power supply input. It provides 3-pin power
supply input terminal blocks. Power supply input range:
-48VDC. Its pin definition is as follows:
Pin NO.
1
2
3
Definition -48VDC
cathode
FG frame
GND
-48VDC
anode
Note:
Power ON operation: first connect power line to the
connection terminal of device power supply, then power
on.
Power OFF operation: first unpin the power plug, then
remove the power line, please note the operation order
above.
【DIP Switch Setting】
The device provides 2 sets of
DIP switches for Ethernet port,
clock modes and loopback test
setting. Its definition is as follows:
Note:
The DIP switch definitions of rack-mounted and
desktop device are different; please refer to the
corresponding setting function.
Rack-mounted
The setting function of SW1 is as follows:
NO. 1
NO. 2
NO. 3
Ethernet port mode setting
OFF
OFF
OFF
10/100M, full/half duplex self-adaption
OFF
ON
OFF
10/100M self-adaption, half duplex
OFF
OFF
ON
10M, full/half duplex self-adaption
OFF
ON
ON
10M, half duplex
ON
OFF
OFF
100M, full duplex
ON
ON
OFF
100M, half duplex
ON
OFF
ON
10M, full duplex
ON
ON
ON
10M, half duplex
No. 4
Clock mode setting
OFF
This end is set as slave clock
ON
This end is set as master clock
The setting function of SW2 is as follows:
NO. 1
E1 loopback test
enablement
No. 2 E1loopback test type
OFF
Turn off loopback test
OFF
Local loopback
ON
Turn on loopback test
ON
Remote loopback
No. 3 No. 4 L
oopback test E1 channel
selection setting
ON
ON
Select No. 1 E1
OFF
ON
Select No. 2 E1
ON
OFF
Select No. 3 E1
OFF
OFF
Select No. 4 E1
Desktop
The setting function of SW1 is as follows:
No. 1 E1 loopback test
enablement
No. 2
E1 loopback test type
OFF
Turn off loopback test
OFF
Local loopback
ON
Turn on loopback test
ON
Remote loopback
No. 3 No. 4 L
oopback test E1 channel
selection setting
ON
ON
Select No. 1 E1
ON
OFF
Select No. 2 E1
OFF
ON
Select No. 3 E1
OFF
OFF
Select No. 4 E1
No. 8
Clock mode setting
OFF
Recover clock
ON
Local clock
The setting function of SW2 is as follows:
No. 3
No. 4
No. 5
Ethernet port mode setting
OFF
OFF
OFF
10/100M, full/half duplex self-adaption
OFF
ON
OFF
10/100M self-adaption, half duplex
OFF
OFF
ON
10M, full/half duplex self-adaption
OFF
ON
ON
10M, half duplex
ON
OFF
OFF
100M, full duplex
ON
ON
OFF
100M, half duplex
ON
OFF
ON
10M, full duplex
ON
ON
ON
10M, half duplex
【E1 Port】
The E1 port of rack-mounted device provides
two connection ways, asymmetrical 75Ω
BNC port and symmetrical 120ΩRJ45 port.
The pin definition of E1 RJ45 is as follows:
Pin NO.
1
2
3
4
5
6
7
8
Definition
NC
RX+
RX-
TX+
GND
GND
TX-
NC
【LED Indicator】
The device provides LED indicators for monitoring device’s
operating status, which has simplified the overall
troubleshooting process. The function of each LED is
described in the table as below:
LED
Status
Description
PWR
ON PWR is connected and running
normally
OFF PWR is disconnected and
running abnormally.
LINK
ON
Ethernet port is connected.
OFF
Ethernet port is disconnected.
DUP
ON Ethernet port is in full duplex
mode.
OFF Ethernet port is in half duplex
mode.
10M/ACT
ON
Ethernet port rate is 10Mbps
Blinking Data is being transmitted through
Ethernet port.
100M/ACT
ON
Ethernet port rate is 100Mbps
Blinking Data is being transmitted through
Ethernet port.
(1-4)
E1-WORK
ON
(1-4) E1 port is running normally
OFF (1-4) E1 port is running
abnormally
(1-4)
E1-LOS
ON (1-4) E1 port signal interruption
alarm
OFF (1-4) E1
port is normally
connected
PTOK
ON Pseudorandom
loopback test
succeeded
OFF
Loopback test is operating or off.
TEST
ON
E1 port is in loopback test status
OFF No E1 port is in loopback test
status
【Specification】
Panel
Ethernet port 1-way 10/100M, full/half
duplex can configure RJ45
port
E1 port 4-way E1, optional 75ΩBNC
port or 120ΩRJ45 port
(rack-mounted)
Indicator Power indicator, Ethernet
indicator, E1 indicator,
loopback test status indicator
Power supply
Input power supply 220VAC (desktop)
Optional 220VAC or -48VDC
(rack-mounted)
Connection terminal 220VAC: 3-hole socket
-48VDC: 3-pin terminal
blocks.
Power consumption
Full-load
≤
2W
Operating temperature
-25~70
℃
Storage temperature
-40~85
℃
Operating humidity
5%~95%(no condensation)

This manual suits for next models

2

Other 3One data Media Converter manuals
3One data PD101-12V-15W User manual

3One data

3One data PD101-12V-15W User manual

3One data 1200 Series User manual

3One data

3One data 1200 Series User manual

3One data IPMC100 Series Operating and maintenance instructions

3One data

3One data IPMC100 Series Operating and maintenance instructions

3One data 277 User manual

3One data

3One data 277 User manual

3One data 1100SS User manual

3One data

3One data 1100SS User manual
3One data 1100SS User manual

3One data

3One data 1100SS User manual

3One data 3010 User manual

3One data

3One data 3010 User manual

3One data PD101G Series User manual

3One data

3One data PD101G Series User manual

3One data USB4485 User manual

3One data

3One data USB4485 User manual

3One data CAN485 User manual

3One data

3One data CAN485 User manual

3One data 1100SS User manual

3One data

3One data 1100SS User manual

3One data CAN232 User manual

3One data

3One data CAN232 User manual

3One data 1200 User manual

3One data

3One data 1200 User manual

3One data IMC100M Series User manual

3One data

3One data IMC100M Series User manual

3One data USB485 Series User manual

3One data

3One data USB485 Series User manual
3One data 3012 Series User manual

3One data

3One data 3012 Series User manual

3One data TLC422 User manual

3One data

3One data TLC422 User manual

3One data IMC100-2T1F-1D User manual

3One data

3One data IMC100-2T1F-1D User manual

3One data 1200 User manual

3One data

3One data 1200 User manual

3One data USB232 Series User manual

3One data

3One data USB232 Series User manual

3One data 3011 User manual

3One data

3One data 3011 User manual

3One data USB8485I User manual

3One data

3One data USB8485I User manual

3One data 1100 User manual

3One data

3One data 1100 User manual

3One data E232 User manual

3One data

3One data E232 User manual

Popular Media Converter manuals by other brands

Hama 00121775 operating instructions

Hama

Hama 00121775 operating instructions

Belkin AV360 Quick install guide

Belkin

Belkin AV360 Quick install guide

IONODES ION-R100 user manual

IONODES

IONODES ION-R100 user manual

Barco STELLAR User and service manual

Barco

Barco STELLAR User and service manual

Canopus ADVC-HDM1 user guide

Canopus

Canopus ADVC-HDM1 user guide

Unika Box Series user guide

Unika

Unika Box Series user guide

AV TOOL AVT-3320 instruction manual

AV TOOL

AV TOOL AVT-3320 instruction manual

UTAS LMC100A user manual

UTAS

UTAS LMC100A user manual

Onbon OVP-M2D user manual

Onbon

Onbon OVP-M2D user manual

CYP CSC-103TXPL Operation manual

CYP

CYP CSC-103TXPL Operation manual

M-Audio MICRO DAC 24/192 user guide

M-Audio

M-Audio MICRO DAC 24/192 user guide

Kramer OC-1N user manual

Kramer

Kramer OC-1N user manual

IMC Networks McBasic TX/FX Operation manual

IMC Networks

IMC Networks McBasic TX/FX Operation manual

BARIX Instreamer user manual

BARIX

BARIX Instreamer user manual

Cross Technologies 2016-75-213 instruction manual

Cross Technologies

Cross Technologies 2016-75-213 instruction manual

Azbil KUX113 user manual

Azbil

Azbil KUX113 user manual

Extron electronics SDI to Analog Video Converter SDI-AVR 100 Specifications

Extron electronics

Extron electronics SDI to Analog Video Converter SDI-AVR 100 Specifications

T+A MP 1250 R user manual

T+A

T+A MP 1250 R user manual

manuals.online logo
manuals.online logoBrands
  • About & Mission
  • Contact us
  • Privacy Policy
  • Terms and Conditions

Copyright 2025 Manuals.Online. All Rights Reserved.