manuals.online logo
Brands
  1. Home
  2. •
  3. Brands
  4. •
  5. 4M
  6. •
  7. Toy
  8. •
  9. 4M STEAM Motorised Origami Bird User manual

4M STEAM Motorised Origami Bird User manual

QUESTION AND COMMENTS:
We value you as a customer and your satisfaction with this product is important to us. If you have comments or questions, or you find any
part of this kit missing or defective, please do not hesitate to contact our distributor in your country. You will find the address printed on the package. You are also
welcome to contact our Marketing Support Team: Email: [email protected], Fax (852) 25911566, Tel: (852) 28936241, Web site: WWW.4M-IND.COM
Pull the top layer out to
the right to create a
diamond shape.
Crease the top right
edge of the diamond flat
and turn the paper over.
Pull the top layer
horizontally across to
the left.
Fold the resulting
triangle in half,
widthways.
Make a valley fold and
ensure the holes are in
the correct orientation
as shown.
Part A: Gearbox housing x 1, Part B: battery compartment cover x 1, Part C: flower-shaped terminal peg x 4, Part D: flower-shaped terminal
cap x 4, Part E: screw x 1, Part F: washer screw x 2, Part G: bottle hub x 1, Part H: string x 1, Part I: push rod x 1, Part J: adhesive tape x
2, Part K: foam piece x 1, Part L: pipe cleaner x 1, Part M: template x 1, Part N: wire stand x 1, Part O: large origami paper x 2, small origami
paper x 1, detailed instructions. (Also required, but not included in the kit: a small crosshead screwdriver, one 1.5 V AAA battery.)
C. CONTENTS
1. Requires one 1.5V AAA battery (not included). 2. For best results, always use fresh battery. 3. Make sure you insert the battery with the
correct polarities. 4. Remove the battery from the kit when not in use. 5. Replace exhausted battery straight away to avoid possible damage
to the kit. 6. Rechargeable battery must be removed from the kit before recharging. 7. Rechargeable battery should be recharged under
adult supervision. 8. Make sure that the supply terminals in the battery case are not short circuited. 9. Do not attempt to recharge
non-rechargeable battery.
B. USE OF BATTERY
1. Please read these instructions carefully before using the product. 2. Adult supervision and assistance are recommended at all times. 3.
This kit is intended for children over 8 years of age. 4. This kit and the finished product contain small parts that present a choking hazard.
Keep away from children under 3 years of age. 5. Only install battery after you have assembled the product. Adult supervision is required.
A. SAFETY MESSAGES
D. ORIGAMI BIRD
1 2 3 4 5 6
7 8 9 10
WARNING:
CHOKING HAZARD - Small parts
Not for Children under 3 years.
A
BC
E
D
F
N O
IH
K L
M
MOTORISED ORIGAMI BIRD
You should now have a
diamond shape.
Fold the left and right
corners toward the center
line and then fold the top
corner toward the center.
Unfold to leave creases.
Now, open the pocket
by pulling the bottom
corner up and form a
diamond shape.
The paper should look
like this.
Turn the paper over and
repeat steps 7-8.
41-04903/1 180828
G
J
Fold and unfold both
tips along the SS line
to make the crease
lines. Inside reverse
fold both tips.
Unfold the right tip and it
will look like this.
11 12
H. FUN FACTS
C
ABlackRed
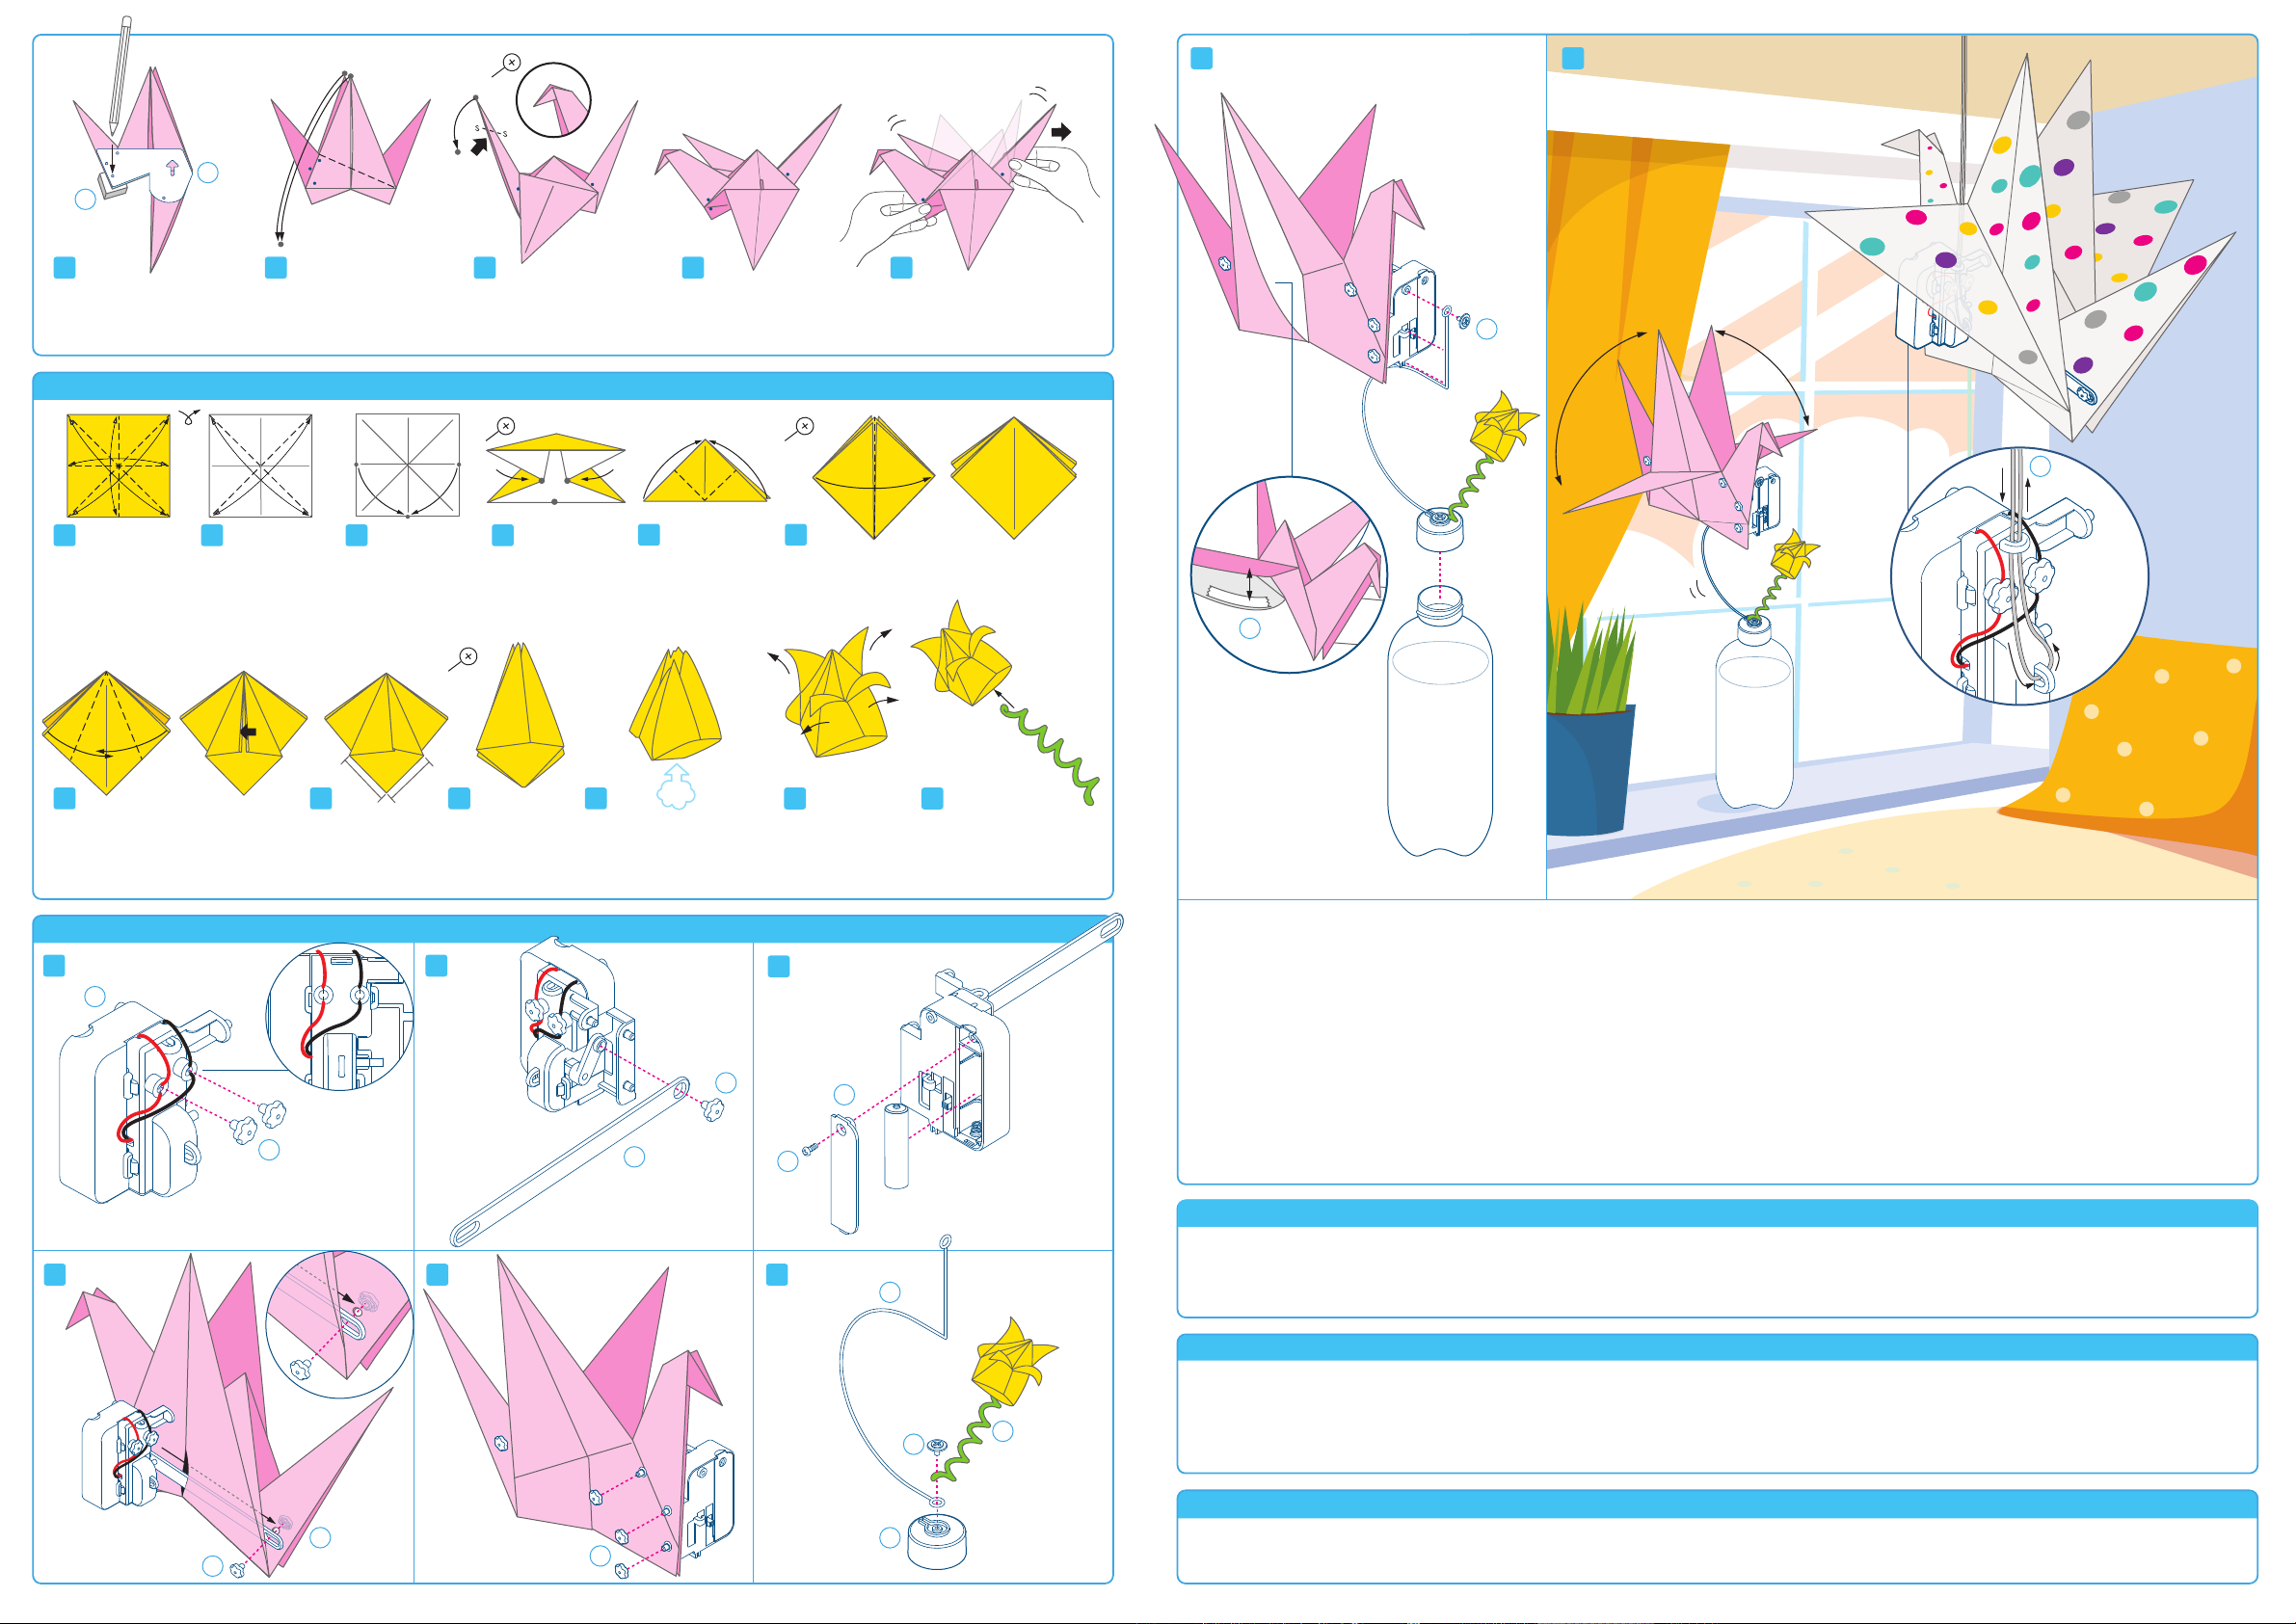
Align the template with the
folded shape. Put a foam
piece underneath and use a
pencil to pin 4 holes heavily.
Fold the top corner
downwards along the crease.
Repeat on the back.
Inside reverse fold along
the SS line to form the
beak.
Your flapping bird is
complete!
A B
When you flatten
this, make sure the
distances A & B
shown are equal.
You will find a small hole
created underneath. Blow
into the base to inflate and
shape the flower.
Use a pencil to curl the
pipe cleaner and insert the
tip at the bottom of tulip.
Your tulip is now ready!
Peel each petal
down, slowly and
carefully.
When you switch on the motorised bird, you make a circuit, which connects the battery to the electric motor inside the gearbox housing.
Electrical energy flows from the battery to the motor, which converts this energy into a rotating mechanical force. The motor axle turns at a
very high speed but with little power, and therefore it cannot move the bird on its own. Inside the gearbox housing, the motor turns the gear
- this slows the speed and increases the power of the motor's mechanical force, making it more useful. Most common machines use a gearbox
to change the power and speed of a force in this way.
Origami is the art of paper folding and originates from Japan. It is now used as an inclusive term for all folding practices and is frequently used
in engineering and a science. Origami structures are used in space exploration to launch structures compactly and deploy them in space.
1. If the bird stops moving, try opening the lower layer of the wings, or pull the bird’s tail.
2. Check that the pegs are fitted as instructed in section F, and that all the fixings are fitted tightly with the paper.
3. Check that the battery is fresh and inserted in correct orientation.
4. Check that the wires are fitted correctly with the ends of the wires in contact with the metal terminals and secured with the pegs.
H. HOW DOES IT WORK?
I. FUN FACTS
G. TROUBLESHOOTING
E. ORIGAMI FLOWER
F. ASSEMBLY
13 14 15 16
7 8 11
12
7 8
3
12
9 10
5
1 2 6
3 4
F
H
D
C
1. Connect the wires by inserting them into the holes, and then secure with the plastic flower-shaped terminal pegs. Wires that are the same
colour should be connected together as illustrated.
2. Slot the push rod onto the gearbox housing and secure with a flower-shaped terminal peg.
3. Insert one 1.5 V AAA battery into the battery compartment. Make sure you insert the battery in the correct orientation polarity (the flat,
negative end of the battery should rest against the coiled spring).
4. Carefully insert the push rod through the precut holes on the origami bird as shown in the diagram. Secure with a flower-shaped terminal
peg and a terminal cap.
5. Align the 3 protruded ends of the gear box housing with the 3 punched holes on the origami bird. Secure with the flower-shaped terminal caps.
6. Secure the bottom part of the wire stand and the pipe cleaner on the bottle hub with a washer screw.
7. Fix the top part of the wire stand in place with a washer screw. Fill a recycled bottle with water and place it on a desk or window sill. Fit
the bottle hub onto the bottle. To enhance performance, open the lower part of the wings and stick the adhesive tape inside the wings.
8. You may also hang the bird from the ceiling with the string provided. Tie the gearbox housing as illustrated. The motorized flapping bird
is now ready for use.
Move the upper flaps toward each
other, and tuck one into the other, as
far as it goes.
Repeat steps 7 & 8
on the back of the
folded shape to get
this.
I
C
6
D
5
Pull the tail to see it
flaps.
17
J
©2018 4M INDUSTRIAL DEVELOPMENT LIMITED. ALL RIGHTS RESERVED.
M
K
4
F
L
N
G
B
+
1.5V AAA
-
E
Fold and unfold in
half diagonally and
in both directions.
Crease well and
open out once again.
Fold and unfold 4
times to make crease
lines along the centre
lines and diagonals.
Turn the paper over.
Holding the points
shown, bring them
in. Flatten model.
It will look like this. Fold bottom corners
of front flaps up to
the top corner.
Repeat this on the
back as well.
Turn the front flap to the right, like turning the
pages in a book. Do the same to the other side.

Other 4M Toy manuals

4M CRYSTAL MINING User manual

4M

4M CRYSTAL MINING User manual

4M Green Science 00-03448 User manual

4M

4M Green Science 00-03448 User manual

4M ECO-TECH BULB User manual

4M

4M ECO-TECH BULB User manual

4M FLASHING EMERGENCY LIGHT User manual

4M

4M FLASHING EMERGENCY LIGHT User manual

4M KidzLabz Giant Visible Padlock User manual

4M

4M KidzLabz Giant Visible Padlock User manual

4M 00-03456 User manual

4M

4M 00-03456 User manual

4M STITCH-A-CIRCUIT ROBOT User manual

4M

4M STITCH-A-CIRCUIT ROBOT User manual

4M Bottle Catamaran User manual

4M

4M Bottle Catamaran User manual

4M Electric Plane Launcher User manual

4M

4M Electric Plane Launcher User manual

4M KidzLabs 00-03399 User manual

4M

4M KidzLabs 00-03399 User manual

4M KidzLabs Gamemaker Chess Designer Kit User manual

4M

4M KidzLabs Gamemaker Chess Designer Kit User manual

4M KidzRobotix HOVER RACER User manual

4M

4M KidzRobotix HOVER RACER User manual

4M KIDZ LABS DINOSAUR SKELETON EXCAVATION KIT User manual

4M

4M KIDZ LABS DINOSAUR SKELETON EXCAVATION KIT User manual

4M DINOSAUR SKELETON EXCAVATION KIT User manual

4M

4M DINOSAUR SKELETON EXCAVATION KIT User manual

4M DOMINOBOT User manual

4M

4M DOMINOBOT User manual

4M Disney Frozen II Code A Maze User manual

4M

4M Disney Frozen II Code A Maze User manual

4M UNICORN FOUNTAIN User manual

4M

4M UNICORN FOUNTAIN User manual

4M KidzRobotix 00-03450 User manual

4M

4M KidzRobotix 00-03450 User manual

4M Techcraft Paper Circuit Racer User manual

4M

4M Techcraft Paper Circuit Racer User manual

4M Tyrannosaurus Rex Robot User manual

4M

4M Tyrannosaurus Rex Robot User manual

4M Hover Racer User manual

4M

4M Hover Racer User manual

4M KidzLabs Crystal Science User manual

4M

4M KidzLabs Crystal Science User manual

4M Creative Straw Kit User manual

4M

4M Creative Straw Kit User manual

4M 3-in-1 Mini Solar Robot User manual

4M

4M 3-in-1 Mini Solar Robot User manual

Popular Toy manuals by other brands

FUTABA GY470 instruction manual

FUTABA

FUTABA GY470 instruction manual

LEGO 41116 manual

LEGO

LEGO 41116 manual

Fisher-Price ColorMe Flowerz Bouquet Maker P9692 instruction sheet

Fisher-Price

Fisher-Price ColorMe Flowerz Bouquet Maker P9692 instruction sheet

Little Tikes LITTLE HANDIWORKER 0920 Assembly instructions

Little Tikes

Little Tikes LITTLE HANDIWORKER 0920 Assembly instructions

Eduard EF-2000 Two-seater exterior Assembly instructions

Eduard

Eduard EF-2000 Two-seater exterior Assembly instructions

USA Trains EXTENDED VISION CABOOSE instructions

USA Trains

USA Trains EXTENDED VISION CABOOSE instructions

Modellbau Laffont Z1601 Assembly instructions

Modellbau Laffont

Modellbau Laffont Z1601 Assembly instructions

NOCH 12905 instruction manual

NOCH

NOCH 12905 instruction manual

Eduard Ki-61-Id quick start guide

Eduard

Eduard Ki-61-Id quick start guide

Viessmann Vollmer 45616 Mounting instruction

Viessmann

Viessmann Vollmer 45616 Mounting instruction

Vollmer 42004 Mounting instruction

Vollmer

Vollmer 42004 Mounting instruction

Phoenix Model CLASSIC-EP instruction manual

Phoenix Model

Phoenix Model CLASSIC-EP instruction manual

H-KING Sopwith Camel British WW1 Fighter instruction manual

H-KING

H-KING Sopwith Camel British WW1 Fighter instruction manual

MODSTER Predator 4x4 Crawler user manual

MODSTER

MODSTER Predator 4x4 Crawler user manual

DHK Hobby 8136 User instruction manual

DHK Hobby

DHK Hobby 8136 User instruction manual

THUNDER TIGER Raptor 50 V2 kit manual

THUNDER TIGER

THUNDER TIGER Raptor 50 V2 kit manual

Timberkits Skateboarder instructions

Timberkits

Timberkits Skateboarder instructions

Hangar 9 Funtana 125 Assembly manual

Hangar 9

Hangar 9 Funtana 125 Assembly manual

manuals.online logo
manuals.online logoBrands
  • About & Mission
  • Contact us
  • Privacy Policy
  • Terms and Conditions

Copyright 2025 Manuals.Online. All Rights Reserved.