A&D UM-102 User manual

Instruction Manual Original
Manuel d’instructions Traduction
Manual de instrucciones Traducción
Manuale di Istruzioni Traduzione
使用手冊 翻譯
1WMPD4002909B


English 1
UM-102
Digital Sphygmomanometer
Instruction Manual
Contents
1. Dear Customers ................................................................................ 2
2. Preliminary Remarks ......................................................................... 3
3. Notes for Proper Use ......................................................................... 4
4. Parts Identification ............................................................................. 7
5. Symbols ............................................................................................. 8
6. Using the Monitor .............................................................................. 9
7. Measurements ................................................................................. 12
8. Useful Features ............................................................................... 13
9. Troubleshooting ............................................................................... 14
10. Maintenance .................................................................................... 14
11. Technical Data ................................................................................. 15

English 2
1. Dear Customers
Congratulations on purchasing a state-of-the-art A&D sphygmomanometer,
one of the most advanced monitors available on the market today.
Designed for ease of use and accuracy. We recommend that you read
through this manual carefully before using this device for the first time.
Intended User: This device is designed to be used by people
who can measure blood pressure by
auscultation.
Applicable Patient: The device is designed for use on adults and
children aged 3 and older.
Environment for Use: The device is designed for use in a medical
facility.
Intended purpose: This device is designed to measure human
blood pressure and heart rates.
Features
Measurement
This sphygmomanometer is designed to monitor and display cuff pressure
during cuff inflation (by rubber bulb) and deflation (by exhaust bulb) while
the user determines the patient’s blood pressure level by listening for
Korotkoff sounds with a stethoscope.
Safety
This sphygmomanometer is designed to measure a patient’s blood pressure
without the use of mercury, therefore protecting your local environment.
An automatic quick exhaust valve is installed in the device to prevent over
pressurization of 300mmHg or higher, therefore protecting the patient.

English 3
2. Preliminary Remarks
Compliance
This device conforms to the European Directive 93/42 EEC for Medical
Products. This is made evident by the mark of conformity. (0123:
The reference number to the involved notified body)
Definitions
SYS Systolic Blood Pressure
DIA Diastolic Blood Pressure
PUL Pulse
Exhaust This means “releasing the cuff air as soon as possible”.
Constant exhaust This means, “releasing the cuff air at a constant
depressurization rate”.
Batteries
Use alkaline batteries (LR6 type, AA type) or equivalent batteries.
Do not mix new and used batteries.
Remove the batteries from the device and store them separately if the
device will not be used for a month or more. Otherwise, the batteries may
degrade.
The battery life varies with the ambient temperature and may be shorter at
low temperatures. Generally, two new LR6 batteries will last approximately
for two months when used forty times for measurement each day.
A Defective Sphygmomanometer
Stop using the device immediately if the device does not work properly.
Please attach a note with the following "Do not use this sphygmomanometer"
to prevent any further use. This defective device should be stored in a safe
place to avoid any misuse until it has been sent for repair.
Repair
Do not attempt to open the device. Contact your nearest A&D authorized
dealer and they will repair or replace the device.
Do not modify the device. It may cause accidents or damage to the device.

English 4
Blood Pressure Measurement
Do not use on patients with blood flow disorders.
The user should stop using the device if there is an abnormality, such as
the patient feeling excessive arm pain, and remove the cuff to protect the
patient.
Contraindications
Do not use the device in an ambulance or air ambulance. Doing so will
prevent the device from providing accurate measurements.
Do not apply the cuff to an arm with another medical electrical equipment
attached. The equipment may not function properly.
Do not apply the cuff on an arm with an unhealed wound.
Do not apply the cuff on an arm receiving an intravenous drip or blood
transfusion. It may cause injury or accidents.
Do not use the device where flammable gases such as anesthetic gases
are present. It may cause an explosion.
Do not use the device in highly concentrated oxygen environments, such
as a high-pressure oxygen chamber or an oxygen tent. It may cause a fire
or explosion.
When the cuff is infected by blood or body fluid, it should be safely disposed
of according to local instructions or protocol to avoid any potential spread of
infectious disease.
3. Notes for Proper Use
Storage
Do not store the device where it could be splashed with water or other liquids.
The device and cuff are not water resistant. If the device is immersed by
accident, it may require servicing. (Do not use the device before it has
endured a full service.)
Do not store the device in a high temperature or high humidity environment,
or in direct sunlight.
Do not store the device where it could be influenced by vibration or shock.
Do not store the device in a dusty, salty or sulfuric environment.
Do not store the device where medicines are stored, or where medicines
are evaporating.
Store the cuff, air hose, and rubber bulb so that they are not bent or
blocked. Doing so may cause an accident or damage to the device.

English 5
Before Use
Make sure that the device works correctly and that measurement values
are accurate.
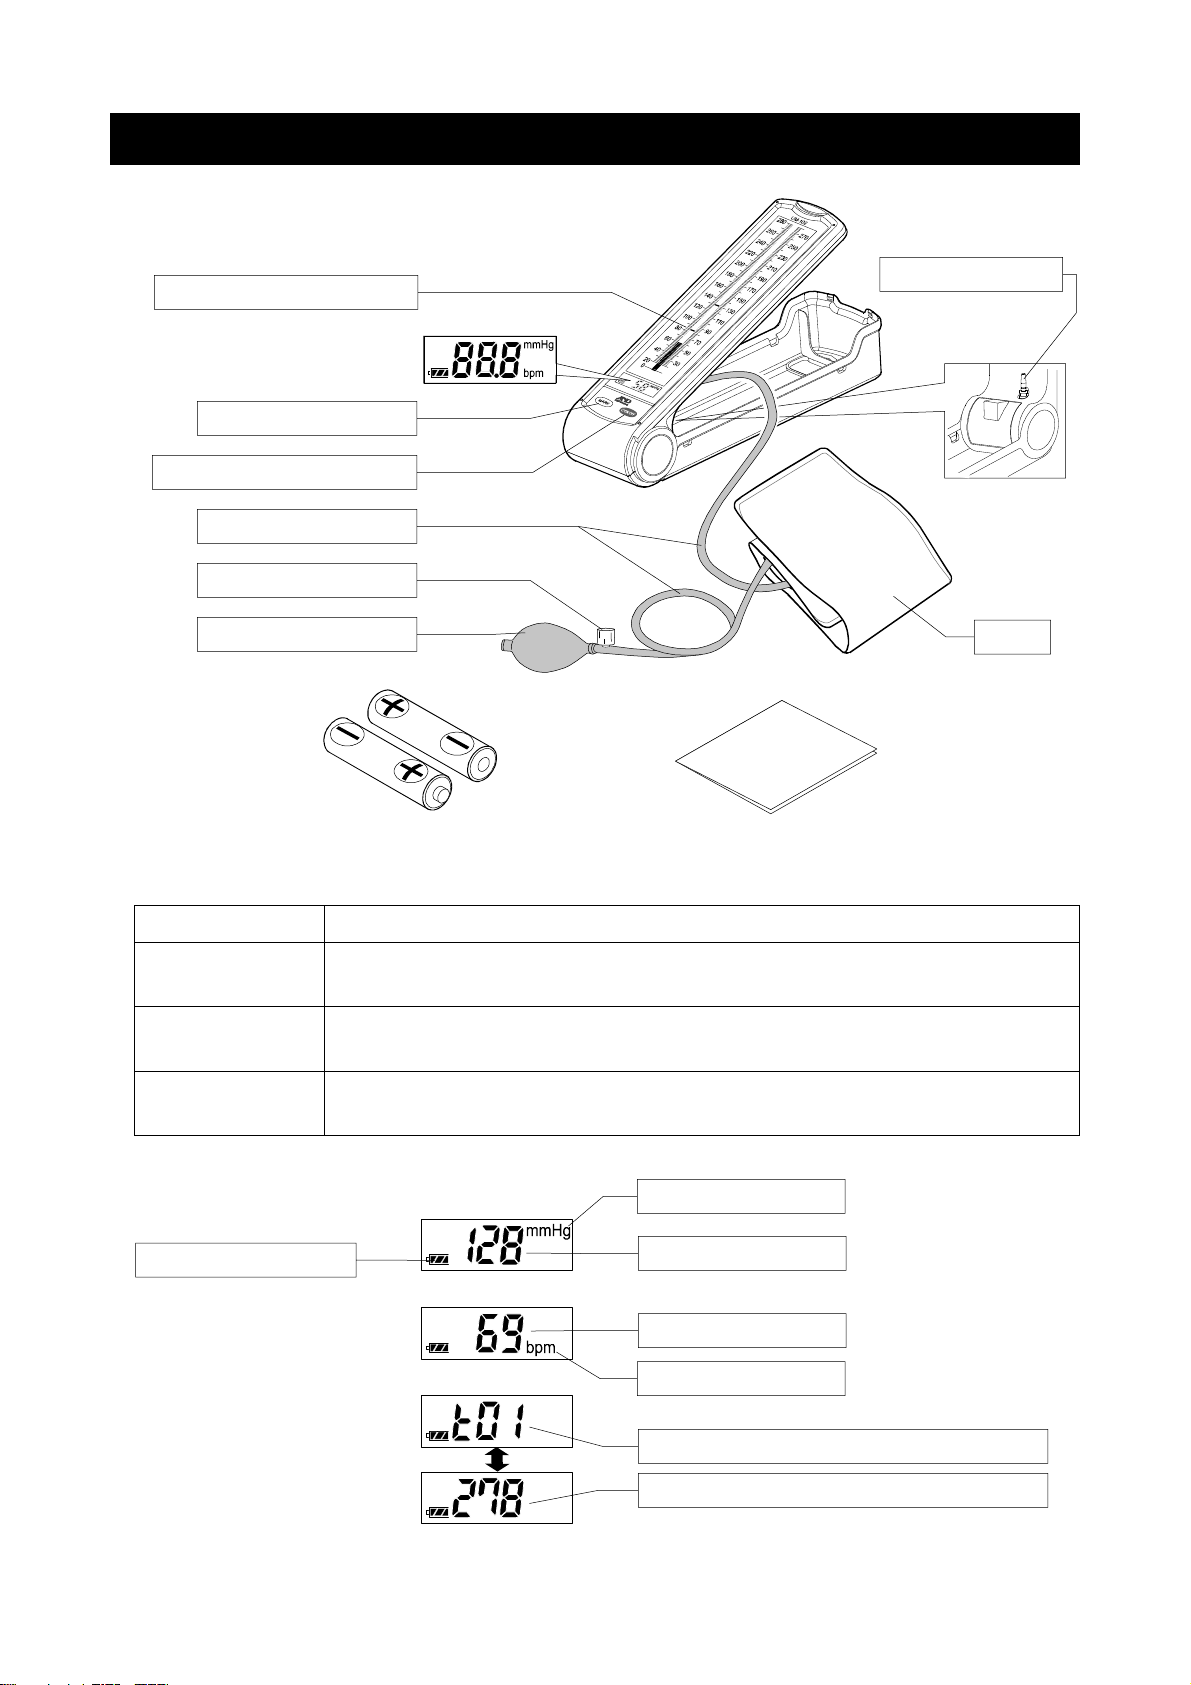
Make sure that the cuff and air hoses are properly connected.
Check and maintain the cleanliness of the parts in direct contact with the patient.
Avoid placing the device near a strong magnetic field or static electricity.
Avoid placing the device near high frequency surgical equipment.
When reusing the device, confirm that the device is clean.
During Use
This device was not designed for patients' own use so care must be taken
to ensure accurate results and to avoid possible accidents.
Regularly confirm patient status when measurement is performed
frequently or for a long time. Otherwise, damage may be caused due to
peripheral arterial disease.
Stop using the device immediately, if the patient feels pain during a
measurement or if the device does not work properly.
Stop using the device if you notice any abnormalities (for example; liquid
inside the device) and request a full service.
To measure blood pressure, the arm must be squeezed by the cuff hard
enough to temporarily stop blood flow through the artery. This may cause
pain, numbness or a temporary red mark to the arm. This condition will
appear especially when measurement is repeated successively.
Any pain, numbness, or red marks will disappear with time.
This is a device which needs to handle with care. Strong impact may result
in malfunction of the device.
Be careful not to get hurt when handling the damaged device.
Do not replace the batteries while the device is in use.
Do not touch the batteries and the patient at the same time.
Should the batteries short-circuit, they may become hot and potentially
cause malfunctions and scalding.
Use the device so that the air hose is not bent or blocked. Using the cuff
with the air hose kinked or bent may result in peripheral circulatory failure
due to hemostasis in the arm (caused by air remaining in the cuff).
After Use
Clean the device, cuff and accessories with a dry, soft cloth or a wet cloth
with water or a neutral detergent. Do not pull or kink the hoses. Do not use
any organic solvent, (antiseptic solution or other harsh chemicals) to clean
the device, cuff or accessories.
Press START/STOP button to turn off the power after measurement.
Keep the original box for further transportation after purchasing the device.
Be careful not to get your fingers caught when folding the device.

English 6
Periodic Maintenance
This device is a precision instrument and contains electronic circuitry. Please
check all functions periodically. Contact your nearest A&D authorized dealer
for official calibration/check-up, according to your local regulations.
Used equipment, parts and batteries are not treated as ordinary household
waste, and must be disposed of according to the applicable local regulations.
The user authority (the hospital, clinic, etc.) is responsible for the safe use and
maintenance of this electronic medical device. Care should be taken to follow
the specified daily maintenance and inspection procedures for safe use.
How to Take Proper Measurements
For the most accurate blood pressure measurement:
Confirm that a patient does not cross the legs, patient’s legs touch on the
floor and patient’s back and arms are supported.
Let a patient relax for about five to ten minutes before measurement.
Place the center of the cuff at the same height as a patient's heart.
A patient must remain still and keep quiet during measurement.
Do not measure right after exercising or taking a bath. A patient must rest
for twenty to thirty minutes before the measurement.
Notes for Proper Measurement
Let a patient sit down in a comfortable position. Confirm that the patient
does not cross their legs, that their feet touch the floor (if possible), and
that their back and the arm being measured are supported.
Let a patient relax for about five to ten minutes before taking a measurement.
If a patient is excited or depressed by emotional stress, the measurement will
reflect this stress as a higher (or lower) than normal blood pressure reading
and the pulse reading will usually be faster than normal.
An individual's blood pressure varies constantly, depending on what a
patient is doing and what a patient has eaten. What a patient drinks can
have a very strong and rapid effect on patient’s blood pressure.
Should the device detect a condition that is abnormal, it will stop the
measurement and display an error symbol. Refer to page 8 for the
description of symbols.
This sphygmomanometer is intended for adults and children aged 3 and
older. Do not use this device on newborns or infants.
Measurement may be affected by the position of the cuff, as well as the
patient's posture (standing, sitting, supine), movement, or physiological
condition.

English 7
4. Parts Identification
Main Body and Accessories
Function
START/STOP
Button Turns on or off the device.
MARK button During measurement ........
.
After turned off ...................
.
Puts a marker at a pressure value
Indicates a lifetime counter
Numerical
display
During measurement ........
.
After exhausted air ............
.
Indicates pressure value
Indicates pulse rate
Display
Unit of pressure
Pressure value
Battery indicator
Pulse rate
Unit of pulse
High digi
t
s of the lifetime counter
Low digi
t
s of the lifetime counter
1.5V Batteries x 2
(LR6 or AA)
Instruction manual
Numerical displa
y
Rubber bulb
Exhaust valve
START/STOP button
MARK button
Pressure bar displa
y
Cuff
Cuff connector
A
ir hose

English 8
5. Symbols
Symbols Function / Meaning Recommended Action
Standby and Turn the device on
MARK Pressure value holding and
lifetime counter
Battery installation guide
SN Serial number
Date of manufacture
Type BF: Device, cuff and tubing
are designed to provide special
protection against electrical shocks.
Full Battery
The battery power indicator during
measurement.
Low Battery
The battery is low when it blinks.
Replace all batteries with
new ones, when the
indicator blinks.
Pressure remains in the cuff. Exhaust it with the
exhaust valve.
Measurement overtime
Device is out of order. Send for service.
The pulse is not detected correctly. Take another measurement.
mmHg Unit of pressure
bpm Unit of pulse
EC directive medical device label
WEEE label
Manufacturer
EU-representative
Refer to instruction manual/booklet

English 9
6. Using the Monitor
Installing / Changing the Batteries
1. Remove the battery cover.
2. Insert a new set of batteries into the battery
compartment as shown. Make sure the polarities
(+) and (-) are correct. Use only LR6, AA or
equivalent batteries.
3. Close the battery cover.
CAUTION
Insert the batteries in the battery compartment.
If not, the device will not work.
When (LOW BATTERY mark) blinks in the LCD display, replace all
batteries with new ones. Do not mix old and new batteries. It may shorten
the battery life, or cause the device to malfunction.
Battery life varies with the ambient temperature and may be shorter at low
temperatures.
Only the specified batteries should be used with this device. The batteries
provided with the device are for testing the device performance and may
have a limited life.
Remove the batteries from the device and store them separately if the
device will not be used for a month or more. Otherwise, the batteries may
degrade.
Connecting the Air Hose
Insert the air hose into the cuff connector firmly.
Connecting the Connector and Plug for the Cuff
(Sold separately)
1. Insert the air hose socket into the cuff connector.

English 10
2. Insert the air hose plug to the air hose of
the cuff.
3. Connect the air hose plug of the cuff to
the air hose socket of the main body.
Use the specified connector. (Refer to page 16)
Selecting the Proper Cuff
Using the correct cuff size is important for accurate readings. If the cuff is
not the proper size, the reading may yield an incorrect blood pressure value.
The INDEX and RANGE markings on the cuff will indicate that you are using
the proper cuff or not. (Refer to "Attaching the Arm Cuff" in the next section)
Arm Size Cuff Size Catalog Number
41 cm to 50 cm LL cuff CUF-KW-LL
31 cm to 45 cm Large Adult cuff CUF-KW-LA
22 cm to 32 cm Adult cuff CUF-KW-A
16 cm to 24 cm Small Adult cuff CUF-KW-SA
12 cm to 17 cm SS cuff CUF-KW-SS
Arm size: The circumference of the biceps
Attaching the Arm Cuff
1. Wrap the cuff around the upper arm, about 1 to
2 cm above the elbow as shown on the right.
Place the cuff directly against the skin, as
clothing may cause a faint pulse and could
result in a measurement error.
2. Constriction of the upper arm, caused by rolling
up a shirtsleeve, may interfere with accurate
readings.
3. Make sure that the index points are within the range.
1 to 2 cm
Cuff
RANGE
INDEX
A
ir hose plug
A
ir hose
(
cuff
)
A
ir hose plug
(cuff)
A
ir hose socket
(
main bod
y
)
Securely connect by turning the air hose
plug the direction of the arrow.

English 11
Symbols that are printed on the cuff
Symbols Function / Meaning
▲ INDEX Proper fit range
ARTERY ▼ Artery position mark
THIS SIDE TO PATIENT Instructions to the patient
REF Catalog number
Lot number
ADULT Cuff size 22 cm to 32 cm
LL Cuff size 41 cm to 50 cm
LARGE ADULT Cuff size 31 cm to 45 cm
SMALL ADULT Cuff size 16 cm to 24 cm
SS Cuff size 12 cm to 17 cm
Operation suggestions

English 12
7. Measurements
1. Place the cuff on the arm (preferably the left arm).
Keep the patient still during measurement.
2. Press the START/STOP button.
When the START/STOP button is pressed, all
of the display symbols will appear for about one
second.
When starts flashing, the device is ready for
measurement. If air is remaining in the cuff when the
START/STOP button is pressed, the display will indicate an error code
.
Turn the device off ( press the START/STOP button again ) and turn
the exhaust valve counterclockwise once to release all the air in the cuff.
Then press the START/STOP button again to reactivate the device.
3. Place the stethoscope on the brachial artery and pressurize the cuff by
squeezing the rubber bulb. (Make sure the exhaust valve is completely
closed.)
While the cuff is inflating, the pressure bar will move and in turn the LCD
will display a number indicating the pressure.
Inflate the cuff to 30 to 40 mmHg higher than the patient’s expected
systolic value.
Note: If you wish to stop inflation at any time, press either the START/STOP
button or turn the screw of the exhaust valve to release the air.
4. When inflation is complete.
Turn the exhaust valve screw to release air slowly.
Measure the systolic pressure and the diastolic pressure by stethoscopy.
5. The heart rate is shown on the numerical display when the measurement is
complete or meets the following conditions.
When you pressurize 80mmHg or higher for the measurement.
When the pressure drops to 20mmHg or lower.
A
t heart level
START/STOP

English 13
6. Turn the exhaust valve screw counterclockwise to
release all the air from the cuff.
If a measurement is taken with insufficient pressure,
the mark will be displayed. Re-pressurize the
cuff to a pressure that is about 30 to 40 mmHg
higher than the previous attempt.
An error message will be displayed if a
measurement is taken with insufficient pulses or in
a very noisy environment.
7. Press the START/STOP button again to turn off the
power.
Note: Model UM-102 has an automatic power-off function.
Allow at least three minutes between measurements on the same person.
8. Useful Features
Measurement with MARK Button
You can put a marker at a certain pressure value
when the MARK button is pressed during the
measurement process. Up to 5 markings can be
shown over the range of 40mmHg.
Lifetime Counter
When the MARK button is pressed while the
device is off, the lifetime counter is displayed.
This counter function indicates the hours the
device was in use and helps to determine when
maintenance is necessary. High digits and Low
digits are alternatively displayed. The example
indicates that the device has been in use for
1,278 hours.
Marker
Marker
START/STOP
High digi
t
Low digi
t
A
lternativel
y

English 14
9. Troubleshooting
Problem Possible Reason Recommended Action
Nothing appears
in the display,
even when the
power is turned
on.
Batteries are empty. Replace all batteries with new ones.
Battery polarities
are not in the correct
position.
Reinstall the batteries with the
negative and positive ends matching
those indicated in the battery
compartment.
The cuff is not
inflated.
The cuff is not
connected properly.
Check the twist of the air hose, and
connection of the cuff and air hose.
There is leakage of
air from the cuff or
rubber bulb.
Replace the cuff or rubber bulb with a
new one.
Remain a display
of .
Error symbol is
displayed one
minute later.
Refer to "5. Symbols".
Note: If the recommendations above do not solve the problem, contact your
nearest authorized A&D dealer. Do not attempt to open or repair this
product by yourself, as any attempt to do so will render your warranty
invalid.
10. Maintenance
Do not attempt to open the device as the delicate electrical components
and intricate air unit inside could be damaged. If you cannot solve the
problem using our troubleshooting guide, request assistance from your
authorized dealer or from any A&D service group.
The device was designed and manufactured for a long service life.
However it is generally recommended to have the device inspected every
2 years, to ensure proper functioning and accuracy. Please contact either
your authorized dealer or A&D for maintenance.
CAUTION
The sphygmomanometer is not waterproof device. Do not splash water on
it and avoid exposure to moisture.
Do not use a organic solvent such as thinner or benzine.
The sphygmomanometer cannot be sterilized by autoclave, EOG or
formaldehyde etc.

English 15
Cleaning
When cleaning the device and cuff, turn off the power by pressing START/STOP
button and remove the batteries.
When the main body or cuff is dirty, wipe them fully by using a gauze or
cloth dampened with water or warm water avoiding excess water.
To prevent a risk due to infection, disinfect the main body and cuff regularly.
When disinfecting them, wipe them gently by using the gauze or
dampened cloth with local antiseptic solution then wipe the moisture off the
surface by using a dry soft cloth.
Use the following disinfectants to clean the main body and cuff.
Ethanol (70%)
Isopropanol (70%)
Chlorhexidine Gluconate Solution (0.5%)
Benzalkonium Chloride Solution (0.05%)
Sodium Hypochlorite (0.05%)
Do not wipe off the valve and its vicinity with
gauze soaked in disinfectant solution. It will
cause stuffing of the rubber bulb.
Clean the device about once every month, based on the policy or
instruction specified by the user authority.
Disposal
This unit and its batteries are not treated as ordinary household waste and
must be disposed of according to the applicable local regulations.
Item Parts Material
Package Box Cardboard
Cushion Cardboard
Bag PE
Main unit and
accessories
Enclosure ABS
Internal parts General electronic components
Batteries Alkaline battery
11. Technical Data
Model UM-102
Measurement method By applying pressure, enabling the determination
of blood pressure by the auscultatory method.
Measurement range
Numerical display Pressure: 0 - 300 mmHg
Rubber bulb
Valve

English 16
Pulse: 40 - 180 beats / minute
Pressure bar display Pressure: 20 - 280 mmHg
Measurement accuracy
Numerical display Pressure: ±3 mmHg
Pulse: ±5 %
Power supply 2 x 1.5 V alkaline batteries (LR6 or AA)
Upper arm circumference 22 - 32 cm using the adult cuff
Number of measurements Approx. 2000 measurements, when AA
alkaline batteries are used, with pressure value
of 180 mmHg at room temperature of 23°C
Classification Internally powered ME equipment
Continuous operation mode
EMD IEC 60601-1-2: 2014
Operating conditions +10°C to +40°C / 15%RH to 85 %RH
800 hPa to 1060 hPa
Transport / Storage conditions -20°C to +60°C / 10%RH to 95 %RH
700 hPa to 1060 hPa
Dimensions Approx. 98 [W] x 324 [H] x 67[D] mm
Weight Approx. 520 g, excluding batteries
Applied part Cuff Type BF
Useful life Device: 5 years
Cuff: 2 years
Rubber bulb unit: 2 years
Accessories sold separately
Cuff
Rubber bulb unit
Connector and Plugs for cuff replacement
Note: Specifications are subject to change without prior notice.
Catalog Number
Cuff Size Arm Size
CUF-KW-LL LL cuff 41 cm to 50 cm
CUF-KW-LA Large adult cuff 31 cm to 45 cm
CUF-KW-A Adult cuff 22 cm to 32 cm
CUF-KW-SA Small adult cuff 16 cm to 24 cm
CUF-KW-SS SS cuff 12 cm to 17 cm
Catalog Number
UM-102-10
Catalog Number
UM-102-11

English 17
EMD Technical Data Battery-operated Blood Pressure Monitor
Medical Electrical Equipment needs special precautions regarding EMD and needs to be
installed and put into service according to the EMD information provided in the following.
Portable and mobile RF communication equipment (e.g. cell phones) can affect Medical
Electrical Equipment.
The use of accessories and cables other than those specified may result in increased
emissions or decreased immunity of the unit.
Table 1 -EMISSION Limits-
Phenomenon Compliance
Conducted and radiated RF EMISSION CISPR 11 Group 1、Class B
Table 2 -IMMUNITY TEST LEVELS:Enclosure Port-
Phenomenon IMMUNITY TEST LEVELS
Electrostatic discharge
IEC 61000-4-2
±8 kV contact
±2 kV, ±4 kV, ±8 kV, ±15 kV air
Radiated RF EM fields
IEC 61000-4-3
10 V/m
80 MHz - 2.7 GHz
80 % AM at 1 kHz
Proximity fields from RF wireless communications equipment
IEC 61000-4-3 See table 3
Rated power frequency magnetic fields
IEC 61000-4-8
30 A/m
50 Hz or 60 Hz
Table 3 -Test specifications for ENCLOSURE PORT IMMUNITY to RF wireless communications
equipment-
Test
frequency
(MHz)
Band
(MHz) Service Modulation
Maximum
power
(W)
Distance
(m)
IMMUNITY TEST
LEVEL
(V/m)
385 380 ~ 390 TETRA 400 Pulse modulation
18 Hz 1.8 0.3 27
450 430 ~ 470 GMRS 460
FRS 460
FM
±5 kHz deviation
1 kHz sine
2 0.3 28
710
704 ~ 787 LTE Band 13,17 Pulse modulation
217 Hz 0.2 0.3 9
745
780
810
800 ~ 960
GSM 800/900
TETRA 800
iDEN 820
CDMA 850
LTE Band 5
Pulse modulation
18 Hz 2 0.3 28
870
930
1720
1700 ~ 1990
GSM 1800
CDMA 1900
GSM 1900
DECT
LTE Band 1,3,4,25
UMTS
Pulse modulation
217 Hz 2 0.3 28
1845
1970
2450 2400 ~ 2570
Bluetooth
WLAN 802.11 b/g/n
RFID 2450
LTE Band 7
Pulse modulation
217 Hz 2 0.3 28
5240
5100 ~ 5800 WLAN 802.11 a/n Pulse modulation
217 Hz 0.2 0.3 9
5500
5785

English 18
MEMO
Table of contents
Other A&D Blood Pressure Monitor manuals

A&D
A&D UA-782 User manual

A&D
A&D UB-511 Operating and maintenance manual

A&D
A&D UA-1200BLE User manual

A&D
A&D UA-1020 User manual

A&D
A&D UA-767 plus BT-Ci User manual

A&D
A&D TN-2655 User manual

A&D
A&D UA-651BLE User manual

A&D
A&D UA-767 Manual

A&D
A&D UA-767 Installation and operating instructions

A&D
A&D UA-1020 User manual