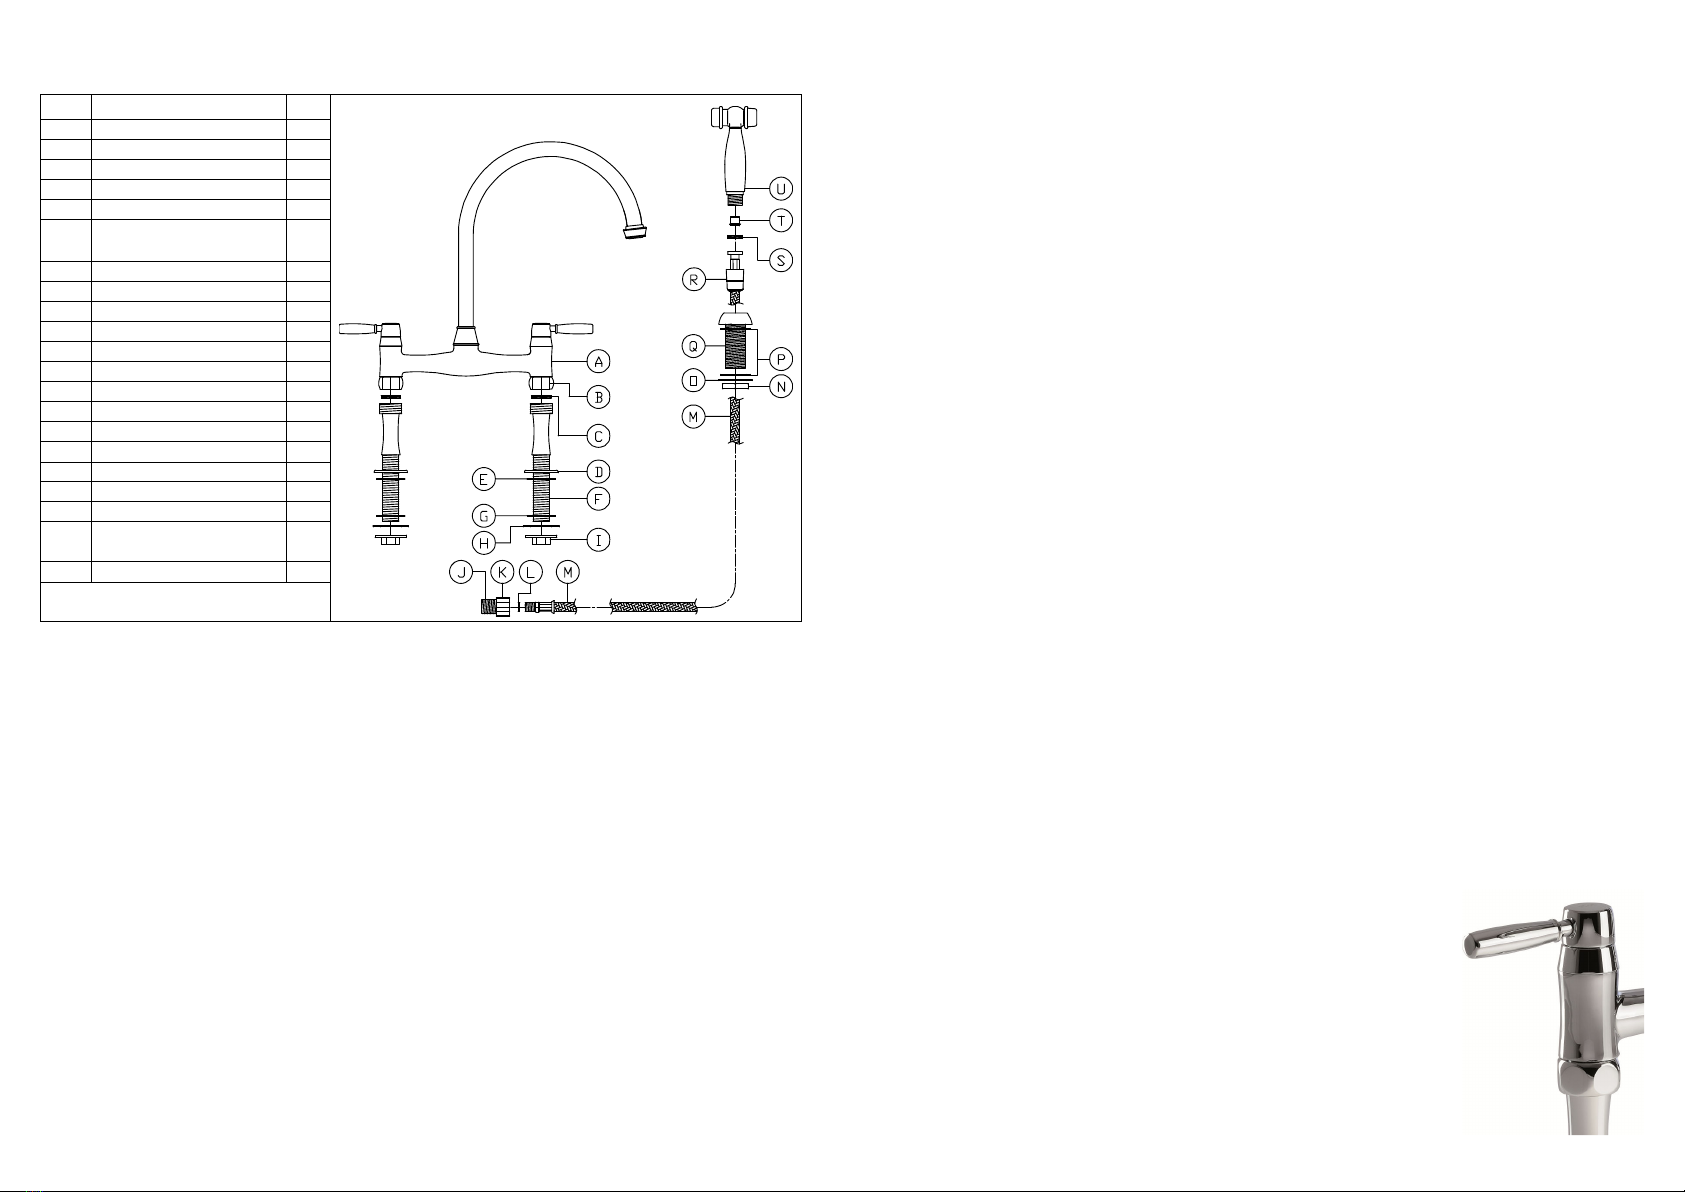
manuals.online logo
Brands
  1. Home
  2. •
  3. Brands
  4. •
  5. Abode
  6. •
  7. Plumbing Product
  8. •
  9. Abode BromptonBridge 5662 User manual

Abode BromptonBridge 5662 User manual

Important Technical Data
Minimum operating pressure 1.0 bar (tap)
Maximum operating pressure 5.5 bar* (tap)
Maximum operating pressure 2.0 bar* (spray)
Maximum hot water temperature 70°C*
Re ommended hot water temperature 46°C
Note: If these temperatures or pressures are
ex eeded, even for short periods, damage an
result. In these instan es a thermostati mixing or
pressure redu ing valve should be installed.
Abode taps use WRAS, KIWA, NSF or re ognised
approved omponents or are manufa tured in
a ordan e with re ognised European or
international standards. Please ensure that your
Abode Kit hen mixer is fitted in a ordan e with
Lo al Water Byelaws.
These installation guidelines have been prepared
for your dire tion and you must exer ise due are
at all times. We do not a ept responsibility for
problems that may o ur through improper
installation. Whilst assembling the tap take are
not to a identally loosen any s rewed
assemblies.
Abode is a registered trademark of Abode A
division of Nor ros Group (Holdings) Limited.
Manufacturers Product Reference
©Abode
11/2017
5662
Unit L, Zenith Park, Whaley Road,
Barnsley,
S75 1HT.
Tel: 01226 283434 Fax: 01226 282434
www.abodedesigns. o.uk
All errors and omissions ex epted.
Brompton
Bridge
with independent
spray
5 Year Warranty,
Terms And Conditions
In the unlikely event that you should experien e
any defe t in the materials or workmanship of
your new Abode mixer within 5 years of
pur hase, the pur haser’s sole remedy shall be
the repla ement (at the manufa turer’s
dis retion) of all or any part of the produ t that is
defe tive. All working parts and valves are
guaranteed for a period of 5 years from
pur hase. De orative surfa e finishes and O-
rings are guaranteed for 1 year from the date of
pur hase provided that our advi e on erning
are has been observed and no s ouring agents
have been used. This is provided that the mixer
or tap has been used for normal domesti
purposes and that the are, installation and
maintenan e instru tions have been observed.
The warranty extends to the original pur haser
only.
Marks, s uffs and s rat hes aused by improper
installation or a idental damage are not
overed by this guarantee. Neither are shade
variations or any damage or defe t aused by
in orre t installation or abuse of the fitting.
As we are ontinuously improving and
developing our range of produ ts, finishes &
olours, in the event of a valid laim, we may
not be able to provide an identi al repla ement
for the defe tive produ t throughout the
guarantee period. Where an identi al produ t is
no longer available, we will supply the nearest
equivalent from our then urrent produ t range.
In assessing your laim, we must be given the
opportunity to inspe t the produ t as installed
prior to removal. Any produ t returns must be
pa kaged as re eived and omplete.
No other warranties, express or implied, are
made, in luding mer hantability or fitness for a
parti ular purpose. Under no ir umstan es shall
the manufa turer be liable for any loss or
damage arising from the pur hase, use or
inability to use this produ t, or for any spe ial,
indire t, in idental or onsequential damages.
No liability is a epted for onsequential
damage to other household fixtures, fittings or
furnishings arising from this laim, even if
atta hed to the produ t. No installer, dealer,
agent or employee of Abode has the authority
to modify the obligations or limitations of this
warranty.
Please leave these instructions for your customer
Parts and Contents:
Key Description Qty
A
Mixertap body
1
B ¾” fixing nuts 2
C ¾” washers 2
D Base plinths 2
E
Upper
rubber washers
2
F Offset inlet legs
(with integral non return valves )
2
G
Lower
rubber washers
2
H Metal washers 2
I Fixing nuts 2
J
½”
adaptor
1
K M15 adaptor 1
L 15mm washer 1
M Nylon pull out hose ½” 1
N Fixing nut 1
O Metal washer 1
P Rubber washers 2
Q
Sprayhead body
1
R
Pull out hose nut
1
S Rubber washer 1
T Non return valve
(internal to sprayhead) 1
U
Sprayhead
1
Installation Preparation:
All parts should be removed from their pa kaging and inspe ted for any transport damage prior to
installation. You should he k you have the required hot and old supply pressure also.
Before installing the new mixer it is essential that you thoroughly flush through the supply pipes in
order to remove any remaining solder, swarf or impurities from your system. Failure to arry out this
simple pro edure ould ause problems or damage to the workings of the mixertap.
We re ommend installing parti le filters and isolation valves to both the hot and old feed pipes in
an a essible position. This will help to prevent premature failure of the valves and ease any future
maintenan e.
Shut off your water heating system and ensure that your mains stop o k is losed. Open the lowest
hot and old taps in the house and allow the water to run until the old-water storage tank and
pipes are fully empty. Please note, the hot water storage ylinder (if appli able) may remain full.
This mixertap requires a 3 x 35∅mm tap holes, the nominal entre spa ing is 203mm. If repla ing an
existing tap, remove the tap & lean the end of the feed pipes using wire wool the tap hole area
should be free from dirt and sealant.
Loosely position the tap and tail pipes to he k if any alteration to the existing pipework is required, if
this is the ase do this now.
If pla ing the tap or spray through a worktop for example the taphole should be sealed in
a ordan e with the worktop manufa tures instru tions, you should pay parti ular are that the seal
between the worktop and the tap is orre tly seated.
The installation of this produ t should respe t requirement IRN R090.
Installation:
1. Pla e the 3/4” washers (C) inside the 3/4” fixing nuts (B).
2. Loosely s rew the offset inlet legs (F) into the ¾”fixing nuts (B) (hand tight only). Now turn the inlet legs (F) to suit
the tap hole spa ing.
3. S rew the base plinths (D) onto the inlet legs (F), now pass the upper rubber washers (E) onto the inlet legs (F)
flush to the base plinths (D).
4. Pass the inlet legs (F) through the tap holes. Now pass the lower rubber washer (G), metal washers (H) then fixing
nuts (I) onto the inlet legs (F).
5. Whilst holding the tap (A) and legs (F) in pla e on the tap hole, tighten the fixing nuts (I).
6. Wrap a lean loth around the ¾” fixing nuts (B), whilst holding the inlet legs (F) pla e an adjustable spanner
around the loth and the fixing nuts (B). Tighten the fixing nuts (B) taking are not to mark them.
7. Conne t the hot and old inlet legs (F) to the water mains using ½” BSPx15mm ompression fittings. Note: Non-
return valves are fa tory fitted internally into inlet legs (F).
8. Push the (upper) rubber seal (P) onto the sprayhead body (Q), then pass the sprayhead body (Q) through the
3
RD
tap hole, now pass the (lower) rubber washer (P), then metal washer (O) over the sprayhead body (Q).
9. With the sprayhead body (Q) entral to the 3
RD
tap hole tighten fixing nut (N) onto sprayhead body (Q) to fix its
position.
10. S rew the hose nut (R) onto the sprayhead (U) ensuring that rubber seal (S) is present in the joint.
11. Pass the pull out hose (M) through the top of the sprayhead body (Q), s rew the pull out hose (M) to the M15
adaptor (K) ensuring that 15mm washer (L) is present in the joint.
12. S rew the ½” adaptor (J) to the old water supply pipe. Nb. we re ommend an additional servi e valve on the
spur to ontrol the spray flow rate.
After Installation:
On e you have visually he ked the installation of the new tap and all onne tions, ensure that all other
fittings are losed ex ept the new tap whi h should be left open. Turn on your water heating system and
ensure that your mains stop o k is open. Re onne t both the hot and old water supplies to this fitting. Che k
the fun tion of flow and fun tion of hot, old and mixed water.
Turn off the tap and he k arefully for any leaks around all onne tions on the fitting and adjoining
plumbing. If possible return to the installation after a longer period to double he k for slower leaks. If pressure
testing equipment is available he k the installation to the maximum re ommended pressure.
Clean the tap to remove any marks reated during installation as instru ted then pla e a bag over the
produ t to prote t the tap until it is ready for use. The installation should be periodi ally he ked for damage,
if the property is left unattended for a prolonged period we re ommend isolating water supplies.
Care Instructions For Your Kitchen Sink Tap:
To maintain the appearan e of this produ t, ensure that it is regularly cleaned only
using a clean, soft damp cloth. A solution of warm water and a mild liquid
detergent may be used where ne essary, and then the fitting rinsed thoroughly
and wiped dry. Any other cleaning action will invalidate your warranty. If the
mixertap has a diffuser it should be uns rewed and leaned periodi ally in water.
Abrasive leaners, s ouring leaners and a idi leaners must not be used under
any ir umstan es. Avoid onta t with all solvents (in luding hlorinated solvents,
ketones or a etones as these may result in surfa e deterioration or et hing). Also
avoid onta t with any harsh household hemi als su h as oven leaners, drain
leaners, rust removers, paint strippers and toilet bowl leaners, bar keepers friend
or Brasso.

Other Abode Plumbing Product manuals

Abode GR10 User manual

Abode

Abode GR10 User manual

Abode Pico Quad Monobloc AT2134 User manual

Abode

Abode Pico Quad Monobloc AT2134 User manual

Abode Bayenne Bridge 5656 User manual

Abode

Abode Bayenne Bridge 5656 User manual

Abode Storm Slimline AB2427 User manual

Abode

Abode Storm Slimline AB2427 User manual

Abode Genio User manual

Abode

Abode Genio User manual

Abode Coniq–R AT2120 User manual

Abode

Abode Coniq–R AT2120 User manual

Abode AX4045 User manual

Abode

Abode AX4045 User manual

Abode Zest Pull Out AT2164 User manual

Abode

Abode Zest Pull Out AT2164 User manual

Abode Ludlow Monobloc User manual

Abode

Abode Ludlow Monobloc User manual

Abode Atlas Monobloc Quad AT2166 User manual

Abode

Abode Atlas Monobloc Quad AT2166 User manual

Abode Tubist T Spray User manual

Abode

Abode Tubist T Spray User manual

Abode Astbury 5685 User manual

Abode

Abode Astbury 5685 User manual

Abode Ceramic Inset Sink AX4002 User manual

Abode

Abode Ceramic Inset Sink AX4002 User manual

Abode Astbury 3 Part AT3050 User manual

Abode

Abode Astbury 3 Part AT3050 User manual

Abode Chao AB4042 User manual

Abode

Abode Chao AB4042 User manual

Abode MARIDO ACT3034-36 User manual

Abode

Abode MARIDO ACT3034-36 User manual

Abode AW1021 User manual

Abode

Abode AW1021 User manual

Abode ACT3023 User manual

Abode

Abode ACT3023 User manual

Abode AB2450 User manual

Abode

Abode AB2450 User manual

Abode Harmonie AB1201 User manual

Abode

Abode Harmonie AB1201 User manual

Abode Globe Aquifier AT2173 User manual

Abode

Abode Globe Aquifier AT2173 User manual

Abode Brompton 3 Part 5692 User manual

Abode

Abode Brompton 3 Part 5692 User manual

Abode Bayenne Monobloc User manual

Abode

Abode Bayenne Monobloc User manual

Abode Fraction Single Lever Professional AT2160 User manual

Abode

Abode Fraction Single Lever Professional AT2160 User manual

Popular Plumbing Product manuals by other brands

Triton INSTAFLOW T30IR manual

Triton

Triton INSTAFLOW T30IR manual

Joseph Miles JMQS105752 Assembly instructions

Joseph Miles

Joseph Miles JMQS105752 Assembly instructions

American Standard Colony/Colony Soft 3475.301 installation instructions

American Standard

American Standard Colony/Colony Soft 3475.301 installation instructions

Gessi Goccia 33637 manual

Gessi

Gessi Goccia 33637 manual

Hans Grohe PuraVida 15070 Series manual

Hans Grohe

Hans Grohe PuraVida 15070 Series manual

newform NIO 68955 instructions

newform

newform NIO 68955 instructions

Woodbridge CLAWFOOT BATHTUB Installation and care guide

Woodbridge

Woodbridge CLAWFOOT BATHTUB Installation and care guide

Eczacibasi Vitra VitraFresh user manual

Eczacibasi

Eczacibasi Vitra VitraFresh user manual

KWC QBIX/QBIX-ART 26.240.502.000 Specification sheet

KWC

KWC QBIX/QBIX-ART 26.240.502.000 Specification sheet

Wirquin Chrono 50120560 instructions

Wirquin

Wirquin Chrono 50120560 instructions

Hans Grohe AXOR ShowerSolutions 220 1jet 35382 Series Assembly instructions

Hans Grohe

Hans Grohe AXOR ShowerSolutions 220 1jet 35382 Series Assembly instructions

Roper Rhodes Minerva Toilet Seat Fitting Instructions & Product Care

Roper Rhodes

Roper Rhodes Minerva Toilet Seat Fitting Instructions & Product Care

Home2O H72K-51D-CH quick start guide

Home2O

Home2O H72K-51D-CH quick start guide

Kohler 24270T-CP installation instructions

Kohler

Kohler 24270T-CP installation instructions

American Standard Deck-Mount Bath Fillers 3900 SERIES installation instructions

American Standard

American Standard Deck-Mount Bath Fillers 3900 SERIES installation instructions

Oras Optima SP1714F Installation and maintenance guide

Oras

Oras Optima SP1714F Installation and maintenance guide

Gessi RETTANGOLO K 53013 manual

Gessi

Gessi RETTANGOLO K 53013 manual

KWC F5 ACST2001 Installation and operating instructions

KWC

KWC F5 ACST2001 Installation and operating instructions

manuals.online logo
manuals.online logoBrands
  • About & Mission
  • Contact us
  • Privacy Policy
  • Terms and Conditions

Copyright 2025 Manuals.Online. All Rights Reserved.