Tubist T Spray
5YearWarranty
TermsandConditions:
Intheunlikelyeventthatyoushouldexperienceany
defectinthematerialsorworkmanshipofyournew
Abodeproductwithin5yearsofpurchase,the
purchaser’ssoleremedyshallbethereplacement(atthe
manufacturer’sdiscretion)ofalloranypartofthe
productthatisdefective.Allworkingpartsandvalvesare
guaranteedforaperiodof5yearsfrompurchase.
DecorativesurfacefinishesandO‐ringsareguaranteed
for1yearfromthedateofpurchaseprovidedthatour
adviceconcerningcarehasbeenobservedandno
scouringagentshavebeenused.Thisisprovidedthatthe
producthasbeenusedfornormaldomesticpurposes
onlyandthatthecare,installationandmaintenance
instructionshavebeenobserved.Thewarrantyextends
totheoriginalpurchaseronly.
Marks,scuffsandscratchescausedbyimproper
installationoraccidentaldamagearenotcoveredbythis
guarantee.Neitherareshadevariationsoranydamage
ordefectcausedbyincorrectinstallationorabuseofthe
fitting.
Aswearecontinuouslyimprovinganddevelopingour
rangeofproducts,finishes&colours,intheeventofa
validclaim,wemaynotbeabletoprovideanidentical
replacementforthedefectiveproductthroughoutthe
guaranteeperiod.Whereanidenticalproductisno
longeravailable,wewillsupplythenearestequivalent
fromourthencurrentproductrange.Inassessingyour
claim,wemustbegiventheopportunitytodiscussyour
claim,reviewyourproofofpurchaseandorinspectthe
productasinstalledpriortoremoval.Anyagreedproduct
returnmustbepackagedasreceivedandcomplete.
Nootherwarranties,expressorimplied,aremade,
includingmerchantabilityorfitnessforaparticular
purpose.Undernocircumstancesshallthemanufacturer
beliableforanylossordamagearisingfromthe
purchase,useorinabilitytousethisproduct,orforany
special,indirect,incidentalorconsequentialdamages.
Noliabilityisacceptedforconsequentialdamageto
otherhouseholdfixtures,fittingsorfurnishingsarising
fromthisclaim,evenifattachedtotheproduct.No
installer,dealer,agentoremployeeofAbodehasthe
authoritytomodifytheobligationsorlimitationsofthis
warranty.
ImportantCareInstructionsforyourProduct:
Tomaintaintheappearanceofthisproduct,ensurethatitisregularlycleanedonlyusingaclean,softdampcloth.Asolution
ofwarmwaterandamildliquiddetergentmaybeusedwherenecessary,andthenthefittingrinsedthoroughlyandwiped
dry.Anyothercleaningactionoruseofcommondomesticcleaningproductswillinvalidateyourwarranty.
Iftheproducthasaplasticaeratorinsertattheendofthespoutitshouldbeunscrewedandtheplasticinternalinsertonly
removedandcleanedordescaledtomaintainflowperformance.Donotusedescalingsolutiononanydecorativemetal
housing,rinsetheinsertthoroughlybeforereattachinginthereverseorder.
Abrasivecleaners,scouringcleanersandacidiccleanersmustnotbeusedonthisproductunderanycircumstances.Avoid
contactwithallsolvents(includingchlorinatedsolvents,ketonesoracetonesasthesemayresultinsurfacedeteriorationor
etching).Alsoavoidcontactwithanyharshhouseholdchemicalssuchasovencleaners,draincleaners,rustremovers,paint
strippersandtoiletbowlcleaners,barkeepersfriendorBrasso.
Pleaseleavetheseinstructionsforyourcustomer.
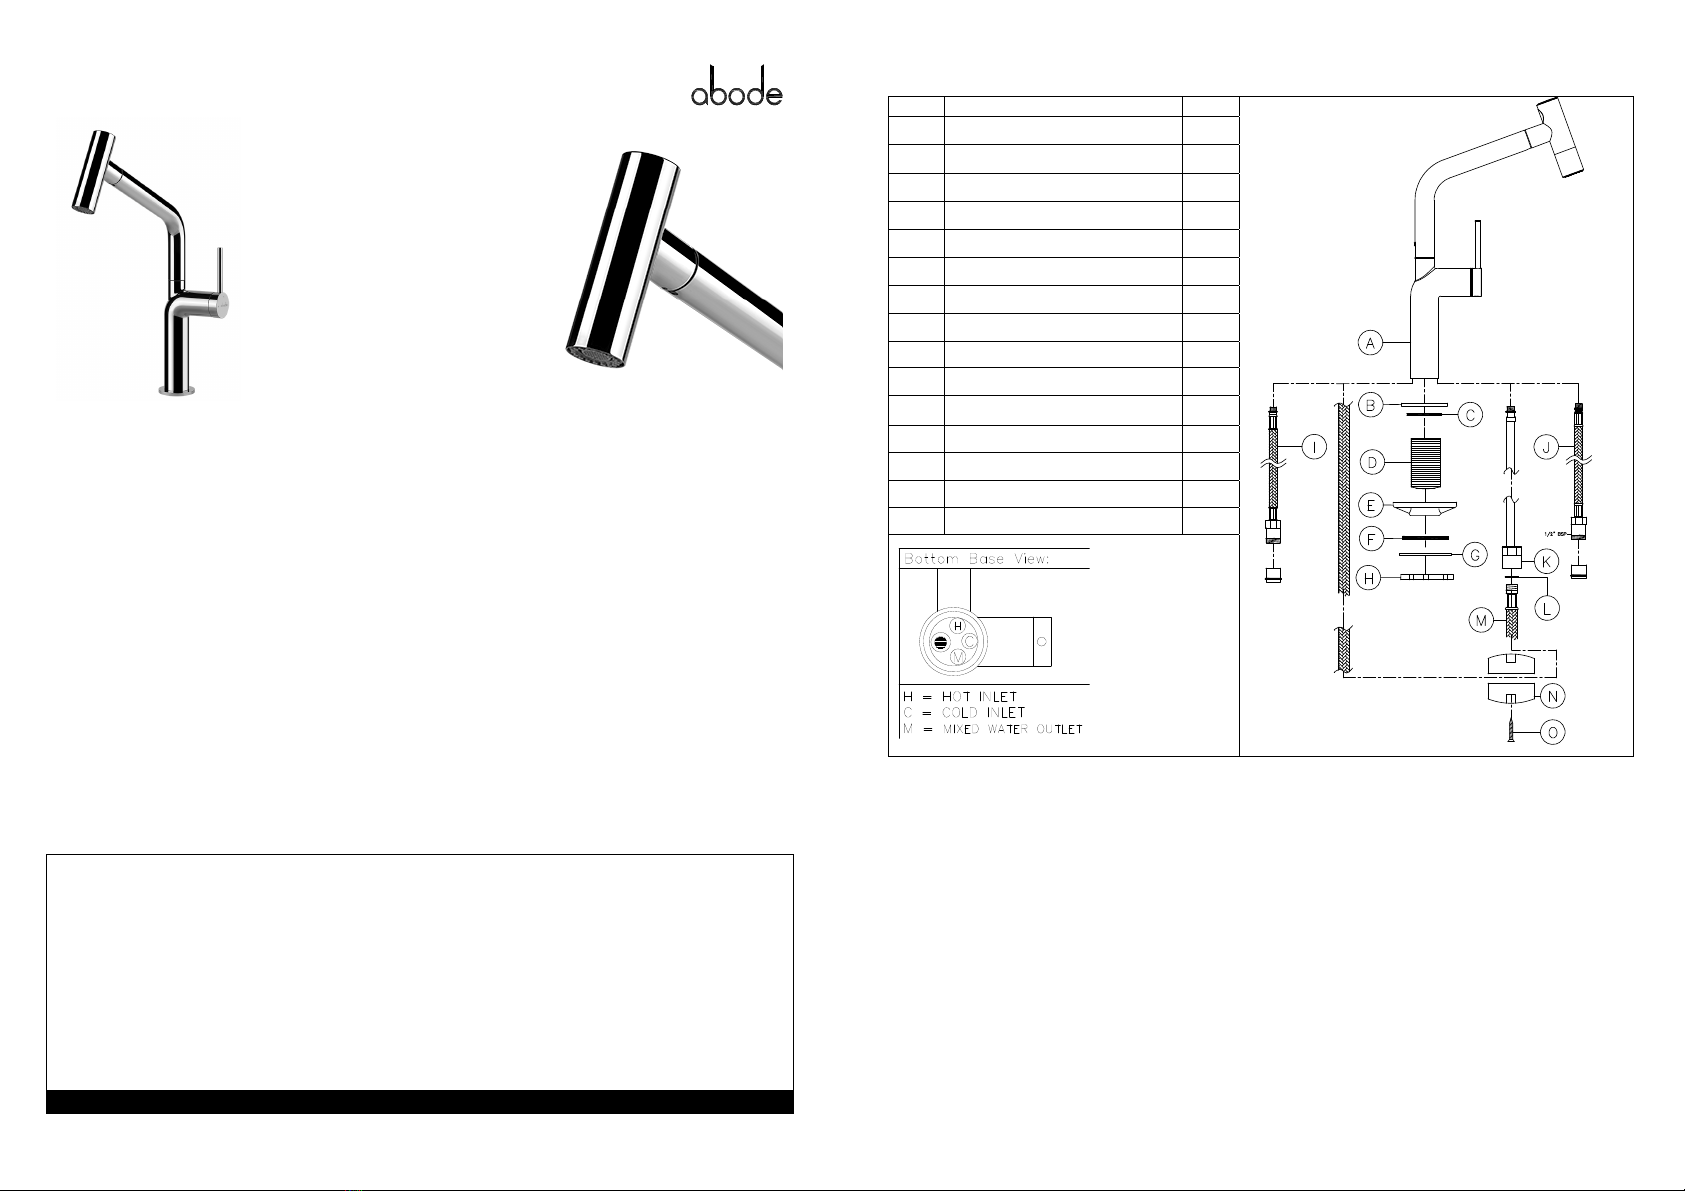
PartsandContents:
InstallationInstructions:
Preparation
Beforeinstallingthenewproductitisessentialthatyouthoroughlyflushthroughthesupplypipesinordertoremoveany
remainingsolder,swarforimpuritiesfromyoursystem.Failuretocarryoutthissimpleprocedurecouldcauseproblemsor
damagetotheworkingsoftheproductorreduceperformanceinvalidatingthewarranty.
Westronglyrecommendbestpracticeofinstallingparticlefiltersandisolationvalvestoboththehotandcoldfeedpipesinan
accessibleposition.Thiswillhelptopreventprematurefailureofthevalvesandeaseanyfuturemaintenance.
Allpartsshouldberemovedfromtheirpackagingandinspectedforanytransportdamagepriortoinstallation.
Shutoff(isolate)yourhotandcoldwatersupplylocallyatthepointofinstallationbeforecontinuingwiththeinstallation.Ifthe
watercannotbeisolatedlocallytheturnoffthemainsstopcockandpowertoanyheatingsystem,nowopenthelowesttapor
drainpointinthesystemuntilbothhotandcoldsuppliesarefullydrained.
Thisproductrequiresa35mmtaphole,ifreplacinganexistingproduct,removeitandcleantheendofthehotandcoldfeed
pipesusingwirewool,thetapholeareashouldbefreefromdirtandsealant.
Looselypositiontheproductandfittingstocheckifanyalterationtotheexistingpipeworkisrequired,ifneeded,dothisnow.
Iftheproductissingleflow(seesectionimportanttechnicaldata“flowcharacteristics”)thennonreturn(check)valvesmustbe
installedtocomplywithregulations.Someproductsaresuppliedwithnon‐returnvalvesthiswillbenotedintheinstructions.
KeyDescriptionQty
AMixerbody1
BBaseplinth1
CUpperseal1
DFixingcolumn1
ETriangularstabilisingbracket1
FLowergasket 1
GMetalspacer 1
HMetalfixingnut1
IHotFlexibletail(withintegralNRV)1
JColdFlexibletail(withintegralNRV)1
KMixedwateroutletextension1
LRubberseal 1
MPullouthorse1
NHoseweight1
OHoseweightscrews2
Figure1


