Stage 1 – Install the Tap:
1. Screw the fixin stud (G) into the base on the tap (A). Note: Fig.1 identifies the water inlets, viewed from the base of the tap.
2. Place the base plinth (B) then the upper seal (C) on to the base of the tap (A).
3. Screw the Cold (J), Hot (I) and filter (Z) tail pipes into the base of the tap.
4. Place the tap (A) centrally and strai ht to the tap hole, passin the fixin stud (G) and tail pipes (J, I & Z) throu h the sink.
5. Pass rubber horseshoe (E) then the metal horseshoe (F) over the fixin stud (G). Note: Only if the tap is to be fitted to a stainless steel sink then the
white triangular plate (D) can be fitted where shown to improve the stability of the tap.
6. Usin a spanner ti hten fixin nut (H) onto the fixin stud (G), a box spanner or small basin wrench will help if one is available.
7. Screw adaptor (X) to Filter tail pipe (Z) ensurin fiber washer (Y) is placed inside first (see drawin ). Note: We advise using PTFE tape on threaded section
of adaptor (X) to make a good seal.
8. Screw the pushfit fittin (W) into the adaptor nut (X). Note: We recommend using PTFE tape (do not use sealing compound) on the thread of the pushfit
fittings to make a good seal without applying excessive force (which may damage the plastic pushfit if overtightened).
9. Attach the hot water tail pipe (I) to the water supply.
10. Attach the 3-way valve (O) to the cold water feed pipe usin compression nut (M) and olive (L).
11. Attach the 3-way valve (O) to the cold water inlet pipe (J) usin a short len th of 15mm pipe, compression nut and olive (not supplied).
Stage 2 – Install the Filter:
1. Locate a convenient position to install the filter (S & R). Leave some room underneath the filter unit (R) to allow it to be changed.
2. Screw the filter bracket (U) to the cupboard wall usin screws (T).
3. Screw bracket (U) to the filter head (S) usin screws (V). Note: The direction of flow is marked on the fliter head and must be respected.
4. Write the date of installation onto the label on the filter cartrid e (R).
5. Insert the filter cartrid e (R) into the filter head (S). Ali n the tabs at the top of the filter cartrid e (R) with the aps in the base of filter head (S), push the
filter cartrid e (R) up into the filter head (S) then turn the filter cartrid e (R) approximately 90 to lock it into place.
6. Screw the pushfit adaptor (P) onto 3 way valve (O).
7. Cut the blue flexible pipe (Q) so it is sli htly lon er than the required len ths to and from the filter unit. When cuttin the pipe use a sharp Stanley or craft
knife, ensurin that the pipe is cut cleanly and square at all ends.
8. Firmly push the blue pipe (Q) apx. 12mm into the pushfit adaptor (P) then into the inlet on the filter head (S) as shown.
9. Firmly push the blue pipe (Q) apx. 12mm into the pushfit fittin (W) then into the outlet on the filter head (S) as shown.
After Installation:
Once you have visually checked the new fittin s and connections, ensure that all taps and drains are closed except the new product which should be left open. Turn
on (reconnect) the water supplies, check carefully for leaks around the installation and product function. Once you are sure of no leaks, close the new product and
recheck for leaks, turn on the water heatin power.
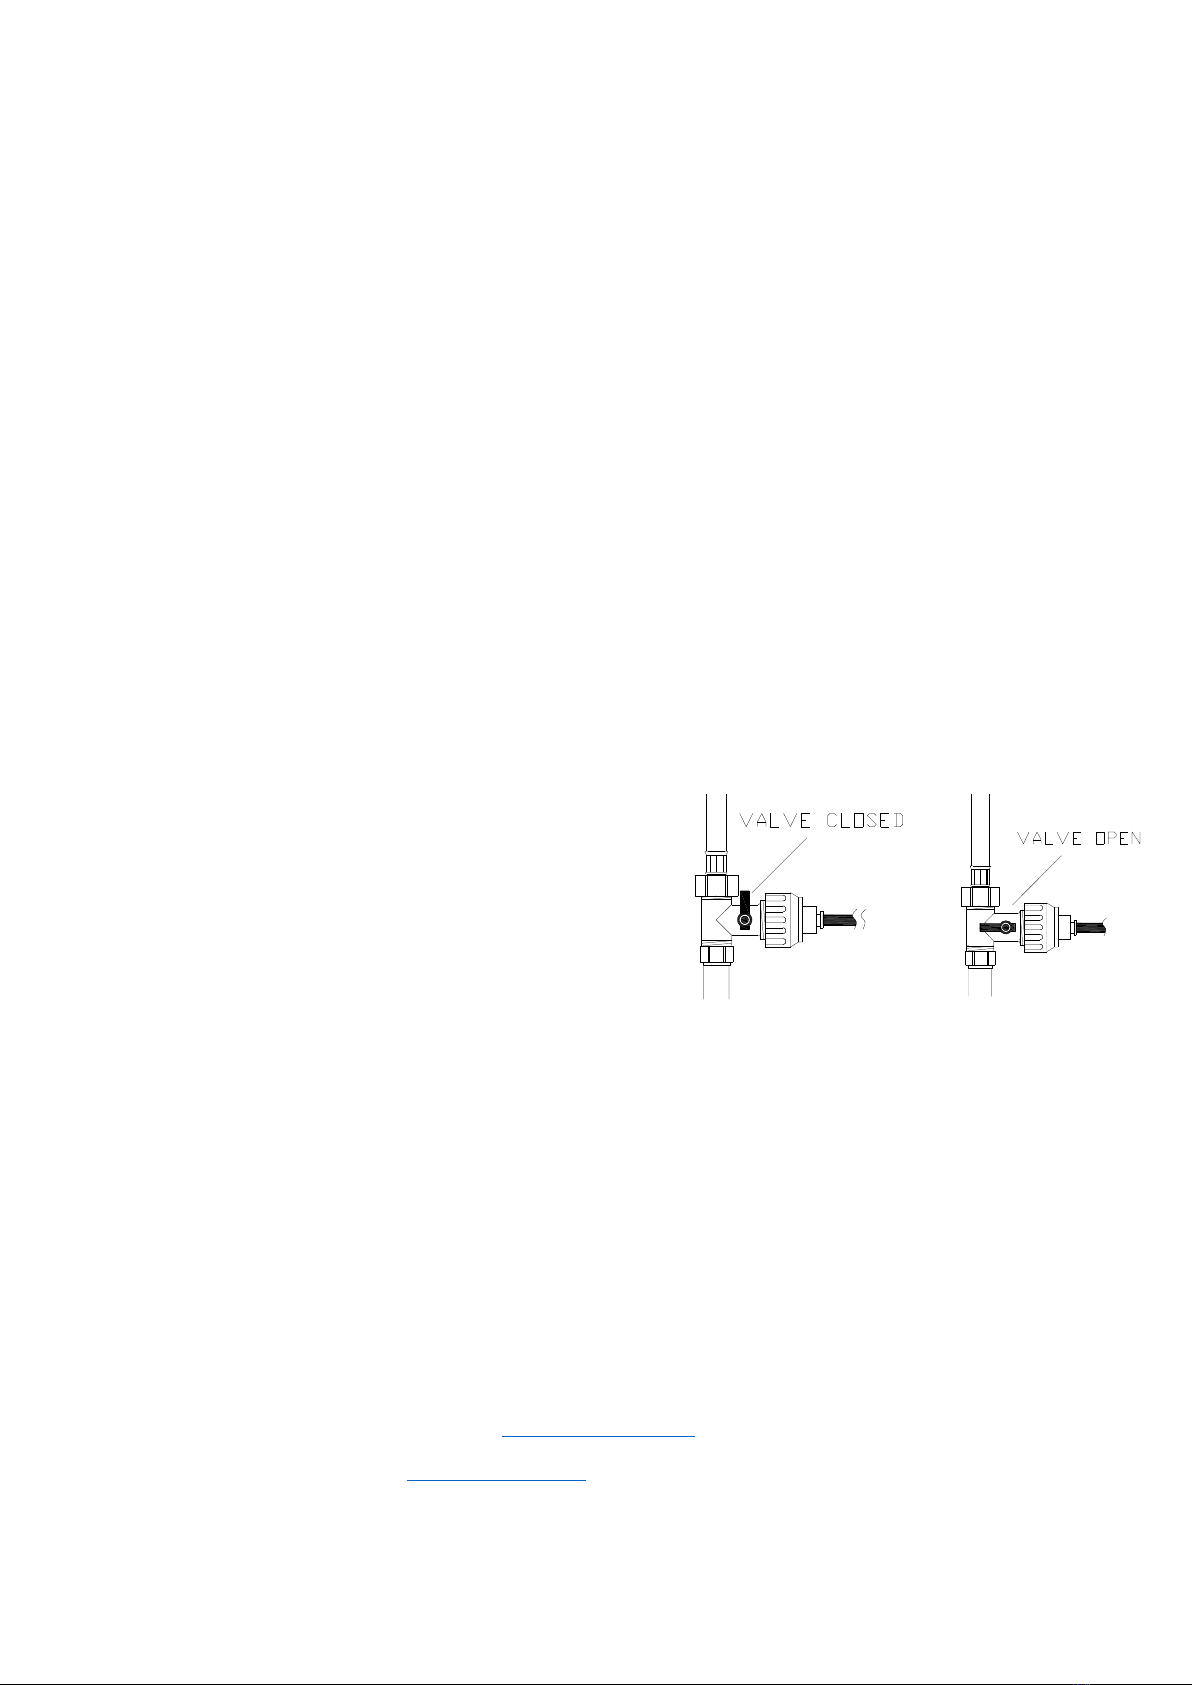
Stage 3 – Adjust the Filter Flow Rate:
Turn your filter tap on by turnin the left handle so filtered water runs throu h the
tap. Note: when the filter is new it will take a moment to push any air thou h the
system, you may notice some discoloration in the water at this point, this is normal
and will pass with flushin .
The filtered drinkin water system performs at a maximum of 2-3 L / min. Turn the
mixertap fully on to filtered water, now turn the lever on the three way valve (O) to
adjust the flow of filtered water to the correct level. Use a kitchen measurin ju
and a stopwatch to approximate the flow rate, when the filter is exchan ed you
should readjust the flow rate afterwards.
Clean and dry the product of any marks from installation then cover the product
with the ba provided to protect it until use.
Using your Tap:
For best results when usin the filtered water always run the tap for a few moments. Runnin the tap will help to flush the system throu h and
make the water cooler for drinkin , if the filter has been unused for a while flush the filter for a lon er period before use. When comparin the
taste of filtered and unfiltered water always taste the filtered water first.
The triple sta e filter is desi ned to improve the taste, clarity and odour of drinkin water, the filter also reduces sediment, the level of chemical
impurities and lime scale build up on kettles and cookware.
Each filter cartridge has a maximum six-month life depending upon your water uality and regardless of usage fre uency for reasons of
hygiene.
Abode operate a free replacement filter reminder service, If you would like to take advantage of this service please fill in and return the
enclosed card or register your a uifier product on online at www.abodedesigns.co.uk
Replacement filters are available directly from www.abode-shop.co.uk or by calling (+44) 01226 28 34 34. Please note that use of non- enuine
abode consumables will void your warranty.


