Abus TVAC10101 User manual

TVAC10101
DKurzanleitung
Quick guide
Version 11/2018

2
DINHALT
Konformitätserklärung................................................................................................. 3
GNU GPL Lizenzhinweis............................................................................................ 3
Merkmale.................................................................................................................... 4
Inbetriebnahme........................................................................................................... 5
Batterie.................................................................................................................... 5
Gebrauchsanweisung ............................................................................................. 5
Funktionsstörung .................................................................................................... 5
Funktionsüberblick...................................................................................................... 6
Kurzmenü................................................................................................................ 7
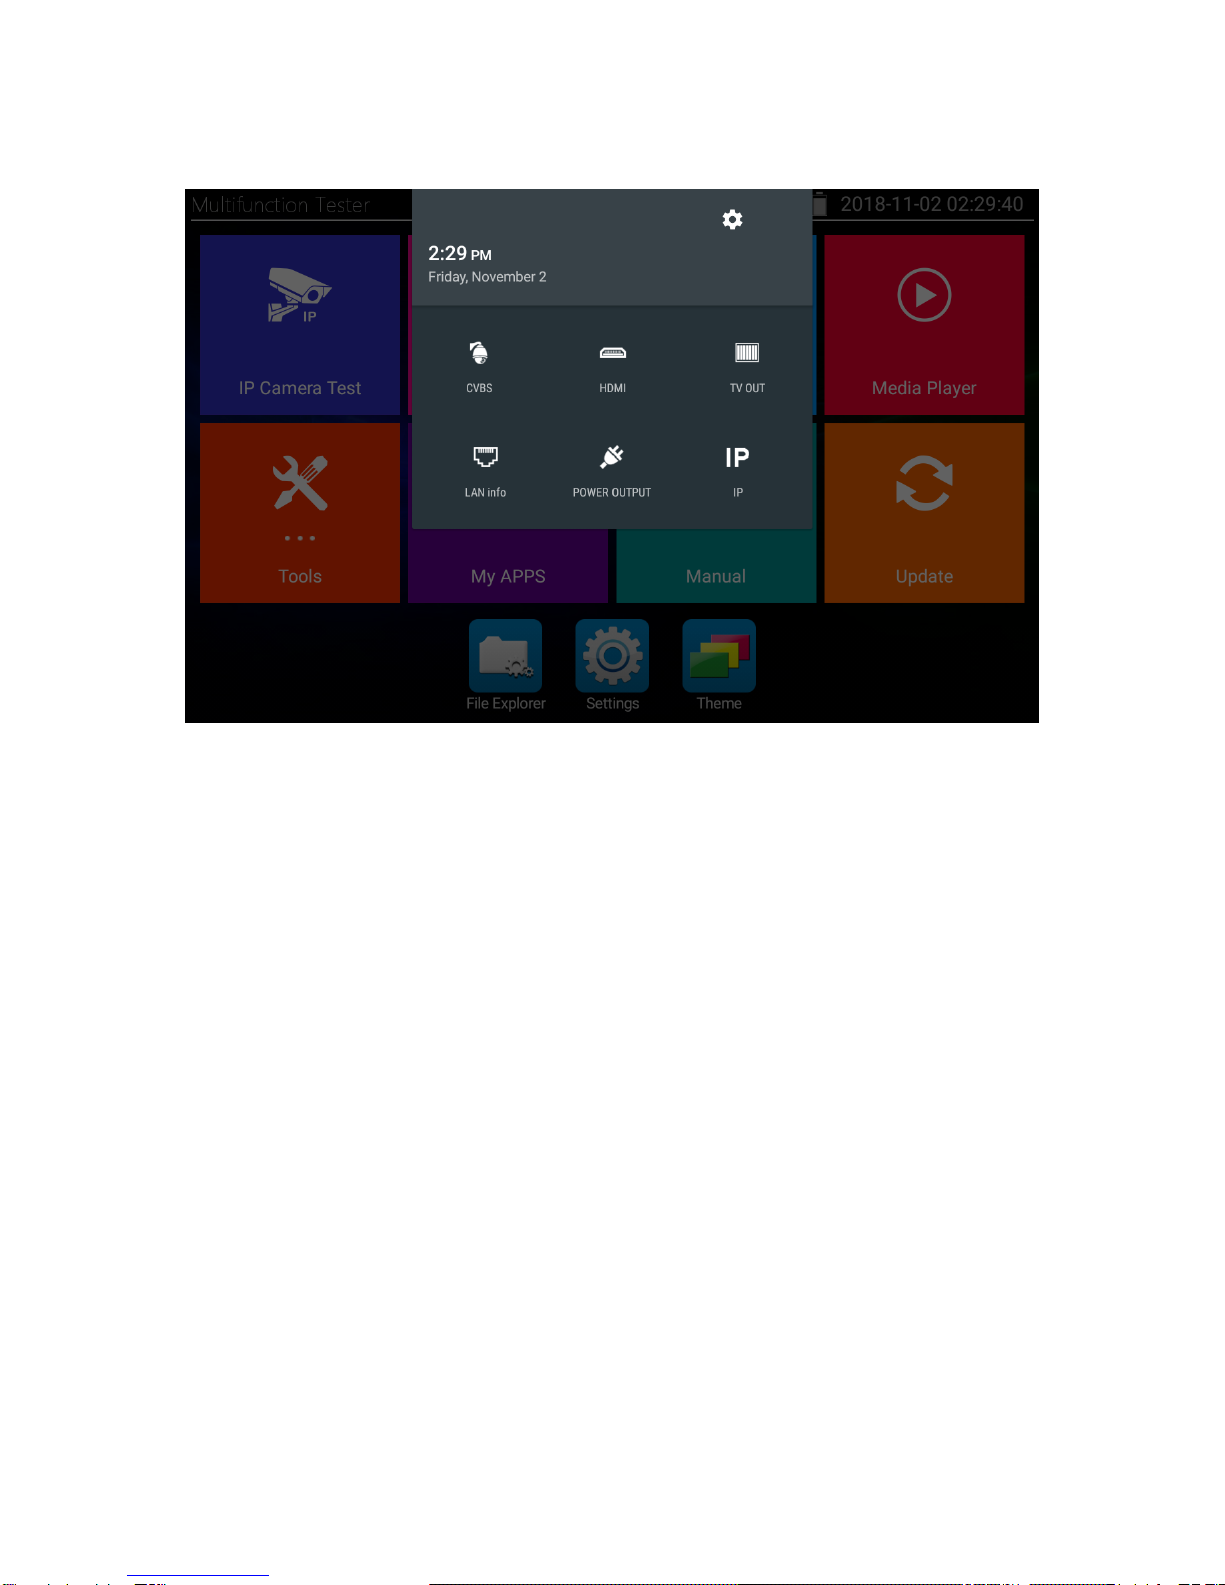
Drop-Down Menü.................................................................................................... 8
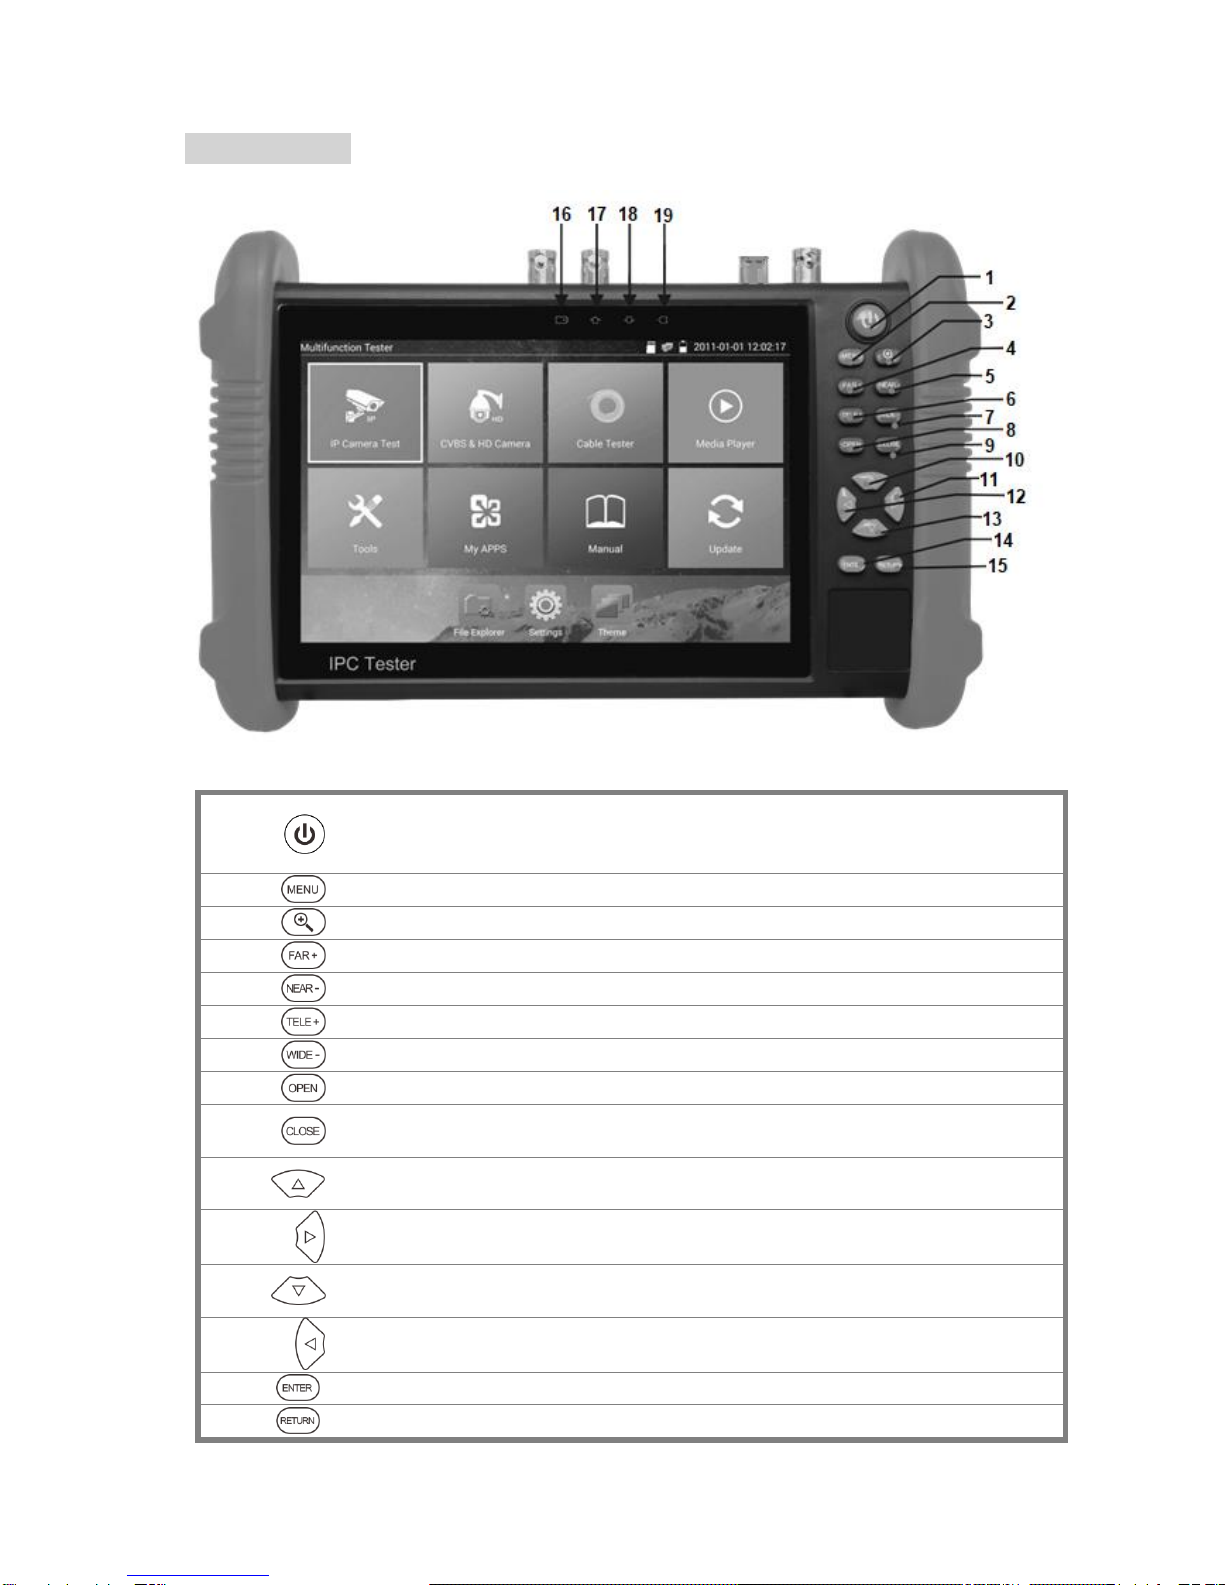
Bedientasten............................................................................................................... 9
Anschlüsse............................................................................................................... 11
CONTENT
Declaration of conformity.......................................................................................... 12
GNU GPL License note............................................................................................ 12
Features ................................................................................................................... 13
Startup procedure..................................................................................................... 14
Battery................................................................................................................... 14
User manual.......................................................................................................... 14
Malfunction............................................................................................................ 14
Application overview................................................................................................. 15
Shortcut menu....................................................................................................... 16
Drop-down menu .................................................................................................. 17
Control buttons......................................................................................................... 18
Interfaces.................................................................................................................. 20

3
D
Konformitätserklärung
Hiermit erklärt ABUS Security-Center, dass das beiliegende Produkt die folgenden
Richtlinien, die das Produkt betreffen, erfüllt:
RED-Richtlinie 2014/53/EU
EMV-Richtlinie 2014/30/EU
Nieder-Spannungsrichtlinie 2014/35/EU
RoHS-Richtlinie 2011/65/EU
Die vollständige EU-Konformitätserklärung kann unter folgender Adresse bezogen
werden:
ABUS Security-Center GmbH & Co. KG
Linker Kreuthweg 5
86444 Affing
GERMANY
www.abus.com/product/Artikelnummer
(„Artikelnummer“ im Link ist mit der Artikelnummer
des beiliegenden Produktes zu ersetzen)
GNU GPL Lizenzhinweis
Beachten Sie, dass dieses Produkt unter anderem Open Source Software enthält,
welche unter der GNU General Public License (GPL) lizensiert ist. Die
Lizenzbestimmungen der GPL kann online unter folgendem Link eingesehen werden:
https://www.abus.com/var/ImagesPIM/d110001/medias/docus/13/gpl-2.0_license.txt

4
Merkmale
•Hochauflösendes 7“ Touch-Display mit 1280x800 Pixel
•Universal Testmonitor für die Wartung und Installation von IP Netzwerk
Kameras sowie analogen AHD, CVI, TVI und CVBS Kameras
•Unterstützt 4K H.264 und 4K H.265 Streams
•Kompatibel zu ONVIF und allen Fremdherstellern
•Mit Netzwerk-Tools zur Wartung und Überprüfung des Netzwerkes
•Integrierte PoE-Stromversorgung mit 24 W am LAN-Port
•Integrierte mobile Stromversorgung für Endgeräte (12V , 3 A)
•Integrierte USB-Stromversorgung für USB-Endgeräte (5V , 2A)
•Integriertes Messgerät zur Überprüfung von PoE Leitungen und Anzeige des
Stromverbrauchs von angeschlossenen Endgeräten
•WLAN- und WLAN-Hotspot-Funktion
•Kabeltester
•Datensicherung auf SD-Karte möglich (Screenshots/Videos/Dokumente)
•PTZ-Kamera-Steuerung, Zoom- und Objektiveinstellungen direkt über die
Bedientasten des Testmonitors möglich
•Integrierte LED Lampe
•Akku-Laufzeit bis zu 10 Stunden (5-6 Stunden Ladezeit)
•Audio-Test
•Testbildausgabe
•Inklusive Adapter-Kabel-Zubehör für alle Anschlüsse
•Inklusive nützlicher Umhängetasche für den Transport des Testmonitors und
des Zubehörs

5
Inbetriebnahme
Vielen Dank für den Kauf des 7” Universal Testmonitors. Bitte lesen Sie diese
Kurzanleitung vor der Nutzung des Gerätes.
Für einen sicheren Umgang mit dem Testmonitor lesen Sie bitte zuerst die separat
beigefügten Sicherheitshinweise sorgfältig durch.
Bitte bewahren Sie die Kurzanleitung als Referenz sorgfältig auf.
Bei Fragen oder Problemen mit dem 7“ Universal Testmonitor sowie Produktschäden,
kontaktieren Sie bitte unseren technischen Support.
Batterie
Der Testmonitor verfügt über eine eingebaute wiederaufladbare Lithium-ionen-
polymer-Batterie.
Für den sicheren Transport ist die Batterieverbindung zum Gerät innerhalb des
Batteriefachs durch eine Plastik-Transportsicherung getrennt.
Vor der Benutzung des Gerätes muss diese Transportsicherung entfernt werden.
Für den alltäglichen Gebrauch ist keine Transportsicherung mehr nötig.
Gebrauchsanweisung
Nach der Erstinbetriebnahme wird dringend empfohlen einen Blick in die
vorinstallierte “Manual” Applikation zu werfen. Dort finden Sie vollumfängliche
Instruktionen mit Anwendungshandbuch für alle Einstellungen, Funktionen und
vorinstallierte Applikationen, sowie eine zusätzliche digitale Kurzanleitung und häufig
gestellte Fragen.
Des Weiteren können Sie bei der Benutzung der vorinstallierten Applikationen direkt
auf die Anwendungshinweise der Applikation zugreifen, indem Sie auf das
Applikationssymbol in der linken oberen Ecke des Displays tippen.
Auch die ABUS IPCam Plus Applikation verfügt über Anwendungshinweise innerhalb
der Applikation.
Funktionsstörung
Sollten Sie Funktionsstörungen feststellen, führen Sie bitte einen Neustart des
Gerätes durch, indem sie für mehr als 2 Sekunden gedrückt halten.
Ist dies im schlimmsten Fall nicht mehr möglich, entfernen Sie bitte den Akku und
schalten Sie das Gerät nach Wiedereinsetzen des Akkus erneut ein.

6
Funktionsüberblick
1
Applikationen zur Installation und zum Test von IP Kameras:
•POE power output: Betreiben von PoE fähigen Endgeräte
•IP Discovery: Anzeige von Geräten im Netzwerk
•Network Tool: Applikation zum Test und Einstellen des Netzwerkes
•ONVIF: Applikation für die Installation von ONVIF Kameras
•IPC Test: Applikation mit Protokollen aller Fremdhersteller
•IPCam Plus: ABUS IP Kamera Applikation
2
Applikationen zur Installation und zum Test von analogen Kameras CVBS,
CVI, AHD, TVI, SDI sowie Applikation mit Testbild für TV in/out
3
Applikationen für den Test von Twisted-Pair Kabeln und RJ45 Schnittstellen.
4
Applikationen für die Medienwiedergabe und Anzeige des HDMI-Eingangs.
5
Nützliche Applikationen:
•Chrome: Webbrowser
•PoE & Power Info: Anzeige des Verbrauchs von angeschlossenen
Endgeräten
•DroiNotes: Applikation zum Erstellen von Notizen
•Data monitor: Applikation für RS485 Schnittstelle
•Calculator: Taschenrechner
•Quickoffice: Vorinstallierte Sammlung von freien Office-Programmen
6
Selbsthinzugefügte Android Applikationen
7
Digitales Benutzerhandbuch
8
Applikation zum Update der Gerätesoftware
9
Dateiexplorer
10
Einstellungen

7
11
Einstellungen der Farbthemen oder Hintergrundbilder der
Menüs/Applikationen
Kurzmenü
Mit der MENU-Taste kann das Kurzmenü jederzeit geöffnet werden.
Sie haben die Möglichkeit den Inhalt des Kurzmenüs in den Einstellungen (Settings)
selbst zu definieren, indem Sie dort Applikationen durch gedrückt halten zu dem
Menü hinzufügen oder entfernen.

8
Drop-Down Menü
Durch zweifaches Wischen über das Display von oben nach unten können Sie das
Drop-Down Menü öffnen, wo Sie nützliche Zusatzfunktionen aufrufen können:
•CVBS: CVBS-Eingang Bild im Bild darstellen
•HDMI: HDMI-Eingang Bild im Bild darstellen
•TV OUT: TV-OUT Bild im Bild darstellen
•LAN info: LAN Informationen Bild im Bild darstellen
•POWER OUTPUT: PoE-Ausgang aktivieren oder deaktivieren
•IP: IP-Settings (Netzwerkeinstellungen) öffnen

9
Bedientasten
1
Taste für mehr als 2 Sekunden drücken um Gerät ein oder aus zu
schalten oder neu zu starten. Taste kurz drücken um Display ein oder
aus zu schalten.
2
MENU-Taste drücken um Kurzmenü zu öffnen.
3
4x Zoom
4
Fokus weit: Fokus in die Ferne legen.
5
Fokus nah: Fokus in die Nähe legen.
6
TELE: Hineinzoomen
7
WIDE: Herauszoomen
8
Open/Set: Blende öffnen oder Parametereinstellungen bestätigen.
9
Return/Close: Blende schließen oder bei Parametereinstellungen
zurückgehen.
10
Oben: Fuktion setzen oder Parameterwert erhöhen. PTZ-Kamera
nach oben neigen.
11
Rechts: Parameter wählen. PTZ-Kamera nach rechts schwenken.
12
Unten: Funktion setzen oder Parameterwert verringern. PTZ-Kamera
nach unten neigen.
13
Links: Parameter wählen. PTZ-Kamera nach links schwenken.
14
Bestätigungstaste (Lange gedrückt halten für Screenshot)
15
Return/Close: Menü schließen oder eine Ebene zurück gehen.

10
16
Ladeanzeige: Leuchtet rot während Batterie geladen wird. Licht geht
aus, wenn Batterie vollständig geladen ist.
17
RS485 Datenübertragungsanzeige: Leuchtet rot während Daten
übertragen werden.
18
Datenempfangsanzeige: Leuchtet rot während Daten empfangen
werden.
19
Power-Anzeige: Leuchtet grün, wenn Gerät mit Steckernetzteil
betrieben wird.

11
Anschlüsse
Anschlüsse oben:
Anschlüsse unten:
1
SDI-Eingang (BNC-Anschluss)
2
RS485 Anschluss für Steuerung von PTZ Kameras
3
LED Lampe
4
Video-Signal-Ausgang (BNC-Anschluss)/ Anschluss für Kabeltester
5
TVI/CVI/AHD/CVBS-Eingang (BNC-Anschluss)
6
HDMI-Eingang
7
12V , 3A Ausgang für eine mobile Stromversorgung
8
12V , 3A Ausgang für eine mobile Stromversorgung
9
12V , 2A Ladeanschluss für mitgeliefertes Steckernetzteil
10
USB 5V , 2A Ausgang (nur für Stromversorgung, kein Datenanschluss)
11
Audio-Eingang
12
Audio-Ausgang und Kopfhörer-Anschluss
13
LAN-Test-Port mit PoE-Stromversorgung für den Test von IP-Kameras mit
oder ohne PoE-Unterstützung
14
PSE-Eingang (Power Sourcing Equipment) für den Test der PoE-Spannung
15
UTP-Port: UTP-Kabel Test-Port / Anschluss für Kabeltester
16
MicroSD-Karte (Unterstützung bis zu 32GB)
17
HDMI-Ausgang

12
Declaration of conformity
ABUS Security-Center hereby declares that the enclosed product complies with the
requirements of the following directives concerning the product:
RED Directive (2014/53/EU)
EMC Directive (2014/30/EU)
Low Voltage Directive (2014/35/EU)
RoHS Directive (2011/65/EU)
The full EU declaration of conformity can be obtained from the following address:
ABUS Security-Center GmbH & Co. KG
Linker Kreuthweg 5
86444 Affing
GERMANY
www.abus.com/product/Itemnumber
(‘Item number’ in the link to be replaced with
the article number of the enclosed product)
GNU GPL License note
Note that this product includes open source software, licensed under the GNU
General Public License (GPL). The GPL license terms can be viewed online under
the following link:
https://www.abus.com/var/ImagesPIM/d110001/medias/docus/13/gpl-2.0_license.txt

13
Features
•High-resolution 7“ touch display with 1280x800 pixel
•Universal test monitor for maintenance and installation of IP network cameras
as well as analog AHD, CVI, TVI and CVBS cameras
•Supports 4K H.264 and 4K H.265 streams
•Compatible with ONVIF and all third-party manufacturers
•With network tools for network maintenance and testing
•Integrated PoE power supply with 24 W at the LAN port
•Integrated mobile power supply for devices (12V , 3 A)
•Integrated USB power supply for USB devices (5V , 2A)
•Integrated measuring device for testing of PoE lines and measuring of the
power consumption of connected devices
•Wifi and Wifi Hot Spot
•Cable tester
•Data storage on SD card (snapshots/videos/documents)
•PTZ camera control, zoom and lens setting directly via the control buttons of
the test monitor.
•Integrated LED lamp
•Battery lasts up to 10 hours (5-6 hours of charging time)
•Audio test
•Test pattern output
•Including adapter cable accessories for all interfaces
•Including useful shoulder bag for transportation of the test monitor and the
accessories

14
Startup procedure
Thank you for purchasing the 7” Universal test monitor. Please read this quick guide
before using the device.
For using the test monitor safely, please first read the separate attached Safety
Information carefully.
The quick guide should be kept well in case of reference.
If there is any question or problem while using the 7” Universal test monitor, or
damages on the product occurred, please contact our technical support.
Battery
The tester has a built-in lithium ion polymer rechargeable battery.
For safety during transportation, the battery connection inside the battery cabin is
disconnected by a transport securing plastic.
Before using the device, the transport securing plastic must be removed.
For job routine there is no need for the transport securing plastic.
User manual
After powering on the device for the first time it is highly recommended to have a look
at the “Manual” application. There you will find comprehensive instructions, including
user guide for all settings, functions and pre-installed applications, as well as a digital
quick guide and frequently asked questions.
Furthermore, while using pre-installed applications, you can directly open the
application’s instruction picture-in-picture by simply tapping on the application symbol
in the left upper corner of the display.
The ABUS IPCam Plus application also provides user instructions within the
application.
Malfunction
If you should notice abnormal behaviour of the device perform a restart by pressing
more than 2 seconds. If this is not possible in worst case scenario, please remove
the battery and power on the device after restoring the battery.

15
Application overview
1
Applications for installation and maintenance of IP cameras:
•POE power output: Powering of PoE devices
•IP Discovery: Displays devices in the network
•Network Tool: Application for maintenance and testing of the
network
•ONVIF: Application for installation and maintenance of ONVIF
cameras
•IPC Test: Application with protocols of all third-party manufacturer
•IPCam Plus: ABUS IP camera application
2
Applications for installation and maintenance of analog cameras CVBS,
CVI, AHD, TVI, SDI as wells as application for test pattern output TV out/in
3
Applications for test of twisted pair cables and RJ45 interfaces
4
Applications for playback and display of the HDMI input
5
Useful applications:
•Chrome: Webbrowser
•PoE & Power Info: Displays the power consumption of connected
devices
•DroiNotes: Application for making notes
•Data monitor: Application for RS485 interface
•Calculator: Calculator application
•Quickoffice: Pre-installed collection of free office tools
6
Self-added Android applications
7
Digital user guide
8
Application for updating the device’s software

16
9
File explorer
10
Settings
11
Settings of color scheme and background pictures of menus/applications
Shortcut menu
Using the MENU button you can open the shortcut menu at any time.
In the device settings, you can easy define the content of the shortcut menu by
simply holding down the applications to add or remove from the menu.

17
Drop-down menu
By double-swiping across the display from the top to the bottom, you can open the
Drop-down menu, where you can find useful additional functions.
•CVBS: CVBS input displayed picture in picture
•HDMI: HDMI input displayed picture in picture
•TV OUT: TV OUT displayed picture in picture
•LAN info: LAN information displayed picture in picture
•POWER OUTPUT: Activate or deactivate PoE output
•IP: Open IP settings

18
Control buttons
1
Press more than 2 seconds to turn on or off or restart the device,
short press to turn on or off the display
2
Press MENU key to call short menu.
3
4x Zoom
4
Far focus: Focus the image faraway
5
Near focus: Focus the image nearby
6
TELE: Zoom in the image
7
WIDE: Zoom out the image
8
Open/Set: Confirm the setting of parameters, open or enlarge the
aperture
9
Return/Close: Return or cancel while setting parameters of the menu,
close or decrease the aperture
10
Upward: Set function or add the value of the parameter. Tilt the PTZ
upward.
11
Rightward: Select the parameter. Add the value of the parameter. Pan
the PTZ to the right.
12
Downward: Set function or reduce the value of the parameter. Tilt the
PTZ downward.
13
Leftward: Select the parameter. Pan the PTZ to the left.
14
Confirm key (Long press to capture screen/take a screenshot)
15
Return/Close: Return page or exit menu.

19
16
Charge indicator: It lights red while the battery is being charged.
When the charging is complete, the indicator turns off automatically.
17
RS485 data transmission indicator: It lights red while the data is being
transmitted
18
Data received indicator: It lights red while the data is being received
19
Power indicator: It lights green while the tester is powered on by the
adapter

20
Interfaces
Top interfaces:
Bottom interfaces:
1
SDI input (BNC interface)
2
RS485 Interface for controlling of PTZ cameras
3
LED lamp
4
Video signal output (BNC interface)/ cable tracer interface
5
TVI/CVI/AHD/CVBS input (BNC interface)
6
HDMI input
7
12V , 3A power output, for provisional DC power supply
8
12V , 3A power output, for provisional DC power supply
9
12V , 2A charging interface
10
USB 5V , 2A power output (only for power, no data)
11
Audio input
12
Audio output and earphone interface
13
LAN test port with PoE power supply output for test of PoE or non-PoE IP
cameras
14
PSE input (power sourcing equipment) for test of PoE voltage
15
UTP cable port: UTP cable tester port / Cable tracer port
16
Micro SD card (supports up to 32GB)
17
HDMI output
Other manuals for TVAC10101
1
Table of contents
Languages:
Other Abus Monitor manuals