ACN Videophone User manual

Videophone
USER MANUAL

Contents
1. Your ACN VideophoNe .................................................................4
1-1. Videophone components............................................................................................................. 4
1-2. Safety instructions....................................................................................................................... 5
1-3. Getting to know your Videophone............................................................................................... 6
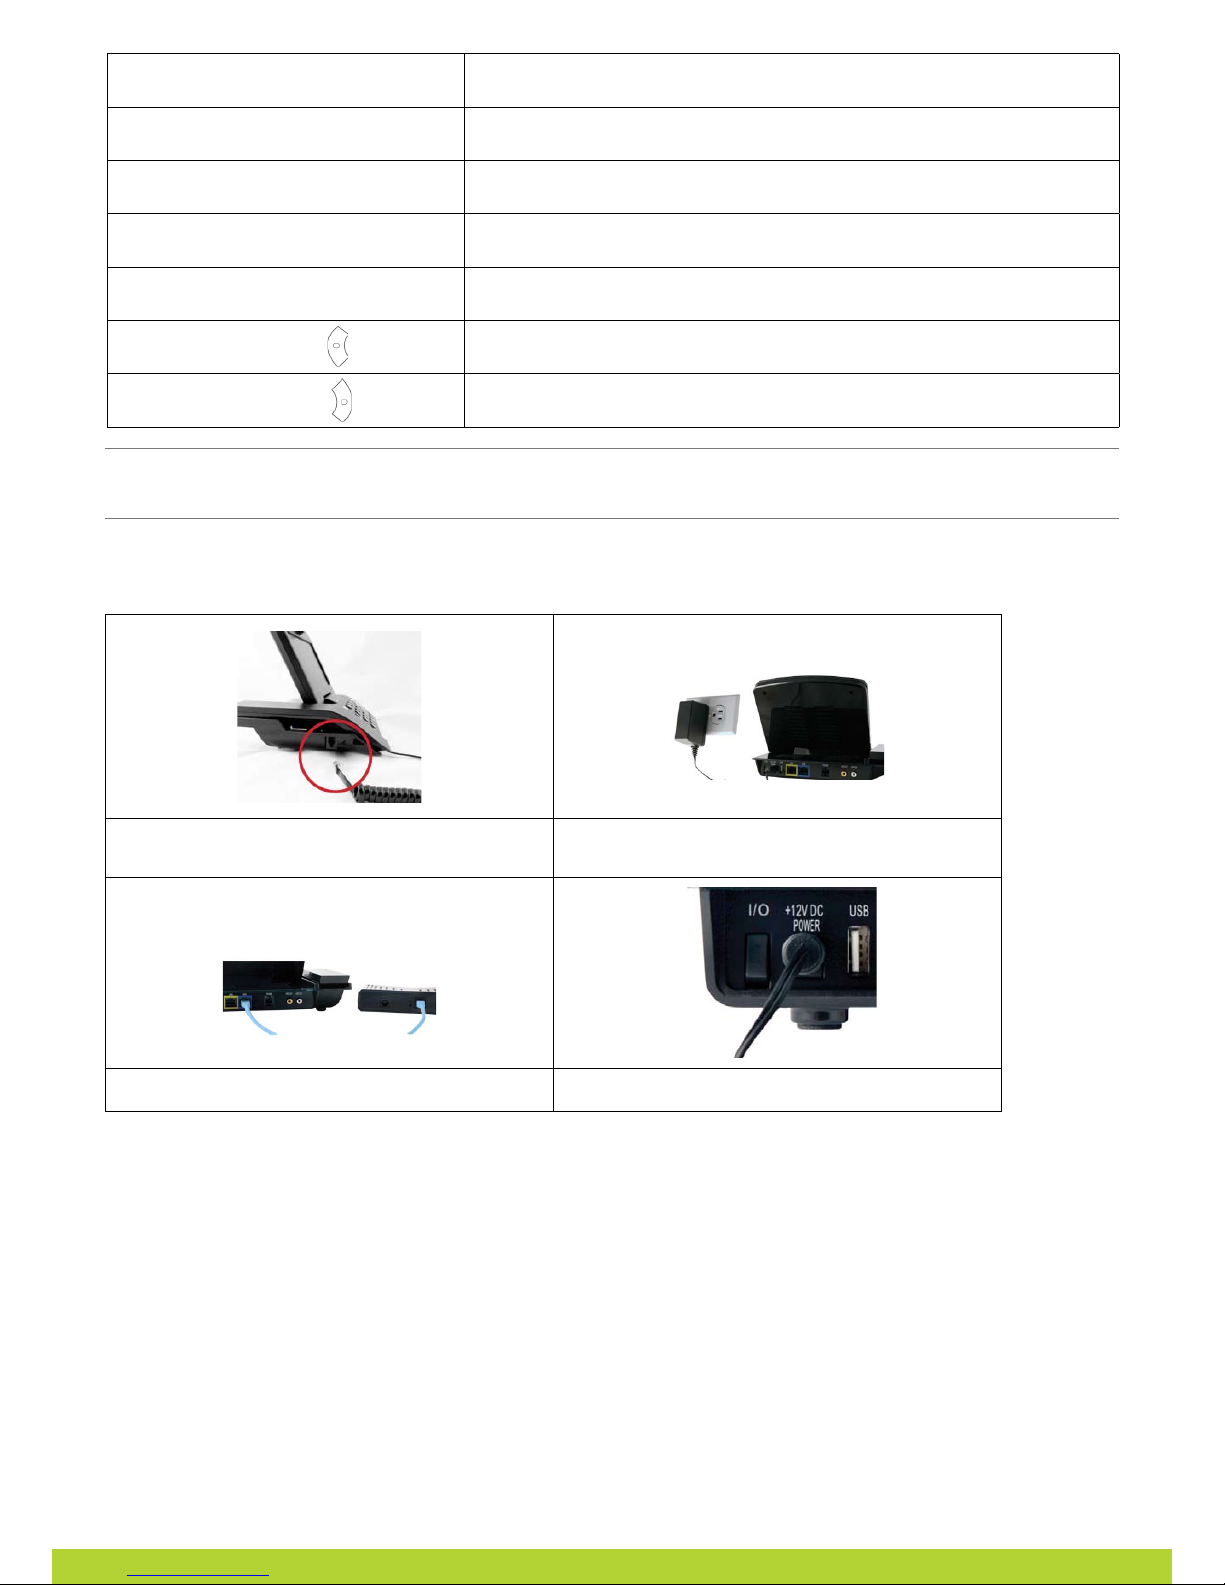
1-4. Installing your Videophone .......................................................................................................... 8
2. usiNg the BAsiC FuNCtioNs oF Your VideophoNe ....................................9
2-1. Placing a call ............................................................................................................................. 9
2-1-1. Placing a call using the keypad ...................................................................................... 9
2-1-2. Placing a call in standby mode (when the LCD screen is off) ........................................ 9
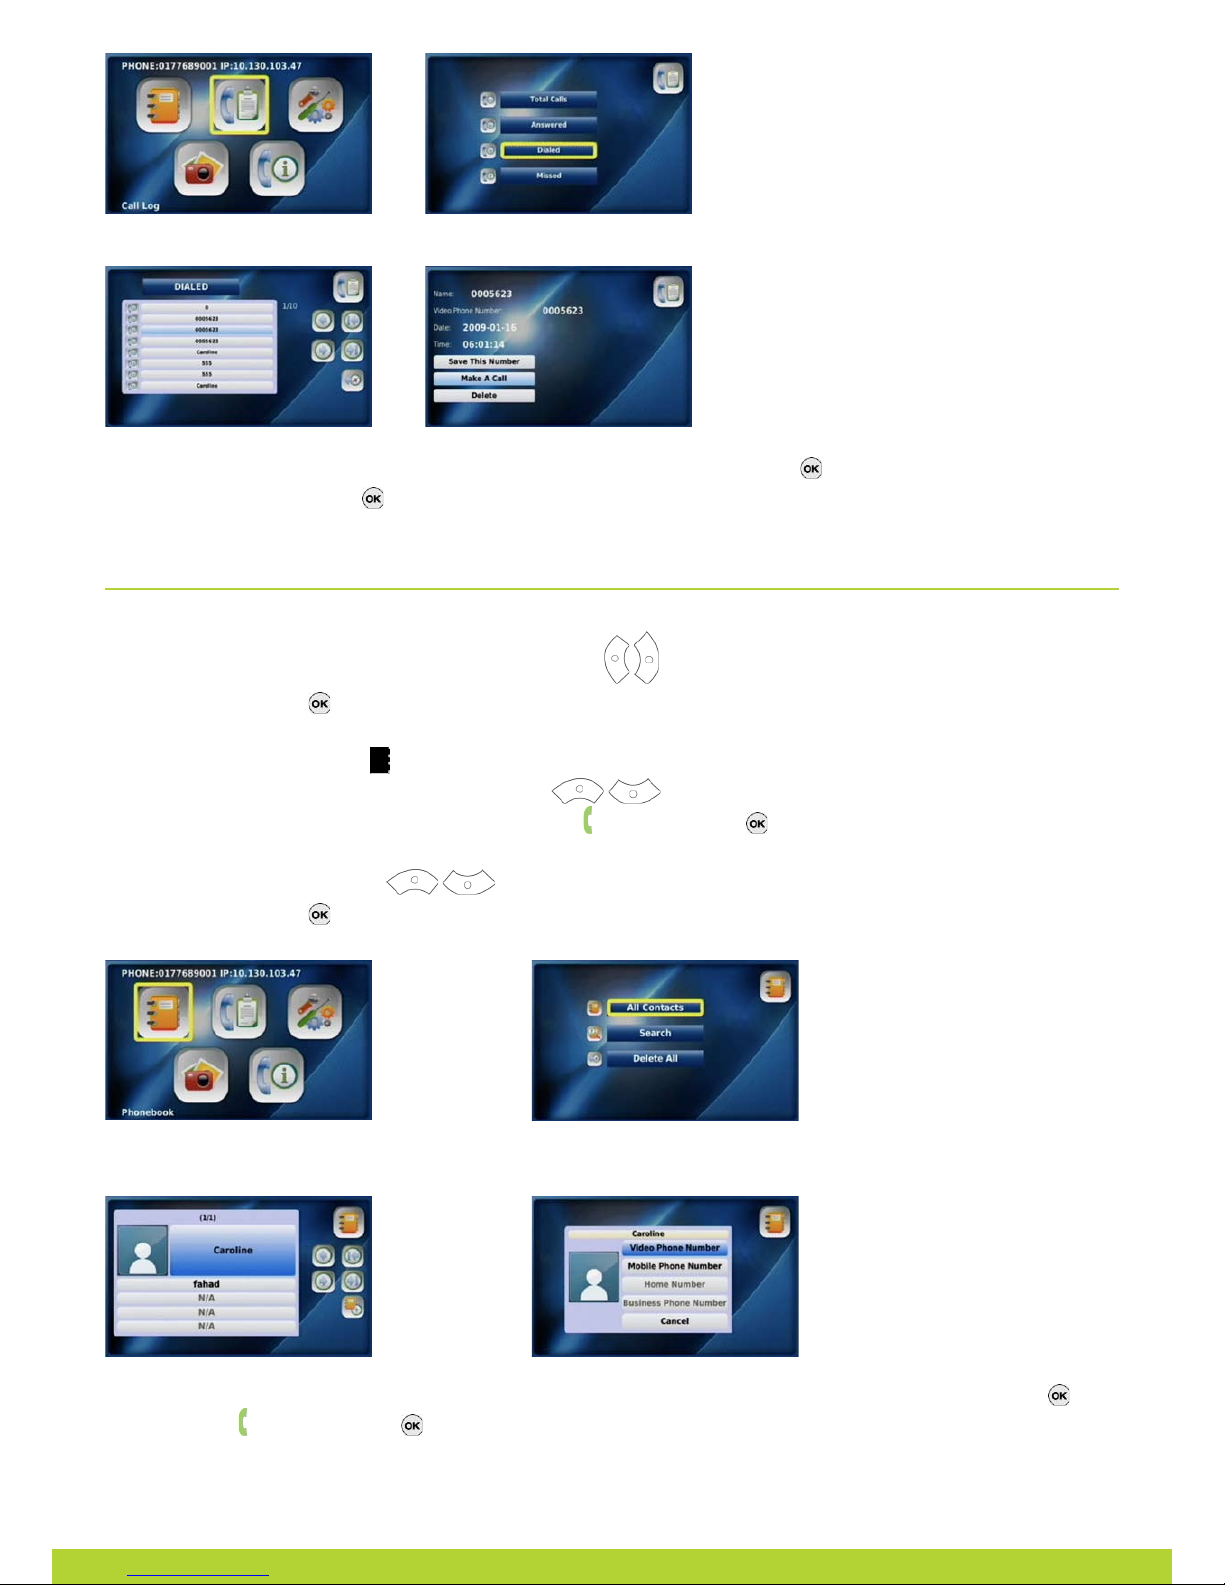
2-1-3. Placing a call from your Call Log ................................................................................... 9
2-1-4. Placing a call from your Phonebook ............................................................................. 10
2-2. Receiving a call .......................................................................................................................... 11
2-3. Rejecting a call........................................................................................................................... 11
2-4. Ending a call ........................................................................................................................... 11
2-5. Retrieving your Video/Voicemail ............................................................................................... 11
2-6. Your Videophone information .................................................................................................... 12
2-7. Useful functions during a call .................................................................................................... 12
2-7-1. Mute ........................................................................................................................... 12
2-7-2. Privacy.......................................................................................................................... 12
2-7-3. Volume control ............................................................................................................ 12
2-7-4. Brightness control ....................................................................................................... 13
2-7-5. Hold ........................................................................................................................... 13
2-7-6. Audio Conferencing (3-Way Calling)............................................................................. 14
2-7-7. Call Waiting ................................................................................................................. 14
2-8. Call Forwarding.......................................................................................................................... 15
2-9. Transferring calls to/from an auxiliary phone ............................................................................. 15
3. set up ...................................................................................16
3-1. Main Menu ........................................................................................................................... 16
3-2. Using the keypad ...................................................................................................................... 17
3-3. Entering characters.................................................................................................................... 17
3-3-1. Entering numbers ........................................................................................................ 18
3-3-2. Entering letters ........................................................................................................... 18
3-3-3. Entering numbers and letters ...................................................................................... 18
3-4. Phonebook ........................................................................................................................... 18
3-4-1. All contacts .................................................................................................................. 18
3-4-1-1. Add new entry.................................................................................................. 19
3-4-1-2. Place a call ....................................................................................................... 19
3-4-1-3. Edit a contact.................................................................................................... 19
3-4-1-4. Delete a contact ............................................................................................... 19

3-4-2. Search ........................................................................................................................... 20
3-4-2-1. Search by name................................................................................................ 20
3-4-2-2. Search by number ............................................................................................ 20
3-4-2-3. Placing a call, updating and deleting information....................................................................... 20
3-4-3. Delete all ...................................................................................................................... 21
3-5. Call log ........................................................................................................................... 21
3-5-1. Total calls...................................................................................................................... 22
3-5-2. Answered calls............................................................................................................. 22
3-5-3. Dialled numbers ........................................................................................................... 22
3-5-4. Missed calls ................................................................................................................ 22
3-5-5. Placing a call, saving or deleting a number .................................................................. 23
3-6. Settings ........................................................................................................................... 24
3-6-1. System settings ........................................................................................................... 24
3-6-1-1. Network............................................................................................................ 24
3-6-1-2. Factory reset ................................................................................................... 24
3-6-1-3. Sound ............................................................................................................... 25
3-6-1-4. Display ............................................................................................................. 26
3-6-2. Setting the time ........................................................................................................... 28
3-6-4. Administrator settings.................................................................................................. 29
3-7. Digital Photo Frame ................................................................................................................. 29
3-8. Information ........................................................................................................................... 29
trouBleshootiNg guide ...................................................................31
WArNiNg MessAges .......................................................................33

4
1.YourACNVideophone
1-1. VideophoNe CoMpoNeNts
The following items should be included with your ACN Videophone. If an item is missing, please contact ACN Customer Services.
Main Unit Handset
Ethernet Cable (RJ-45)
Power Adapter
*Warning: Use the Power Adapter that comes with your Videophone. Use of any
other power adapter, other than one provided by ACN, may result in corruption of
your Videophone or even a fire.
Telephone Cable (RJ-11)

5
1-2. sAFetY iNstruCtioNs
This guideline is to advise you on user safely and prevention of any financial loss.
Read thoroughly before using your Videophone.
There are two types of precautions which are explained as follows:
CAUTION
When unplugging the power adaptor, turn
off the power switch before removing the
plug from the electrical outlet.
• Unplugging while the power switch
is on may cause your Videophone to
malfunction.
Do not install your Videophone in an
unsafe place, or on an unstable surface.
• Your Videophone may not operate
properly, or may not work at all.
Use a soft fabric when cleaning the LCD
screen and camera.
• Do not use strong chemical solutions
or abrasive cleaning materials as they can
damage your Videophone, especially the
LCD screen and camera.
Use the most accessible electrical outlet to install your Videophone.
WArNINg
Do not install your Videophone in a dusty
environment or where it can be affected
by gas.
Do not disassemble or modify your
Videophone or power adapter. The
warranty will not cover any defect that
occurs due to such mishandling.
To avoid damage, over heating or the
possibility of an electrical shock, do not
install in a humid environment.
Do not subject your Videophone to direct
sunlight, or install it near heat sources,
such as radiators.
To avoid the possibility of an electric
shock, do not touch the power adapter
during thunder storms.
To prevent damage, protect your
Videophone from sudden shock. Do not
apply excessive force, especially to the
LCD screen or camera.
A sudden change of temperature may
cause damage to your Videophone.
Disconnect the power cable when your
Videophone is not in use for an extended
period of time.
Only use the power adapter supplied with
your Videophone.

6
1-3.GettingtoknowyourVideophone
FrONT
1:@/ 2ABC 3D EF
4GHI 5JKL 6M NO
7
PQRS
8TUV
9
WXYZ
*0-._ # .
REGISTER POWER
1 Handset Videophone handset
2 Speaker Plays ring tones and transfers audio in speakerphone
mode.
3 Camera Captures images that are transmitted to the called party.
4 LCD Screen Displays your image and the image of the person you are
talking to during a call.
5 Keypad Buttons that operate the functions of your Videophone.
6 Microphone Receives and transmits audio in speakerphone mode.
reAr
I/O +12V DC
POWER
USB LAN WAN LINE PHONE VIDEO OUT AUDIO OUT
ON/OFF (I/O) Turns your Videophone on/off
POWER (DC IN) Connects to the power adapter
USB USB port used to transfer data to/from your Videophone
LAN Local Area Network connection
WAN Connects to Internet via the Ethernet cable
PHONE Connects a cordless or corded phone to your Videophone
VIDEO OUT Transmits video to a TV or Computer
AUDIO OUT Transmits audio to external speakers or audio system.
LAN (Local Area Network) is a computer network covering a small geographic area, like a home, office, or a group of
buildings i.e. a school.
A home network is a residential local area network, and is used to connect multiple devices within the home.
The simplest home networks are used to connect 2 or more computers for sharing files, printers, and a single
connection to the Internet (usually broadband Internet through a cable or DSL provider).
WAN (Wide Area Network) is a computer network that covers a broad area. WANs are used to connect LANs and
other types of networks together, so that users and computers in one location can communicate with users
and computers in other locations. The wide area network provides network address translation (NAT), allowing
multiple devices such as computers or videophones to share one IP address and Internet connection. The router
can be identified as it almost always has 5 Ethernet ports on the back. One port is separate from the four other
ports. The largest and most well-known example of a WAN is the Internet.

7
KeypAd
1:@/ 2ABC 3DEF
4GHI 5JKL 6MNO
7
PQRS
8TUV
9
WXYZ
*0-._ # .
REGISTER POWER
(1) REGISTER The green LED light is on when your Videophone is connected to ACN’s Digital
Phone Service.
(2) POWER Indicates if your Videophone is switched on.
(3) MAIL Allows you to retrieve video/voicemail.
(4) HOLD Enables you to place calls on hold.
(5) MUTE Disables the voice transmission during the call.
(6) PHONEBOOK Provides access to your personal phonebook.
(7) CONFERENCE Allows you to audio conference multiple callers on to one call (3-Way Calling).
(8) PRIVACY Temporarily disables the video signal transmission during a call.
(9) * Enters “*”
(10) NUMERIC KEYPAD Enters phone number in the dialling mode or letters in the “Settings” menu.
(11) # Enters “#”.
Rejects the incoming call.
(12) MENU Activates the “Main” menu on your LCD screen.
(13) BACK Moves to the previous menu from the “Settings” menu or “Set Up” menu during a
call and deletes characters when entering information.
(14) MY CONTENT Lists available content.
(15) UP NAVIGATION Up navigation button.
(16) OK Use to enter selections and save settings in the “Settings” menu.
(17) DOWN NAVIGATION Down navigation button.
(18) LEFT NAVIGATION Left navigation button.

8
(19) RIGHT NAVIGATION Right navigation button.
(20) STATUS Lists information needed for technical support i.e. configuration and software
version
(21) CAPS Allows you to enter capital letters and selects the type of letters or characters to
enter. Switches between numeric, lower-case letters and upper-case letters.
(22) MY APPLICATIONS Lists available applications.
(23) REDIAL Makes a call to the last number dialled.
(24) SPEAKER Activates/deactivates the speakerphone.
(25) CALL Makes a call to the dialled number.
1-4.InstallingyourVideophone
Please check to ensure you have the following components before installing your Videophone. For optimal results, please follow the
installation procedures provided in the Quick Installation Guide, which is included with your Videophone.
Connect the handset to the connection point located on
the side of your ACN Videophone.
Connect the power adaptor to the power port.
Connect the Ethernet cable to the WAN port. Turn the Power Switch on.
NOTE: Your Videophone may take up to 3 minutes before it is ready to use. During this time the system will perform an initial software
update and connect to ACN’s Digital Phone Service. The LCD screen will display a status as it moves through the process. When the
process is complete, the registration light will turn green.

9
2.UsingtheBasicFunctionsofyourVideophone
2-1. plACiNg A CAll
2-1-1. plACiNg A CAll usiNg the keYpAd
Pick up the handset or press the “Speaker” button
• Enter the phone number
• Press the “Call” button
NOTE: Refer to Section 3-2 for instructions on entering characters. The keypad tones are switched off by default.
If you would like to switch on the keypad tones, refer to Section 3-6-1-3 Sound.
2-1-2. plACiNg A CAll iN stANdBY Mode (WheN the lCd sCreeN is oFF)
Enter the first digit of the phone number
• A window will appear on the screen
• Enter the remaining digits of the phone number
• Press the “Call” button
2-1-3. plACiNg A CAll FroM Your CAll log
Press the “MENU” button
• Use the navigation buttons “ ” to select “Call Log”
• Press the “OK” button
• Select the category of the number you would like to call (Total Calls, Answered Calls, Dialled Numbers, Missed Calls) by using the
navigation buttons “ ” (for example: select “Dialled”)
• Press the “OK” button
• Use the navigation buttons “ ” to select the desired number
• Press the “OK” button
• Use the navigation buttons “ ” to select “Make A Call”
• Press the “OK” button

10
Select “Call Log” from the Main Menu Select the required call category
Select the number you would like Select “Make A Call” and press the “OK” button
to call and press the “OK” button
2-1-4. plACiNg A CAll FroM Your phoNeBook
Press the “MENU” button when the LCD screen is off or in idle mode.
• The Main Menu is displayed
• Select the Phonebook menu by using the navigation buttons “ ”
• Press the “OK” button
OR
• Press the “Phonebook” button located on the front of your Videophone.
• Select “All Contacts” by using the navigation buttons “ ”
• Select the desired contact and then press the “Call” button or the “OK” button
• Select the number (video, mobile, home, company phone number) you would like to call
by using the navigation buttons “ ”
• Press the “OK“ button
Select “Phonebook” from the Main Menu Select “All Contacts”
Select the desired contact and press Select the number you would like to call and press the “OK” button
the “Call” button or the “OK” button

11
2-2. reCeiViNg A CAll
When your Videophone rings the LCD screen will show the person calling or the name and phone number of the person calling.
Pick up the handset or press the “Speaker” button to answer the call. If there is a picture associated with a contact, it will be
displayed.
2-3. rejeCtiNg A CAll
If you are unable, or do not want to answer, a call simply press the button to reject it. The call will then be sent directly to your
voicemail.
2-4. eNdiNg A CAll
Simply hang up the handset or if you are in speakerphone mode, press the “Speaker” button .
NOTE: Your call data will be stored in your Call Log.
2-5. retrieViNg Your Video/VoiCeMAil
An envelope will appear in the bottom right-hand corner of your screen indicating that you have video/voicemail and the number of
message(s) waiting.
To retrieve your video/voicemail:
• Press the “Mail” button on the front of your Videophone
• Enter your 4 digit access code and press #
• Press 1 to retrieve your video/voicemail
• If you have mail, the voice prompt will indicate whether it is a voicemail or video message.

12
Video/Voicemail Functions
Press Command
# Key Save your message
7 Erase your message
2 Repeat your message
4 Go back to your previous message
5 Play your message
6 Go to your next message
8 Return the call
9 Additional options
* Key Go back to the previous menu
2-6. Your VideophoNe iNForMAtioN
Select the “Information” icon from the Main Menu to view information about your Videophone.
Press the “Back” or the “OK” button on the front of your Videophone to exit.
2-7. useFul FuNCtioNs duriNg A CAll
2-7-1. Mute
Press the “Mute” button to prevent the other party from hearing you speak. To release mute, press the “Mute” button again.
2-7-2. priVACY
Press the “Privacy” button to keep your image from being displayed to the other party. In privacy mode, instead of your image, a
logo image is displayed on the other party’s screen. To exit from privacy mode, press the “Privacy” button again.
2-7-3. VoluMe CoNtrol
You can control the volume by using the navigation buttons “ “ during a call.
The volume icon is shown at the top of the LCD screen.

13
“ ” Lowers the volume “ “ Increases the volume
In order to control the volume during a call:
• Press the “MENU” button
• Select “Volume Control” by using the navigation buttons “ ”
• Press the “OK” button
• Use “ “ to adjust the volume
• Press the “Back” button to return to the previous menu
2-7-4. BrightNess CoNtrol
You can adjust the LCD brightness by using the navigation buttons “ “ during a call. The brightness icon is shown at the top of
the LCD screen.
In order to control the LCD brightness during a call:
• Press the “MENU” button
• Select “Brightness Control” by using the navigation buttons “ ”
• Press the “OK” button
• Use “ “ to adjust:
• Press the “Back” button to return to the previous menu
2-7-5. hold
You can place a call on hold by pressing the “Hold” button during a call. The LCD screen will then become dark and not display
anything. To resume your call, simply press the “Hold” button again.
Caller will see “Hold” Person called will see “On Hold”

14
2-7-6. Audio CoNFereNCiNg (3-WAY CAlliNg)
The Audio Conferencing function enables 3-way calling during a voice call. To activate press the “Hold” button during the call. This
will place the existing caller on hold.
Caller will see “Hold” Person called will see “On Hold”
• Dial the number of the 3rd person you would like to conference in and press the “Call” button
• When the 3rd party answers, press the “Conference” button
NOTE: If the person who initiated the conference call hangs up during the call, it will end the call for all parties.
2-7-7. CAll WAitiNg
You will hear a stutter tone to indicate an incoming call and the caller ID information will be displayed.
• To accept the incoming call, press “1” (the existing call will be placed on hold)
• To reject the call, press “2” (the new caller will hear a busy signal)
• Once the incoming call is completed, press the “Hold” button again to reconnect to the original caller.

15
2-8. CAll ForWArdiNg
The Call Forwarding feature enables you to forward your calls to another telephone number or to your voicemail.
To activate this feature simply following the below instructions depending on the option you would like:
CALL FORWARDING ALWAYS
Activation Press *72 followed by the “Call” button , then the number that you would like your calls forwarded to
followed by the # key
De-activation Press *73 followed by the “Call” button
CALL FORWARDING ALWAYS TO VOICEMAIL
Activation Press *21 followed by the “Call” button
De-activation Press #21 followed by the “Call” button
CALL FORWARDING TO BUSY
(caller will hear a busy signal)
Activation Press *90 followed by the “Call” button
De-activation Press *91 followed by the “Call” button
CALL FORWARDING BUSY TO VOICEMAIL
(caller will be forwarded to voicemail if you are on another call)
Activation Press *40 followed by the “Call” button
De-activation Press #40 followed by the “Call” button
CALL FORWARDING NO ANSWER
Activation Press *92 followed by the “Call” button , then the number that you would like your calls forwarded to
followed by the # key
De-activation Press *93 followed by the “Call” button
CALL FORWARDING NO ANSWER TO VOICEMAIL
(caller will be forwarded to voicemail if there is no answer)
Activation Press *41 followed by the “Call” button
De-activation Press #41 followed by the “Call” button
Please note, ACN’s standard rates apply to the forwarded call depending on the fixed or mobile number the call is
forwarded to.
2-9. trANsFerriNg CAlls to/FroM AN AuxiliArY phoNe
To transfer calls to or from an auxiliary phone connected to the phone port of your Videophone simply do the following:
TRANSFERRING CALLS FROM YOUR VIDEOPHONE
Press the “Call” button . The auxiliary phone will ring. Simply answer the auxiliary phone to complete the transfer.
TRANSFERRING CALLS TO YOUR VIDEOPHONE
Press *1 on the auxiliary phone to transfer audio only to your
Videophone.
Press *2 on the auxiliary phone to transfer both audio and video
to your Videophone.

16
3.SetUp
3-1. MAiN MeNu
Press the “MENU” button to display the Main Menu.
NOTE: To navigate the menu screen, use the “ ” buttons to until you reach the desired menu item, then press
the “OK” button
MAIN MeNU seleCTIONs
Phonebook Save contact names and phone numbers for frequently dialled numbers
Search for phone numbers by name and number
Place calls directly
•
•
•
Call Log View recent calls in your Call Log, including total calls, answered calls, dialled numbers and missed calls
Place calls directly
•
•
Settings Provides access to a variety of settings, including System, Time, Upgrade and Administrator settings
In the “System Settings” menu you can manage your Sound and Display options, in addition to accessing
your network settings and the Factory Reset function.
In the “Network” menu you can access your Net and Interface settings. To adjust these settings please
contact ACN Customer Services.
Factory Reset allows you to delete your configuration and reset to the factory defaults. If this is necessary,
ACN Customer Services will provide you with the password to reset your Videophone
In the “Sound” menu, you can set your Ring Tones, Ring Volume, Sound Effects, Sound Volume and Audio
Output.
The “Display” menu allows you to activate and manage Video Output, LCD Brightness, Upload Bandwidth,
Picture Capture (captures and saves pictures from live video conversation, which you can associate with
your phonebook contacts), Self View, Power Saving (controls timing for Digital Photo Frame and Wallpaper),
Wallpaper and your Digital Photo Frame and Language options.
The “Time Setting” menu allows you to set the time parameters such as NTP, DST, and GMT.
In the “Upgrade” menu, you can access the Upgrade Server Address and the method for upgrading your
software. To adjust these settings please contact ACN Customer Services.
The “Administrator” menu provides access to SIP, A/V Codec settings, DNS, Proxy and LAN settings. To
adjust these settings please contact ACN Customer Services.
•
•
•
•
•
•
•
•
•
Digital Photo
Frame The Digital Photo Frame allows you to view the pictures from your memory stick or SD card as a slide show
•
Information The Information screen shows you the main system settings for your Videophone
•

17
3-2. usiNg the keYpAd
Numeric keys Used for character input
•
(Caps) Enables you to select the type of characters to enter (Numeric/Lowercase/Capital)
•
(Back) Enables you to return to the previous menu
•
(OK) Used to select and confirm selections
•
Navigation buttons
Used to navigate between menus
Directs you to edit mode, and allows you to set values for selected items
•
•
3-3. eNteriNg ChArACters
Press the “Caps” button to select the required input mode (Numeric/Lowercase/Capital). The current input type is indicated at the
top left of the LCD screen, represented by one of the following icons:
Indicates numeric
Indicates lowercase letters
Indicates capital letters
Mode
Key Lowercase Capital Numeric
:@/ :@/ 1
abc ABC 2
def DEF 3
ghi GHI 4
jkl JKL 5
mno MNO 6
pqrs PQRS 7
tuv TUV 8
wxyz WXYZ 9
“.” “-“ 0
* * *
# # # .
Space Space space
3-3-1. eNteriNg NuMBers
Example: To enter “123”:
• Press the “Caps” button until the appears at the top left of the screen.
• Press the buttons consecutively.

18
3-3-2. eNteriNg letters
• Press the ”Caps” button until the appears at the top left of the screen.
• Press the corresponding buttons until the desired letter appears. Example: To enter “SKY”:
• Press the “Caps” button to set the input mode to
• Press the corresponding buttons for ‘S’, ‘K’, ‘Y’ consecutively: , ,
3-3-3. eNteriNg NuMBers ANd letters
Example: To enter “123.com”
• Press the “Caps” button to set the input mode to .
• Press the buttons consecutively.
• Press the “Caps” button to set the input mode to .
• Press the corresponding buttons for ‘”com” until the desired letter appears:
• Press the , , buttons consecutively
3-4. phoNeBook
The Phonebook enables you to save any frequently dialled numbers as contacts, and place phone calls directly. Up to 300 contacts can
be stored in the Phonebook.
Select “Phonebook” Phonebook menu
from the Main Menu
3-4-1. All CoNtACts
“All Contacts” lists all the contacts you have saved in your Phonebook. You can edit, save or delete your contact information.
Select “All Contacts” from the “All Contacts” list
Phonebook menu
3-4-1-1. Add NeW eNtrY
“Add New Entry” enables you to add new contact information such as name, phone number, set up a corresponding ring tone, as well
as a photo of the contact. After entering the information select “Save”. If you do not want to save the information, select “Cancel”.
Select “Add New Entry” from Enter information and
the All Contacts menu select “Save

19
3-4-1-2. plACe A CAll
You can place a call to anyone listed in your “All Contacts” list by selecting the name and number you would like to call.
Select the contact from your Select the “Make Call” option Select the number
“All Contacts” list you would like to call and press
the “OK” button
3-4-1-3. edit A CoNtACt
You can edit information such as phone number, name, ring tone and the photo of the contact. Once you have edited the information,
select “Save” to save your changes. If you do not want to save, select “Cancel”.
Select the contact from your Select the “Edit” option Enter information and
“All Contacts” list select “Save”
3-4-1-4. delete A CoNtACt
You can delete contact information that you no longer need.
Select the contact from your Select the “Delete” option Select “YES” to delete
“All Contacts” list
3-4-2. seArCh
You can search for a contact stored in your Phonebook by name or number and directly place a call, edit or delete the contact
information.
Select “Search” from the Search menu
Phonebook menu

20
3-4-2-1. seArCh BY NAMe
You can search for a contact by name in your Phonebook by selecting “Search by name”.
NOTE: You should enter all characters using upper and lower case letters accordingly.
Select “Search by name” from the Enter the name that you would The contact information will be
Search menu like to find and press the “OK” displayed
button
3-4-2-2. seArCh BY NuMBer
You can search for a number that has been saved in your Phonebook
Select “Search by number” from Enter the number you would like The contact information will be
the Search menu to find and press the “OK” button displayed
3-4-2-3. plACiNg A CAll, updAtiNg ANd deletiNg iNForMAtioN
You can place a call to a number in your Phonebook, or update or delete your saved contact information.
Placing a call
Select “Make Call” Select the number
you would like to call and press the “OK” button
Updating information Deleting information
Select “Edit” and press the “OK” To “Delete” a contact, select “Delete”
button to update an entry, and then press the “OK” button .
then select “Save” Select “Yes” to confirm the deletion
Table of contents
Other ACN Telephone manuals