ActivePure Induct Guardian I User manual
READ MANUAL CAREFULLY FOR PROPER USE AND OPTIMAL OPERATION.

2
SPECIFICATIONS
Technology:
• ActivePure®
Electrical:
• 24Vac ~ 50/60Hz
• Current: 1.0A
• Power Factor: 0.99
• Power: 17 Watts
Mechanical:
• Distribution via air handler.
Dimensions:
• 8.5” x 8.5” x 11”
(21.59 cm x 21.59 cm x 27.94 cm)
Weight:
• 3 pounds (1.2 kg.)
Operating Temperature:
• 34°F - 200°F (16°C - 93°C)
Coverage:
• Up to 1,250 sq. ft. (116 m2)
Warranty:
• Limited 3 years
GENERAL INFORMATION
If you have any questions concerning this, or any ActivePure®product,
contact ActivePure®Customer Service at 800.572.1446 or email
customerservice@ActivePure.com.
CONTENTS
Product Overview ...........................2
Specifications ..............................2
Important Safety Instructions ................3
Product Contents ...........................3
Installation Hardware........................3
Replacement Parts..........................3
Recommended Installation Tools .............4
Installation Requirements ....................4
Metal Ductwork Installation ..................5
Fiberglass Ductwork Installation ............6-7
Maintenance/UV Lamp Indicator ..............8
Changing the ActivePure®Cell ................8
Replacing the Ballast .....................9-10
Troubleshooting Guide....................11-13
Warranty Information.......................14
FCC Declaration of Conformity ..............15
Responsible Party..........................15
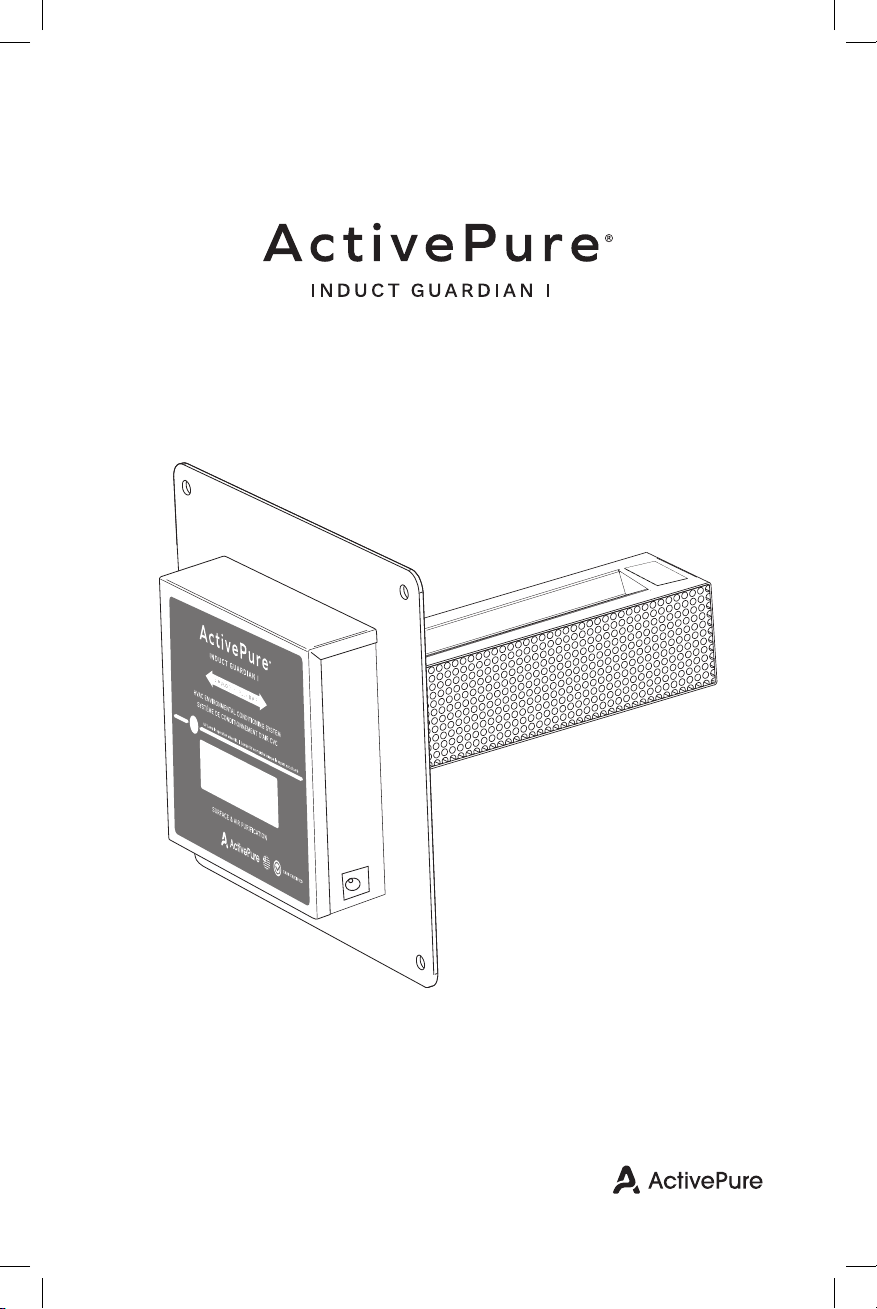
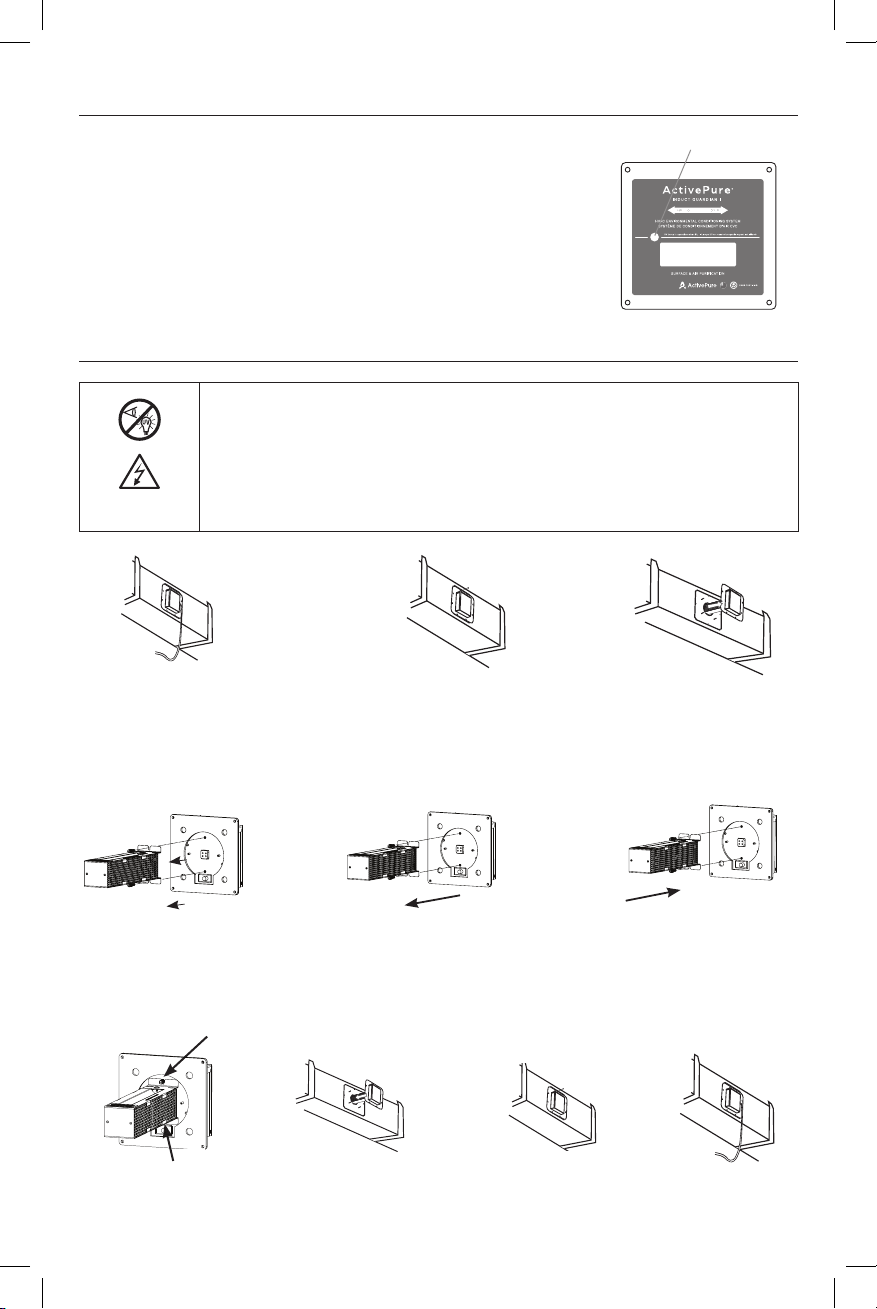
PRODUCT OVERVIEW
Congratulations on your purchase of the ActivePure®Induct Guardian I! The unit is easily mounted into
the supply side of air conditioning and heating system air ducts by an electrician or HVAC professional,
where it will provide continuous and automated, surface and air disinfection. Please read and follow all
service procedures outlined in this manual before installing or performing maintenance.
ActivePure®reserves the right to change or modify
any specication without notice.

3
• Ozone-Free ActivePure®Cell
(Includes UV Bulb)
Item # 9950231
• Ballast
Item # 9950102
• Power Cord
Item # 9950103
Base
Unit
ActivePure®Cell
• UV Light in operation; disconnect unit from power supply before servicing; failure
to follow warnings may result in severe eye damage and electrical shock.
• To prevent damage to the unit, operating environment temperature must never
exceed 200°F (93°C)
• This unit must be installed by a licensed HVAC contractor or electrician; failure
to do so will void warranty of the product
• This unit must never be used with an extension cord
• Do not connect this unit to any voltage source above 32 volts; doing so will cause
damage to the unit
Power Cord Mounting Plate
UV bulb indicator
Replaceable ActivePure®
Cell (includes UV Bulb)
Safety Switch
IMPORTANT SAFETY INSTRUCTIONS
PRODUCT CONTENTS
INSTALLATION HARDWARE
REPLACEMENT PARTS
WARNING
Location for Protective Earth Line.
(8) #8 - .75 1/4” Self-tapping screws
Item # US7067
(4) #6 - 32 X 2 inch Threaded bolts
Item #US70680
(2) Thumb screws
Item #36-00213
(2) Thumb nuts
Item #36-00214
(4) #6 - 32 Toggle
bolt wall anchors
Item # US70682
4
1/4
NOTE:
1. Unit should be installed after the air handler in the
HVAC system.
2. The ductwork around the installation area should be
clean and dry to ensure proper adhesion of the gasket
materials and any tape used.
3. When installing near a furnace or heating coils, run
the heating system through five (5) full heating cycles
to ensure the temperature of the ActivePure®Induct
4. An approximate 3.5” (8.89 cm) opening will need
to be cut into the existing ductwork to install the
unit properly.
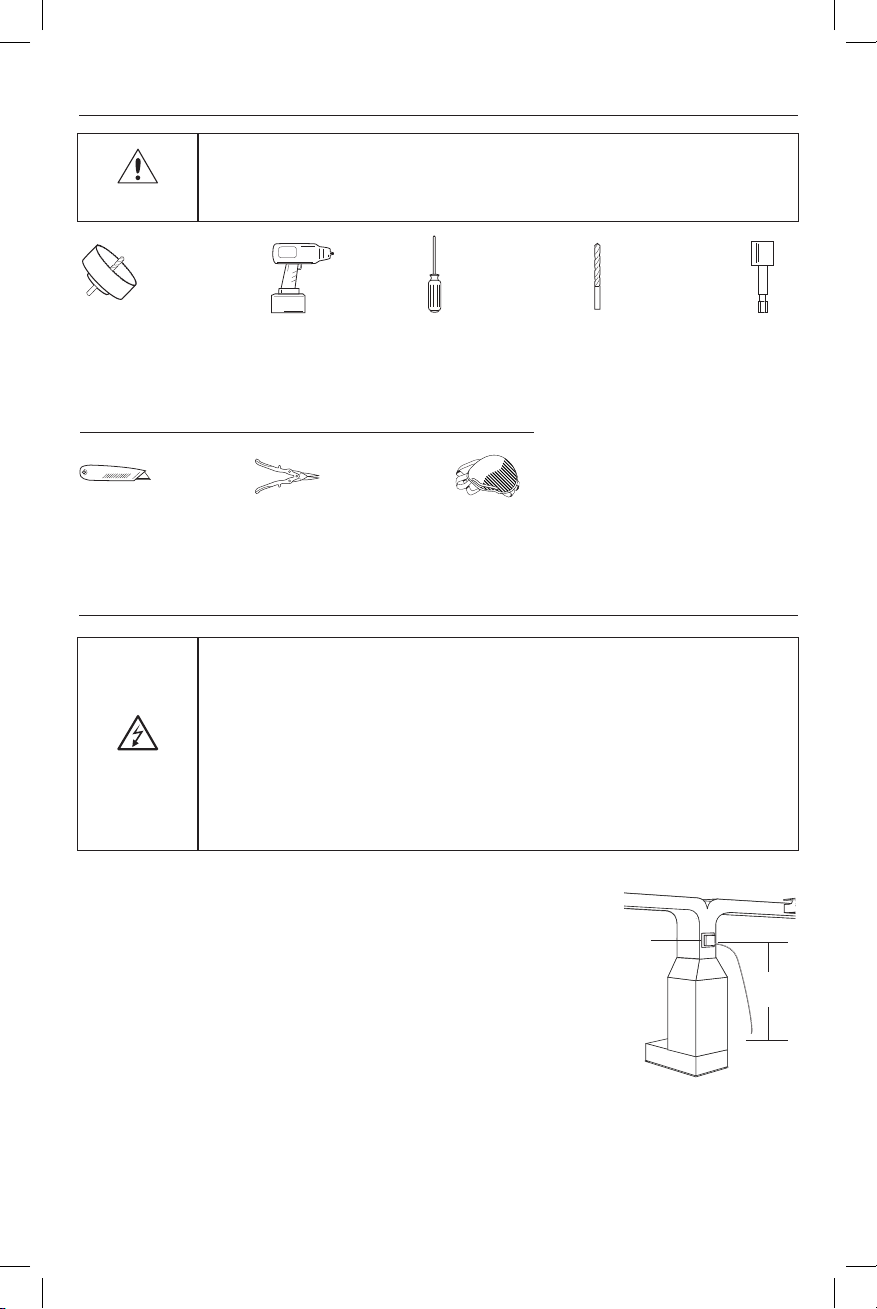
3 1/2” Hole Saw
(for wood or metal)
Drill/Power
Driver
Phillips
Screwdriver
3/8” Drill Bit
(if installing into
toggle bolts)
YOU MAY ALSO NEED:
1/4” Nut
Driver Bit
Min. 9” x
9” Metal
Ductwork
Min. 10” x 10”
Fiberglass
Ductwork
Air Handle
Max.
15 ft.
RECOMMENDED INSTALLATION TOOLS
INSTALLATION REQUIREMENTS
When the unit is installed in a roof mounted HVAC system, the unit must be
protected from elements.
This unit must be installed by a licensed HVAC contractor or electrician. Failure
to do so will void warranty of the product.
Power Connection Requirements: This device is designed to operate using
a 24 VAC, 40Va transformer. Transformers supplied with a straight cooling
capable of handling the additional device load before installation. If the system
transformer is not capable of handing the extra load, a separate 24 VAC, 40Va
transformer MUST be used. Do not connect the device to any power source
with a voltage less than 22 VAC and a maximum of 32 VAC. Doing so will cause
damage to the device.
WARNING
Caution
Tin Snips
(for metal ductwork)
Utility Knife Dust Mask
5
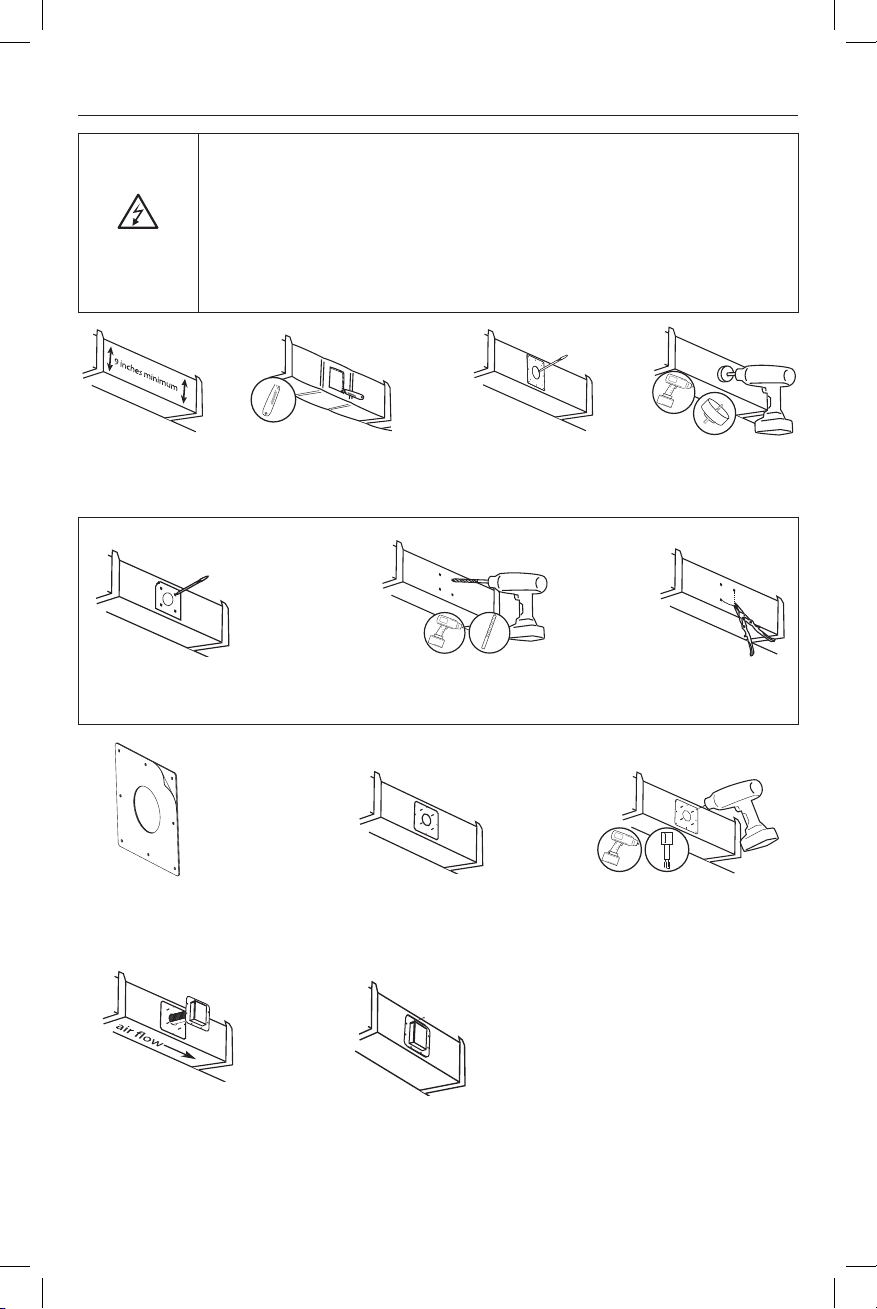
6. Center openings and press
mounting plate onto duct. The
adhesive gasket will hold the
mounting plate in place.
8. Insert unit into opening.
Be sure the air will pass
though the ActivePure®
Cell honeycomb matrix.
9. Secure the unit to the
mounting plate with (4) thumb
nuts.
7. Secure the mounting plate using
(8) #8 self-tapping screws.
NOTE:
1. Locate suitable
area of duct for
installation.
3. Mark location for 3.5”
opening using the
mounting plate.
4. Cut hole in duct
using 3.5” hole saw.
2. Cut away insulation
to expose metal
duct (if needed).
1/4
a. Using the mounting plate,
mark 4 Cutting Method
holes on duct.
b. Drill 4 holes where marked. c. Cut between holes
using tin snips.
ALTERNATE CUTTING METHOD
METAL DUCTWORK INSTALL ATION
5. Remove backing from
mounting plate adhesive
gasket.
Power Connection Requirements: This device is designed to operate using
a 24 VAC, 40Va transformer. Transformers supplied with a straight cooling
capable of handling the additional device load before installation. If the system
transformer is not capable of handing the extra load, a separate 24 VAC, 40Va
transformer MUST be used. Do not connect the device to any power source
with a voltage less than 22 VAC and a maximum of 32 VAC. Doing so will cause
damage to the device.
WARNING
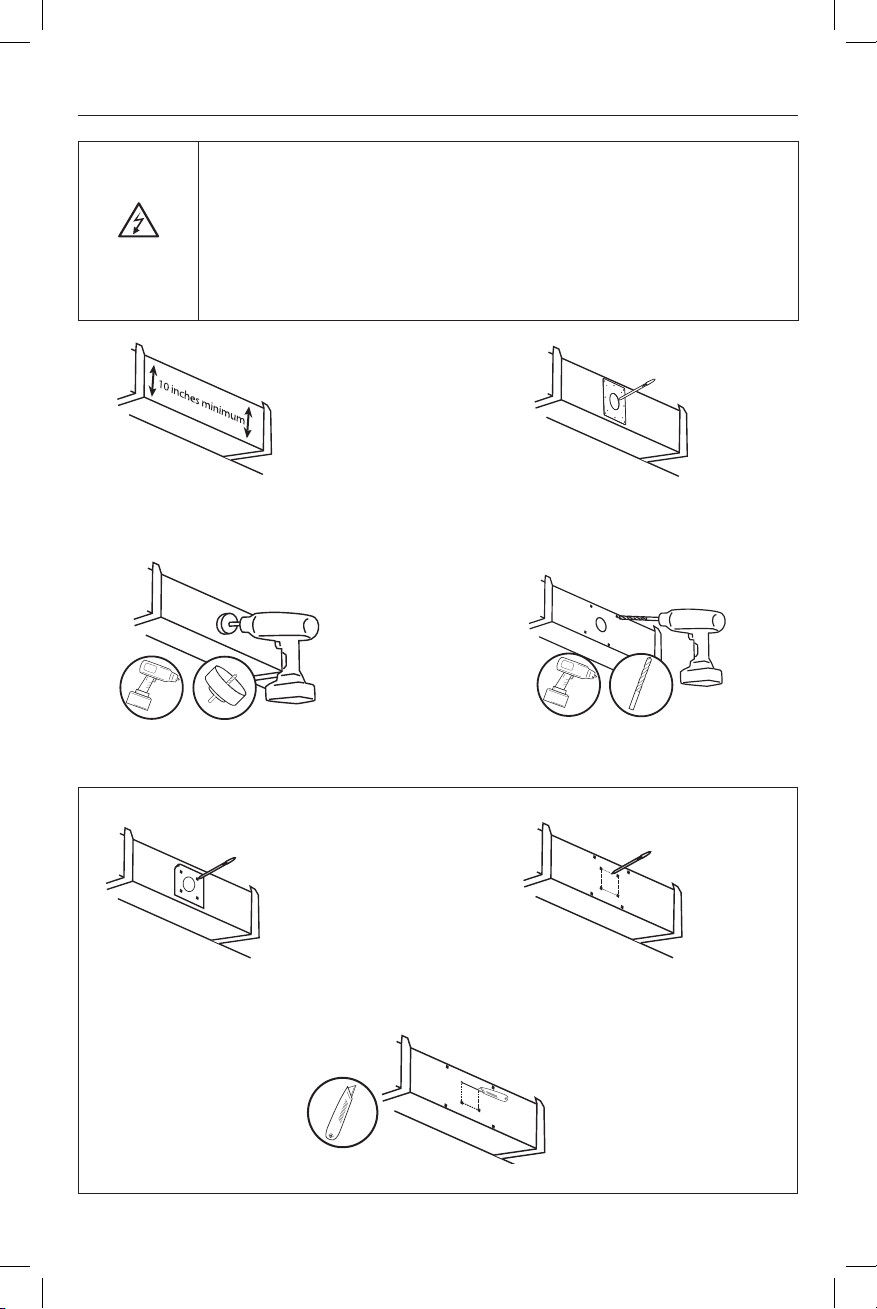
6
a. Using the mounting plate, mark 4
holes for alternative cutting method
on duct. If, not already done, mark 4
corner holes.
b. Draw a line between each
alternative cutting method marks
(as shown).
c. Cut between holes using a utility knife. Continue with #4 (above).
ALTERNATE CUTTING METHOD
1. Locate suitable area of
duct for installation.
2. Mark location for 3.5” opening using
the mounting plate. Also mark the
locations of 4 screw holes in corners.
3. Cut hole in duct using 3.5” hole saw. 4. Drill 4 holes (at corner screw
locations) using a 3/8” drill bit.
FIBERGLASS DUCTWORK INSTALLATION
Power Connection Requirements: This device is designed to operate using
a 24 VAC, 40Va transformer. Transformers supplied with a straight cooling
capable of handling the additional device load before installation. If the system
transformer is not capable of handing the extra load, a separate 24 VAC, 40Va
transformer MUST be used. Do not connect the device to any power source
with a voltage less than 22 VAC and a maximum of 32 VAC. Doing so will cause
damage to the device.
WARNING

7
Stud
5. Remove backing from the mounting
plate adhesive gasket.
6. Insert (4) 2” Threaded bolts into screw
holes at corners of mounting plate.
Attach (4) toggle bolt anchors to ends of
threaded bolts.
7. Insert (4) toggle bolts into 3/8” holes
in duct. Be sure toggle anchors open
after inserting.
8. Center large opening in the mounting plate
over 3.5” opening in duct and press plate
to duct. The adhesive gasket will hold the
mounting plate into place. Tighten toggle
bolts - DO NOT OVERTIGHTEN.
9. Insert unit into opening. Be sure the air
will pass through the ActivePure®Cell
honeycomb matrix.
10. Secure the unit to the mounting plate
with four (4) thumb nuts.
FIBERGLASS DUCTWORK INSTALLATION
NOTE:
8
Your ActivePure®Induct Guardian I unit requires no periodic
maintenance beyond normal replacement of the ActivePure®Cell
every one (1) year.
The UV lamp operation indicator on the face of the unit will glow
when the UV lamp is in use. If the indicator does not glow and
the unit has power, the ActivePure®Cell should be replaced.
Power
Cord
UV Lamp Operation Indicator
2. Remove the 4
thumb nuts.
3. Remove the unit from
the mounting plate.
4. Remove the 2 thumb
screws holding the
ActivePure®Cell.
5. Remove the used ActivePure®
Cell from the base unit and
dispose of the bulb properly.
6. Plug the new ActivePure®
Cell into the base unit. Be
sure Air Flow / Honeycomb
Cell direction is correct.
7. Secure with 2
thumb screws.
8. Insert the unit into the
mounting plate.
9. Secure unit with 4
thumb nuts.
10. Reconnect
power cord.
MAINTENANCE/UV LAMP INDICATOR
CHANGING THE ACTIVEPURE®CELL
1. Disconnect (unplug) power
cord from unit
NOTE: Always follow OHSA electrical lockout safety requirements to prevent accidental release of energy
during service or maintenance activities.
NOTE: Visit: www.lamprecycle.org
for proper bulb disposal regulations.
• UV Light in operation; disconnect unit from power cord before servicing; failure
to follow warnings may result in severe eye damage
• Disconnect power at the breaker or fuse panel before servicing unit;
always follow OSHA lockout procedures to prevent accidental exposure to
electrical energy
WARNING

9
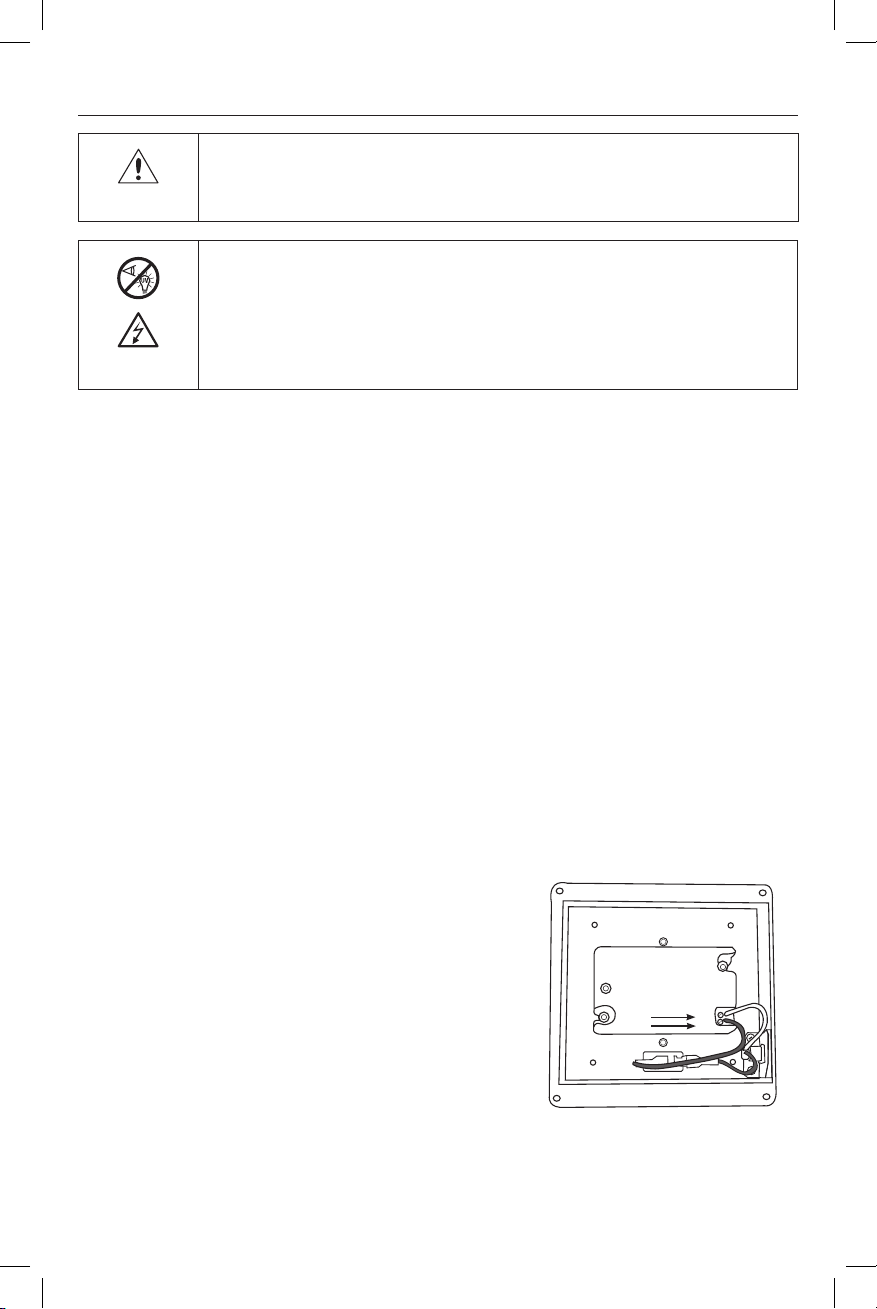
2. Open the ballast housing by removing the
four (4) screws then removing the cover.
4. Remove the two (2) nuts securing ballast to
the case. Remove the ballast.
5. Place new ballast into original location and secure using the two (2) nuts removed in step 4.
3. Disconnect all ballast wiring by pressing
down on connector tabs and pulling wire
straight out.
1. Disconnect (unplug) power cord from unit.
REPLACING THE BALLAST
Power
Cord
NOTE: Always follow OHSA electrical lockout safety requirements to prevent accidental release of energy
during service or maintenance activities.
• UV Light in operation; disconnect unit from power cord before servicing; failure
to follow warnings may result in severe eye damage
• Disconnect power at the breaker or fuse panel before servicing unit;
always follow OSHA lockout procedures to prevent accidental exposure to
electrical energy
WARNING

10
7. Replace cover and secure with the original
four (4) screws.
8. Re-install unit if removed from duct. Reconnect
power cord, turn breaker or fuse power back on
and check for proper operation.
NOTE:
in operation.
6. To reconnect wiring, insert wire into wire pocket in ballast until bottomed. Gently pull wire to
ensure it is properly locked into place.
REPLACING THE BALLAST (CONTINUED)
11
TROUBLESHOOTING GUIDE FOR ACTIVEPURE®INDUCT GUARDIAN I (Model: B1013U)
Tools Required:
• 1/4 Nut Driver
• Phillips Head Screwdriver
• Multimeter
• Small Flat Head Screwdriver
• Flashlight
1. Check the incoming voltage by unplugging the power cord from the side of the ActivePure®Induct
Guardian I and placing one probe on the outside of the plug and the other on the inside of the
plug. Voltage measurement should read 18-32VAC. If no voltage is present, replace the transformer
supplying power to the ActivePure®Induct Guardian I.
2. Leave unit attached to ducting. Remove (4) Phillips head screws from the cover of the unit. Remove
the cover. Unplug the black and white wires from the ballast. Check incoming voltage by placing
Multimeter probes on the two exposed wires. Voltage measurement should be between 18-32VAC.
If there is no voltage reading, power is not supplied to the unit. Check power source and verify
Induct Safety Switch is fully depressed. Safety switch plunger is located underneath the unit and is
depressed when unit is secured to mounting plate.
3. Re-plug the black and white wires to the ballast.
4.
nuts that secure the unit to the mounting plate.
5. Remove the (2) Phillips head screws that hold the cell
assembly in place. Remove the UV lamp from the 4-pin
the 4-pin connector and the UV lamp base. Gently pry and
lift up on the Cell until the UV lamp is unseated from the
4-pin connector, remove the Cell Assembly.
TROUBLESHOOTING GUIDE
• UV Light in operation; disconnect unit from power cord before servicing; failure
to follow warnings may result in severe eye damage
• Live voltage may be present
WARNING
This unit must be installed and serviced by a licensed HVAC contractor or
electrician. Failure to do so will void the warrant of the product.
Caution

12
1.
broken. Resistance can also be checked if continuity is not available on the Multimeter. Resistance
should be between 3-5 ohms. If continuity or resistance check is bad, replace the ActivePure®Cell.
4. Remove the two (2) nuts
securing ballast to the
case. Remove the ballast.
2. Open the ballast housing
by removing the four (4)
screws then removing
the cover.
5. Place new ballast into
original location and
secure using the two (2)
nuts removed in step 4.
3. Disconnect all ballast
wiring by pressing down on
connector tabs and pulling
wire straight out.
6. To reconnect wiring, insert
wire into wire pocket in ballast
until bottomed. Gently pull
wire to ensure it is properly
locked into place.
1. Disconnect (unplug) power cord
from unit.
NOTE: Always follow OHSA electrical
lockout safety requirements
to prevent accidental release
of energy during service or
maintenance activities.
TROUBLESHOOTING GUIDE
2. If continuity or resistance check is good replace the ballast. To replace the ballast follow these steps.
Test Continuity
or Resistance
at each set of 2
closest Pin
Test Continuity
or Resistance
at each set of 2
closest Pin
Power Cord
• UV light in operation; DO NOT look directly at UV light; failure to follow warning
may result in severe eye damage
• Disconnect power at the breaker or fuse panel before servicing unit;
always follow OSHA lockout procedures to prevent accidental exposure to
electrical energy
WARNING

13
8. Re-install unit if removed from duct. Reconnect
power cord, turn breaker or fuse power back on
should be lit when in operation).
7. Replace cover and secure the
original four (4) screws.
Replacement Part Numbers:
• Ozone-Free ActivePure®Cell
(Includes UV Bulb)
Item # 9950231
• Ballast
Item # 9950102
• Power Cord
Item # 9950103
Base Unit
ActivePure®Cell
To order replacement parts, contact your sales representative or ActivePure®
Customer Service for further assistance at 800.572.1446 or email
customerser[email protected].
TROUBLESHOOTING GUIDE

14
LIMITED 3 YEAR WARRANTY
Customer should not repackage and ship the ActivePure®
Induct Guardian I unit due to possibility of irreparable
damage. For warranty service, please contact ActivePure
Customer Service at 800.572.1446.
WHAT IS COVERED BY THIS WARRANTY?
We warrant the ActivePure®Induct Guardian I to the
Customer, subject to the conditions below, against
defects in workmanship or material, provided that the
products are returned to ActivePure Manufacturing, LLC
within the following time periods:
• ActivePure®Induct Guardian I (excluding the ActivePure
Cell and Lamp) within three (3) years of date of
purchase.
• ActivePure®Cell and Lamp within one (1) year of date
of purchase if the Induct Guardian I is connected to a
power source where the ActivePure Cell is “ON” 100%
of the time.
• If the Induct Guardian I is connected to the fan circuit
where the ActivePure®Cell cycles “ON and OFF” with
the system fan, the ActivePure Cell is only covered by a
ninety (90) day warranty from date of purchase.
INSTALLATION AND MAINTENANCE REQUIREMENTS
This warranty is expressly conditioned upon proper
installation, operation, cleaning and maintenance, all in
of these requirements will void this warranty. Servicing of
your ActivePure®Induct Guardian I using parts other than
genuine ActivePure parts will also void this warranty.
HOW TO OBTAIN WARRANTY SERVICE
Customer must go online to www.ActivePure.com/
Warranty or call 1.800.572.1446 to register their unit
and activate their warranty within 1-year from date
of purchase. ActivePure®Induct Guardian I will repair
or replace and return the product, without charge
and within a reasonable period of time, subject to the
conditions herein, if its examination shall disclose any
part to be defective in workmanship or material. If we,
in our discretion, are unable to repair the product after
a reasonable number of attempts, we will provide either
a refund of the purchase price or a replacement unit, at
of installation method.
WHAT IS NOT COVERED BY THIS WARRANTY
Ordinary wear and tear shall not be considered a defect
in workmanship or material. These warranties do not
misapplication. This warranty is non-transferable.
MISSING SERIAL NUMBERS AND UNAUTHORIZED
CHANNELS
If a valid serial number is missing from the product, the
warranty will be voided. ActivePure®Induct Guardian
I products are for sale through authorized sales
representatives only. Warranties are voided if a product is
purchased through unauthorized channels; this includes
company sponsored or independent websites that
are not authorized to use ActivePure®Induct Guardian
I trademarked names, images and logos as well as
warranty coverage prior to purchasing a product, contact
ActivePure® Customer Service at 800.572.1446 with the
serial number located on the back of the unit.
EXCLUSION OF OTHER WARRANTIES AND CONDITIONS
LIMITATION OF LIABILITY FOR SPECIAL, INCIDENTAL,
OR CONSEQUENTIAL DAMAGES
Such excluded damages include, but
the use of the products, and any loss caused by leaks or
other water damage.
FOR U.S. APPLICATION ONLY
also have other rights which vary from state to state.
Some states do not allow limitations on warranties, or on
remedies for breach. In such states, the above limitations
may not apply to you.
FOR CANADIAN APPLICATION ONLY
required by applicable legislation, this warranty is not
and you may also have other rights which vary from
province to province. Some provinces and territories
do not allow limitations on warranties, or on remedies
for breach. In such provinces or territories, the above
limitations may not apply to you. If any provision of this
warranty or part thereof is held by a court of competent
jurisdiction to be invalid, illegal, or unenforceable, the
validity, legality and enforceability of the remaining
provisions or parts thereof will not in any way be
court. This entire warranty shall continue to be valid,
legal and enforceable in any jurisdiction where a similar
determination has not been made.
This warranty is provided by:
ActivePure Manufacturing, LLC
1300 Valley Drive
Bristol, VA 24201
SERVICE
up-to-date instructions manual on the use of our
our products may without notice make the information
contained herein subject to alteration. For the latest
information, please visit our website at www.activepure.
com or www.activepure.com/manuals.
LIMITED THREE (3) YEAR WARRANTY

15
This equipment has been tested and found
to comply with a Class B digital device,
pursuant of Part 15 of the FCC Rules These
limits are designed to provide reasonable
protection against harmful interference in
a residential installation. This equipment
generates, uses, and can radiate radio
frequency energy, and if not installed and
used in accordance with the instructions,
may cause harmful interference to radio
communications. However, there is no
guarantee that interference will not occur
in a particular installation. If this equipment
does cause harmful interference to radio
or television, which can be determined
user is encouraged to try to correct the
interference by one or more of the following
measures:
Reorient or relocate the receiving antenna.
Increase the separation between the
equipment and receiver.
Connect the equipment into an outlet on
receiver is connected.
Consult the Independent Owner for help.
FCC DECLARATION OF CONFORMITY
Name: ActivePure®Induct Guardian I
Model: B1013U
Manufacturer: ActivePure Manufacturing, LLC
This device complies with Part 15 of the
FCC Rules.
RESPONSIBLE PARTY
ActivePure Manufacturing, LLC
1300 Valley Drive
Bristol, VA 24201
Ph: 800.572.1446
Signature:___________________________
Printed Name:
Title: Vice President of Product Development
and Manufacturing
Date: 06/10/2021

AIG_OM_65-00832_VA-01621_0621
For information regarding the use of this product please call Customer Service.
www.activepure.com
ActivePure Manufacturing, LLC | Bristol, VA 24201 | 800.572.1446
© ActivePure Manufacturing. All Rights Reserved.
Other manuals for Induct Guardian I
1
This manual suits for next models
1
Table of contents
Other ActivePure Air Cleaner manuals

ActivePure
ActivePure Induct Guardian User manual

ActivePure
ActivePure Surface & Air Guardian User manual

ActivePure
ActivePure INDUCT GUARDIA N II User manual

ActivePure
ActivePure INDUCT GUARDIAN IV User manual

ActivePure
ActivePure Beyond Guardian User manual

ActivePure
ActivePure TRANSIT GUARDIAN B101A User manual

ActivePure
ActivePure Guardian Pro User manual

ActivePure
ActivePure F159L User manual

ActivePure
ActivePure Transit Guardian External User manual

ActivePure
ActivePure Surface & Air Guardian User manual


