ACV Inbay 240000-02 User manual

Inbay® Kit
Artikel-Nr.: | part-no.: 240000-02
www.inbay.systems
Kit Content
(1) Ladespule
(2) Spannungswandler 12V -> 5V / 3A
(3) 1m USB Kabel
(4) Lichtwellenleiter L=19,1 mm / d=2,8 mm
(5) Inbay® Pad d=55mm
(6) Linsenkopfschraube
(7) Scheibe 2,7 PA6
Kit Content
(1) Cupper inductor
(2) Voltage Transformer 12V -> 5V / 3A
(3) 1m USB cable
(4) Optical waveguide L=19,1 mm / d=2,8 mm
(5) Inbay® Pad d=55mm
(6) Fillister head screw
(7) Pane 2,7 PA6
1
2
3
4
5
6 7
Stromanschluss:
=> Ziehen Sie den Stecker der Bordsteckdose ab
und schieben Sie die Isolierung etwas zurück
=> Montieren Sie die Abzweigverbinder auf den
beiden Kabeladern. Verwenden Sie abhängig von
der Kabelstärke die entsprechenden Abzweigverbinder:
• Kabelstärke 2,5mm² => blau
• Kabelstärke 1,5mm² => rot
Power Connection:
=> Disconnect the plug of the on-board socket and
push down a bit the cable insulation
=> Mount the branch connectors on both cable
wires. Depending on the cable diameter
use the appropriate branch connectors:
• Cable diameter 2,5mm² => blue
• Cable diameter 1,5mm² => red
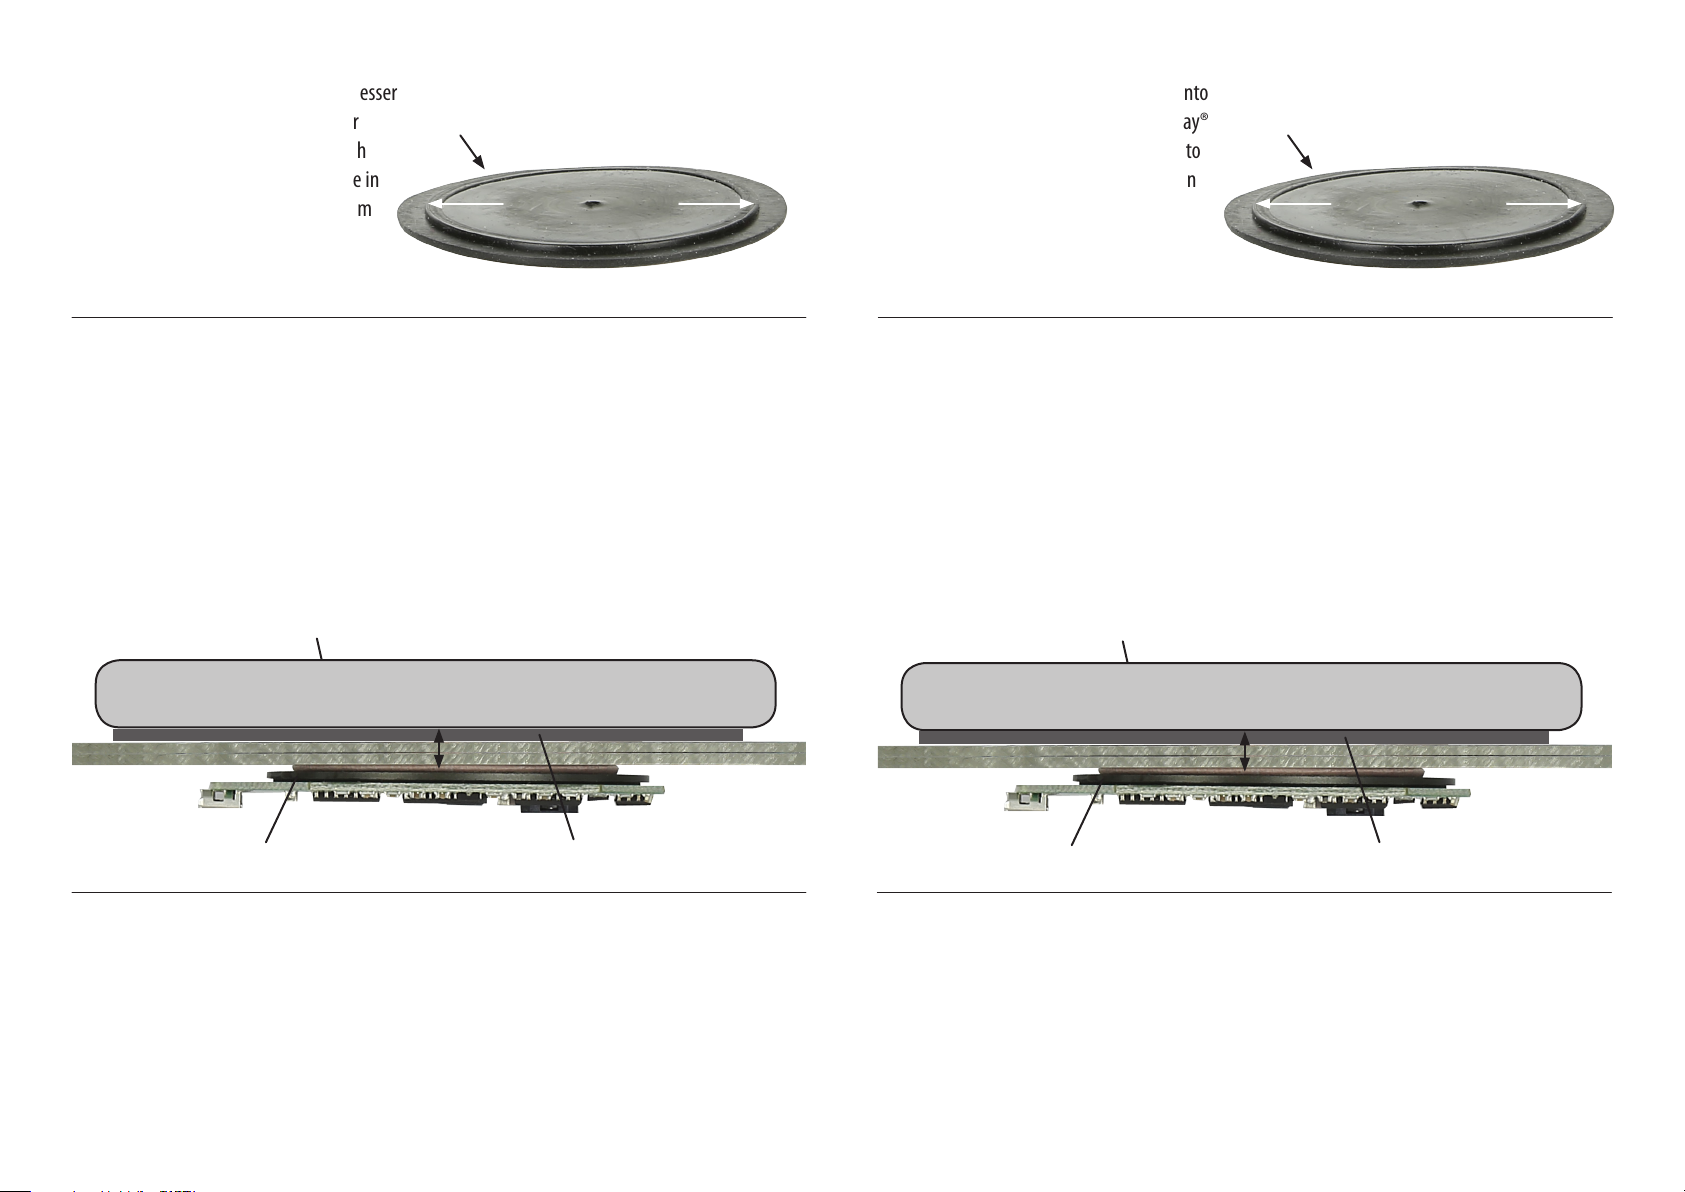
Der Abstand zwischen Receiver
und Spule muss zwischen 3 - 8 mm betragen.
Idealabstand zwischen Receiver und Spule: 5 mm
Achtung! Der Mindestabstand von 3mm
darf nicht unterschritten werden !!!
Spule Inbay Pad (Antirutschmatte)
Smartphone (mit Qi-Receiver)
Abstand zwischen Spule und Qi-Receiver:
mindestens: 3mm - ideal: 5 mm - maximal: 8 mm
The distance between receiver
and cupper inductor must be between 3 - 8 mm.
Ideal distance between receiver and cupper inductor: 5 mm
Caution!There is a minimum distance of 3mm
which must not be undercut !!!
Spool Inbay Pad (anti-skid mat)
Smartphone (with Qi-Receiver)
Distance between spool and Qi-Receiver:
minimum 3mm - ideal: 5 mm - maxium: 8 mm
Bohren Sie ein Loch mit einem Durchmesser
von Ø 51 mm in die Oberäche. Auf der
Unterseite des Inbay® Pads bendet sich
eine entsprechend große Kante, welche in
die Bohrung eingesetzt werden muss um
das Inbay® Pad plan auf der Oberäche
verkleben zu können.
Mittels des beigefügten Lichtleiters können Sie die optische Ladestandsanzeige
(rotes oder blaues Leuchten) der Platine auf die Oberäche des Einbauortes verlegen.
Hierzu muss die abgeachte Seite des Lichtleiters parallel zur LED eingebaut werden.
Für die Montage des Lichtleiters wird eine Bohrung mit einem Durchmesser von d=2,9 mm benötigt.
The included optical waveguide can be used to move the optical charging status (red or blue light)
from the PCB to the surface of the installation point.
In order to do this you have to install the at side of the optical waveguide parallel to the LED.
For the mounting of the optical waveguide you need a drill hole with a diameter of 2,9 mm.
Make a hole with a diameter of Ø 51 mm into
the surface. On the bottom side of the Inbay®
Pad is a border which has to be inserted into
to hole in order to glue the Inbay® Pad even
to the surface
Unterseite des Inbay® Pads bottom side of Inbay® pad
Kante border
51 mm 51 mm
Other ACV Automobile Accessories manuals


