manuals.online logo
Brands
  1. Home
  2. •
  3. Brands
  4. •
  5. Crux
  6. •
  7. Automobile Accessories
  8. •
  9. Crux Sightline VIMFD-95 User manual

Crux Sightline VIMFD-95 User manual

Other Crux Automobile Accessories manuals

Crux Logic ACPBM-77Y User manual

Crux

Crux Logic ACPBM-77Y User manual

Crux RVCCH-75W User manual

Crux

Crux RVCCH-75W User manual

Crux AVICH-03 + VCIP5 User manual

Crux

Crux AVICH-03 + VCIP5 User manual

Crux MRVFD-79Q User manual

Crux

Crux MRVFD-79Q User manual

Crux VIMBM-86B User manual

Crux

Crux VIMBM-86B User manual

Crux AVIGM-04S User manual

Crux

Crux AVIGM-04S User manual

Crux BEECR-35 User manual

Crux

Crux BEECR-35 User manual

Crux DKGM-51 User manual

Crux

Crux DKGM-51 User manual

Crux Sightline RVCAD-81B Instruction Manual

Crux

Crux Sightline RVCAD-81B Instruction Manual

Crux ACPBM-77X User manual

Crux

Crux ACPBM-77X User manual

Crux SWRGM-49L User manual

Crux

Crux SWRGM-49L User manual

Crux RVCCH-75D User manual

Crux

Crux RVCCH-75D User manual

Crux VIMMB-85S User manual

Crux

Crux VIMMB-85S User manual

Crux WVI-X User manual

Crux

Crux WVI-X User manual

Crux VRFAD-81C User manual

Crux

Crux VRFAD-81C User manual

Crux BTI-ISO User manual

Crux

Crux BTI-ISO User manual

Crux RVCCH-75E User manual

Crux

Crux RVCCH-75E User manual

Crux BEECR-35D User manual

Crux

Crux BEECR-35D User manual

Crux BEECR-35C User manual

Crux

Crux BEECR-35C User manual

Crux SOOCR-26 User manual

Crux

Crux SOOCR-26 User manual

Crux ACPGM-80N User manual

Crux

Crux ACPGM-80N User manual

Crux RVCTY-71L User manual

Crux

Crux RVCTY-71L User manual

Crux MG-3 User manual

Crux

Crux MG-3 User manual

Crux SWRTY-61N User manual

Crux

Crux SWRTY-61N User manual

Popular Automobile Accessories manuals by other brands

James Baroud Odyssey user guide

James Baroud

James Baroud Odyssey user guide

Motorola i50sx owner's manual

Motorola

Motorola i50sx owner's manual

Yakima 9MM STANDARD BIKE MOUNT instructions

Yakima

Yakima 9MM STANDARD BIKE MOUNT instructions

Feniex T3 instruction manual

Feniex

Feniex T3 instruction manual

Kia E8300-4D000 manual

Kia

Kia E8300-4D000 manual

Brink 756843 installation instructions

Brink

Brink 756843 installation instructions

Whispbar K085W Fitting instructions

Whispbar

Whispbar K085W Fitting instructions

v.link CI-VL2-PC-HSD manual

v.link

v.link CI-VL2-PC-HSD manual

Viking Stack-Rack Assembly and use instructions

Viking

Viking Stack-Rack Assembly and use instructions

Aries 203015 installation manual

Aries

Aries 203015 installation manual

Choetech AT0005 user manual

Choetech

Choetech AT0005 user manual

ZZ2 ZZAIR-PRO instruction manual

ZZ2

ZZ2 ZZAIR-PRO instruction manual

Holman 4A80L installation guide

Holman

Holman 4A80L installation guide

Thule 2075 parts manual

Thule

Thule 2075 parts manual

Motorola T325 quick start guide

Motorola

Motorola T325 quick start guide

TAUBENREUTHER 16-3950 FITTING INSTRUCTION

TAUBENREUTHER

TAUBENREUTHER 16-3950 FITTING INSTRUCTION

DV8 FBJL-02 Product installation manual

DV8

DV8 FBJL-02 Product installation manual

Prorack K1163 manual

Prorack

Prorack K1163 manual

manuals.online logo
manuals.online logoBrands
  • About & Mission
  • Contact us
  • Privacy Policy
  • Terms and Conditions

Copyright 2025 Manuals.Online. All Rights Reserved.

ACTIVATE AND DEACTIVATE OPTION
Using the RIGHT HAND SIDE SWC buttons you can activate and deac-
tivate the video in-motion function. (ONLY WITH DIP SWITCH 1 OFF)
Simply press and hold the LEFT arrow on the
side mirror control.
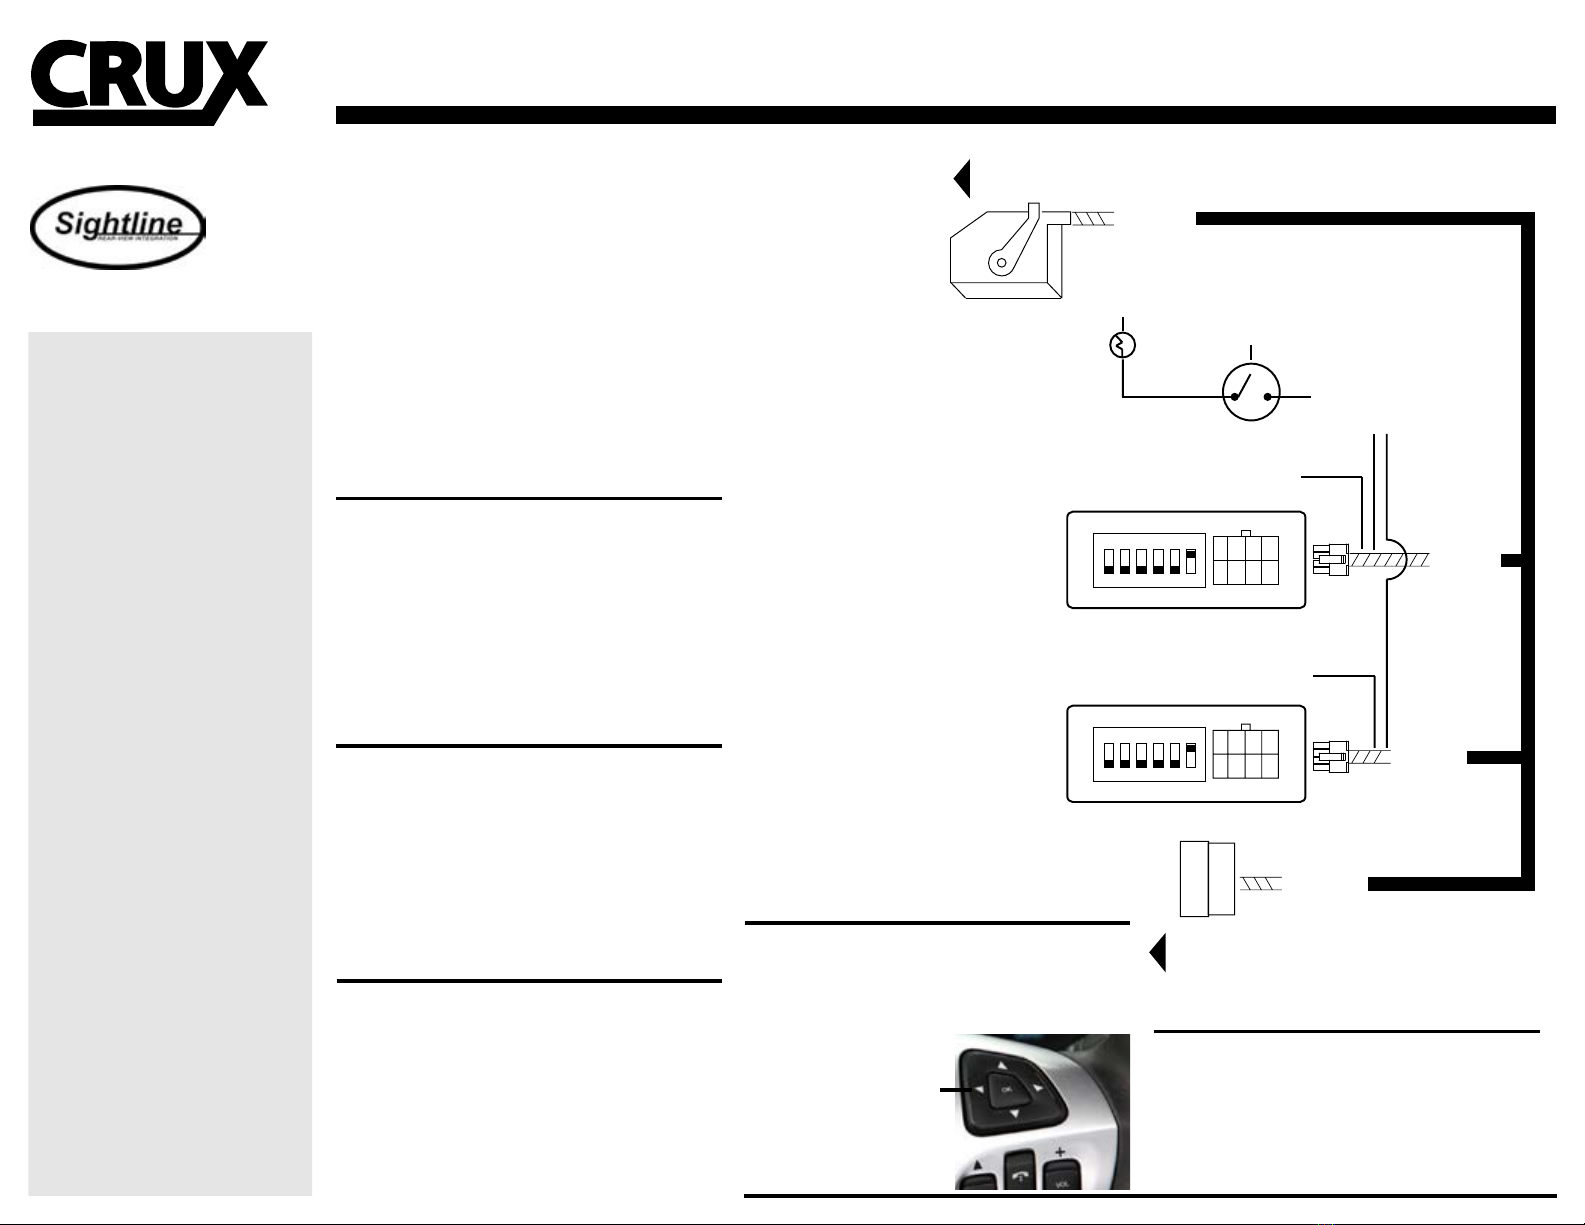
TO FACTORY
HARNESS
8-PIN
(male plug)
WHITE/ OPTIONAL
12V OUTPUT
54-PIN
(female plug)
54-PIN
(male plug)
8-PIN
(male plug)
TO FACTORY
RADIO
4 5 6
ON
1 2 3
4 5 6
ON
1 2 3
------------------
------------------
------------------
GREEN/ 12V POWER SWITCH
(SAME FUNCTION AS DIP 1)
NON-PERMANENT
FUSE
(NOT INCLUDED)
12V OPTIONAL/
TOGGLE SWITCH
NOT INCLUDED
WHITE/ OPTIONAL
12V OUTPUT
C-500
INTERFACE
C-125
INTERFACE
SAFETY WARNING:
THIS INTERFACE IS DESIGNED TO ACTIVATE
VIDEO IN-MOTION TO ALLOW THE PASSENGER
ACCESS TO THE ADDRESS INPUT WHILE THE
VEHICLE IS IN-MOTION. THIS INTERFACE MAY
CAUSE AN ERROR WHEN SERVICED AT THE OEM
DEALER. BE AWARE THAT MOST DEALERS
WILL ATTEMPT TO VOID THE MANUFACTURERS
WARRANTY WHEN INSTALLING ANY AFTERMAR-
KET EQUIPMENT. IMPROPER USE OF THIS INTER-
FACE BY THE DRIVER MAY RESULT IN CITATION.
DRIVER MUST KEEP FULL ATTENTION ON THE
ROAD AND RESPONSIBILITY ON THE SAFETY OF
THEIR PASSENGERS.
INTERFACING SOLUTIONS
VIDEO IN-MOTION ACTIVATION FOR SELECT FORD MyFord Touch RADIOS 2011-UP
FORD:
2011 - 2014 Ford Edge
2011 - 2014 Ford Explorer
2012 - 2014 Ford Focus
2013 - 2014 Ford Focus ST
2013 - 2014 Ford Taurus
2013 - 2014 Ford Escape
2013 - 2014 Ford F150
2013 - 2014 F150 Raptor
2013 - 2014 F250, 350, 450, 550
2013 - 2014 Ford Fusion Hybrid
2013 - 2013 Ford Fusion Energy
2013 - 2014 Ford Taurus
2013 - 2014 C-Max Hybrid
2013 - 2014 C-Max Energy
LINCOLN
2011 - 2012 MKX
2013 - 2014 MKS
2012 - 2014 MKT
2013 - 2014 MKZ
WORKS FOR ALL:
MyFord Touch Radios
NOTE: The radio system will go through
a reboot process that may take up to 1
minute. It will initialize and re-load all
previous settings. Once complete it will
resume the original radio display.
VIMFD-95 We recommend reading this installation guide rst before starting any
work. Following these instructions from “Start” to” Finish” will ensure
a smooth and hassle free installation. We oer telephone support M-F
9:00 AM – 5:00PM PDT at 1 (855) 822-1348. We are here to help.
PARTS INCLUDED:
(1) FD-95 C-500 Interface
(1) FD-95 C-125 Interfaces
(1) FD-95 T-Harness
(1) Instruction
PRECAUTIONS:
- Remove the negative side of the battery to avoid any short circuits
durring the installation.
- Do not install the interface near any major components or near the
HVAC system. This may cause damage or overheating to the vehicle.
- Do not disconnect the airbag connection behind the radio panel.
PRELIMINARY:
Please read the entire manual before installing this interface.
This interface does not activate DVD reader.
INSTALLING THE INTERFACE:
1. Remove the factory display to gain access to the factory connectors.
2. Remove the 54-Pin connector from behind the display.
3. Make the T-Harness connections behind the factory display.
(if the connectors do not match please contact tech support)
4. Connect both Interfaces to an 8-Pin connector. No orientation.
4. Set the dip switches as needed on both interfaces. (See below)
5. Test the Navigation address input while the car is in-motion to verify
the VIM is active.
As an option we have provided a 12v output wire from our inter-
face, as the vehicle does not provide 12v Acc 250ma.
Do not use if not needed.
INSTALLATION OVERVIEW
Rev. 111113
TROUBLE SHOOTING
1. No video display while in-motion.
- Make sure the dip switches are in the correct position.
For more support contact tech support.
CONNECT BEHIND
THE DISPLAY
(Not The Radio)
ENABLE OR
DISABLE
(Video In-Motion)
HOLD FOR
3 SECONDS
AND RELEASE
SETTING THE DIP SWITCHES
Dip 1: Activates the Video In-Motion feature. The dip switch
is the permanent solution for keeping the VIM unlocked.
The SWC feature will be deactivated with this ON.
Dip 5 & 6: These dip switches may vary. See attached slip sheet.
FOR DIP SWITCH SETTINGS
SEE ATTACHED
SLIP SHEET
INTERFACING SOLUTIONS
VIDEO IN-MOTION ACTIVATION FOR SELECT FORD MyFord Touch RADIOS 2011-UP
FORD:
2011 - 2014 Ford Edge
2011 - 2014 Ford Explorer
2012 - 2014 Ford Focus
2013 - 2014 Ford Focus ST
2013 - 2014 Ford Taurus
2013 - 2014 Ford Escape
2013 - 2014 Ford F150
2013 - 2014 F150 Raptor
2013 - 2014 F250, 350, 450, 550
2013 - 2014 Ford Fusion Hybrid
2013 - 2013 Ford Fusion Energy
2013 - 2014 Ford Taurus
2013 - 2014 C-Max Hybrid
2013 - 2014 C-Max Energy
LINCOLN
2011 - 2012 MKX
2013 - 2014 MKS
2012 - 2014 MKT
2013 - 2014 MKZ
WORKS FOR ALL:
MyFord Touch Radios
NOTE: The radio system will go through
a reboot process that may take up to 1
minute. It will initialize and re-load all
previous settings. Once complete it will
resume the original radio display.
VIMFD-95
Rev. 111113
COMPATIBLE RADIO:
PIN 1/ VIM CONTROL CONFIGURATION
DIP# C-125 C-500 RESULT
Dip 1 OFF OFF
Dip 2 ON ON
User control of the VIM feature will be
turned ON and OFF from the SWC.
See instruction for SWC activation.
VIM Permanently on. No control on SWC
PIN 5 & 6 VIM CAN CONFIGURATION
ATTEMPT 1
ATTEMPT 2
ATTEMPT 3
ATTEMPT 4
In the case where the VIM does not function or the radio may not
turn on, this may be due to incorrect combination of Pin Configuration.
Dip 5
Dip 6
Dip 5
Dip 6
Dip 5
Dip 6
Dip 5
Dip 6
C-125 C-500
OFF
OFF
OFF
OFF
OFF
ON
OFF
ON
ON
ON
OFF
ON
ON
ON
OFF
ON
INTERFACING SOLUTIONS
DIP SWITCHES SLIP SHEET