Thank you for choosing an ADC®Satin™ Laryngoscope.
Device Description and Intended Use
A laryngoscope is a two-part, hand-held device consisting of a handle that contains batteries and a
detachable blade. Laryngoscopes are designed to provide illumination within the larynx during the
process of performing intubations. This instruction book covers standard, fiberoptic, and disposable
laryngoscopes. Fiberoptic laryngoscopes are indicated by an “F” following the item number. Disposables are
indicated by a “D” following the item number.
Contraindications
The following are only relative contraindication to tracheal intubation:
1. Severe airway trauma or obstruction that does not permit safe passage of an endotracheal tube.
Emergency cricothyrotomy is indicated in such cases.
2. Cervical spine injury, which requires complete immobilization of the cervical spine, makes
endotracheal intubation difficult.
General Warnings
A warning statement in this manual identifies a condition or practice which, if not correct-
ed or discontinued immediately, could lead to patient injury, illness, or death.
WARNING: Federal law restricts this device to sale by or on the order of a physician or licensed healthcare
practitioner.
WARNING: ONLY TRAINED PERSONNEL SHOULD USE A LARYNGOSCOPE FOR INTUBATION.
WARNING: ADC recommends that spare lamps, batteries, and replacement parts always be available for
emergency use.
WARNING: The sterilization guidelines included in this instruction booklet are intended as procedures
compatible with specific materials. Sterilization must be performed to approved hospital protocol. ADC can-
not guarantee that any of the recommended methods will guarantee sterility. This must be validated by the
hospital and/or sterilization equipment manufacturer.
WARNING: Fiberoptic handles may be used with ALL fiberoptic blades (reusable or disposable) that
conform to the ISO 7376 standards. Standard handles may be used with any standard blades that conform
to the ISO 7376 standards. Standard and fiberoptic blades and handles are NOT interchangeable.
Operation of all Laryngoscope Models
To Activate: Attach selected blade onto handle by hooking blade onto
handle rod as shown in Figure 1. Pull blade upward to open position to
automatically activate light.
To turn off, push blade downward into off position and disconnect
from handle. (See Figure 1).
Compatibility/Standards
Standard ADC Satin Laryngoscopes conform to current ISO 7376 standards. They are compatible with
virtually all major brands of standard illumination hook-on blades and handles.
Fiberoptic ADC Satin Laryngoscopes and Disposable Laryngoscope blades conform to current ISO 7376
standards. They are compatible with virtually all major brands of fiberoptic illumination hook-on blades
and handles. For easy visual identification, ALL fiberoptic models are clearly delineated by a
green indicator on both handle and blade.
Cleaning, Disinfecting, and Sterilization Procedures
ADC Satin Laryngoscope blades are crafted from rugged stainless steel. ADC Disposable Fiberoptic
Laryngoscope blades are crafted from polycarbonate, are for single use only, and should not be cleaned or
sterilized. Reusable handles are machined from chrome-plated brass or anodized aluminum. To ensure
maximum life and optimum performance, the following instructions should be strictly adhered to.
Disposable handles are made of ABS, are for single use only, and should not be cleaned or sterilized.
See the sections on the reverse panel for specific cleaning, disinfection, and sterilization
procedures for your laryngoscope type.
Cleaning Procedure for All Reusable Models:
Almost immediately after use, laryngoscope blades should be cleaned to prevent blood, saliva, and
other residues from drying. On conventional blades, the lamp socket and wires are an integral part of the
blade for cleaning and replacement.
WARNING: Ultrasonic cleaning is not recommended.
Disinfection/Sterilization Warnings for All Laryngoscope Blades:
CAUTION: ADC laryngoscope blades do not come sterilized. The Sterrad®process is NOT to be used
with disposable fiberoptic blades or fiberoptic blades.
WARNING: Flash autoclaving and hot air sterilization are not recommended, as these processes will
damage the instrument. The repeated high temperature and changes in temperature caused by autoclav-
ing will shorten the life of all laryngoscope products.
WARNING: Do not immerse blades in bleach, betadine, or peroxide solutions. Doing so will severely
damage the instrument. Also, avoid metal-to-metal contact on non-disposable blades.
Disinfection/Sterilization Warnings for All Battery Handles:
CAUTION: Do not allow excess fluid to seep into electrical contact. Be sure that the top and bottom of
the battery handle are secure before use. Poor maintenance of this device or failure to follow the warnings
in this instruction booklet could result in device failure and/or patient injury. NOTE: Remove lamp cartridge,
bulb, and batteries before disinfecting/sterilizing.
Basic Cleaning Procedure for Standard and Fiberoptic Blades:
Prepare a Klenzyme®, Manu-klenz™, or equivalent cleaning solution as per manufacturer’s instructions
and soak for ten minutes. Rinse devices with lukewarm running tap water for one minute to remove any
residual detergent after cleaning. Dry with a clean, lint-free cloth.
Basic Cleaning Procedures for Standard and Fiberoptic Handles:
Prepare a Klenzyme, Manu-klenz, or equivalent cleaning solution as per manufacturer’s instructions. Remove
both end caps, lamp cartridge and bulb, and batteries from device, and rinse with lukewarm tap water until all
visible contamination has been removed. Soak handle and end caps in the prepared solution for a minimum
of ten minutes, ensuring that all components are fully submerged. After the soak, the components should be
scrubbed with a soft-bristled brush paying particular attention to hard-to-reach areas. Rinse with cool running
tap water to remove all residual detergent. Dry with a clean, lint-free cloth. Note: Always allow handles to
completely dry before disinfection or use. Lamp cartridge and bulb can be wiped with a cloth dampened with
70% isopropyl alcohol. DO NOT ALLOW SOLUTION TO ENTER INTO THE CARTRIDGE. The lamp cartridge
and bulb CANNOT be SOAKED OR AUTOCLAVED.
High-Level Disinfection for Standard and Fiberoptic Blades:
To achieve high-level disinfection, a 2.4% glutaraldehyde solution (Cidex®or equivalent) must be pre-
pared at 77°F (25°C) to the manufacturer’s instructions. The blades should be fully immersed in the disin-
fectant for a minimum of 45 minutes. No air bubbles should be visible on the immersed blades during this
soak time. The blades should then be removed from the disinfectant and immersed in purified water to
rinse off all disinfectant. Immersion should be for a minimum of one minute and the process should be
repeated two additional times using fresh purified water each time. Once rinsing is complete, the blades
should be thoroughly dried using a sterile, lint-free cloth. Note: Always allow blades to completely dry
before use.
High-Level Disinfection for Disposable Fiberoptic Blades:
Disposable fiberoptic laryngoscope blades are supplied non-sterile. They are designed for single-patient
use only and are not disinfected after use. Gas sterilization by ethylene oxide following these guidelines.
Temperature 55°C (±5°C) EO pressure - 180 mmHg (± 20 mmHg) Chamber pressure 210mmHg
(±20mmHg).
High-Level Disinfection for Standard and Fiberoptic Handles:
To achieve high-level disinfection, a 2.4% glutaraldehyde solution (Cidex or equivalent) must be prepared
at 77°F (25°C) to the manufacturer’s instructions. The end caps of the handles, lamp cartridge and bulb,
and batteries must be removed. Both the end caps and handles should be fully immersed in the disinfec-
tant for a minimum of 45 minutes. No air bubbles should be visible on the immersed components during
this soak time. The components should then be removed from the disinfectant and immersed in purified
water to rinse off all disinfectant. Immersion should be for a minimum of one minute and the process
should be repeated two additional times using fresh purified water each time. Once rinsing is complete, the
components should be thoroughly dried using a sterile, lint-free cloth. Note: Always allow components to
completely dry before reassembling the handles, inserting batteries, or using the devices. Lamp cartridge
and bulb can be wiped with a cloth dampened with 70% isopropyl alcohol. DO NOT ALLOW SOLUTION
TO ENTER INTO THE CARTRIDGE. The lamp cartridge and bulb CANNOT be SOAKED OR AUTOCLAVED.
Steris Sterilization Processes for Disposable and Fiberoptic Laryngoscopes:
This product has been validated with the V-PRO 1 Standard Cycle; V-PRO 1 Plus Lumen and Non Lumen
Cycles; V-PRO maX Lumen, Non Lumen, and Flexible Cycles; V-PRO 60 Lumen and Non Lumen Cycles
using the V-PRO 60 Low Temperature Sterilization System with VAPPROX®HC Sterilant and V-PRO maX
Low Temperature Sterilization System.
Steam Sterilization for Standard and Fiberoptic Blades and Handles:
Sterilizer Type: Prevacuum Sterilizer Type: Gravity
Preconditioning Pulses: 3Minimum Temperature: 249.8°F (121°C)
Minimum Temperature: 269.6°F (132°C) Full Cycle Time: 30 minutes
Full Cycle Time: 4 minutes Minimum Dry Time: 15 minutes
Minimum Dry Time: 20 minutes
Repair/Maintenance
Battery Replacement: (Reuseable Models)
1) Unscrew bottom cap of handle and remove batteries.
2) Replace with appropriate size battery, taking care to insert positive ends
first. Screw bottom cap on and tighten. (Figure 2).
NOTE: Alkaline batteries should be used with your handle for maximum
performance and are recommended for replacement. Ordinary carbon zinc
batteries may also be used.
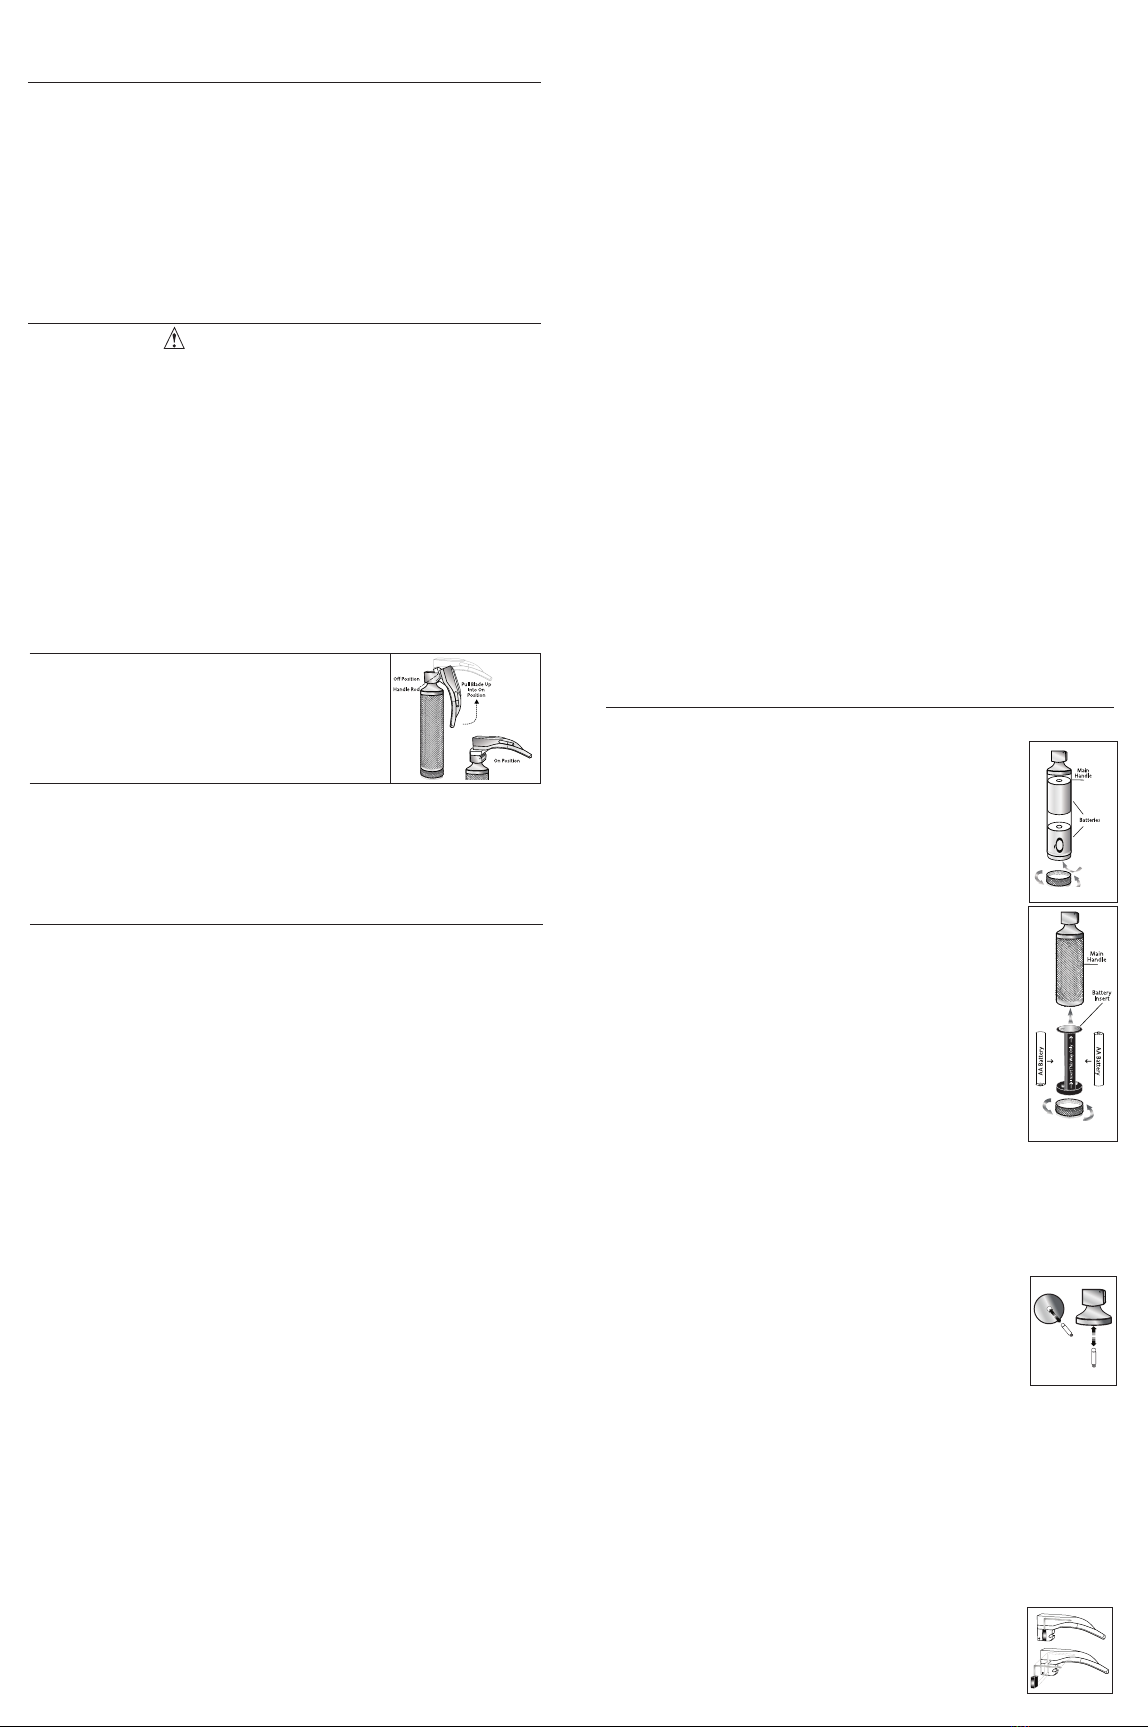
Battery Replacement: (4067F Stubby Handle)
1) Unscrew bottom cap of handle and remove battery insert.
2) Replace with appropriate size batteries. Insert one battery positive end first
and the other negative end first into battery insert, paying attention to the
polarity markings. Slide battery insert back into handle following the direction
of the “Insert This Way Only” arrows. Screw bottom cap on and tighten. (Figure 3)
NOTE: Alkaline batteries should be used with your handle for maximum
performance and are recommended for replacement. Ordinary carbon zinc
batteries may also be used.
Lamp Replacement: (Standard Models)
For correct illumination, alignment, and assurance of watertight seal during
immersion/autoclave, we recommend using only ADC #4500-1 and #4501-1
replacement lamps for standard blades.
1) To remove lamp on standard blades, grip lamp collar and rotate lamp counterclockwise until free.
2) Replace the lamp with a new ADC lamp.
3) Verify that lamp is sufficiently tightened before use.
CAUTION: Be sure lamp’s glass surface is clean and free from fingerprints after assembly. If necessary,
the glass may be cleaned with a soft cloth or cotton ball moistened in alcohol.
Lamp Replacement: (Fiberoptic Models)
For correct illumination and alignment we recommend using only ADC replacement
lamp model #5111N-4 (Figure 4).
1) Prior to removal, allow lamp time to cool.
2) Unscrew the laryngoscope head from the barrel of the handle in a
counterclockwise direction.
3) Pull lamp out of the laryngoscope head. The lamp is friction fit and does
not need to be twisted.
4) Insert replacement lamp by firmly pressing into head until it is completely seated.
5) Screw the laryngoscope head onto the barrel of the handle. Tighten by hand only.
CAUTION: Be sure lamp’s glass surface is clean and free from fingerprints after assembly. If necessary,
the glass may be cleaned with a soft cloth or cotton ball moistened in alcohol.
Fiberoptic Light Guide Replacement:
1) Loosen the locking screw with a screwdriver. (Note: This screw is NOT designed to be completely
removed. This prevents the screw from falling out while the laryngoscope is in use. DO NOT attempt
to remove this screw from the laryngoscope blade.)
2) Pull out the green base of the fiberoptic bundle and slide out the light guide (Figure 5).
(Note: The fiberoptic bundle is tightly fitted and may be difficult to remove.)
3) Insert new fiberoptic bundle by reversing the above steps.
4) Tighten the locking screw, ensuring that the fiberoptic bundle is securely
attached to the laryngoscope blade.
Figure 4
Figure 1
Figure 5
Figure 3
Figure 2
9358-00 rev 15.qxp_Layout 1 7/2/19 4:44 PM Page 2


