ADE M501020 User manual

Operating Manual
Class III approved Scales
Electronic Wheelchair Scales
M501020
M501020-210322-Rev006-UM-e

2 M501020-210322-Rev00 -UM-e
Contents
Installation and use of scale .................................................................................................................... 3
Check carton contents ........................................................................................................ 3
Assembling the scales ........................................................................................................ 3
Mains and battery connection for the scales .................................................................... 4
Mains connection ................................................................................................................. 4
Installing a rechargeable battery ........................................................................................ 4
Tips for handling the batteries............................................................................................ 4
Quality features .................................................................................................................... 5
Using the scales for legal metrological applications ....................................................... 5
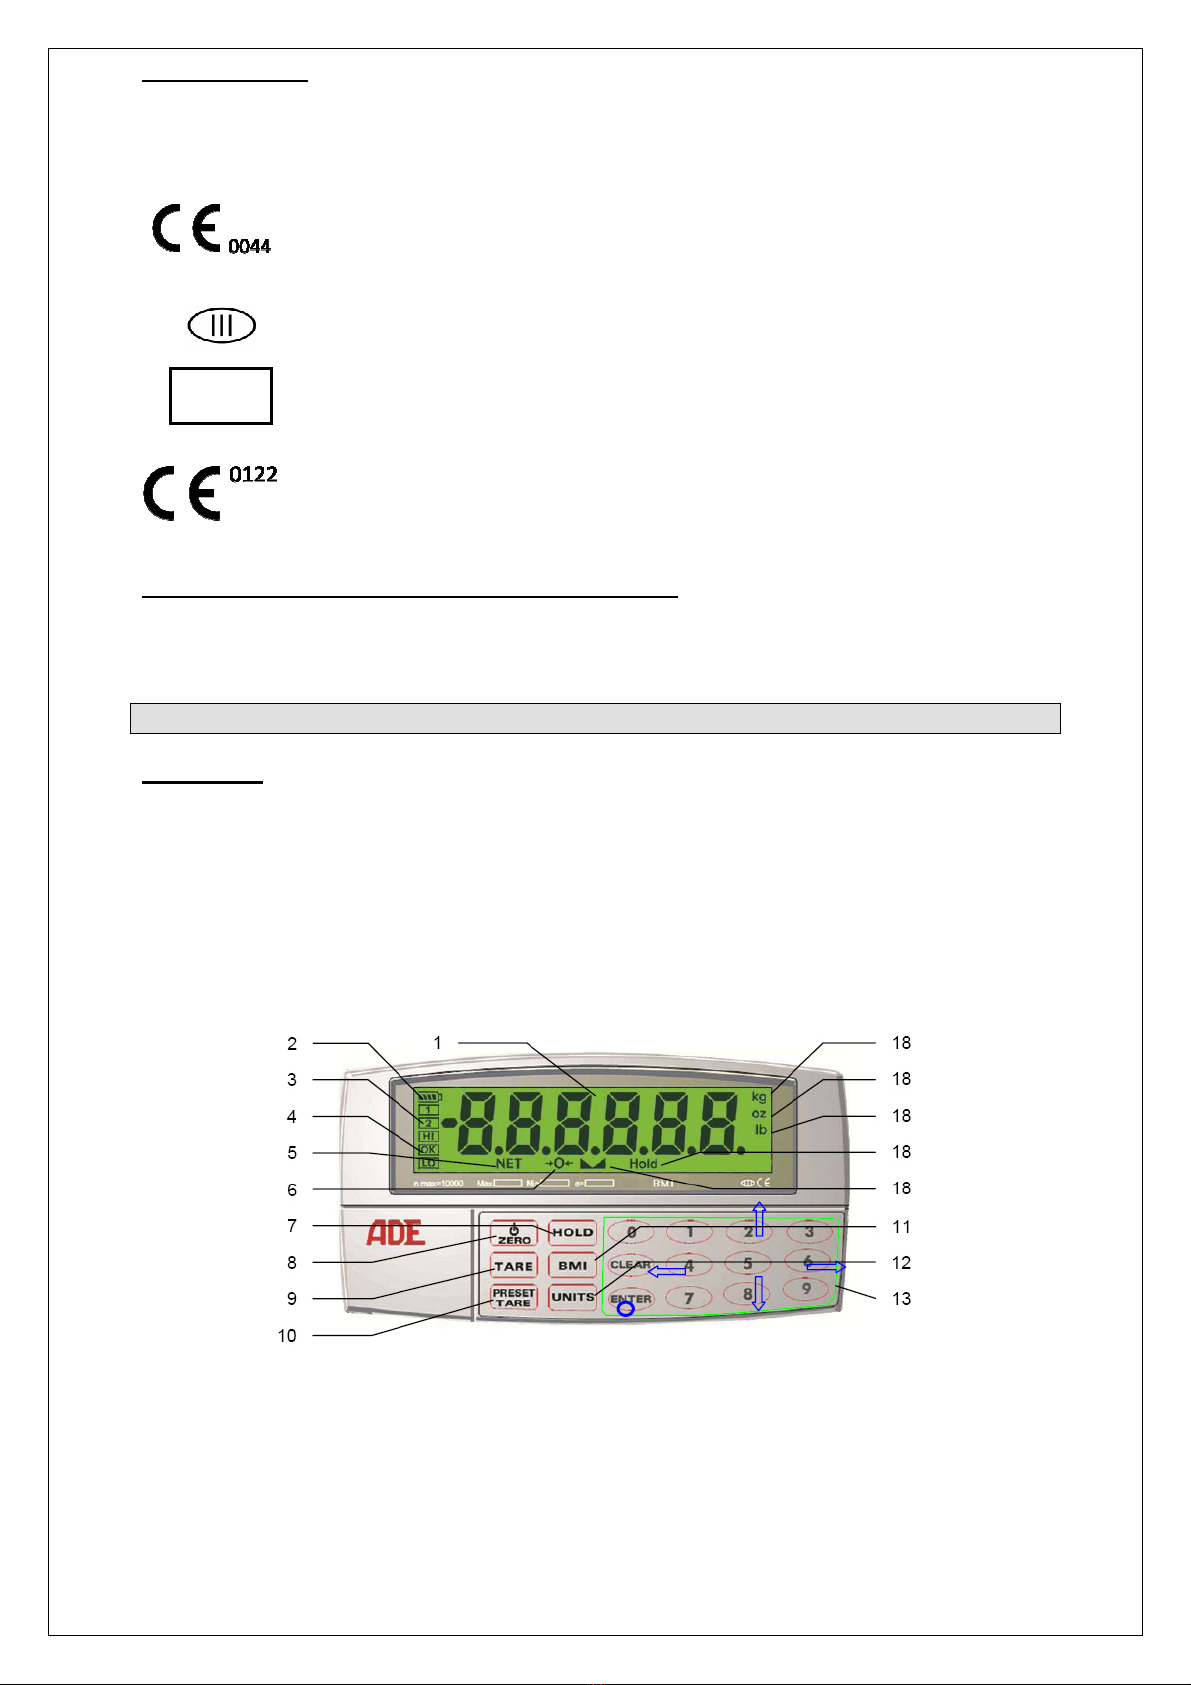
ADE-MAK display unit ............................................................................................................................. 5
Description ............................................................................................................................ 5
Indicator and operating controls ........................................................................................
Features ................................................................................................................................
Safety instructions ............................................................................................................... 7
Status displays ..................................................................................................................... 8
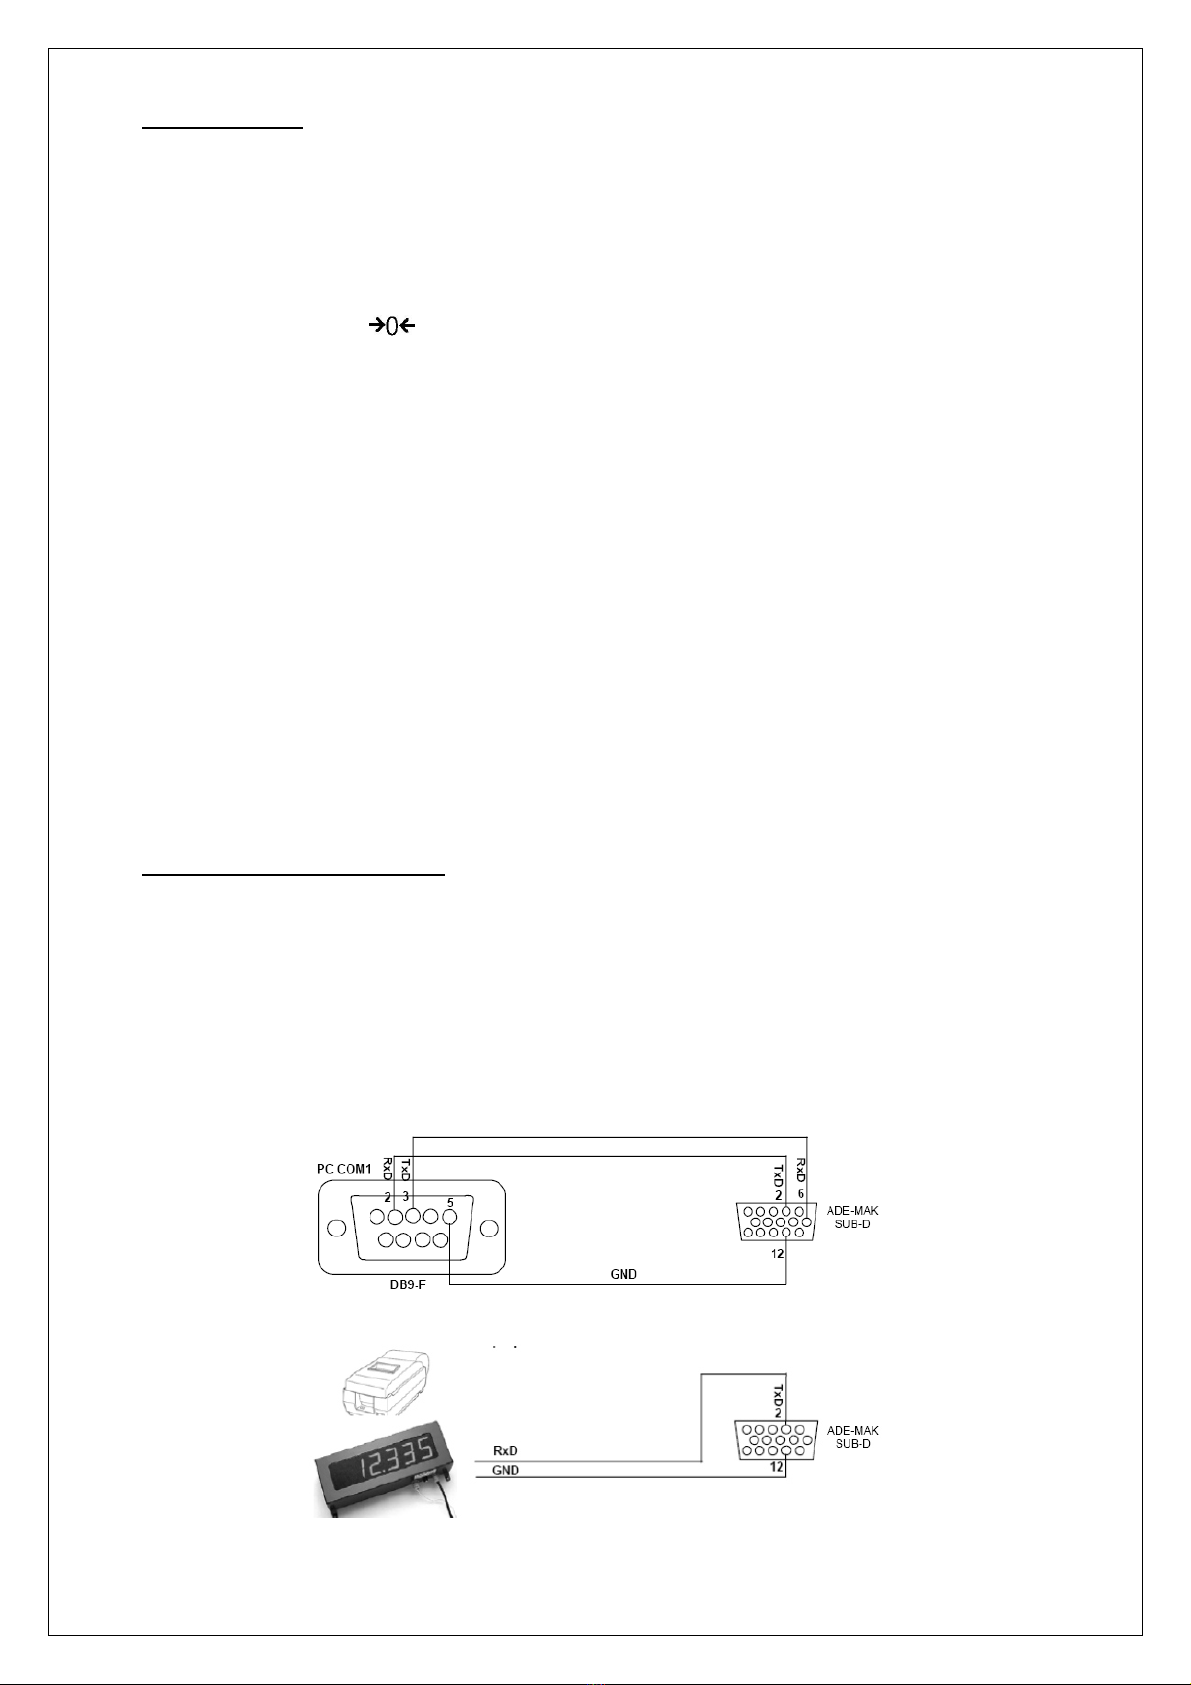
Connecting ancillary e uipment......................................................................................... 8
Housing and connections ................................................................................................... 9
Modes .................................................................................................................................. 10
Settings ............................................................................................................................... 11
Setting date and time ......................................................................................................... 11
Operating the scales .............................................................................................................................. 11
Aligning the scales ............................................................................................................ 11
Setting the weight unit ....................................................................................................... 12
Determining the weight ..................................................................................................... 12
Resetting the scales .......................................................................................................... 12
Tare functions..................................................................................................................... 12
Hold function ...................................................................................................................... 13
Determining the Body Mass Index (BMI) ......................................................................... 13
Evaluating Body Mass Index............................................................................................. 13
Print out a record ............................................................................................................... 13
Care, servicing and recalibration ........................................................................................................... 14
Cleaning .............................................................................................................................. 14
Error messages .................................................................................................................. 14
Safety instructions ............................................................................................................. 14
Waste disposal ................................................................................................................... 15
Storage and transport conditions .................................................................................... 15
Warranty .............................................................................................................................. 15
Recalibration....................................................................................................................... 15
Technical specifications ......................................................................................................................... 1
Conformity declaration ........................................................................................................................... 17

M501020-210322-Rev00 -UM-e 3
Installation and use of scale
This symbol means: "Consult operating instructions". To achieve accurate results, read
the instructions for use carefully before use and follow all instructions provided therein.
Keep the instructions for use for future reference.
Your ADE Electronic Wheelchair Scale is a class III approved scale which has been manufactured for
medical use in hospitals, by doctors or medical specialists as well as in rehabilitation centres or
nursing homes.
Portable and mobile HF-communication systems may influence electronic medical devices.
Electronic medical devices are restricted to special safety regulations in respect of their electromag-
netic compatibility and have been positioned and operated strictly as per the instructions of this Opera-
ting Manual.
The scale is used to evaluate the weight of patients sitting in a wheelchair, able to walk on their own or
by using any kind of walking aid or lying on an emergency litter. Due to its high capacity the scale is
also used for adipose patients.
The scale is a precision instrument for medical use.
The weighing result is used as an essential basis for medical application decided by doctors or medi-
cal personnel in hospitals, nursing homes, rehabilitation- and dialysis centres.
In order to achieve the best possible results kindly read and follow the Operating Manual in all re-
spects.
Check carton contents
The scales are already mounted trough and ready for use.
In the scope of supply are contained:
- Platform Scale compline mounts
- Indicator and cable with jag connector system
- Mains adapter
- Operating Manual including Certificate of Conformity
In any case, check that the serial numbers on the scales and the display unit match!
This is a mandatory precondition for using the scales in legal metrological applications.
Observe the safety instructions!
Assembling the scales
The ADE-MAK display unit can be mounted on walls or bases, or can be used as a stationary unit on
a table.
If your scales are not connected to the ADE-MAK, connect your scales to the ADE-MAK scales con-
nection point (Fig. 2-1) using an appropriate connecting cable.
You must make sure that the display unit is set up dry, without being knocked, and that it is secured
against falling. Connect the data cable for the display unit to the scales.
Unpack the scale and the display carefully.
Place a scale onto a solid and flat underground so that all feet have contact with the ground.
If the scale was transported or moved, the scale must be lined up again.

4 M501020-210322-Rev00 -UM-e
Mains and battery connection for the scales
Power is supplied either through the rechargeable battery pre-installed in the display unit or through
mains power via the supplied power unit. The imprinted voltage value must match the voltage on-site.
Connect the mains cable to the connection socket and connect the mains plug to a wall socket. Note:
The wall socket must be located near to the unit and be easily accessible. Only the power adapter
supplied may be used. The connection socket for the mains cable must be securely connected to the
display unit.
The power unit supplied is simultaneously used to charge the battery pack.
When charging the battery for the first time, ensure a sufficient charging period of approx. 24 hours.
If you are using the unit in battery mode and the display indicates – Lo, then the battery must be re-
charged by plugging in the power adapter.
Allow a charging period of 12-1 hours. The battery must be charged with the unit switched off. When
the battery is fully charged and the unit switched on, –Lo- must not appear on the display. If it does,
please inform your service partner.
Mains connection
The following diagram shows the pin ar-
rangement for mains connection:
Installing a rechargeable battery
The battery compartment is located on the front of the unit.
1) Open the battery compartment.
2) Remove the battery cables carefully from the housing, connect the wires (red to red, black to
black) and insert the battery into the housing.
3) Close the battery compartment again.
Only use original rechargeable batteries and charger units. The warranty does not cov-
er any damage caused by using other types of batteries or charger units.
Tips for handling the batteries
The life of a battery depends essentially on the load, frequency of use, temperatures, settings and the
accessories used.
New batteries or batteries that have been stored for long periods require a longer charge peri-
od.
Charge the batteries at room temperature.
Store the batteries empty (uncharged) in a cool, dark and dry place.
Never subject the batteries to temperatures below -10°C (14°F) or above 45°C (113°F).
Over the course of time, batteries lose their charge capacity and require a longer charge peri-
od. If the battery performance drops considerably, then it is time to replace the battery.
New batteries are supplied partially charged. Some batteries only achieve their full capacity af-
ter several complete charge and discharge cycles.
When disposing of disused batteries, observe the valid legal and municipal regulations.
Never dispose of batteries in fire as they can leak or explode!
Pin
1
2
3
Name
DC+ DC- Mass

M501020-210322-Rev00 -UM-e 5
Quality features
ADE products correspond to the applicable EC Directives and European standards to manufacture
and distribute world-wide medical devices as per the latest technical standards ensuring a long life
time and continuous reliability.
This symbol stands for compliance of the European Directive covering medical
devices and declares the conformity as per the Medical Device Law..
Approved scales classes III respecting the standards of the European guideline
covering approved scales are carrying this sign.
Scales carrying this symbol are approved and accredited within the European
Community and fulfils first class demands for calibrated scales.
Products carrying this symbol meet the requirements as per:
The valid EC Directive for non automatic scales
in the latest version.
Using the scales for legal metrological applications
The scales may be used in medical facilities for diagnostic and medicinal purposes as long as they are
calibrated. The scales must be recalibrated according to legal conditions and regulations.
ADE-MAK display unit
Description
The ADE-MAK is a digital precision display unit for medical use in hospitals by doctors, specialists and
paediatricians. The compact design and optional battery operation make the ADE-MAK ideal for port-
able use. The unit in particular features easy operation, high efficiency and long-lasting operation
(over 200 hours in power save mode).
The latest Sigma-Delta A/D technology is used in the ADE-MAK. This guarantees extremely fast and
accurate measurements. Set-up and calibration are digital; all set-up parameters are permanently
saved. The unit can be optionally operated using battery or mains power. There is a soft on/off func-
tion which retains saved values. If the unit is on, it will automatically restart if there is a brief interrup-
tion to the power supply.
Fig. 1-1 Indicator and operating controls
M21

M501020-210322-Rev00 -UM-e
No.
Name Function
1 Display LCD display for indicating weight, as well as showing the mode and
configuration information.
2 Battery charge level Status indicator for the current battery charge level.
3 Switching points 1 & 2 Status indicator for switching points 1 & 2.
4 BMI status indicator
(HI, OK, LO) Status indicator, automatic BMI (Body Mass Index) evaluation.
5 Net status indicator LCD on - net weight is shown on the display.
LCD off – gross weight is shown on the display.
Status indicator
LCD on - the weight is within ¼ of a calibrated value from the zero
point.
LCD off - the weight is outside ¼ of a calibrated value from the zero
point.
7 Hold Press to activate the hold function.
8 On/off, zero Turns the unit on and off or re-sets the display.
9 Tare Press to tare the scales.
10 Preset tare Press briefly to access the tare function.
Press for a long period to enter and save the tare value.
11 BMI Press to access BMI mode and to enter the height. Press again to
return to weight mode.
12 Units Press to change between primary and secondary units.
13 Number pad
Figures 0-9, Clear, Enter. - Navigation functions:
Key means to the RIGHT
Key 4 means to the LEFT
Key 8 means DOWN
Key 2 means UP
Special function:
"0" key
In weight mode, you can change between gross and net weight using
figure "0" (if the scales have been tared).
"Enter" key Function in weight mode: "Print".
14 Standstill status indica-
tor (14):
The scales are at standstill (precondition for functions such as
resetting, printing and taring).
LCD off: The scales are not at standstill
15 Hold Status indicator, LCD on - display frozen.
1 Ib Status indicator, LCD on - the weight is shown in pounds.
17 oz Status indicator, LCD on - the weight is shown in ounces.
18 kg Status indicator, LCD on - the weight is shown in kilograms.
g Status indicator, LCD on - the weight is shown in grams.
Indicator and operating controls
The blue symbols under the keys (up, down, left, right) describe the key functions in configuration and
setting modes. These keys are used to navigate through the menus, to select numerical values and to
increase or lower the values.
Features
– Large, -digit LCD display, digit height 21 mm.
– Either battery operation or mains operation.
– Integrated charging function.
– Supply for four 350 Ω or eight 700 Ω weighing cells.
– An RS-232 interface, full-duplex, with configurable address (for PC connection).
– An RS-232 interface, semi-duplex (for printer connection or remote display).
– One print format (500 characters).
– Power save mode (adjustable unit shutdown, adjustable shutdown of the background light).

M501020-210322-Rev00 -UM-e 7
– Automatic unit converter, manual unit selection (lb/kg/oz/g).
– Operating period over 200 hours in power save mode. Max. 100 hours operation with a 350 Ω
weighing cell (in battery operation mode, per cell).
– Easy calibration, with test and setting functions carried out via a hyper-terminal program.
– Manual tare setting using a key pad.
– A system clock for print formats.
– Trade approved/capable of being calibrated.
– Suitable for 0.5 mV/V to 4 mV/V weighing cells without jumper settings.
– Overload/under-load display.
– Indicator for the current battery charge level.
– Animal weighing function.
– Three hold functions.
– BMI calculation and adjustable, automatic evaluation display.
– Switching points and digital inputs (optional).
Safety instructions
The ADE-MAK display unit corresponds to the status of technology and complies with
standard regulations and directives.
The user must observe the safety instructions in this operating manual, the country-
specific installation standards as well as the applicable safety conditions and accident
prevention regulations.
– Before commissioning, ascertain whether the mains voltage and power type stated on the type
plate match the mains voltage and power type at the place of use.
– Make sure that the mains cable does not pose any potential trip hazard.
– Only use approved accessories and peripheral equipment.
– Only operate the unit in the permitted ambient conditions (see p. 7 and 14).
– Remove the mains plug before cleaning the unit.
– Do not operate the unit in hazardous or unstable conditions.
– Do not submerge the unit in water or other liquids.
– All actions/operations described in this operating manual may only be carried out by trained and
authorised professional personnel.
– Using accessories that do not meet the safety requirements of this unit can lead to a reduction in
the safety level of the entire system.
– Set up the unit as far away as possible from equipment that generates electromagnetic or other
interference.
– Before using high-frequency surgical equipment, defibrillators, etc. read their respective operating
manuals.
– Only ADE power adapters may be used to avoid any risk of fire and electric shock.
– Clean with a dry cloth; do not use any sharp cleaning materials.

8 M501020-210322-Rev00 -UM-e
Status displays
The ADE-MAK display has a series of LCD status displays which provide information about the value
shown:
NET status indicator (5):
LCD on - the net weight is shown on the display.
LCD off - the gross weight is shown on the display.
Status indicator ( ):
LCD on - the weight is within ¼ of a calibrated value from the zero point.
LCD off - the weight is outside ¼ of a calibrated value from the zero point.
Standstill status indicator (14):
LCD on - the scales are at standstill (prerequisite e.g. for print and tare functions).
LCD off - the scales are not at standstill.
Status indicators lb, kg, oz, and g (1 , 17, and 18):
LCD on - the weight is displayed in the corresponding unit: lb = pounds, kg = kilogram,
oz = ounce, g = gram.
The units shown can be set to primary and secondary units. Both units can be freely selected by the
user. In weight mode, the UNITS key (12) can be used to change between primary and secondary
units.
Examples:
– If the primary unit is pounds (lb) and the secondary unit is kilograms (kg), the lb LCD will be on for
the primary units and the kg LCD will be on for the secondary units.
– If the primary unit is kilograms (kg) and the secondary unit is pounds (lb), the kg LCD will be on
for the primary units and the lb LCD will be on for the secondary units.
Connecting ancillary e uipment
It is possible to connect ancillary equipment such as a printer, PC or remote display (interface
RS-232).
The serial interface is connected to the SUB-D connection, 15-pole (cf. Fig. 2-1 and 2-2).
The PC connection only supports the RS-232 interface. The printer connection offers both an active
20mA output and also the RS-232 interface.
Both interfaces are configured via the SERIAL menu.
EDP port (RS-232C, can be used for PC, printer or remote display)
To Personal Computer
To Printer or Remote Display

M501020-210322-Rev00 -UM-e 9
Printer connections (TxD 20 mA, either a printer or remote display can be used)
To Personal Computer (RS232C,
ADE- MAK Stream Output)
To Printer / Remote Display (RS232C, ADE- MAK Print Function/Stream Output)
To Printer / Remote Display (+20mA, ADE- MAK Print Function/Stream Output)
Housing and connections
The mains connection, serial connection and weighing cell connection points are located on the back
of the ADE-MAK housing. The set-up switch to start configuration mode is recessed underneath the
housing. It is protected by a cover plate and secured by a cylinder head screw (not shown in Fig. 2-1).
The PIN allocation of the connecting sockets is shown in Fig. 2-2.
Do not press the set-up switch as otherwise calibration will be lost (reserved for use by
service personnel only)!
Manipulations made to test and configuration modes will result in the forfeiture of any
warranty claims!
A PC, printer or digital inputs and outputs can be connected through the SUB-D connecting socket.

10 M501020-210322-Rev00 -UM-e
Table 2-1 SUB-D for EDP/Printer/Remote switch
Modes
The ADE-MAK display unit has four modes:
Normal mode (weight mode)
Normal mode is the "weighing mode" on the display unit. The display unit displays gross or net weight
as required (using an LCD status indicator; if NET is on the display then the weight shown is net, oth-
erwise it is gross weight). Following initial configuration and sealing (by attaching a calibration sticker
to the back of the unit), the ADE-MAK can only be operated in this mode.
Setting mode
Date, time and consecutive numbers for print commands are set in setting mode. To start setting
mode, hold the GROSS/NET key pressed until TIME appears on the display.
Pin Connection Function
1 Printer connection RS-232 TxD
2 PC connection RS-232 TxD
3 N/C spare
4 OUT1/2 COM Shared switching points 1 & 2
5 OUT2 Switching point 2
PC connection RS-232 RxD
7 N/C spare
8 RSW1/2/3 Digital inputs 1+2+3 Mass
9 N/C spare
10 OUT1 Switching point 1
11 Printer connection TxD 20 mA
12 PC/printer connection RS-232 mass/–20 mA OUT
13 RSW1 Digital input 1
14 RSW2 Digital input 2
15 RSW3 Digital input 3

M501020-210322-Rev00 -UM-e 11
Configuration mode (set-up mode)
The values for different parameters can be set in configuration mode and the display unit calibrated.
This function is reserved for service personnel.
Test mode
There are different diagnostic functions for the ADE-MAK in test mode; this is reserved for service
personnel.
Manipulations to test and configuration modes can revoke the calibration status and
will result in forfeiture of any warranty claims!
Settings
The following functions are available in setting mode:
– Select the serial interface, no metrological parameters.
– Set date, time and consecutive printout numbers.
– Set print format.
– Set switching points.
– Test functions
Access the function menu by pressing the CLEAR (13) key until TIME appears on the display. Use the
key pad (13) to navigate within the menus, to select numerical values and to increase or lower the
values. Press the ENTER key to save the values entered and to return to the super ordinate menu
level.
Menus structure of setting mode:
Setting date and time
– Hold the CLEAR key pressed for approx. 4 sec; FILTER appears on the display.
– Press key " " x; TIME appears on the display.
– Press ENTER key; SHOW appears on the display.
– Press key " " 1x; HOUR appears on the display.
– Press ENTER key and set the hours using the arrow keys "2", "4", " " and "8".
– Press the ENTER key and set the minutes and seconds.
– Go back by pressing key "2"; TIME appears on the display.
– Press key " " 1x; DATE appears on the display like the time entry.
– Press key "2" 2x; EXIT Y appears on the display.
– Confirm with ENTER; date and time are set.
Operating the scales
Aligning the scales
Place the scales onto a solid, even surface
Align the scales so that all feet are in contact with the surface.
Check that the scales are horizontal using a spirit level ensuring that the air bubble is centred.
Connect the display unit to the scales platform using the connecting plug provided.
If the scales have been transported or were in storage, they will need to be re-aligned as described
above.

12 M501020-210322-Rev00 -UM-e
Setting the weight unit
Select the weight unit (kg/oz/lb) by pressing the Units key. The corresponding LCD status indicator
(1 , 17 or 18) for the current weight unit lights up.
Determining the weight
Press the ON key for at least 3 seconds to turn the scales on. An automatic function test is carried out
after being switched on. This is completed by displaying zero. The scales are now ready to operate. If
the display shows zero, the scales can be loaded. The weight can be read directly after a period of
standstill.
Resetting the scales
Wait until the standstill status indicator (14) is on. By pressing the ZERO key (8), measuring inac-
curacies are compensated for after the scales are switched on and reset before the actual weighing
process. The status indicator ( ) is on when the scales are reset.
Tare functions
Taring the scales:
Use the TARE key (9) for example if the patient is being weighed with other items (e.g. clothing, shoes
or other items). To do this, weigh these items first. After the weight is displayed, press the TARE key
(9) to reset the display again. The ADE-MAK changes to net mode (NET status indicator (5) is on).
The weight of the previously weighed and saved items is deducted later when weighing the patient
and only the patient weight is displayed.
Deleting saved tare values:
Remove the weight from the scales and wait until the standstill status indicator (14) lights up.
Press the TARE key (9). The ADE-MAK changes to gross mode (NET status indicator (5) goes out).
Enter the manual tare value:
Enter the appropriate tare value using the key pad. If no value is entered "ER TOUT" will appear on
the display. The ADE-MAK changes automatically to weight mode. If the tare value has been entered
correctly, the value will be saved in the unit. Press the ENTER key (or TARE). The ADE-MAK is now
ready for weighing and changes to net mode [NET status indicator (5) is on].
The manual tare value must be >0, the maximum value is limited by the weighing range.
PRESET TARA adjusted:
Press and hold the PRESET TARE key (10) [approx. 3 sec.], PRO PT X appears on the display. Then
you can select the memory location (e.g. 2). Now enter the TARE VALUE and confirm with ENTER.
Accessing the preset
PRESET TARA
value:
Press the PRESET TARE key (10). "Pt x" appears on the display. Enter a number from 0-9 (memory
location for the tare value). If no number is entered within five seconds, the unit will change back to
weight mode.
After entering the number, the ADE-MAK accesses the preset tare value, shows it for five seconds on
the display and then changes to net mode. The accessed tare value is accepted at the same time.
Changing the preset
PRESET TARA
value:
Press the PRESET TARE key (10) for two seconds to change a preset tare value. PRO PT X will ap-
pear on the display.
Select a number from 0-9 (memory location for the tare value).
The ADE-MAK accesses the preset tare value at this memory location and shows it on the display.
Enter the new value and press the ENTER key. The unit saves the new value at the selected memory
location.

M501020-210322-Rev00 -UM-e 13
Displaying the gross weight, net weight and tare value:
Press the "0" key to change between displays for tare, gross weight (NET status indicator (5) off) and
net weight (NET status indicator (5) on). If a tare value is saved, the net weight shown corresponds to
the gross weight minus the tare value. If there is no tare value saved, the display remains in gross
mode.
The tare value flashes briefly, then after a second the display changes to gross mode.
Hold function
Use the HOLD key to hold the display if there are weight fluctuations which e.g. are caused by patient
movements on the scales. To do this, the scales must be at standstill, e.g. the standstill status indica-
tor (14) is on (depending on the setting it is not always necessary for the scales to be at stand-
still). The Hold status indicator (15) is on.
The fixed weight can still be read after the scales have been vacated.
Deactivate the HOLD function by pressing the key again.
Determining the Body Mass Index (BMI)
BMI is calculated by the relationship of body weight to height.
BMI= body weight
(height)²
You need the height of the test subject to determine the body mass index. This is most easily calculat-
ed with an ADE measuring rod model MZ10023 or 10032.
Start the scales and weigh the subject. Then press the BMI key (11) to start BMI mode. The last value
entered appears on the display. Now you can use the numerical key pad to enter a new value for the
height (in cm) or to retain the value displayed. Confirm the value entered with the ENTER key or de-
lete it using the CLEAR key. After the entry has been confirmed by the ENTER key, the BMI value will
be calculated using the weight on the scales. The display changes between weight value and BMI
value "b xx.x" (every two seconds) for a period of 3 minutes. Press the BMI key (11) to cancel before
this time has expired.
Evaluating Body Mass Index
BMI under 18
An increase in weight is recommended.
BMI between 18 and 20
The patient is borderline underweight.
The patient feels well, there is no rea-
son for complaint.
BMI between 20 and 25
The patient is within the normal
weight range.
BMI between 25 and 30
The patient is moderately to slightly overweight. A reduction in weight is indicated if there are
pre-existing illnesses (e.g. diabetes, high blood pressure, heart failure).
BMI over 30
Weight loss is urgently recommended. Consultation with a specialist is advised.
Print out a record
The scales must be at standstill, e.g. standstill status display (14) is on.
Press the ENTER key (13) to send the data to the serial interface.
Note: Printing is not possible if the net weight is 0.
The print function only produces one print-out. A reset is required to print out another copy.
BMI evaluation according to WHO
BMI
< 1 Severely underweight
1 - 17 Moderately underweight
17 - 18.5
Slightly underweight
BMI
18.5 - 25 Normal weight
BMI
25 - 30 Overweight
30 - 35 Obese Class I
35 - 40 Obese Class II
> 40 Obese Class III

14 M501020-210322-Rev00 -UM-e
Care, servicing and recalibration
Cleaning
Please disconnect the unit from the operating voltage before cleaning. Do not use any aggressive
cleaning materials for cleaning; only use a damp cloth or conventional disinfectant.
Make sure that no li uids penetrate the unit!
Error messages
Error mes-
sage
Description Problem solution
Overload display Weight exceeds max. capacity of the
scales.
Overflow indicator (negative) Negative weight indicated – weight too
low to be displayed (<=99999).
Overflow indicator (positive) Positive weight indicated – weight too
high to be displayed (>=999999).
AD LOW A/D above negative range Check if the scales are correctly as-
sembled or if they are damaged.
AD HI A/D above positive range Check if the scales are correctly as-
sembled or if they are damaged.
EE SUM Parameter or calibration error Recalibrate – please contact your sup-
plier or service partner:
EE WR EEPROM indicates an error Please contact your supplier or service
partner.
PM SUM Internal program indicates a check error Please contact your supplier or service
partner.
HOFSET Switch on – above zero Please remove the weight from the
scales and restart.
LOFSET Switch on – below zero Check scales for damage and inform
your service partner:
UOFSET Irregular
Do not touch the scales after they have
been switched on.
Safety instructions
Hazard-free operation is no longer guaranteed
- if the power unit exhibits visible damage.
- if the power unit is no longer working.
- after longer periods of storage in damp rooms.
Inform your service partner in such cases for your own safety.
Any power units or batteries other than those supplied by the manufacturer may not be
used. There is otherwise a risk of influencing other medical, electrical devic-
es/e uipment!
If the chair scales remain unused or the patient must wait while remaining seated in the
chair scales, secure the unit by operating both brake locking devices on the rear
wheels.
The connecting cable between the scales and power unit must be laid in such a way
that they do not present a trip hazard.

M501020-210322-Rev00 -UM-e 15
Waste disposal
Used electrical e uipment and batteries do not belong in the domestic waste.
Please dispose of defective or used e uipment and batteries according to the legal
regulations applicable in your specific country!
Please make sure that only discharged batteries or batteries with insulated "poles" are
disposed of as otherwise they may short-circuit!
Storage and transport conditions
Keep all packaging in case you need to return the item, in order to avoid any potential transport dam-
age.
Disconnect all connected cables before dispatch. This is how you can avoid unnecessary damage.
Warranty
ADE will repair or replace this product if proof is shows that it has failed within 2 years of the purchase
date (receipt is required) due to faulty work quality or defective materials. All removable parts, e.g.
batteries, cables, power units, etc. are excluded from this. This warranty does not cover any normal,
external appearance of use and wear or any damage occurring as a result of an accident or misuse.
Any warranty or damage compensation claims presuppose the use of original ADE accessories and
replacement parts. The warranty does not cover units that have been opened by unauthorised per-
sons.
The legally regulated rights of the customer are in no way affected by this agreement.
The supplier who sold the scales is in charge of complaints, customer service and replacement parts.
Recalibration
Have recalibration carried out by an authorised company or authorised person according to national
legislative regulations. The CE symbol shows the authorised site (0122) and the year of initial calibra-
tion. Recalibration must be carried out
- if the calibration mark has been damaged
- after calibrated scales have been successfully repaired
- or after expiry of a period for recalibration as stipulated by national, legal regulations.

1 M501020-210322-Rev00 -UM-e
Technical specifications
Power supply
Power Adapter:
Mains voltage 115 or 230VAC
Frequency 50 or 0HZ
Power Consumption 11W in-charger, 2W off-charger
Main power circuit
Input Voltage 5.0VDC
Max. Current (in-charger) 1000mA
Battery Requirement: Rechargeable Lithium Ion Cylindrical (18 50x2) Cell 3.7V
4000mAH
Battery Operation:
Charger 7~10 Hours
Saving (350ohm, Backlight-ON 30Sec,
Shutdown 5Min) 200Hours
Serial Communications
EDP Port Full duplex RS-232
38400,19200,9 00, 4800, 2400, 1200 bps
Printer Port Output-only RS-232 or active 20 mA current loop,
9 00, 4800, 2400, 1200 bps
Both Ports 7 or 8 data bits; even, odd, or no parity
Operator Interface
Display -digit LCD display. 7-segment, 0.815 in (21.2 mm) digits
LCD annunciator net, center of zero, standstill, kg/lb/g/oz/ units,
Battery, Set points, Hold, HI/OK/LO
Keyboard 24-key flat membrane panel
Environmental
Operating Temperature –10 to +40°C (legal);
Storage Temperature –25 to +70°C
Humidity 0–95% relative humidity
Altitude 2000 m ( 500 ft) maximum
Weighing station:
Max. Capacity: 300 kg / 0 lbs
Graduation: 100 g / 0.2 lb
Access to ramp: 41 mm
Dimensions: 1070 x 1050 x 70 mm
Total weight: 45 kg
Working Temperature: 10 to +40 degrees Celsius

M501020-210322-Rev00 -UM-e 17
Conformity declaration
Manufacturer
:
ADE Germany GmbH
Neuer Hoeltigbaum 15
22143 Hamburg / Germany
℡ +49 40 432 77 -0
+49 40 432 77 -10
info@ade
-
germany.de
Notified body:
TÜV NORD CERT GmbH
NB 0044 (93/42/EEC)
Langemarckstraße 20
D - 45141 Essen
℡ +49 201 825-0
+49 201 825-2517
info.tncert@tuev
-
nord.de
Declaration of conformity by the manufacturer
This product has been manufactured in accordance with the harmonised European standards.
They conform to the regulations of the EC-directives listed below:
NAWI Directive 2014/31/EC
Medical Devices Directive 93/42/EEC
EMC Directive 2014/30/EC
Low Voltage Directive 2014/35/EC
RoHS Directive 2011/ 5/EC
in the currently valid versions.
This declaration loses its validity if modifications are made to the scale without our approval.
Hamburg, March 2021
ADE Germany GmbH
Neuer Hoeltigbaum 15
22143 Hamburg / Germany

18 M501020-210322-Rev00 -UM-e

M501020-210322-Rev00 -UM-e 19

20 M501020-210322-Rev00 -UM-e
authorised dealer:
Table of contents
Other ADE Scale manuals