Afag SA-1 Series User manual

SA-1-OI-vers. 2.2 gb.23.07.14
Telescope spindle axis
SA-1
-Declaration of Incorporation
-Module Information
-Montage Instructions
-Maintenance Instructions
“Translation” of the Original Montage Instructions
© Copyright by Afag Automation AG

SA-1-OI-vers. 2.2 gb.23.07.14
This Montage Instruction a maintenance manual is valid for:
Telescope spindle axis
SA-1-50/100/150
Version of the documentation : SA-1-OI-vers.2.2 gb.23.07.14
Symbols : Assembly and commissioning must be carried out by qualified
personnel only and according to these Montage Instructions.
DANGER
Indicates an immediate threatening danger.
Non-compliance with this information can result in death or
serious personal injuries (invalidity).
WARNING
Indicates a possible dangerous situation.
Non-compliance with this information can result in death or
serious personal injuries (invalidity).
CAUTION
Indicates a possibly dangerous situation.
Non-compliance with this information can result in damage to
property or light to medium personal injuries.
NOTE
Indicates general notes, useful operator tips and operating
recommendations which don’t affect safety and health of the
personnel.
The actual serial number will
be sticked in here upon delivery of
the device.

SA-1-OI-vers. 2.2 gb.23.07.14
Table of contents:
1.0.0 Declaration Incorporation Side 6
1.1.0 Declaration of Incorporation according the Machinery Directive
2006/42/EG Side 6
2.0.0 Module Information Side 7
2.1.0 Transport and storage (packing and unpacking) Side 7
2.1.1 Fastening the module Side 8
2.1.2 Hole spacing and centering bushings Side 9
2.1.3 Tightening torque for screw Side 10
2.1.4 Slide unit load factors Side 11
2.1.5 Module description Side 12
2.1.6 Description module SA-1 Side 13
2.1.7 Description motor arrangement Side 14
2.1.8 Preferred combinations for SA-1 Side 15
2.1.9 Installation for SA spindle axis in a system Side 16
2.2.0 Motor control Interface for spindle axis Side 17
2.2.1 Afag standard controller for spindle axis Side 18
2.2.2 SE-24 Side 19
2.2.3 SE-48 Side 20
2.2.4 SE-Power Side 21
2.2.5 Servo controller Side 22
2.2.6 Programming for the SA spindle extension Side 23
2.2.7 Power fallure during installation and set-up Side 24
2.2.8 Noise emissions Side 25
2.2.9 Protective device at the assembly system Side 25
3.0.0 Montage Instructions Side 26
3.1.1 Manufacturer address Side 26
3.1.2 These operating instructions apply to Side 27
3.1.3 General Description for SA-1 Side 28
3.1.4 Safety note Side 28
3.1.5 Scope of supply/ Intend use/ Safety note Side 29
3.1.6 Warranty Side 30
3.1.7 Dimension for SA-1 Side 31
3.1.8 Technical data Side 32

SA-1-OI-vers. 2.2 gb.23.07.14
3.1.9 Installation Side 33
3.2.0 First start-up Side 33
4.0.0 Maintenance Instructions Side 34
4.1.0 Maintenance and service the Telescope spindle axis Side 34
4.1.1 Lubrication of the spindle gear Side 35
4.1.2 Lubrication of the linear guide Side 36
4.1.3 Further maintenance Side 37
4.1.4 Accessories Side 37
4.1.5 Trouble shooting Side 38
4.1.6 Disassembling and repair Side 40
5.0.0 Disposal Side 40
4

SA-1-OI-vers. 2.2 gb.23.07.14
1.0.0 EC Declaration for Incorporation
1.1.0 According to 2006/42/EC dated 09. June 2006, Appendix II B VI for
Incorporation of partly completed machinery.
The manufacturer: Afag Automation AG, Fiechtenstrasse 32, CH-4950 Huttwil
Tel. +41 62 959 87 02, www.afag.com
As manufacturer of the partly completed machine we declare that:
-The specified machine corresponds to the listed essential requirements of the
directive 2006/42/EG, wehere applicable the other directives and standards
listed below.
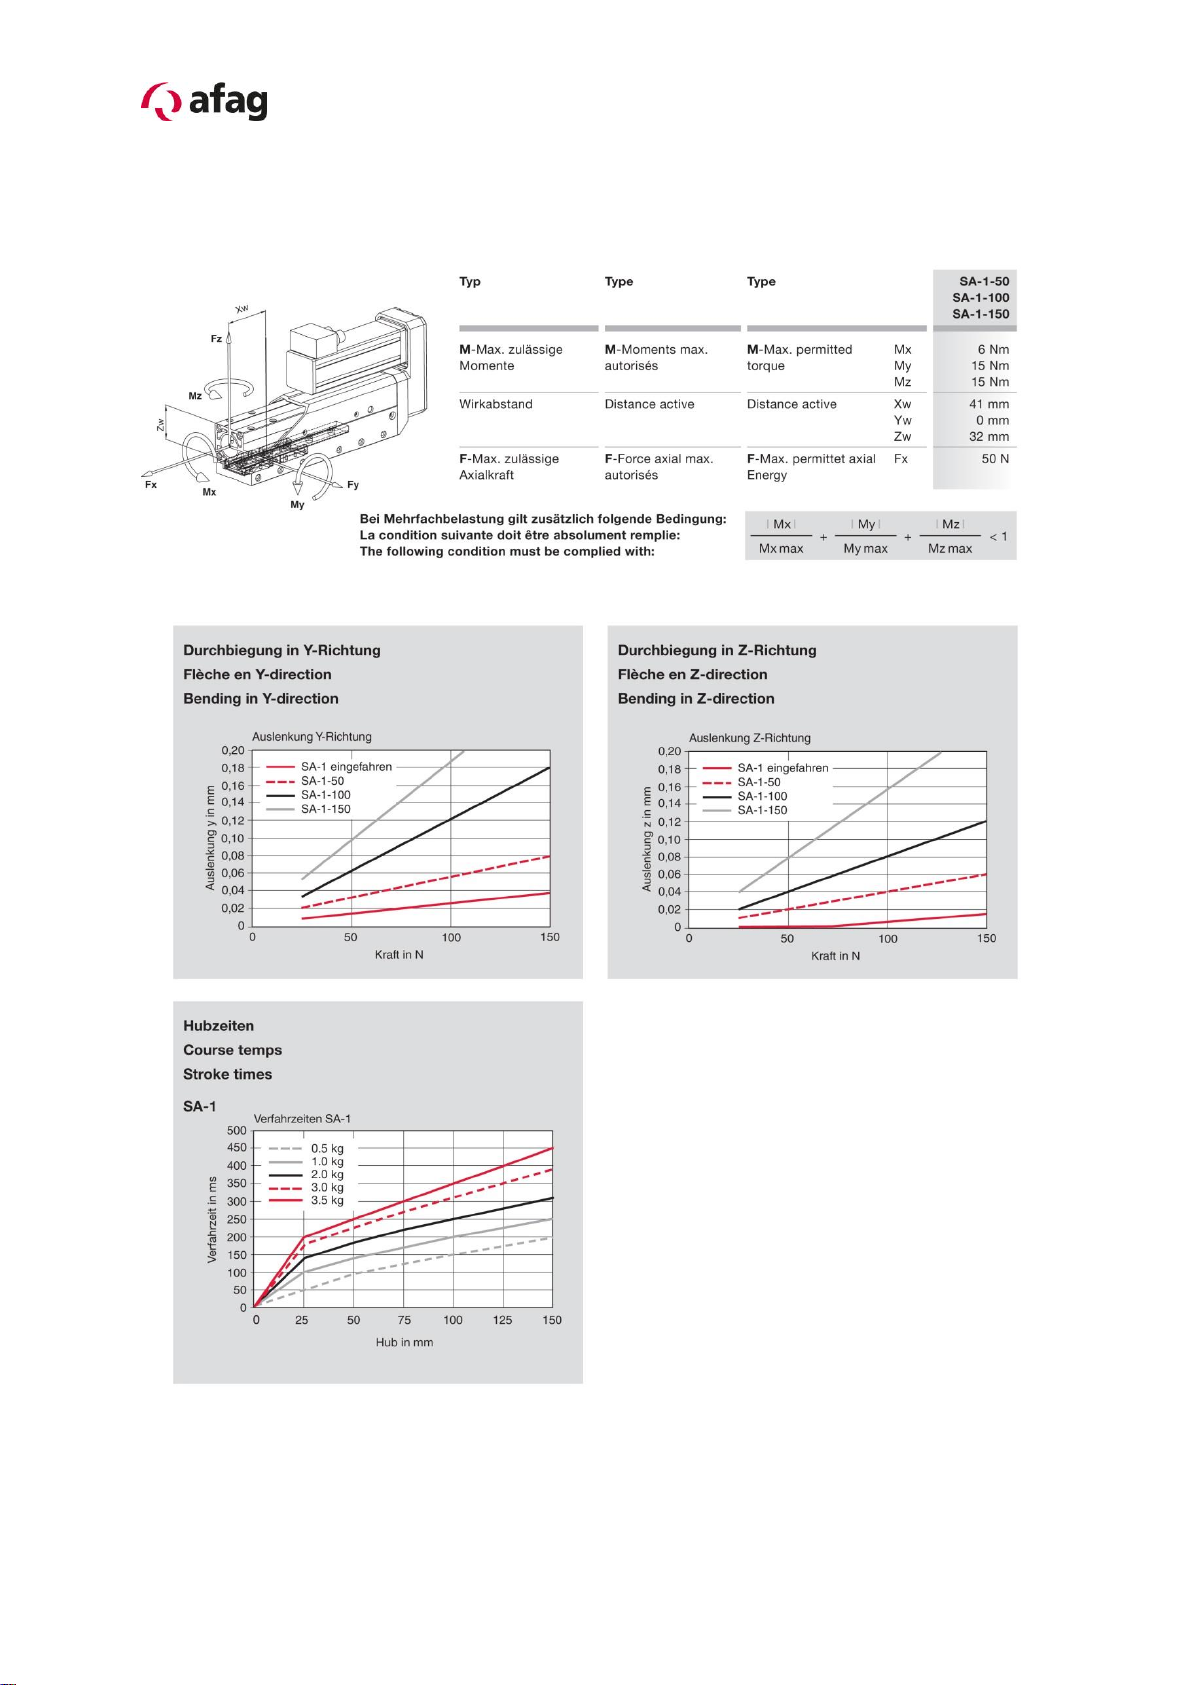
Designation: Telescope spindle axis (electrical)
Type : SA-1-50 / SA-1-100 / SA-1-150
Sequential series No. 50xxxxxx
-Machinery Directive 2006/42/EC
-Low voltage Directive 2006/42/EG
-The relevant technical documentation is complied in accordance with part B of
Annex VI
-The relevant technical documentation in accordance with part B of Annex VI
will be transmitted in response to a reasonable request by the national
authorities in printed from or in electronic from (pdf).
Notes to the Declaration of Incorporation according to the Machinery Directive
2006/42/EC, Annex IIB, section 4
(Checklist on accurate and basic health and safety requirements).
-1.1; 1.1.1; 1.1.2; 1.2; 1.2.1; 1.2.3; 1.2.4.4; 1.2.5; 1.3; 1.3.3; 1.3.5; 1.3.6; 1.3.7;
1.3.8.1; 1.3.8.2; 1.3.9; 1.4; 1.4.1; 1.5; 1.5.1; 1.6; 1.6.1; 1.6.3; 1.6.4; 1.7; 1.7.1; 1.7.4.;
1.7.4.1; 1.7.4.2; 1.7.4.3; 3.3.5; 3.4.1
-Increase of the harmonized standards applied:
-EN 349; EN ISO 12100-1; EN 12100-2; EN ISO 14121-1; EN 60204-1: 2006 partly
fulfilled
-
This partly completed machinery must not be put into service until the final machinery
into which it is to be incorporated has been declared in conformity with the provisions
of this Directive 2006/42/EC, where appropriate.
Name and address of the person authorised to compile the relevant technical documentation:
Lanz Beat, PM & Marketing-Services, Afag Automation AG
Place/Date: Huttwil, 23.07.2014
Markus Werro
Managing Director
Afag Automation AG
Siegfried Egli
Head of HT
Afag Automation AG
5

SA-1-OI-vers. 2.2 gb.23.07.14
2.0.0 Module Information
2.1.0 Transport and storage (packing and unpacking)
CAUTION
Caution when to packing and unpacking the telescope spindle-
axis! When careless handling of the telescope spindle axis
fingers can be pinced as the axis in the state back and forth can
be moved!
The transport takes place in the transport packaging of Afag Automation AG.
If there is no packaging of Afag Automation AG are used, they must be the telescope
spindle axis shock and dust packed.
The axis is in the transport package dry storage.
NOTE
Depending on the type of SA telescope axis can weight between 0.8
to 1.2 kg.
The telescope spindle axis is a fine mechanical unit and must be
handled with the necessary care and cleanliness during transport
and storage as well as when handling, setting up and assembling.
Telescope spindle axis can
independently exit
6

SA-1-OI-vers. 2.2 gb.23.07.14
1.1 Fastening the module
The module may only be fastened on is underside!
SA-1: Hole spacing 30x30 mm / Thread M4 / Centering bushings 7x3 mm
Telescope spindle axis:
Hole spacing 20x30 mm / Thread M3 / Centering bushings 5x2.5 mm
NOTE
The threads (M3) on the left and right side of the base body are only
used for fastening additional parts (energy chain holder, switch
fixtures etc.).
Modul Un
In determining the length of the screws should be noted that the screw of 7 mm is not
exceeded.
View of module under
side
Telescope spindle axis
Ausleger
(X)
7

SA-1-OI-vers. 2.2 gb.23.07.14
2.1.2 Hole spacing and centering bushings
SA-1
Module
Braket
Hole spacing
30x30
20x30
Thread
M4
M3
Centering bushings (H7)
Ø 7mm
Ø 5mm
Use it for positioning the centering
bushings supplied. Put them in
two diagonally opposite mounting
holes of the grid.
8

SA-1-OI-vers. 2.2 gb.23.07.14
2.1.3 Tightening torque for screws
The screws to be used for assembly must at least satisfy the following conditions:
Standard: VDI 2230
Strength: Classe 8.8
Surface: galvanized blue, oiled or greased
Thread
Torque
M3
1,1 … 1,4 Nm
M4
2,6 … 3,3 Nm
M5
5,2 … 6,5 Nm
M6
9,0 ... 11,3 Nm
M8
21,6 … 27,3 Nm
Tis is an incomplete machine
Assembly of the telescope spindle axis in a system.
The series of the telescope spindle axis modules is used for the linear, smooth
movement of rigidly mounted loads under the ambient and Installation conditions
defined for this module, see Technical data. The Installation position of the telescope
spindle axis is arbitrary.
NOTE
These Montage Instructions should be read carefully before carrying
out any activity on or with the telescope spindle axis module. The
telescope spindle axis module may only be deployed in accordance
with the intended use.
9

SA-1-OI-vers. 2.2 gb.23.07.14
2.1.4 Slide unit load factors
10

SA-1-OI-vers. 2.2 gb.23.07.14
2.1.5 Module description
The following types of the module SA-1are available:
Type
Nominal stroke
SA-1-50
50 mm
SA-1-100
SA-1-150
100 mm
100 mm
Motor attachment optionally on the front left or right side or on the rear axial side.
The modules of the SA-series are modules with a movable bracket.
Compared with the usual slide model this type series offers the advantage to “dip”
into the working area and to leave it again completely. The bracket (2) is moved
along a linear guide (3) vis-à-vis the base body (1). A ball-type linear drive (4) with a
spindle nut mounted on the bracket (2) transforms the rotary movement in a linear
movement.
The spindle is driven by a servomotor (7) via a toothed belt back gear (5) or a torsion
ally stiff coupling (6).
The reference switch (10) is an inductive sensor which recognizes the home position
of the bracket during the reference run.
The servomotor (7) can also be equipped with an integrated parking brake (8) which
secures the bracket position when the module is not energized.
This parking brake is required by all means in case of vertical applications!
11

SA-1-OI-vers. 2.2 gb.23.07.14
2.1.6 Description module
1
Base body
6
Coupling housing
2
Bracket
7
Servomotor
3
Linear guide
8
Integrated parking brake
4
5
Ball screw axis
Toothed belt housing
9
10
Motor/Encoder connector
Reference switch connector
12

SA-1-OI-vers. 2.2 gb.23.07.14
2.1.7 Description / motor arrangement
- Switch off the controller of the module!
- Remove cable
- Remove cover (1) by unscrewing the screw (2) M3x6
- Remove 4 screws (3) M3x6
- Turn housing (4) by 90° to the left or right
- Tighten 4 screws (3) M3x6 with 1.4 Nm
- Screw down cover (1)
- all Cable mount
- Switch on control system
CAUTION
Carry out a reference run with the module afterwards!
(see controller manual)
The correct toothed belt tension is retained and must NOT be
changed!
13

SA-1-OI-vers. 2.2 gb.23.07.14
2.1.8 Preferred combinations for SA-1
NOTE
For the cultivation of external modules to the telescope spindle axis
over the Afag no liability. Any module are growing so big that they
choose for a full telescope spindle axis of the stand and the payload
does not exceed.
14

SA-1-OI-vers. 2.2 gb.23.07.14
2.1.9 Installation for SA-spindle axis in a system
CAUTION
Installation of the SA-spindle axis in a system may occur only
with switched off and secure control. The Installation of the SA-
spindle axis may be explained only by a certified professional
person.
The Installation of the SA-spindle axis may be explained only by
a certified professional person.
NOTE
The investment farmer is himself responsible for the Installation
spindle axis in a system.
15

SA-1-OI-vers. 2.2 gb.23.07.14
2.2.0 Motor control Interface for telescope spindle axis
Pin assignment of the motor connection: Pin assignment of the encoder
connection
SA-1
Signal
A
U
B
V
C
W
D
GND Motor
+
Brake +
-
Brake -
Pin assignment, reference switch connection:
NOTE
We recommend you to use the Afag standard cable which are listed
in the accessories.
Motors plugs can be rotated 180°
-Screws solve
-Turn the plug
-Tighten the screws
Pin SA-1
Signal
1
S1
2
S3
3
S4
4
S2
5
R1
6
R2
7
Thermal switch
8
Thermal switch
Pin
Signal
1
5 ... 24 V DC
3
GND
4
Signal, PNP
16

SA-1-OI-vers. 2.2 gb.23.07.14
2.2.1 Afag standard controller for spindle axis
NOTE
The Afag offers to spindle axis two different controls.
You take further information in the technical products catalogue.
www.afag.com
17

SA-1-OI-vers. 2.2 gb.23.07.14
2.2.2 SE-24
18

SA-1-OI-vers. 2.2 gb.23.07.14
2.2.3 SE-48
19

SA-1-OI-vers. 2.2 gb.23.07.14
2.2.4 SE-Power
20
Other manuals for SA-1 Series
1
Table of contents
Other Afag Industrial Equipment manuals
Popular Industrial Equipment manuals by other brands

Trane Technologies
Trane Technologies V-Traq BAYTRAQ001 Series installation instructions

Agriculex
Agriculex ESC-2 Operator's manual

PCB Piezotronics
PCB Piezotronics 352C43 Installation and operating manual

Evenheat
Evenheat Glass Kiln GTS 18 General operations manual

TaiShan
TaiShan 80l Operation manual

Nordco
Nordco C Installation, operation and maintenance manual