manuals.online logo
Brands
  1. Home
  2. •
  3. Brands
  4. •
  5. Airaid
  6. •
  7. Other
  8. •
  9. Airaid 310-136 Service manual

Airaid 310-136 Service manual

Other Airaid Other manuals

Airaid 450-238 User manual

Airaid

Airaid 450-238 User manual

Airaid 450-756 User manual

Airaid

Airaid 450-756 User manual

Airaid 450-331 User manual

Airaid

Airaid 450-331 User manual

Airaid 310-164 User manual

Airaid

Airaid 310-164 User manual

Airaid 302-371 User manual

Airaid

Airaid 302-371 User manual

Airaid 302-370 User manual

Airaid

Airaid 302-370 User manual

Airaid 451-328 User manual

Airaid

Airaid 451-328 User manual

Airaid 450-330 User manual

Airaid

Airaid 450-330 User manual

Airaid 200-104 Service manual

Airaid

Airaid 200-104 Service manual

Airaid 312-366 User manual

Airaid

Airaid 312-366 User manual

Airaid 402-368 User manual

Airaid

Airaid 402-368 User manual

Airaid 300-143 Service manual

Airaid

Airaid 300-143 Service manual

Airaid 401-762 User manual

Airaid

Airaid 401-762 User manual

Airaid 400-758 User manual

Airaid

Airaid 400-758 User manual

Popular Other manuals by other brands

Opticon EduMic Compatibility guide

Opticon

Opticon EduMic Compatibility guide

Kessil A360W owner's manual

Kessil

Kessil A360W owner's manual

TEFAL ULTRA COMPACT MIXER manual

TEFAL

TEFAL ULTRA COMPACT MIXER manual

Martin Audio WS18X - SCHEMATICS manual

Martin Audio

Martin Audio WS18X - SCHEMATICS manual

Hendrickson AR2 series Service instructions

Hendrickson

Hendrickson AR2 series Service instructions

GO Industries 38017 installation instructions

GO Industries

GO Industries 38017 installation instructions

Cissell 30LBCMAN2 manual

Cissell

Cissell 30LBCMAN2 manual

RIDGID K-60SP manual

RIDGID

RIDGID K-60SP manual

Gage Bilt GB751SH-5 Original instructions

Gage Bilt

Gage Bilt GB751SH-5 Original instructions

OVE SIERRA 60 installation manual

OVE

OVE SIERRA 60 installation manual

ReelCraft 7800 OLB21 operating instructions

ReelCraft

ReelCraft 7800 OLB21 operating instructions

Body Armor 4x4 ECO-SERIES user manual

Body Armor 4x4

Body Armor 4x4 ECO-SERIES user manual

ROBLIN DROP Dimensions

ROBLIN

ROBLIN DROP Dimensions

EMG EMG-ACB BARREL Installation information

EMG

EMG EMG-ACB BARREL Installation information

MiniSolar MT-150 Assembling Guide

MiniSolar

MiniSolar MT-150 Assembling Guide

Parkside PSZ 250 B2 Operation and safety notes

Parkside

Parkside PSZ 250 B2 Operation and safety notes

ABB REM 610 Technical reference manual

ABB

ABB REM 610 Technical reference manual

Tyent ACE-13 user manual

Tyent

Tyent ACE-13 user manual

manuals.online logo
manuals.online logoBrands
  • About & Mission
  • Contact us
  • Privacy Policy
  • Terms and Conditions

Copyright 2025 Manuals.Online. All Rights Reserved.

#310-136 INSTALLATION INSTRUCTIONS
91-01 Jeep Cherokee 4.0L
Thank you for purchasing the Airaid Intake System. Please read the instruction manual carefully before
proceeding with the installation. Contact Airaid @ (800) 498-6951 8:00 AM - 5:00 PM MST weekdays for
questions regarding fit or instructions that are not clear to you. Your Airaid Intake System was carefully
inspected and packaged. Check that no parts are missing, or were damaged during shipping. If any parts are
missing, contact Airaid. The air filter element is protected from direct exposure to water and debris; care should
be taken not to drive through deep water. WATER INGESTION IS THE DRIVERS RESPONSIBILTY! The
air filter is reusable and should be cleaned using the Airaid Filter Tune-Up Kit periodically.
Thank you for selecting Airaid.
PackingList:
700-450 AiraidPremiumFilter 1
KIT136RFC RightPanelBlack 1
KIT136MAFC MAFPanelBlack 1
KIT136A 136PlasticAdapterTube 1
KITWSTRIP02 WeatherStrip32½” 1
KIT136HP HardwarePack 1
-KIT6C31MXPPZ 6-32x5/16”Screw 4
-KIT6CNKEPZ 6-32Nut 4
Packing List (cont’d):
- KIT6WSAPZ #6 FlatWasher 4
-KIT15DHC3050 ¼-20Bolt 2
-KIT09LWZ025 ¼” Lock Washer 2
-KIT106CAP RubberCap 1
-KITHOSE02 ½” x7” Hose 1
-KITSNP16M4 #16Speed Clamp 2
ToolsRequiredforthisInstallation:
FlatHeadScrewdriver
PhillipsScrewdriver
Included with your Airaid Intake System is a sticker with a California Air Resources Board
(C.A.R.B.) Executive Order (EO) number. This sticker must be placed in plain view inside of
the engine compartment. Failure to do so may prevent you from passing a smog inspection.
Installation Instructions. Read Me!
I
DISCONNECT NEGATIVE (-) BATTERY CABLE
II Remove Factory Air Box Lid
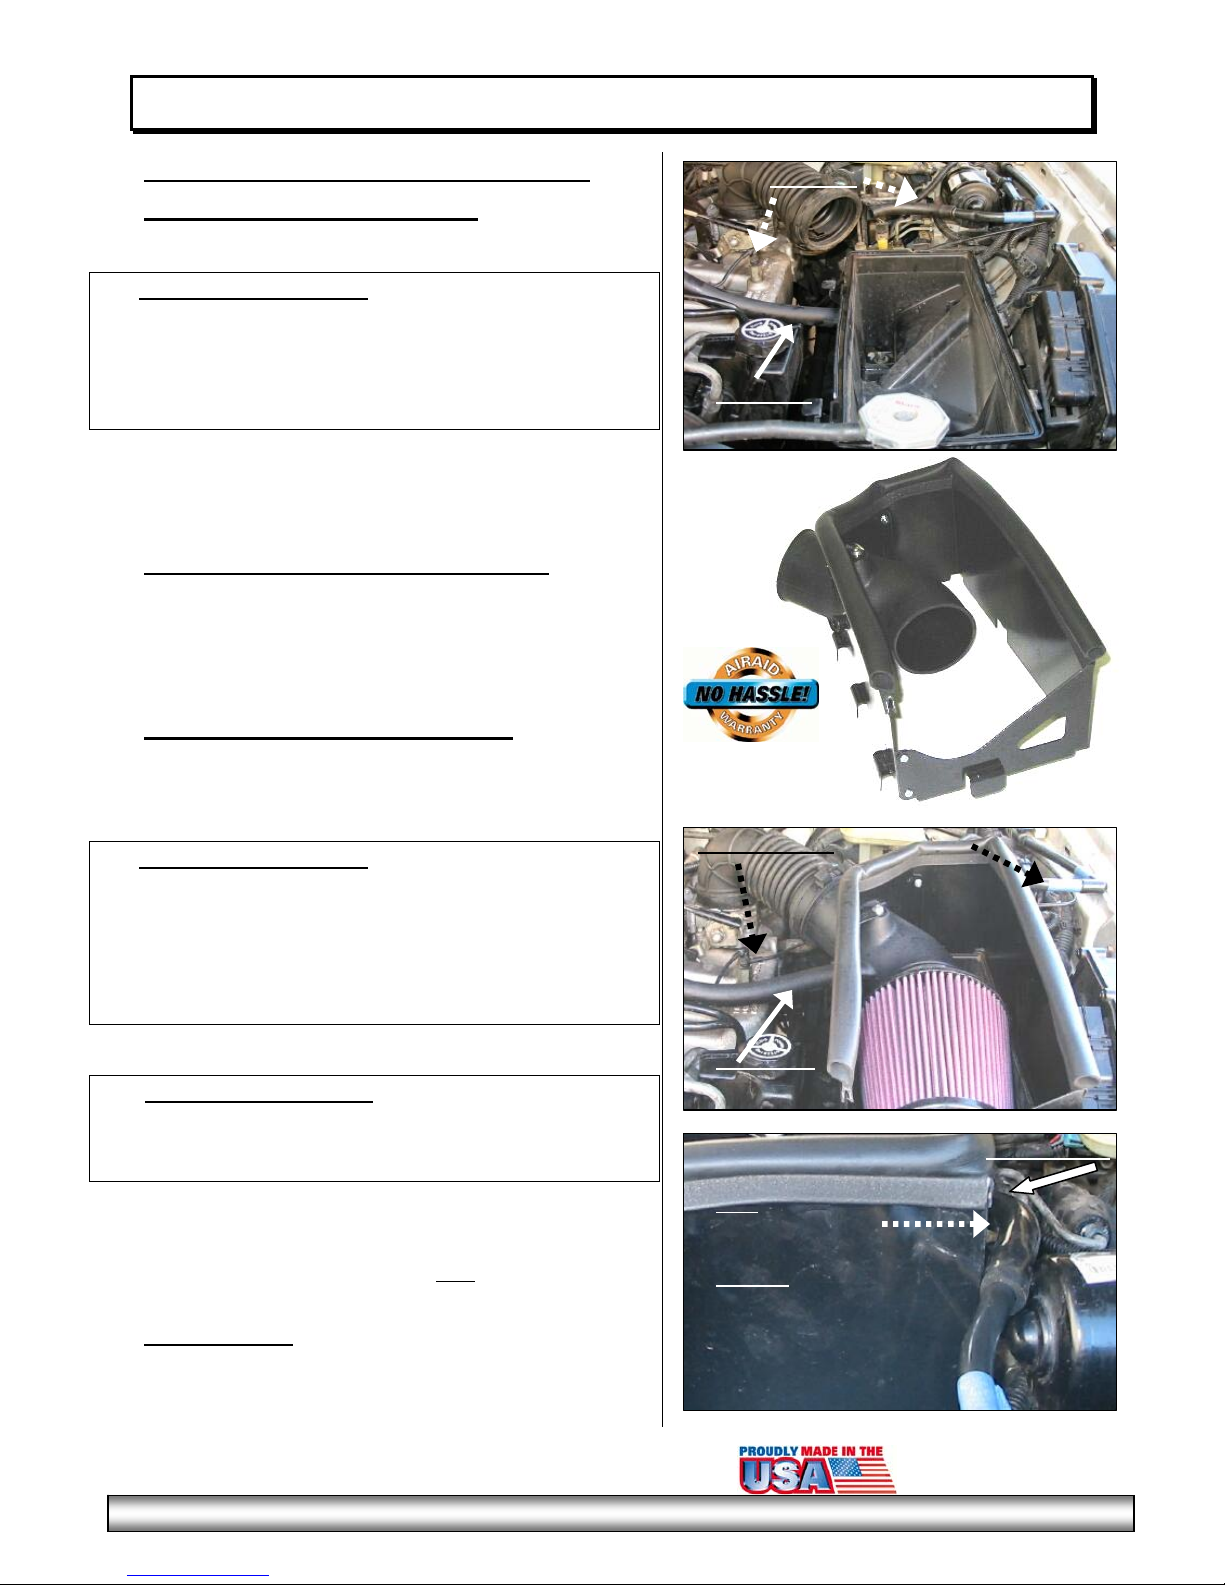
a) Loosen the factory intake tube clamp at the air box lid
using a flat head screwdriver. Refer to Fig #1
1991-1995 Models Only:
b) Disconnect the vacuum hose located on the driver side
rear of the factory air box. Next disconnect the small
vacuum line where it attaches to the intake manifold. Be
careful with the plastic line as it is fragile. It is only
moved to enable the install. Refer to Fig #1
c) Disconnect the breather hose from the passenger side of
the factory air box lid. Refer to Fig #1
d) Unclip the factory air box lid and remove from engine
compartment. See Fig #1
III Assemble the Airaid Intake System
a) Mount the black plastic adapter tube onto the Airaid
Cool Air Dam and fasten using the two 1/4-20 button
head bolts and two lock washers provided. See Fig #2
b) Assemble the two Airaid Cool Air Dam panels using the
small screws, nuts, and washers provided. See Fig #2
IV Install the Airaid Intake System
a) Position the Airaid Cool Air Dam in place of the original
factory air box lid and snap into place. See Fig #3
b) Connect the factory tube onto the Airaid plastic tube
using the factory hose clamp. Refer to Fig #3
1991-1995 Models Only:
c) Reattach the small vacuum line to the factory locations,
including the manifold. Replace the short factory hose
located on the plastic factory tube, with the longer ½”x
7” hose and secure on the intake tube nipple using the
two #16 black Speed clamps included. Refer to Fig #3
&#4
d) Reattach the breather hose to the Airaid plastic adapter
tube. Refer to Fig #3
1996-2001 Models Only:
e) Plug the remaining nipple on the driver’s side of the
Airaid tube with the black rubber cap provided. Refer
to Fig #4
f) Mount the Airaid Premium Filter to the plastic adapter
inside the air dam. Refer to Fig #3
g) Press the provided weather seal onto the top rim of the
Airaid system. Refer to Fig #3 (Hint:Start at a corner
of the air dam for ease of installation.)
V Finishing Up
a) Inspect overall work and check hood clearance.
b) Ensure that no foreign objects are in the intake path!
c) Re-connect negative battery cable.
Vacuum line
Breather hose
Fig#1
Fig#2
Small Vacuum Line
Breather Hose
Fig#3
To Nipple on tube
91- 95: attach provided 7”
hose to plastic tube.
(Shown)
Late 96-01: Plug nipple on
plastic intake tube with
rubber cap provided.
(Not Shown)
Fig#4
Rev. 03/08/07
Airaid Filter Co. 2688 E Rose Garden Ln. Phoenix AZ 85050
(
800
)
498-6951 AiraidInfo
@
airaid.co
m
www.airaid.co
m