manuals.online logo
Brands
  1. Home
  2. •
  3. Brands
  4. •
  5. Alemlube
  6. •
  7. Tools
  8. •
  9. Alemlube EL SERIES User manual

Alemlube EL SERIES User manual

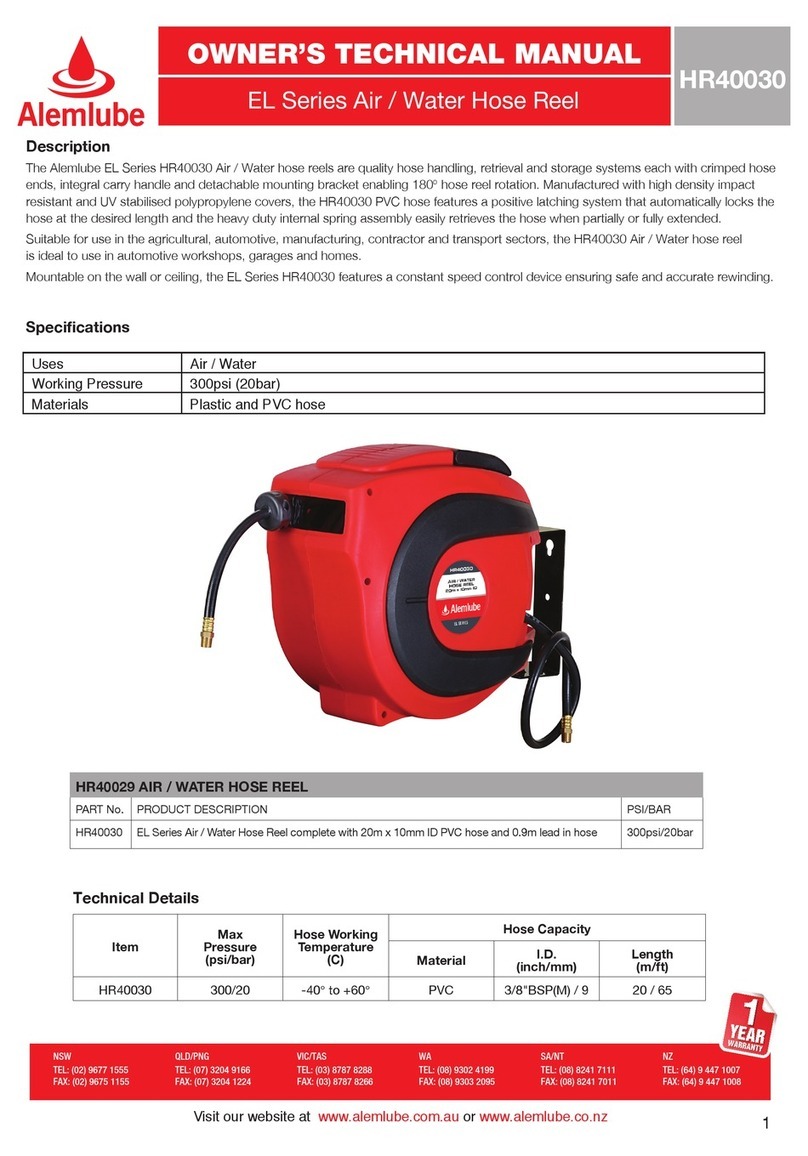
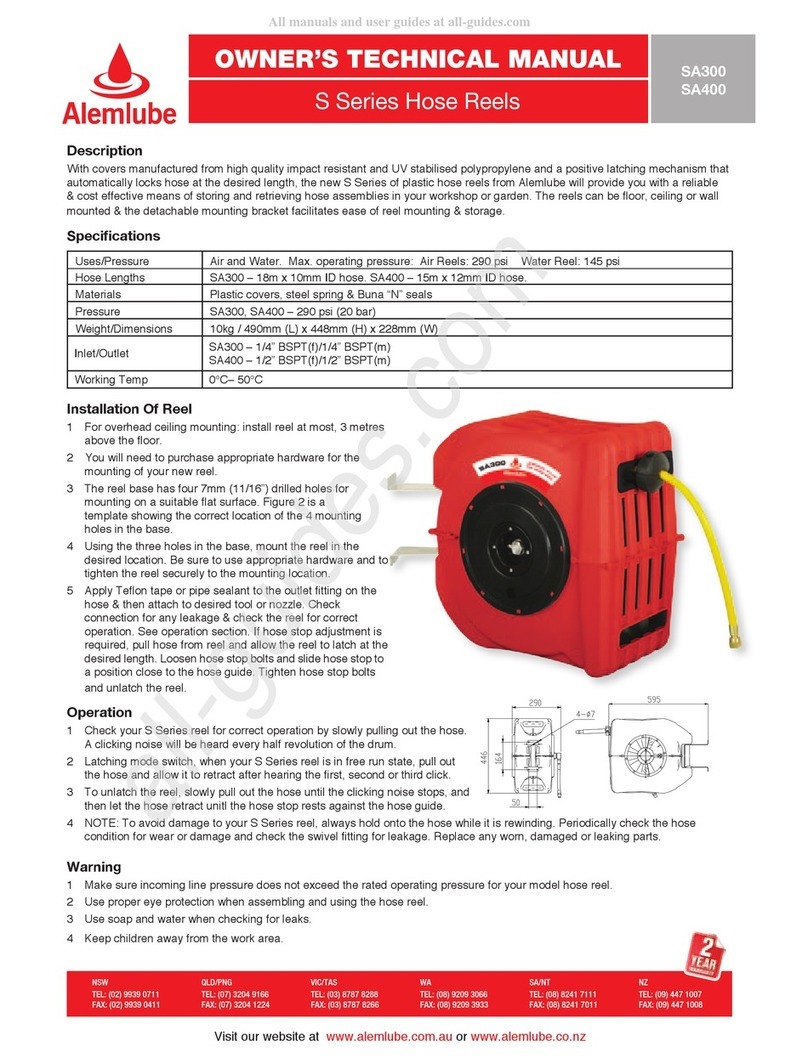
HR40040 AIR / WATER HOSE REEL
PART No. PRODUCT DESCRIPTION PSI/BAR
HR40040 EL Series Air / Water Hose Reel complete with 15m x 12mm ID Hybrid Polmer hose and 0.9m lead 300psi/20bar
Uses Air / Water
Working Pressure 300psi (20bar)
Materials Hybrid Polymer
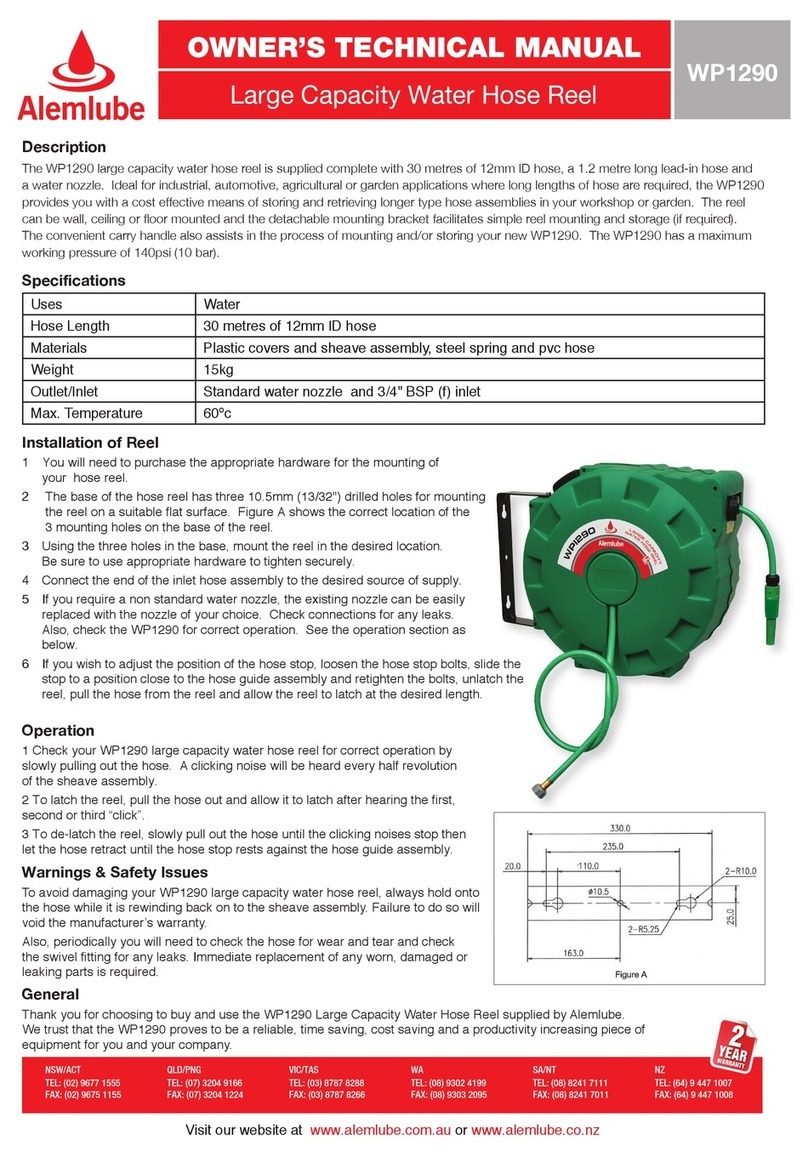
Description
The Alemlube EL Series HR40040 Air / Water hose reels are quality hose handling, retrieval and storage systems each with crimped hose
ends, integral carry handle and detachable mounting bracket enabling 180º hose reel rotation. Manufactured with high density impact
resistant and UV stabilised polypropylene covers, the HR40040 PVC hose features a positive latching system that automatically locks the
hose at the desired length and the heavy duty internal spring assembly easily retrieves the hose when partially or fully extended.
Suitable for use in the agricultural, automotive, manufacturing, contractor and transport sectors, the HR40040 Air / Water hose reel
is ideal to use in automotive workshops, garages and homes.
Mountable on the wall or ceiling, the EL Series HR40040 features a constant speed control device ensuring safe and accurate rewinding.
Specifications
Technical Details
Item
Max
Pressure
(psi/bar)
Hose Working
Temperature
(C)
Hose Capacity
Material I.D.
(inch/mm)
Length
(m/ft)
HR40040 300/20 -40°to +60°PVC 1/2"BSPT / 12 15 / 49
Visit our website at www.alemlube.com.au or www.alemlube.co.nz
NSW
TEL: (02) 9677 1555
FAX: (02) 9675 1155
QLD/PNG
TEL: (07) 3204 9166
FAX: (07) 3204 1224
VIC/TAS
TEL: (03) 8787 8288
FAX: (03) 8787 8266
WA
TEL: (08) 9302 4199
FAX: (08) 9303 2095
SA/NT
TEL: (08) 8241 7111
FAX: (08) 8241 7011
NZ
TEL: (64) 9 447 1007
FAX: (64) 9 447 1008
1
EL Series Air / Water Hose Reel HR40040
OWNER’S TECHNICAL MANUAL
Plastic Spring Driven Reel
2766 Series Instruction
Plastic Spring Driven Reel 2766 Series Instruction
Technical Details
Spring driven drum: for automatic retractable.
Locking ratchet: to maintain the desired length of hose in use.
Safety Precautions
GENERAL SAFETY RULES
WARNING: Read and understand all instructions.
WARNING:
The warnings, cautions, and instructions discussed in this instruction manual
cannot cover all possible conditions or situations that could occur. It must be understood by
the operator that common sense and caution are factors which cannot be built into this
product, but must be supplied by the operator.
Hose Reel Safety Precautions
1. Use proper eye protection when assembling and using the hose reel.
2.Keep children away from the work area.
3. Personal injury and/or equipment damage may result if proper safety precautions are not
observed.
4. Ensure that reel is properly installed before connecting input and output hoses.
5. Bleed fluid/gas pressure from system before servicing reel.
6. Before connecting reel to supply line ensure that pressure does not exceed maximum
working pressure rating of reel.
7. Remember, even low pressure is very dangerous and can cause personal injury or death.
8. If a leak occurs in the hose or reel, remove system pressure immediately.
9. Ensure that reel, hose, and equipment being service are properly grounded.
10. If reel ceases to unwind or rewind, remove system pressure immediately.
11. o not pull or jerk on hose.
Installation of Hose Reel
You will need to purchase appropriate hardware for mounting your new reel.
1) For mounting: For air series, Install reel on the wall and ceiling at most 9feet / 3m above the
floor. For water series, Install reel on the wall at most 4.5feet / 1.5m above the floor .
2) The reel base has two mounting holes for mounting on a suitable flat surface for air series
(four mounting holes for water series). Below figures is a template showing the correct
location of the mounting holes in the base.
3) Using the mounting holes in the base, mount the reel in the desired location. Be sure to use
appropriate hardware and tighten securely.
1 OF 4
REV 12/03/14
WARNING:
Read carefully and understand all INSTRUCTIONS before operating. Failure to
follow the safety rules and other basic safety precautions may result in serious
personal injury.
Save these instructions in a safe place and on hand so that they can be read
when required.
Item Medium
27667203-18
27667203-28
27667204-31
27667204-21
27667155-31
27667155-21
300/20
300/20
140/10
140/10
140/10
140/10
Air
Air
Water
Water
Water
Water
-20~60
-20~60
0~60
0~60
0~60
0~60
PVC
PVC
PVC
PVC
PVC
PVC
3/8" /10
3/8" /10
1/2" /12
1/2" /12
5/8" /15
5/8" /15
20/65
20/65
20/65
20/65
15/50
15/50
Work Tem.(˚C)
Material
Hose Capacity
I.D.
(inch/mm)
Length
(m/ft)
Max
Pressure
(psi/bar)
For Water
For Air
Safety Precautions
General Safety Rules
HR40040 Instruction
Plastic Spring Driven Reel 2766 Series Instruction
2766 for air wall & ceiling
2766 for water wall
4) The end of incoming hose can be connected to desired supply source.
5) Outlet fittings on reel hose attach to desired tool, or nozzle. Check connection for leakage,
also check hose reel for correct operation. See: Operation section.
6) If hose stopper adjustment is required, pull hose from reel and allow to latch at desired
length. Loosen stopper bolts, and slide stopper to a position close to the hose guide. Tighten
stopper bolts, and unlatch the reel.
2 OF 4
Plastic Spring Driven Reel 2766 Series Instruction
Operation
1. Check reel for correct operation by slowly pulling out the hose.
2. To latch the reel, pull out the hose about 3 feet/1m and allow it to retract until the hose
stops retracting.
3. To unlatch the reel, slowly pull out the hose about 1 foot/0.3m then let the hose retract
until the hose stopper rests against the hose guide opening.
Note: To avoid damage to the reel, always hold on to the hose while it is rewinding.
4. Periodically check the hose condition for wear or damage, and check the swivel fitting
for leakage. Replace any worn, damaged, or leaking parts.
Maintenance
Make sure the hose is in proper working order.
Clean the hose with a cloth dipped in warm water to remove dirt or deposits and ensure
correct rewinding.
Do not use detergents or solvents which could prove incompatible with cable-winder materials.
Dismantling of the unit by unskilled personal could prove hazardous; the risk involved mainly
concern the preloaded springs.
Limited Warranty
1. The manufacturer warrantees this hose reel against defects in material and craftsmanship,
for a period of 24 months from date of purchase, but not including hose and O-ring parts.
2. Manufacturer’s liability is limited to replacement or repair of defective material within the
warranty period, when returned freight prepaid to the distributor or their designated
service depot.
3. The warranty does not cover damage caused by accident, misuse or faulty installation.
4. The reel must be installed and maintained in compliance with the instructions.
3 OF 4
HR40029 for air and water - wall and ceiling mount
Plastic Spring Driven Reel 2766 Series Instruction
2766 for air wall & ceiling
2766 for water wall
4) The end of incoming hose can be connected to desired supply source.
5) Outlet fittings on reel hose attach to desired tool, or nozzle. Check connection for leakage,
also check hose reel for correct operation. See: Operation section.
6) If hose stopper adjustment is required, pull hose from reel and allow to latch at desired
length. Loosen stopper bolts, and slide stopper to a position close to the hose guide. Tighten
stopper bolts, and unlatch the reel.
2 OF 4
Plastic Spring Driven Reel 2766 Series Instruction
Operation
1. Check reel for correct operation by slowly pulling out the hose.
2. To latch the reel, pull out the hose about 3 feet/1m and allow it to retract until the hose
stops retracting.
3. To unlatch the reel, slowly pull out the hose about 1 foot/0.3m then let the hose retract
until the hose stopper rests against the hose guide opening.
Note: To avoid damage to the reel, always hold on to the hose while it is rewinding.
4. Periodically check the hose condition for wear or damage, and check the swivel fitting
for leakage. Replace any worn, damaged, or leaking parts.
Maintenance
Make sure the hose is in proper working order.
Clean the hose with a cloth dipped in warm water to remove dirt or deposits and ensure
correct rewinding.
Do not use detergents or solvents which could prove incompatible with cable-winder materials.
Dismantling of the unit by unskilled personal could prove hazardous; the risk involved mainly
concern the preloaded springs.
Limited Warranty
1. The manufacturer warrantees this hose reel against defects in material and craftsmanship,
for a period of 24 months from date of purchase, but not including hose and O-ring parts.
2. Manufacturer’s liability is limited to replacement or repair of defective material within the
warranty period, when returned freight prepaid to the distributor or their designated
service depot.
3. The warranty does not cover damage caused by accident, misuse or faulty installation.
4. The reel must be installed and maintained in compliance with the instructions.
3 OF 4
Visit our website at www.alemlube.com.au or www.alemlube.co.nz
NSW
TEL: (02) 9677 1555
FAX: (02) 9675 1155
QLD/PNG
TEL: (07) 3204 9166
FAX: (07) 3204 1224
VIC/TAS
TEL: (03) 8787 8288
FAX: (03) 8787 8266
WA
TEL: (08) 9302 4199
FAX: (08) 9303 2095
SA/NT
TEL: (08) 8241 7111
FAX: (08) 8241 7011
NZ
TEL: (64) 9 447 1007
FAX: (64) 9 447 1008
2
HR40040 Instruction
Plastic Spring Driven Reel 2766 Series Instruction
2766 for air wall & ceiling
2766 for water wall
4) The end of incoming hose can be connected to desired supply source.
5) Outlet fittings on reel hose attach to desired tool, or nozzle. Check connection for leakage,
also check hose reel for correct operation. See: Operation section.
6) If hose stopper adjustment is required, pull hose from reel and allow to latch at desired
length. Loosen stopper bolts, and slide stopper to a position close to the hose guide. Tighten
stopper bolts, and unlatch the reel.
2 OF 4
Plastic Spring Driven Reel 2766 Series Instruction
Operation
1. Check reel for correct operation by slowly pulling out the hose.
2. To latch the reel, pull out the hose about 3 feet/1m and allow it to retract until the hose
stops retracting.
3. To unlatch the reel, slowly pull out the hose about 1 foot/0.3m then let the hose retract
until the hose stopper rests against the hose guide opening.
Note: To avoid damage to the reel, always hold on to the hose while it is rewinding.
4. Periodically check the hose condition for wear or damage, and check the swivel fitting
for leakage. Replace any worn, damaged, or leaking parts.
Maintenance
Make sure the hose is in proper working order.
Clean the hose with a cloth dipped in warm water to remove dirt or deposits and ensure
correct rewinding.
Do not use detergents or solvents which could prove incompatible with cable-winder materials.
Dismantling of the unit by unskilled personal could prove hazardous; the risk involved mainly
concern the preloaded springs.
Limited Warranty
1. The manufacturer warrantees this hose reel against defects in material and craftsmanship,
for a period of 24 months from date of purchase, but not including hose and O-ring parts.
2. Manufacturer’s liability is limited to replacement or repair of defective material within the
warranty period, when returned freight prepaid to the distributor or their designated
service depot.
3. The warranty does not cover damage caused by accident, misuse or faulty installation.
4. The reel must be installed and maintained in compliance with the instructions.
3 OF 4
Visit our website at www.alemlube.com.au or www.alemlube.co.nz
NSW
TEL: (02) 9677 1555
FAX: (02) 9675 1155
QLD/PNG
TEL: (07) 3204 9166
FAX: (07) 3204 1224
VIC/TAS
TEL: (03) 8787 8288
FAX: (03) 8787 8266
WA
TEL: (08) 9302 4199
FAX: (08) 9303 2095
SA/NT
TEL: (08) 8241 7111
FAX: (08) 8241 7011
NZ
TEL: (64) 9 447 1007
FAX: (64) 9 447 1008
3
HR40040
Parts and drawing breakdown
 


     
  


   
  
  
 








37;)
䓵⹆㔾Ⰵ


ƤƤƱ
㠞⮇㦇




⭝⺍

4

37;):
䓵⹆㔾Ⰵ


+5
⮇㠍

4$

0
㵍⤞⫙



ろ䓇

320

37;)
䓵⹆㔾Ⰵ



⭓㠍

4


㚇⤢⿘

3&


⿛⨆⧾㔷

3$

*%70;
㬏䓷⤼⧢㵘㔾Ⰵ



㝭㳆

33


㵍⤞㔷⭓⟆

$%6


㵍⤞㔷

$%6

37;)
䓵⹆㔾Ⰵ

 *%7
⮇㠍
 

ボ⶞⢎ Ⳉ㾟

320


2㾮㦇

1%5


⮇㦇

4W 


2㾮㦇

1%5


Ⱓ㵘

$%6

ボ⶞⢎ Ⳉ㳆

320

ボ⶞⢎ ⭆ⱛ㋉⹠



⹽㋉

3$

ボ⶞⢎ ⭐⿪

6L0Q$

ボ⶞⢎ ⹽䓽⧪


ボ⶞⢎ 䐚Ⱀ㌊䓽⧪



䑘䑂

33/*)

37[)
⧢㵘䓵⹆㔾Ⰵ


ボ⶞⢎ ⹭Ⰹ䔚

33

ボ⶞⢎ ⭝㧌⹽䓽⧪


37;)
䓵⹆㔾Ⰵ



㳂㬷

33/*)


㋼㝭

33


䔔〛㋨

33


䇳〛㋨

33


㔾ⶬ

320


⭝㔷䐈ソ$

$%6


⺗㔷

320


⿜㼓㋼

320


⭝㔷䐈ソ%

$%6

ボ⶞ミ 㾂㵍⤞㔷

320
㿓⼦
㵝⼦⢋䓝⼦
㘜⧧ 㭞㑠 ⤥㑰 䐹㑠 ⡙䓃
,7,(6%

6+((72)
⭻䄔⹓䄔
㦧⹽㡘䓽⧪
⪬㵝⟇㦉⺊㬠㩭󰵪㩰⼄󰵫〛㾖䇱㻿⹌㯟㰚
䇱󰵮㸕㈎㿎㋪󰵮㦯⼯㦬⤜㿎ⶕ䐧〓㬚䇤᱄
,QWUDGLQ6KDQJKDL0DFKLQHU\&R/WGUHVHUYHWKH
FRS\ULJKWIRUWKLVGUDZLQJ
,WVKDOOQRWEHFRSLHGRUPDGHDYDLODEOHIRUWKLUG
SDUWLHVZLWKRXWSULRUDSSURYDO
㘜⧧
7,7/(
㵝⼦
'5$:,1*12
⟇⪯

9(56,21
䐹㑠
:(,*+7.J
⡩㏞
6&$/(
⤥㑰
0$7(5,$/
㬠㩭㩰⼄〛㾖䇱㻿⹌㯟
,QWUDGLQ6KDQJKDL0DFKLQHU\&R/WG

标记
MARK
⪇㭞
02',),&$7,216
ⷝⶥ㸥ミ⼦
'2&80(1712
㣊䓷
6,*1('%<
㦶㠻
'$7(
㪉ェ
'(6,*1('%<
㾄ⰵ
&+(&.('%<
㪔⼬
$8',7('%<
⢋䓝⿐
67$1'$5',=('%<
㞛䓝
$33529('%<
⹅䄶
352&(66('%<



⟇⪯ 㦶㠻

Item No Part No Description Q’ty
1HR40040-1 Hose Compositor 1
2HR40040-2 Right Casing 1
3HR40040-3 Left Casing 1
4HR40040-4 End Cover 2
5HR40040-5 Handle 1
6HR40040-6 Screw 19
7HR40040-7 Hose Assembly 1
8HR40040-8 Base 1
9HR40040-9 Screw 4
10 HR40040-10 Main shaft 1
11 HR40040-11 Bumper Block 1
12 HR40040-12 Hose Assembly 1
13 HR40040-13 Spring 1
14 HR40040-14 Clamp 1
15 HR40040-15 Hose Clamp 2
16 HR40040-16 Swivel Body 1
17 HR40040-17 Plug 1
18 HR40040-18 O-Ring 1
19 HR40040-19 Retainer 1
20 HR40040-20 O-Ring 2
Item No Part No Description Q’ty
21 HR400409-21 Swivel Spool 1
22 HR40040-22 - -
23 HR40040-23 - -
24 HR40040-24 Synchronous Wheel 1
25 HR40040-25 Screw 4
26 HR40040-26 Guard Plant 1
27 HR40040-27 Drum 2
28 HR40040-28 Screw 4
29 HR40040-29 Ring 1
30 HR40040-30 Gear 1
31 HR40040-31 Guard Plant 6
32 HR40040-32 Screw 8
33 HR40040-33 Screw 2
34 HR40040-34 Washer 2
35 HR40040-35 Ratchet Paw 1
36 HR40040-36 Synchronous Belt 1
37 HR40040-37 Screw 1
38 HR40040-38 Washer 1
39 HR40040-39 Guide Path 1
Visit our website at www.alemlube.com.au or www.alemlube.co.nz
NSW
TEL: (02) 9677 1555
FAX: (02) 9675 1155
QLD/PNG
TEL: (07) 3204 9166
FAX: (07) 3204 1224
VIC/TAS
TEL: (03) 8787 8288
FAX: (03) 8787 8266
WA
TEL: (08) 9302 4199
FAX: (08) 9303 2095
SA/NT
TEL: (08) 8241 7111
FAX: (08) 8241 7011
NZ
TEL: (64) 9 447 1007
FAX: (64) 9 447 1008
4

Other manuals for EL SERIES

10

This manual suits for next models

1

Other Alemlube Tools manuals

Alemlube EL SERIES User manual

Alemlube

Alemlube EL SERIES User manual

Alemlube S Series User manual

Alemlube

Alemlube S Series User manual

Alemlube 6336N User manual

Alemlube

Alemlube 6336N User manual

Alemlube 670AN3 User manual

Alemlube

Alemlube 670AN3 User manual

Alemlube G10042 User manual

Alemlube

Alemlube G10042 User manual

Alemlube EL SERIES Operating instructions

Alemlube

Alemlube EL SERIES Operating instructions

Alemlube 660AS User manual

Alemlube

Alemlube 660AS User manual

Alemlube 200A User manual

Alemlube

Alemlube 200A User manual

Alemlube S Series User manual

Alemlube

Alemlube S Series User manual

Alemlube SW500N User manual

Alemlube

Alemlube SW500N User manual

Alemlube 220A User manual

Alemlube

Alemlube 220A User manual

Alemlube EL SERIES Operating instructions

Alemlube

Alemlube EL SERIES Operating instructions

Alemlube EL SERIES User manual

Alemlube

Alemlube EL SERIES User manual

Alemlube 660A Operating instructions

Alemlube

Alemlube 660A Operating instructions

Alemlube 200ACB User manual

Alemlube

Alemlube 200ACB User manual

Alemlube EL SERIES User manual

Alemlube

Alemlube EL SERIES User manual

Alemlube G10040N User manual

Alemlube

Alemlube G10040N User manual

Alemlube 660AN User manual

Alemlube

Alemlube 660AN User manual

Alemlube 660AN User manual

Alemlube

Alemlube 660AN User manual

Alemlube 600A User manual

Alemlube

Alemlube 600A User manual

Alemlube Air Operated Grease Gun User manual

Alemlube

Alemlube Air Operated Grease Gun User manual

Alemlube HR90005 User manual

Alemlube

Alemlube HR90005 User manual

Alemlube EL SERIES User manual

Alemlube

Alemlube EL SERIES User manual

Alemlube 600A User manual

Alemlube

Alemlube 600A User manual

Popular Tools manuals by other brands

GRS 003-541 quick guide

GRS

GRS 003-541 quick guide

Gage Bilt GB703SRVTPTS Original instructions

Gage Bilt

Gage Bilt GB703SRVTPTS Original instructions

Global Industrial 641767 instruction manual

Global Industrial

Global Industrial 641767 instruction manual

Cherry Aerospace H828-8MB Technical data sheet

Cherry Aerospace

Cherry Aerospace H828-8MB Technical data sheet

BEA 554 DCC Spare parts list/service instructions

BEA

BEA 554 DCC Spare parts list/service instructions

Utility Solutions BREAK-SAFE 600 FIELD INSPECTION PROCEDURE

Utility Solutions

Utility Solutions BREAK-SAFE 600 FIELD INSPECTION PROCEDURE

Facom 14.9X12 instruction manual

Facom

Facom 14.9X12 instruction manual

NovoPress AFP101 operating manual

NovoPress

NovoPress AFP101 operating manual

Clam 109935 quick start guide

Clam

Clam 109935 quick start guide

Welbilt 1971202 user manual

Welbilt

Welbilt 1971202 user manual

Raider RD-AH01 user manual

Raider

Raider RD-AH01 user manual

Kreg KMA4000 owner's manual

Kreg

Kreg KMA4000 owner's manual

Dritz 16P Instruction guide

Dritz

Dritz 16P Instruction guide

jbc NA101 instruction manual

jbc

jbc NA101 instruction manual

Howmet Aerospace BobTail BTT25-ST instruction manual

Howmet Aerospace

Howmet Aerospace BobTail BTT25-ST instruction manual

Josef Kihlberg F53PN operating instructions

Josef Kihlberg

Josef Kihlberg F53PN operating instructions

Conrad 97 17 06 quick start guide

Conrad

Conrad 97 17 06 quick start guide

Trotec PTNS 10-230V operating manual

Trotec

Trotec PTNS 10-230V operating manual

manuals.online logo
manuals.online logoBrands
  • About & Mission
  • Contact us
  • Privacy Policy
  • Terms and Conditions

Copyright 2025 Manuals.Online. All Rights Reserved.