Assembly instructions for LED panel
Carefully remove the LED panel from its packaging.
Over the corner edge of the light carefully put it into the ceiling section.
Avoid mechanical tensions on panel, the light should have some space.
Turn Off power supply before starting any installation.
Do not connect the device under power.
Connect the supply cables according to the electrical regulations to the
primary connection 230V AC to LED converter.
The electrical connection from LED panel to the converter is connected with
a plug-in connector. Do not unplug before switching on, also not during
operating the lamp.
Only use the supplied LED converter! Other converters or transformers may
destroy the light. The DIP setting must not be changed!
In case of ceiling installation place LED converter sideways to the light.
It is not allowed to cover LED panel and LED converter with heatinsula-
ting cover sheet or similar materials!
Additional drillings in the LED luminaire are not allowed!
Do not place the LED converter on the LED pendant luminaire to avoid
unnecessary transfer of heat.
Another installation / assembly / materials / types than provided in the
manual sheets, release us from any electrotechnical and electrostatic
responsibility.
DALI-Version:
Delay on rst power up or power interruption.The luminaire registers with
its address on the DALI BUS and exchange the parameters here.
The parameterization (at rst use) is done with programs offered on the
internet (for example TRIDONIC masterCONFIGURATOR).
OSRAM Dali-Version:
The resistance must not be changed (only after consultation with the
manufacturer).
Fixing materials:
Pendant mounting order number Z-ELEDN
Assembly frame order number ELEDN-AUR626
The warranty is void if the buyer or a third party repairs or modies the
luminaire.
Plug-in and lock
after half rotation.
X
Please check that the lamp has an electronic ballast with connection for
functional earth. If so, please connect the functional earth according to
the valid standards and guidelines!
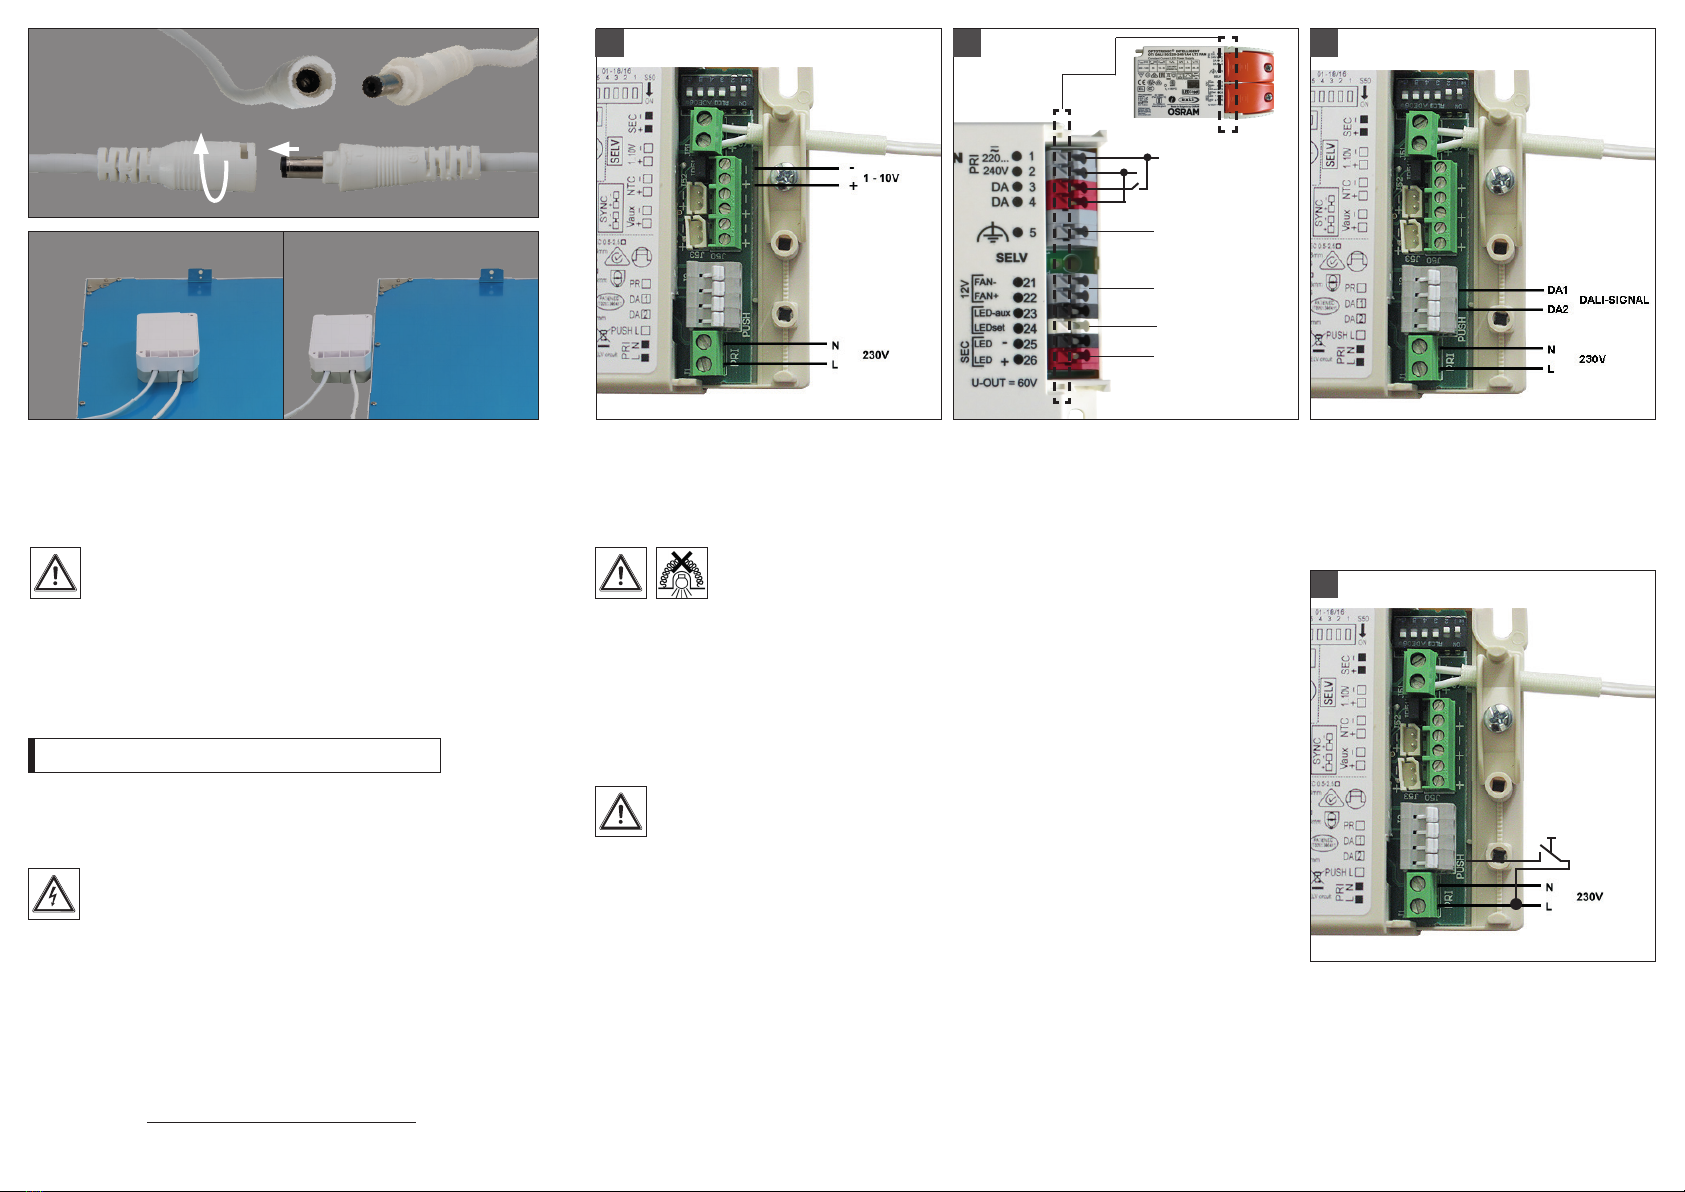
01. Connect the LED power supply to main power
and connect the LED power supply with the light,
see Fig. 01. Connect the wires at the power supply
ohnprimary an secondary side. Max. conductor
cross-section 1,5 mm².
02a. Connect the LED power supply to main power
and connect the LED power supply with the light,
see Fig. 02a. Connect the wires at the power supply
ohnprimary an secondary side. conductor cross-
section 1,5 mm²
03. Connect the connection cables to the power
supply, see Fig. 03.Then connect the power supply
to the luminaire and connect the power supply
unit to the power supply max., conductor cross
section 1.5mm².
For the PUSH -L dimming input always only use the
phase that also powers the power supply!
02b 03 04 05
04. Setzen Sie das waagerechte Gerät in den T-Rahmen ein.
Stellen Sie sicher, dass das eingesetzte Produkt waagerecht ist.
04. Place the horizontal product into the T-Bar.
Ensure the inserted product is horizontal.
05. Schalten Sie die Sicherung nach der Montage wieder ein und
überprüfen Sie die Funktion des Gerätes.
05. Once installation is complete, turn on the power switch to check
it is operating properly.
02b. Verbinden Sie den Stecker mit der Buchse.
02b. Connect the plug to the socket.
03. Drehen Sie das angeschlossene Gerät um 20 Grad. Führen Sie
das Gerät dann in den T-Rahmen ein. Stellen Sie sicher, dass alle
vier Seiten des Produktes in den T-Rahmen passen.
03. Rotate the connected product by 20 degrees. Then insert it into
the T-Bar insertion space. Make sure that all 4 sides of the product
match the T-Bar.
ON
ELED2
ELED4
02. Verbinden Sie die Anschlusskabel am Netzteil, siehe Abb. 02.
Anschließend verbinden Sie das LED-Netzteil mit dem Stromnetz und
schließen das Netzteil an die Leuchte an max. Leiterquerschnitt 1,5 mm2.
01. Verbinden Sie die Anschlusskabel am Netzteil, siehe Abb. 01.
Anschließend verbinden Sie das LED-Netzteil mit dem Stromnetz und
schließen das Netzteil an die Leuchte an max. Leiterquerschnitt 1,5 mm2.
Version 1 - 10V Dali-Version
03. Verbinden Sie die Anschlusskabel am Netzteil, siehe Abb.03.
Anschließend schließen Sie das Netzteil an der Leuchte an und verbinden
Sie das Netzteil mit dem Stromnetz max., Leiterquerschnitt 1,5mm².
Für den PUSH -L Dimm Eingang immer nur die Phase verwenden, die auch
das Netzteil versorgt!
PUSH-L on/off und Dimmen über Taster
01
03
Version 1 -10V
PUSH -L on /off and dimming via buttons
02b. Connect the LED power supply to main power
and connect the LED power supply with the light,
see Fig. 02b. Connect the wires at the power supply
ohnprimary an secondary side. conductor cross-
section 1,5 mm²
02b 03 04 05
04. Setzen Sie das waagerechte Gerät in den T-Rahmen ein.
Stellen Sie sicher, dass das eingesetzte Produkt waagerecht ist.
04. Place the horizontal product into the T-Bar.
Ensure the inserted product is horizontal.
05. Schalten Sie die Sicherung nach der Montage wieder ein und
überprüfen Sie die Funktion des Gerätes.
05. Once installation is complete, turn on the power switch to check
it is operating properly.
02b. Verbinden Sie den Stecker mit der Buchse.
02b. Connect the plug to the socket.
03. Drehen Sie das angeschlossene Gerät um 20 Grad. Führen Sie
das Gerät dann in den T-Rahmen ein. Stellen Sie sicher, dass alle
vier Seiten des Produktes in den T-Rahmen passen.
03. Rotate the connected product by 20 degrees. Then insert it into
the T-Bar insertion space. Make sure that all 4 sides of the product
match the T-Bar.
ON
ELED2
ELED4
02. Verbinden Sie die Anschlusskabel am Netzteil, siehe Abb. 02.
Anschließend verbinden Sie das LED-Netzteil mit dem Stromnetz und
schließen das Netzteil an die Leuchte an max. Leiterquerschnitt 1,5 mm2.
01. Verbinden Sie die Anschlusskabel am Netzteil, siehe Abb. 01.
Anschließend verbinden Sie das LED-Netzteil mit dem Stromnetz und
schließen das Netzteil an die Leuchte an max. Leiterquerschnitt 1,5 mm2.
Version 1 - 10V Dali-Version
03. Verbinden Sie die Anschlusskabel am Netzteil, siehe Abb.03.
Anschließend schließen Sie das Netzteil an der Leuchte an und verbinden
Sie das Netzteil mit dem Stromnetz max., Leiterquerschnitt 1,5mm².
Für den PUSH -L Dimm Eingang immer nur die Phase verwenden, die auch
das Netzteil versorgt!
PUSH-L on/off und Dimmen über Taster
02b Dali-Version
02a Dali-Version
PRI. L/N
Resistor for power
SEC. LED Connection
to LED luminaire
NC
Grounding
Push-Dim / DALI


-C User manual")


