Ambiano XJ-14709C0 User manual

User Manual
DIGITAL FOOD
DEHYDRATOR
ID: #05007
m
y
h
a
n
s
e
c
o
n
t
r
o
l
.
c
o
m
M
A
N
U
A
L
D
E
V
E
L
O
P
E
D
I
N
G
E
R
M
A
N
Y
User-friendly
Manual

Dok./Rev.-Nr. 197115_20190626
Overview .............................................................................3
Use........................................................................................4
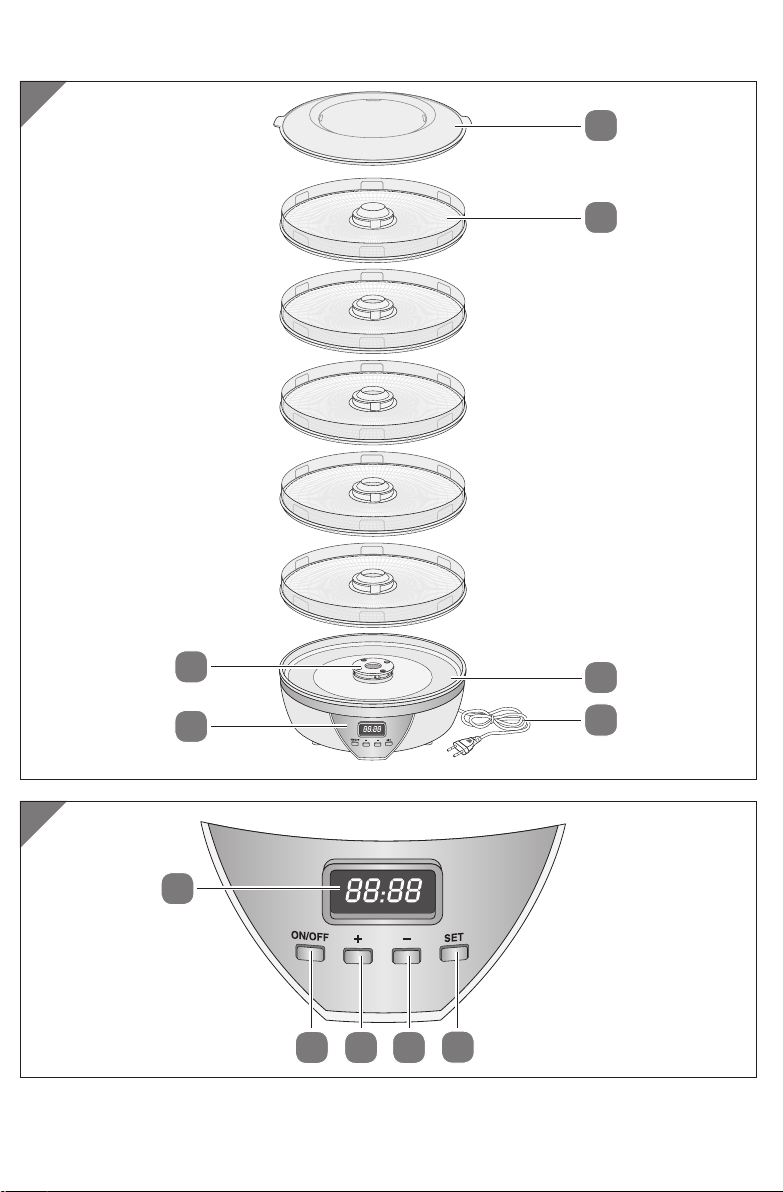
Package contents / parts....................................................5
General ................................................................................6
Read and retain the user manual ......................................... 6
Explanation of symbols .......................................................... 6
Safety ................................................................................... 7
Proper use..................................................................................7
Safety instructions....................................................................7
First use...............................................................................11
Checking the dehydrator and the package contents........11
Basic cleaning...........................................................................11
Assembling the dehydrator...................................................11
Heating process before first use .......................................... 12
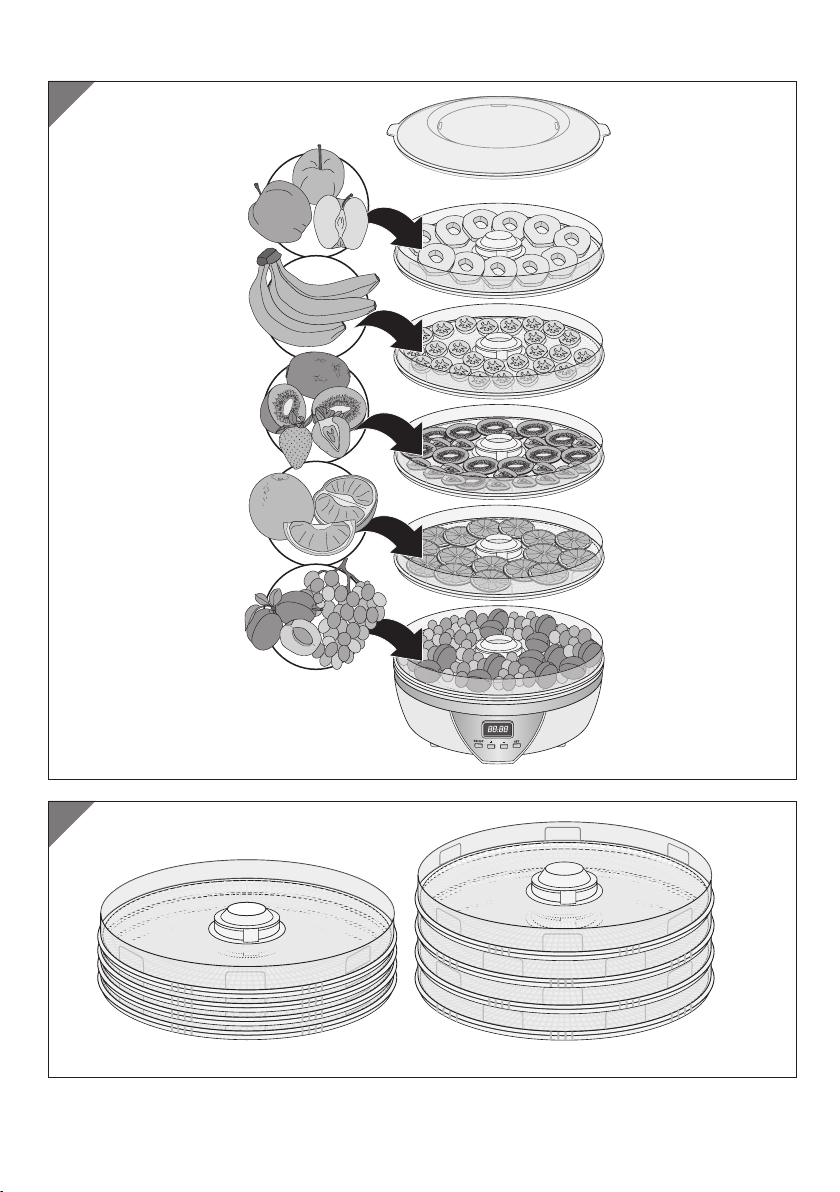
General information on dehydrating foods ....................... 12
Before dehydrating............................................................12
What you should take into account...................................... 12
Preparing foods ...................................................................... 13
Dehydration table ............................................................. 13
The dehydration process .................................................. 16
Fill up the dehydrators...........................................................16
Starting the dehydration process ........................................16
During dehydration................................................................ 17
Replacing and turning the drying grid............................... 17
Pausing/stopping the dehydrating process...................... 17
Ending the dehydraton process...........................................18
Storing dehydrated foods ................................................ 18
Preparing dehydrated food ............................................. 18
Cleaning............................................................................. 19
Storage ..............................................................................20
Technical data ...................................................................20
Disposal..............................................................................20
Disposing of the packaging ................................................. 20
Disposing of dehydrator....................................................... 20
Warranty details.................................................................21
Repair and refurbished goods or parts notice................ 22
Contents

3
A
B
7
8 9 10 11
1
2
3
4
5
6

4
D
C

Package contents / parts
5
Package contents / parts
1Cover (with steam outlet openings)
2Drying grid, 5×
3Base unit
4Mains cord with mains plug
5Control panel
6Hot air outlet
7Display
8ON/OFF button
9Plus button
10 Minus button
11 SET button

General
6
General
Read and retain the user manual
This user manual accompanies this digital food dehydrator (hereinafter
referred to simply as the “dehydrator”). It includes important information
on set-up and operation.
Read the user manual with care, in particular the safety instructions,
before using the dehydrator. Failure to heed this user manual can lead to serious
injuries or damage to the dehydrator.
Retain the user manual for continued use. If you pass the dehydrator on to third
parties, ensure that you also pass on this user manual.
Explanation of symbols
The following symbols and signal words are used in this user manual, on the
dehydrator or on the packaging.
WARNING!
This signal symbol/word designates a hazard
involving a moderate degree of risk, which, if not
avoided, may lead to death or to serious injury.
CAUTION!
This signal symbol/word designates a hazard
involving a low degree of risk, which, if not
avoided, may lead to minor or moderate injury.
NOTICE! This signal word warns of possible damage to
property.
This symbol gives you useful additional information on set-up or
operation.
This symbol designates electrical appliances which have double
protective insulation and therefore correspond to safety class II.
This symbol designates products which are safe for use with foods. The
flavour and aroma are not compromised as a result.

Safety
7
Safety
Proper use
The dehydrator is exclusively designed to dehydrate or dry suitable foods. It is
exclusively designed for private use and is not suitable for commercial use.
Only use the dehydrator in the manner described in this user manual. Any other use is
considered improper and may lead to damage to property or even to personal injury.
The dehydrator is not a children’s toy.
The manufacturer or retailer assumes no liability for damage which is caused by
improper or incorrect use.
Safety instructions
WARNING!
Danger of electric shock!
Incorrect electrical installation or excessively high mains voltage
can lead to an electric shock.
− Only connect the dehydrator if the mains voltage of the mains
socket corresponds to the specifications on the type plate.
− Only connect the dehydrator to an easily accessible mains
socket so that you can quickly connect the dehydrator from the
power supply in case of a fault.
− Do not operate the dehydrator if it exhibits visible damage or if
the mains cord or mains plug is defective.
− If the mains cord of the dehydrator is damaged it must be
replaced by the manufacturer or its After Sales Support or a
similarly qualified person in order to avoid a hazard.
− Do not open the housing – leave the repair to the specialists.
Contact a specialist workshop for this purpose. If repairs are
carried out independently, if the appliance is improperly
connected or if it is improperly operated, liability and warranty
claims are excluded.
− For repairs, only parts may be used which correspond to the
original appliance data. This dehydrator includes electrical and

Safety
8
mechanical parts which are essential for protecting against
sources of danger.
− Do not operate the dehydrator with an external timer or a
separate remote control system.
− Do not submerge the dehydrator, the mains cable or the mains
plug in water or other liquids.
− Do not touch the mains plug with damp hands.
− Never pull the mains plug out of the plug using the mains
cord, always take hold of the mains plug itself.
− Never use the mains cord as a carrying handle.
− Keep the dehydrator, the mains plug and the mains cable
away from open flames and hot surfaces.
− Lay the mains cord out in such a way that it does not present a
trip hazard.
− Do not kink the mains cable and do not lay it over sharp edges.
− Only use the dehydrator in interior spaces. Do not operate it in
wet rooms or in the rain.
− Never position the dehydrator in such a way that it could fall
into a bath tub or wash basin.
− Never try to retrieve an electrical appliance if it has fallen into
water. If this occurs, pull out the mains plug immediately.
− Ensure that children do not insert objects into the dehydrator.
− If you are not using the dehydrator, if you are cleaning it or if
a fault occurs, always switch the dehydrator off and pull the
mains plug out of the mains socket.
− The dehydrator is intended to be used in household and
similar applications such as:
− staff kitchen areas in shops, offices and other working
environments;
− farm houses;
− by clients in hotels, motels and other residential type
environments;
− bed and breakfast type environments.

Safety
9
WARNING!
Risk of injury!
If you do not use the dehydrator properly, there is an increased risk
of injury.
− This dehydrator may be used by children aged eight years or
older and by persons with reduced physical, sensory or mental
abilities or a lack of experience and knowledge if they are
supervised or have been instructed in using the dehydrator
safely and understand the resulting hazards. Children shall
not play with the dehydrator.
− Cleaning and user maintenance may not be carried out by
chidren unless they are older than eight years old and are
being supervised.
− Keep children who are younger than eight years old away
from the dehydrator and the connection cable.
− Do not leave the dehydrator unsupervised during operation.
− Do not allow children to play with the packaging film. Children
may become entangled in it when playing and may suffocate.
WARNING!
Danger of burns!
The upper part of the dehydrator becomes hot during operation.
You may burn yourself.
− Ensure that the dehydrator is securely positioned. It should be
set up horizontally and should not wobble.
− Do not touch hot components of the dehydrator with your
bare fingers during operation. Always use heat-insulated oven
gloves or a potholder to touch the dehydrator. Also ensure that
you indicate the hazards to other users!

Safety
10
NOTICE!
Risk of damage!
Improper use of the dehydrator may lead to damage to the
dehydrator.
− Position the dehydrator on an easily accessible, even, dry, heat-
resistant and sufficiently stable work surface. Do not position
the dehydrator on the edge or corner of the work surface.
− To avoid heat build-up, do not position the dehydrator directly
against a wall or under wall units.
− Never position the dehydrator on or in the vicinity of hot
surfaces (oven hotplates etc.).
− Never allow the mains cord to come into contact with hot
components.
− Never expose the dehydrator to hot temperatures (heating
etc.) or weather conditions (rain etc.).
− Do not in any case place the base unit in the dishwasher. It
would be destroyed as a result.
− Use the drying grid and the cover exclusively for this
dehydrator.
− Discontinue use of the dehydrator if the plastic components
of the dehydrator exhibit cracks or fissures or have become
misshapen. Only replace damaged components with suitable
original parts.

First use
11
First use
Checking the dehydrator and the package contents
NOTICE!
Risk of damage!
If you open the packaging wih a sharp knife or other sharp objects
without due care, the dehydrator may easily become damaged.
− Proceed with great care when opening the packaging.
1. Remove the dehydrator from the packaging.
2. Check whether all parts are included (see Fig.A).
3. Check whether the dehydrator or the individual parts show signs of damage. If
this is the case, do not use the dehydrator. Contact the manufacturer using the
service address indicated on the warranty card.
Basic cleaning
1. Remove the packaging material and all protective films.
2. Before first use, clean all parts of the dehydrator in the manner described in the
chapter “Cleaning”:
• cover 1,
• drying grids 2and
• base unit 3.
Assembling the dehydrator
1. Position the base unit 3on a level, dry, non-slip and heat-resistant surface
which is close to a mains socket.
2. Position a drying grid 2on the base unit and lay as many drying grids on top of
one another as are required for the dehydration process.
Ensure that the drying grid without an opening in the middle is always on top.
3. Place the cover 1on the upper drying grid.

Before dehydrating
12
Heating process before first use
In order to remove any production-related residues, it is necessary to
carry out a 1-hour heating process with no food prior to first use of the
dehydrator. If an odour is emitted, this is normal and will disappear
after a short time. This does not indicate that the dehydrator has
malfunctioned. Ensure adequate ventilation by opening windows.
1. Plug the mains plug 4into a properly installed mains socket.
The display 7on the control panel 5will begin to flash (see Fig. B).
2. Press the plus button 9once.
1HR will show in the display.
3. Turn the power on by pressing the ON/OFF button 8.
The ventilator will be switched on and warm air will come out of the hot air
outlet 6.
After one hour, the dehydrator will switch off automatically.
4. Pull the mains plug out of the mains socket and allow the dehydrator to cool off.
General information on dehydrating foods
Drying and dehydrating are the oldest conservation methods known to man. By
eliminating water, the breeding ground for fermentation processes is removed which
therefore prevents the formation of bacteria responsible for decay and mould. With
correct utilisation and storage, dehydrated products can be kept for years.
As the aromas are concentrated, dehydrated foods are extremely flavoursome.
Vitamins, nutrients and minerals are not compromised in this process.
Many dehydrated foods can be used in numerous recipes once they have been
soaked in water.
Before dehydrating
What you should take into account
− Only use fresh, ripe and high-quality fruits and vegetables.
− Clean the fruit and vegetables as quickly as possible after they are picked and
carry out further preparations if applicable.
− Prevent unwanted colour and/or taste changes by blanching or submerging the
foods in solutions (such as lemon juice).

Dehydration table
13
Preparing foods
− Wash all foods well.
− Remove any damaged areas as well as any pips or cores.
− Prepare the food in accordance with the following dehydration table. Cut the
food into evenly-sized pieces and take note that the foods become significantly
smaller as a result of the dehydration process.
Dehydration table
The values indicated in the table are guideline values only. The
dehydration time depends on the size and thickness of the cut pieces
or slices. You can decide yourself how you prefer to enjoy your food.
Food for
dehydration
Preparation
Temperature (in °C)
Dehydration time
(in hours)
Consistency
Fresh weight (in g)
Weight after the de-
hydration process
(in g)
Pineapple Peel and cut into small
pieces.
70 15 pliable 600 150
Apples Peel and cut into slices of
approx. 3mm thickness.
70 16 pliable 500 95
Bananas Peel and cut into slices of
approx. 3mm thickness.
70 10 crunchy 500 150
Pears Peel and cut into slices of
approx. 3mm thickness.
70 16 pliable 600 140
Beans Cook whole beans until
they are soft and allow to
drip dry well.
50 6brittle 400 60
Peas Shell, blanch and allow to
drip dry well.
50 9hard 400 90
Strawber-
ries
Halve or cut into strips of
approx. 8mm.
70 8hard 500 80
Cucumbers Peel and cut into slices of
approx. 3mm thickness.
50 6hard 450 21

Dehydration table
14
Food for
dehydration
Preparation
Temperature (in °C)
Dehydration time
(in hours)
Consistency
Fresh weight (in g)
Weight after the de-
hydration process
(in g)
Carrots Clean and cut into slices of
approx. 3mm thickness.
70 6hard 450 70
Cherries Pit cherries and leave
whole.
70 15 leathery 500 140
Herbs Wash, allow to drip dry well
and place in a teabag.
30–40 3brittle – –
Leeks Halve, cut into pieces of
6-8cm in length, blanch
and allow to drip dry well.
70 8brittle 500 100
Mandarins Peel and place on the
sheet in segments.
70 12 pliable 600 200
Apricots Halve and place on the
sheet with the cut surface
to the bottom.
70 20 pliable 400 85
Peppers Cut into strips. 50–60 9pliable 400 85
Chilli
peppers
Cut into strips. 50–60 9pliable 500 100
Mushrooms Clean well and cut into slic-
es lengthwise.
50 4chewy – –
Celery Peel, cut into 3mm slices,
blanch and drip dry well.
70 8hard 400 60
Tomatoes Wash, cut into 6mm thick
slices, allow to drip dry
well.
70 8hard 600 85
Grapes Halve and place on the
sheet with the cut surface
to the bottom.
70 16 leathery 500 200

Dehydration table
15
Food for
dehydration
Preparation
Temperature (in °C)
Dehydration time
(in hours)
Consistency
Fresh weight (in g)
Weight after the de-
hydration process
(in g)
Zucchini Unpeeled, cut into slices of
approx. 3 mm in thickness.
50–60 6hard 400 60
Damsons/
plums
Halve and place on the
sheet with the cut surface
to the bottom.
70 20 pliable 500 120
Dehydrating meat
Food for
dehydration
Preparation
Temperature (in
°C)
Dehydration time
(in hours)
Consistency
Fresh weight (in g)
Weight after the
dehydration pro-
cess (in g)
Beef, poul-
try or fish
Cut off the fat, cut into
slices of 6mm thickness
65–70 5–6 leathery – –
− In order to dehydrate it, meat must be cut into very thin slices.
Partially freeze the meat for a maximum of 1 hour. Remove it from
the freezer and cut it into thin slices along the grain. Place the slices
onto the drying grid 2immediately.
− Fillets of fish should also be cut into thin slices. If required, partially
freeze the fish for a maximum of one hour. Remove all bones (even
the small ones) to achieve optimal results.
− Prepare a delicious, low-fat teriyaki chicken jerky by cutting the
chicken breast into thin slices and marinating it for 1 hour in teriyaki
sauce prior to dehydrating it. Pat the meat dry and lay it on the
drying grid. After the dehydration process, add chilli flakes, chilli
powder or other spices in order to enhance the flavour experience.

The dehydration process
16
The dehydration process
Fill up the dehydrators
NOTICE!
Risk of damage!
Liquid may penetrate into conductive parts and damage them.
− Never add liquid to the dehydrators.
− Place fruits and vegetables on the drying grids 2in such a way that warm air
can still circulate well.
− If you are using foods with different dehydration times, place the food with the
longest dehydration time on the lowest drying grid as the temperature is highest
there (see Fig. C).
− As far as possible, use the same types of food on all drying grids.
− Place fruit pieces upright and close to one another on the drying grid.
− Always place unpeeled fruit with the cut surface facing upwards on the drying
grid, unless a different recommendation has been made in a recipe.
− Place pieces which have been cut into slices in a scale-like formation on the
drying grid.
− Distribute the vegetables only in one position on the drying grid.
− Position the drying grids on top of one another in such a way that the teeth on
the drying grids fit into the designated holders on the underside of the drying
grids (see Fig. D).
Starting the dehydration process
The dehydration process can be displayed either in Celsius (°C) or in
Fahrenheit (°F).
− Hold the SET button 11 pressed in for 3 seconds in order to reach
the desired mode. The selected mode will be shown in the
display 7.
1. Plug the mains plug 4into a properly installed mains socket.
The indicator on the display on the control panel 5will begin to flash
(see Fig. B).
2. Set the desired dehydration time using the plus button 9and/or the minus
button 10 .

The dehydration process
17
3. Press the SET button to adjust the temperature.
The °C and °F symbol will light up.
4. Using the plus button and/or the minus button, set the desired temperature.
5. Start the operation by pressing the ON/OFF button 8.
The ventilator will come on and warm air will be emitted through the hot air
outlet 6.
Once the selected dehydration time has elapsed, the dehydrator will switch off
automatically.
During dehydration
The indicator in the display will switch between the remaining dehydration time and
the dehydration temperature every 5 seconds.
During the dehydration process, you can amend both the dehydration temperature
and the dehydration time.
1. Press the SET button 11 , if the mode which you want to change is displayed. The
indicator on the display 7will begin to flash.
2. Change the dehydration time/the dehydration temperature respectively by
pressing the plus button 9and/or the minus button 10 .
3. Wait until the notification in the display is no longer flashing to save the setting.
Replacing and turning the drying grid
− In order to guarantee even drying, replace and turn the drying grid 2now and
again during the dehydration process.
Ensure that the drying grid without an opening in the middle is always on top.
− As the food on the lower grids is exposed to the hottest and driest air, position the
lower grid at the top and the upper grid at the bottom.
Pausing/stopping the dehydrating process
You can pause or stop the dehydration process at any time.
− In order to pause the dehydration process, press the ON/OFF button 8briefly.
The display 7will show the message PA.
Press the ON/OFF button again in order to continue the dehydration process.
− In order to stop the dehydration process, hold the ON/OFF button pressed in for
3 seconds.
The message 00 will show in the display.

Storing dehydrated foods
18
Ending the dehydraton process
Once the dehydration process has ended, a signal tone will sound for a few seconds
and the dehydrator will switch off automatically.
− Pull the mains plug 4out of the mains socket.
Storing dehydrated foods
− Allow the dehydrated food to cool off thoroughly prior to packaging it. Suitable
containers are closable jars or film-sealed portion packaging.
− You can store dehydrated goods at room temperature, preferably in dry, cool or
dark rooms.
− In order to have a better overview of your dehydrated foods, label your
containers clearly.
Preparing dehydrated food
CAUTION!
Risk to health!
The dehydration process does not cause food to lose its bacteria,
yeast fungus or mould fungus. This means that if it is left to soak for
too long at room temperature, the dehydrated food might spoil.
This can upset your stomach.
− Place the dehydrated food in the fridge if you wish to soak it
for longer than two hours.
You can enjoy most fruits dried. However, vegetables generally taste better when
prepared.
− Allow the vegetables to soak in the fridge for 2 to 8 hours in the fridge. Then use
the water you used to soak them to boil them.
− Then prepare the vegetables in the usual way.
− Vegetables such as carrots work best if you soak them in ice water or water in the
fridge.

Cleaning
19
Cleaning
WARNING!
Danger of burns!
The upper part of the base unit becomes hot during operation. You
may burn yourself.
− Allow the dehydrator to cool off completely before cleaning.
NOTICE!
Danger of short-circuiting!
Water or other liquids which have penetrated into the housing may
cause short circuiting.
− Never submerge the base unit in water or other liquids.
− Ensure that no water or other liquids penetrate into the
housing.
NOTICE!
Risk of damage!
Improper use of the dehydrator may lead to it becoming damaged.
− Do not use aggressive cleaning products, brushes with
metallic or nylon bristles or sharp or metallic cleaning objects
such as knives, hard scrapers and the like. They can damage
the surfaces.
− Do not in any case place the base unit in the dishwasher. It
would be destroyed as a result.
1. Prior to cleaning, unplug the mains plug 4from the socket.
2. Allow the dehydrator to cool off completely.
3. Remove the cover 1and the drying grid 2.
4. Wipe the base unit 3with a lightly moistened cloth.

Storage
20
5. Wash the drying trays and the cover thoroughly with a mild detergent or put these
parts in the dishwasher.
6. Then allow all parts to dry off completely.
Storage
All parts must be completely dry prior to storage.
− Always store the dehydrator in a cool place.
− Protect the dehydrator from direct sunlight.
− Store the dehydrator in a place which is inaccessible to children, safely sealed
and at a storage temperature of between +5°C and +20°C (room temperature).
− Position the drying grids 2on top of one another in such a way that the teeth
on the upper surface of the drying grid are not inserted into the intended holders
in order to save space (see Fig. D)
Technical data
Model: XJ-14709C0
Supply voltage: 230V~ 50 Hz
Output: 350W
Protection class: II
Weight: approx. 2.8 kg
Dimensions: ∅ 30 cm
Product code: 95459
Disposal
Disposing of the packaging
− Dispose of the packaging according to type. Put paperboard and cardboard
boxes in the paper recycling, and film in the general recycling.
Disposing of dehydrator
− Should the dehydrator no longer be capable of being used at some point in time,
dispose of it in accordance with the regulations in force in your city or state.
− Please ensure your recycling information applies to the local regulations.
Table of contents
Other Ambiano Kitchen Appliance manuals

Ambiano
Ambiano MD 37430 User manual

Ambiano
Ambiano WHB-13H User manual

Ambiano
Ambiano CAKE POP MAKER User manual

Ambiano
Ambiano 61221 User manual

Ambiano
Ambiano XJ-14709C1 User manual

Ambiano
Ambiano 57438 User manual

Ambiano
Ambiano YD509 User manual

Ambiano
Ambiano VC04 User manual

Ambiano
Ambiano L-PM250 User manual

Ambiano
Ambiano PM-1300S User manual

Ambiano
Ambiano TX-103O User manual

Ambiano
Ambiano MD 10128 User manual

Ambiano
Ambiano MF006 User manual

Ambiano
Ambiano FD550 User manual

Ambiano
Ambiano S-201 User manual

Ambiano
Ambiano TX-103M User manual

Ambiano
Ambiano PM-3400 User manual

Ambiano
Ambiano WTF-99E-2 User manual

Ambiano
Ambiano KYS-338B User manual

Ambiano
Ambiano MC-603D User manual