Gastrodomus ASQCH8 User manual

1
FORNO ESSICATORE PER FRUTTA
FRUIT DEHYDRATOR OVEN
DÖRRGERÄT FÜR OBST
HORNO DESHIDRATADOR DE FRUTAS
FOUR DÉSHYDRATEUR POUR FRUITS
Manuale d’uso
User manual
Betriebsanleitung
Manual del usuario
Manuel de l'utilisateur

2

3
ITALIANO / ENGLISH / DEUTSCH / ESPAÑOL/ FRANÇAIS
INDICE / INDEX / ÍNDICE
I.Parametri tecnici ............................................................................................................................................. 5
II.Funzionamento ............................................................................................................................................... 5
III.Avvertenze Generali ...................................................................................................................................... 6
IV.Avvertenze all'installazione ........................................................................................................................... 6
V.Mantenimento e pulizia ................................................................................................................................. 7
VI.Schema Circuito ............................................................................................................................................. 7
I.Technical Parameters ...................................................................................................................................... 9
II.Operation........................................................................................................................................................ 9
III.General Warnings ........................................................................................................................................ 10
IV.Installation Warnings .................................................................................................................................. 10
V.Maintenance and Cleaning........................................................................................................................... 11
V.Circuit Diagram ............................................................................................................................................. 11
I.Technische Daten .......................................................................................................................................... 13
II.Funktion ........................................................................................................................................................ 13
III.Warnhinweise .............................................................................................................................................. 14
IV.Installation ................................................................................................................................................... 14
V.Wartung und Reinigung ............................................................................................................................... 15
VI.Schaltplan .................................................................................................................................................... 15
I.Características técnicas ................................................................................................................................. 17
II.Funcionamiento ............................................................................................................................................ 17
III.Advertencias generales ............................................................................................................................... 18
IV.Instrucciones de instalación ........................................................................................................................ 18
V.Limpieza y mantenimiento ........................................................................................................................... 19
VI.Diagrama de cableado ................................................................................................................................. 19
I. Paramètres techniques………………………………………………………………………………………………………………21
II. Fonctionnement……….………………………………………………………………………………………………………………21
III. Avertissements généraux……….…………………………………………………………………………………………….…22
IV. Avertissements concernant l'installation………………………………………………………………………….…….22
V. Entretien et nettoyage
VI. Schéma du circuit

4
Manuale dell'utente
(Si prega di leggere attentamente queste istruzioni prima dell'uso)

5
I.Parametri tecnici
Modello
Nome del
prodotto
Dimensione (CM)
Volt (V)
Potenza (Kw)
ASQ
-
CH
8
Forno essicatore
per frutta 8 ripiani
40*46.5*42
220V
1.0
ASQ
-
CH
12
Forno essicatore
per frutta
12 ripiani
40*46.5*55
220V
1.0
ASQ
-
CH
16
Forno essicatore
per frutta
16 ripiani
40*46.5*68
220V
2.0
ASQ
-
CH
20
Forno essicatore
per frutta
20 ripiani
40*46.5*80
220V
2.0
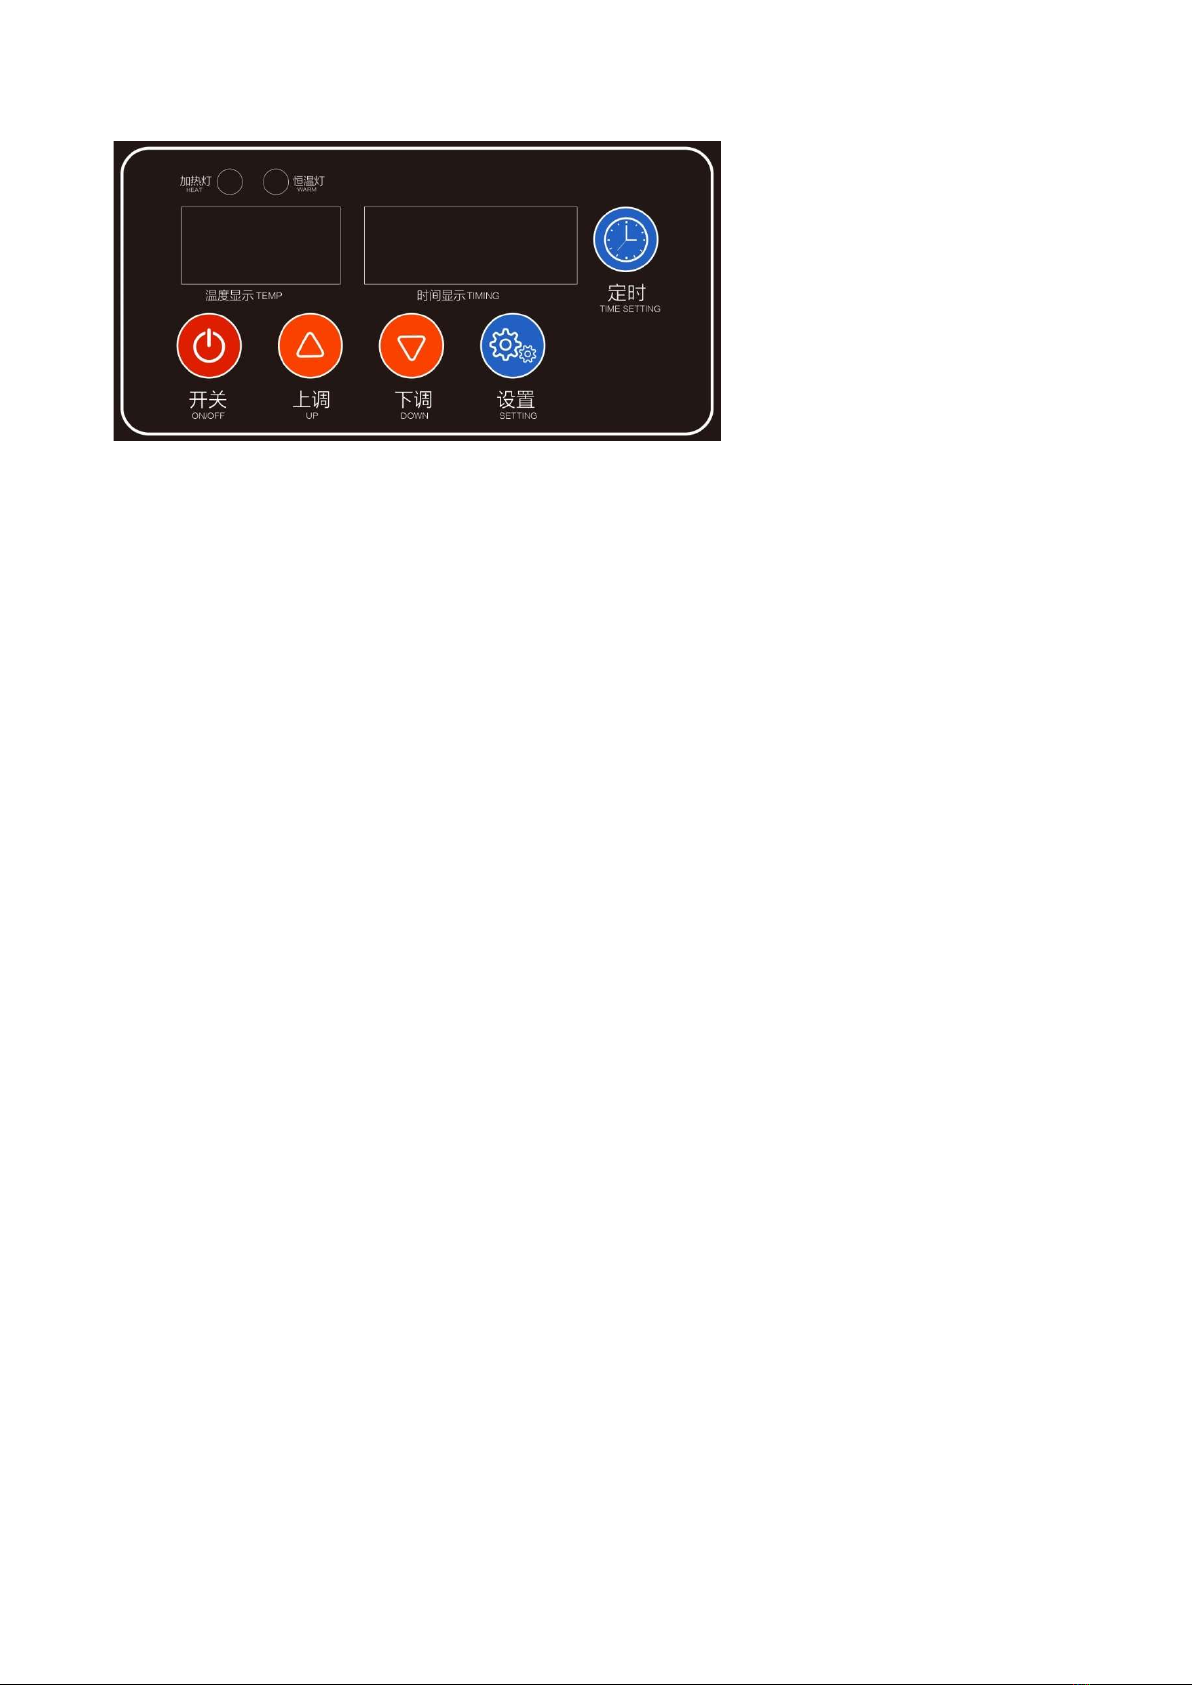
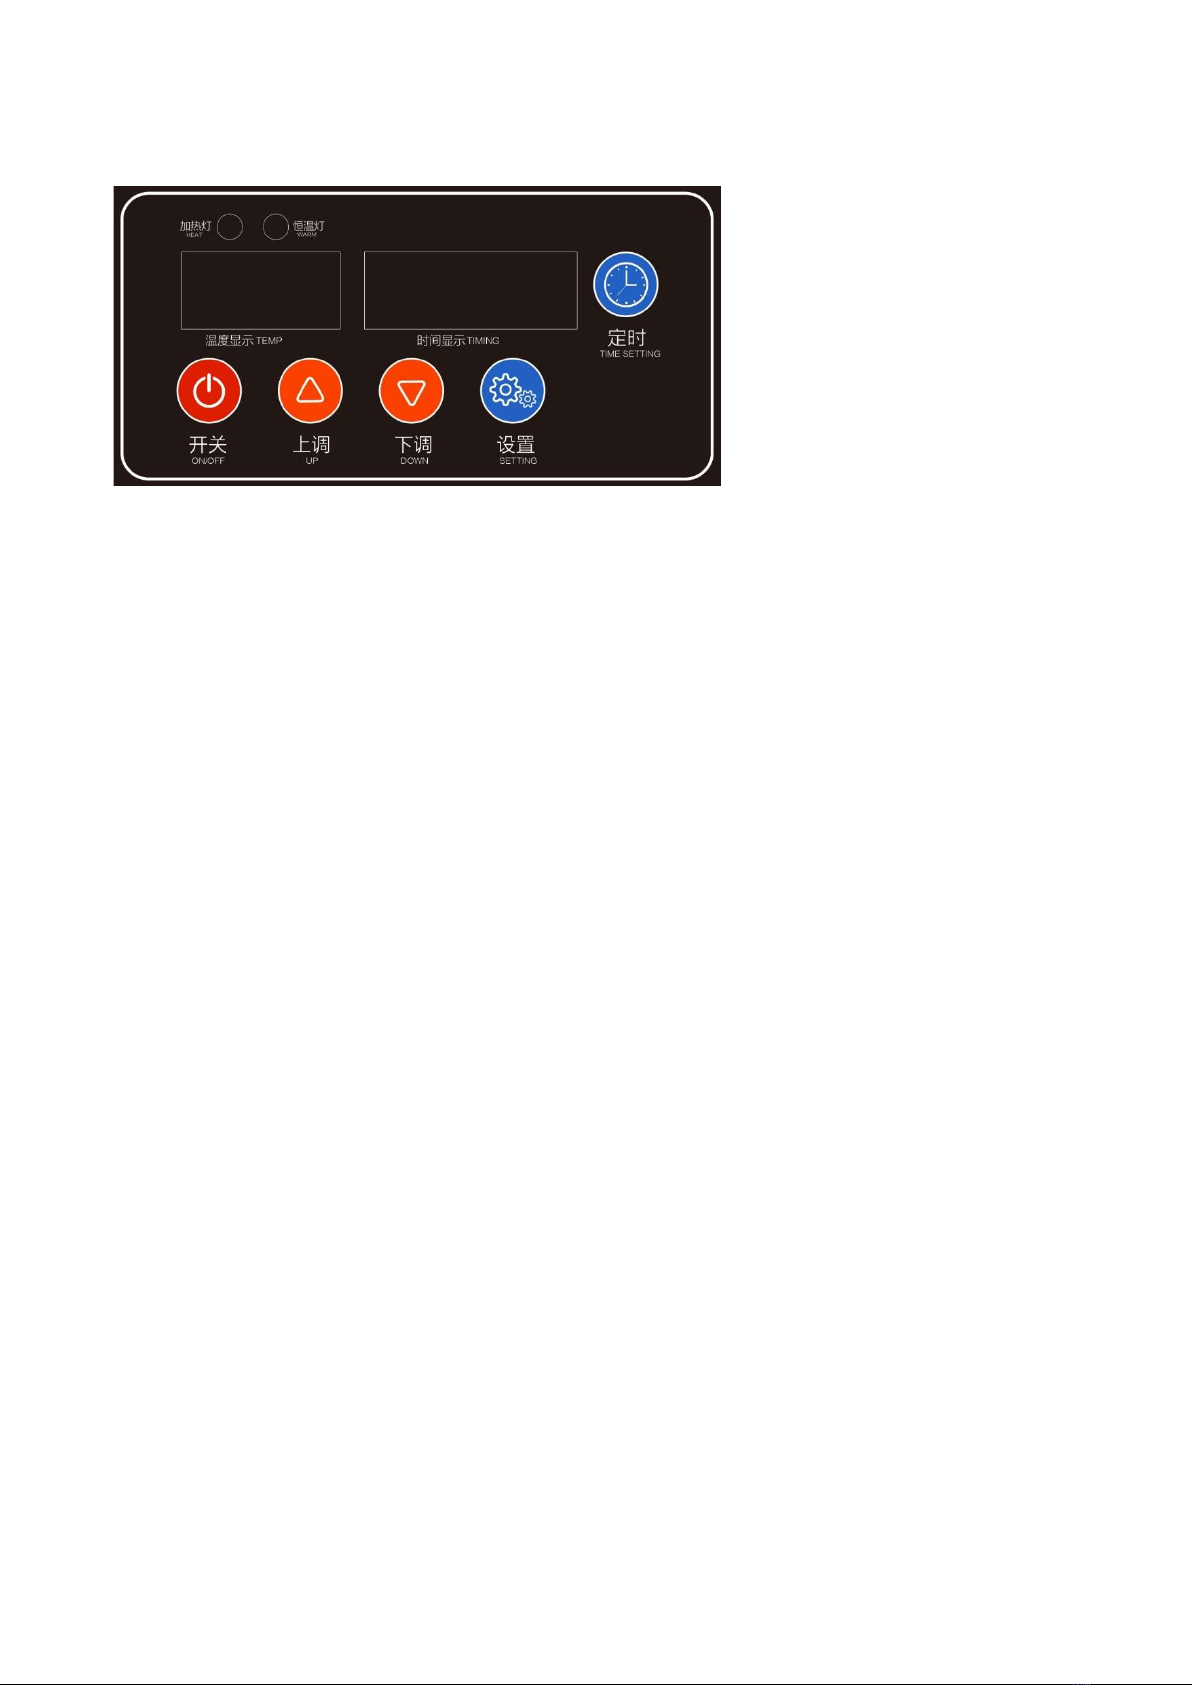
II.Funzionamento
1.Impostazione della temperatura: premere "Su" o "Giù" nello stato di accensione, quando il quadro della
temperatura inizierà a lampeggiare sarà possibile regolarla. La temperatura è regolabile : 40°C~90°C. Dopo
5 secondi di impostazione, manterrà la temperatura impostata.
2. Impostazione Timer : Premerendo il pulsante "Setting" nello stato di accensione il quadro “timing”
inizierà a lampeggiare . Premere il pulsante "Su" o "Giù" per regolare . E’ possibile regolare il timer a partire
da 1 minuto a 99 ore. Dopo 5 secondi di impostazione, manterrà il tempo impostato.
Dopo aver impostato il tempo nello stato di accensione, premere il pulsante "Timer", avverà il conto alla
rovescia ,visibile nel riquadro “timing”. Terminato il tempo precedentemente impostato , verrà emesso un
segnale acustico "beep" e premere "Timer".

6
III.Avvertenze Generali
1. Dopo l'uso, spegnere l'apparecchio e staccare dalla corrente.
2. Se si trova qualsiasi perdita o malfunzionamento, spegnere immediatamente l'apparecchio e chiamare
un tecnico , in tal modo da poter prendere visione e/o ripararlo.
3. La temperatura di questo apparecchio è compresa tra 40-90 °C. Si raccomanda che la temperatura di
utilizzo abituale sia di 60-85 °C.
4. Questa apparecchiatura dovrebbe essere installata in un ambiente con buone condizioni di ventilazione
di ≤45 °C.
5. L'attrezzatura deve essere posizionata in modo tale da soddisfare i requisiti di sicurezza.
IV.Avvertenze all'installazione
1. Verificare se L'apparecchiatura è predisposta per funzionare alla tensione e frequenza con cui sarà
alimentata.
2. Se il cavo di alimentazione è danneggiato, deve essere sostituito con un cavo , resistente all'olio, YCW o
YZW con un filo di terra bicolore giallo-verde.
3. L'attrezzatura dovrebbe essere collocata in un luogo stabile, la distanza tra la superficie dell'attrezzatura
e i materiali infiammabili dovrebbe essere ≥ 50cm
4. Il cablaggio fisso collegato al cavo di alimentazione di questo apparecchio deve essere dotato di una
distanza aperta (distanza di apertura dei contatti di 3 mm o più) e di un interruttore di protezione contro le
perdite scollegato su tutti i poli secondo le regole di cablaggio. Si raccomanda di installare un interruttore di
protezione da dispersione a terra. Non impilare detriti davanti all'interruttore per facilitare il
funzionamento.
5. C'è un bullone di messa a terra dietro il corpo del forno, e il filo di rame del nucleo non inferiore a
1.5mm2 è usato per connettersi in modo affidabile con il filo di terra che soddisfa le norme di sicurezza.
7
6. Dopo l'installazione, controllare se il cablaggio è allentato, se la tensione è normale e se la terra di
sicurezza è collegata in modo affidabile.
7. Non conservare materiali infiammabili o esplosivi vicino al luogo di installazione. La temperatura
ambiente è inferiore a 45 °C.
8. L'installazione di questa attrezzatura dovrebbe essere gestita da un tecnico autorizzato .
V.Mantenimento e pulizia
1. Prima di pulire, spegnere l'alimentazione elettrica per evitare incidenti.
2. Dopo il funzionamento quotidiano, strofinare con un panno umido (non utilizzare detergenti corrosivi).
3. Quando si pulisce il corpo del forno, è vietato lavare direttamente con acqua (o colonna d'acqua),
altrimenti si lascerà che l'acqua penetri nelle prestazioni dell'apparecchiatura elettrica e comprometta il
normale funzionamento del prodotto.
4. Quando non viene utilizzato per un lungo periodo, l'attrezzatura dovrebbe essere pulita e posta in un
luogo ben ventilato .
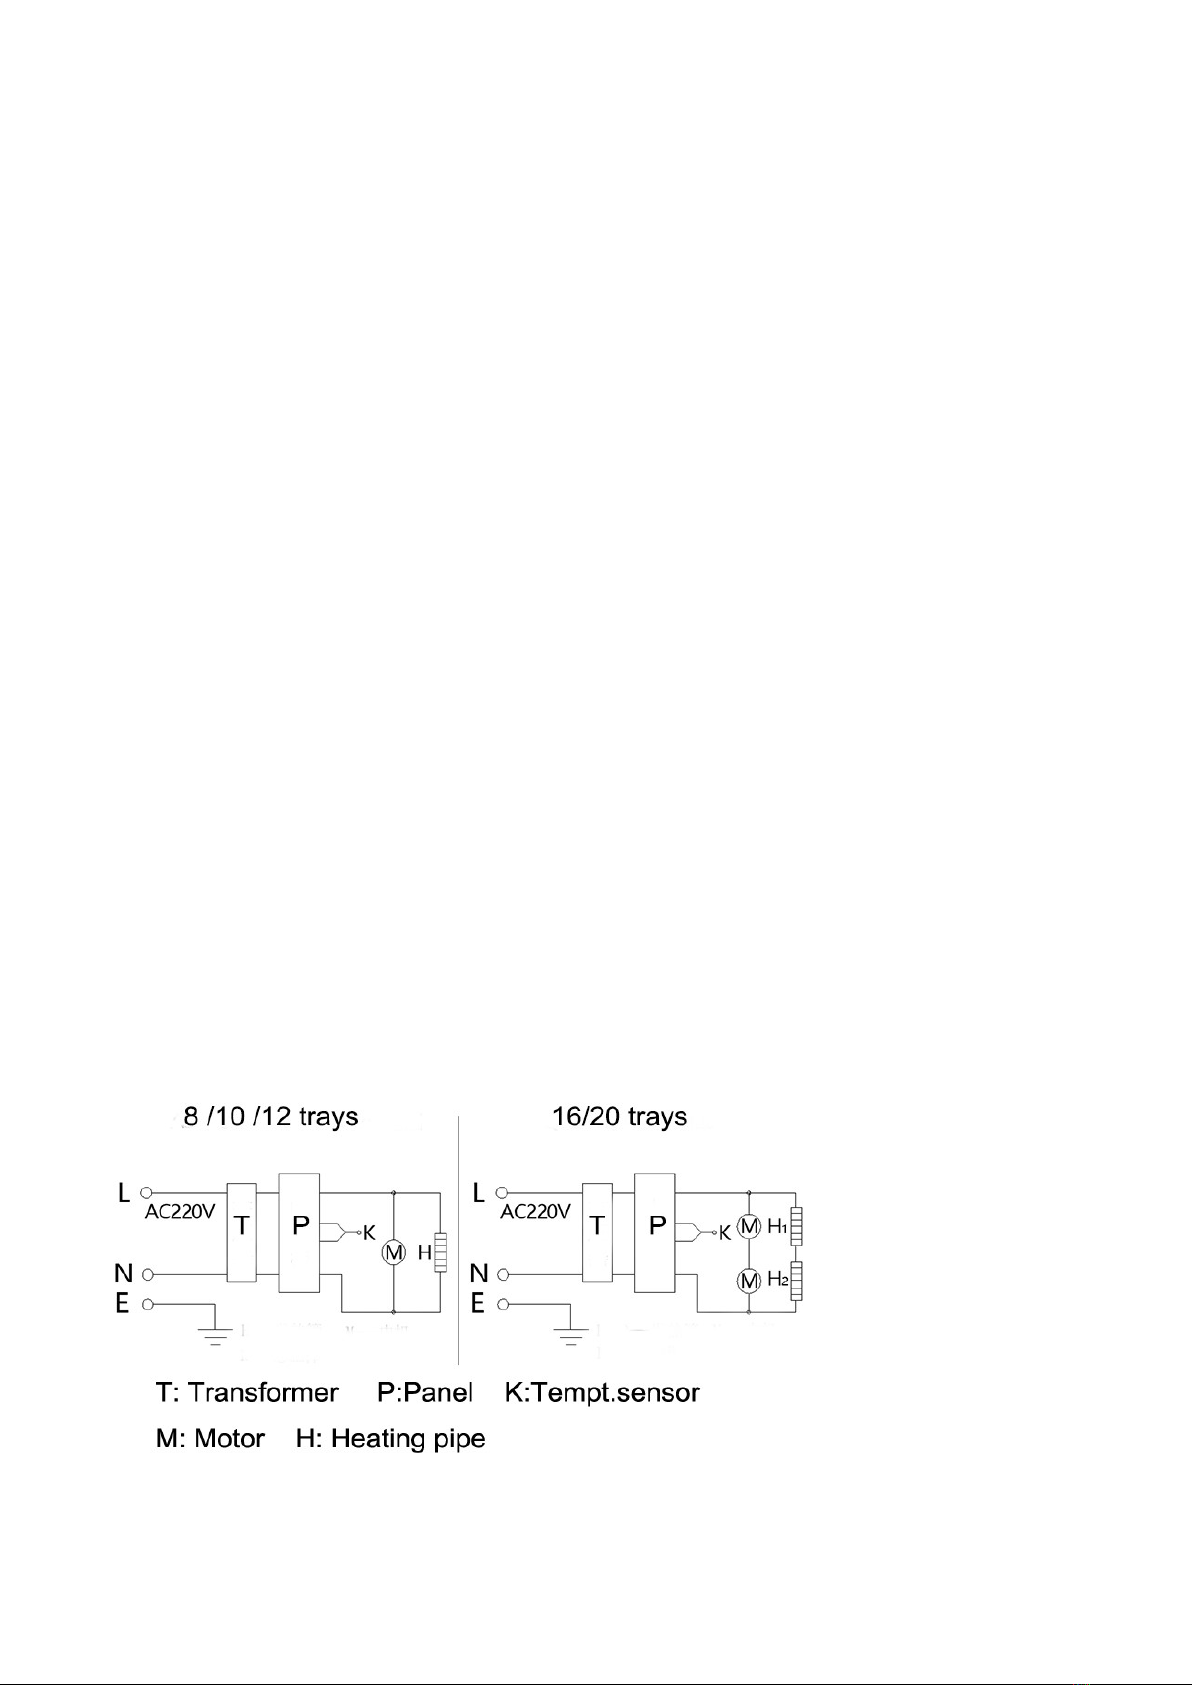
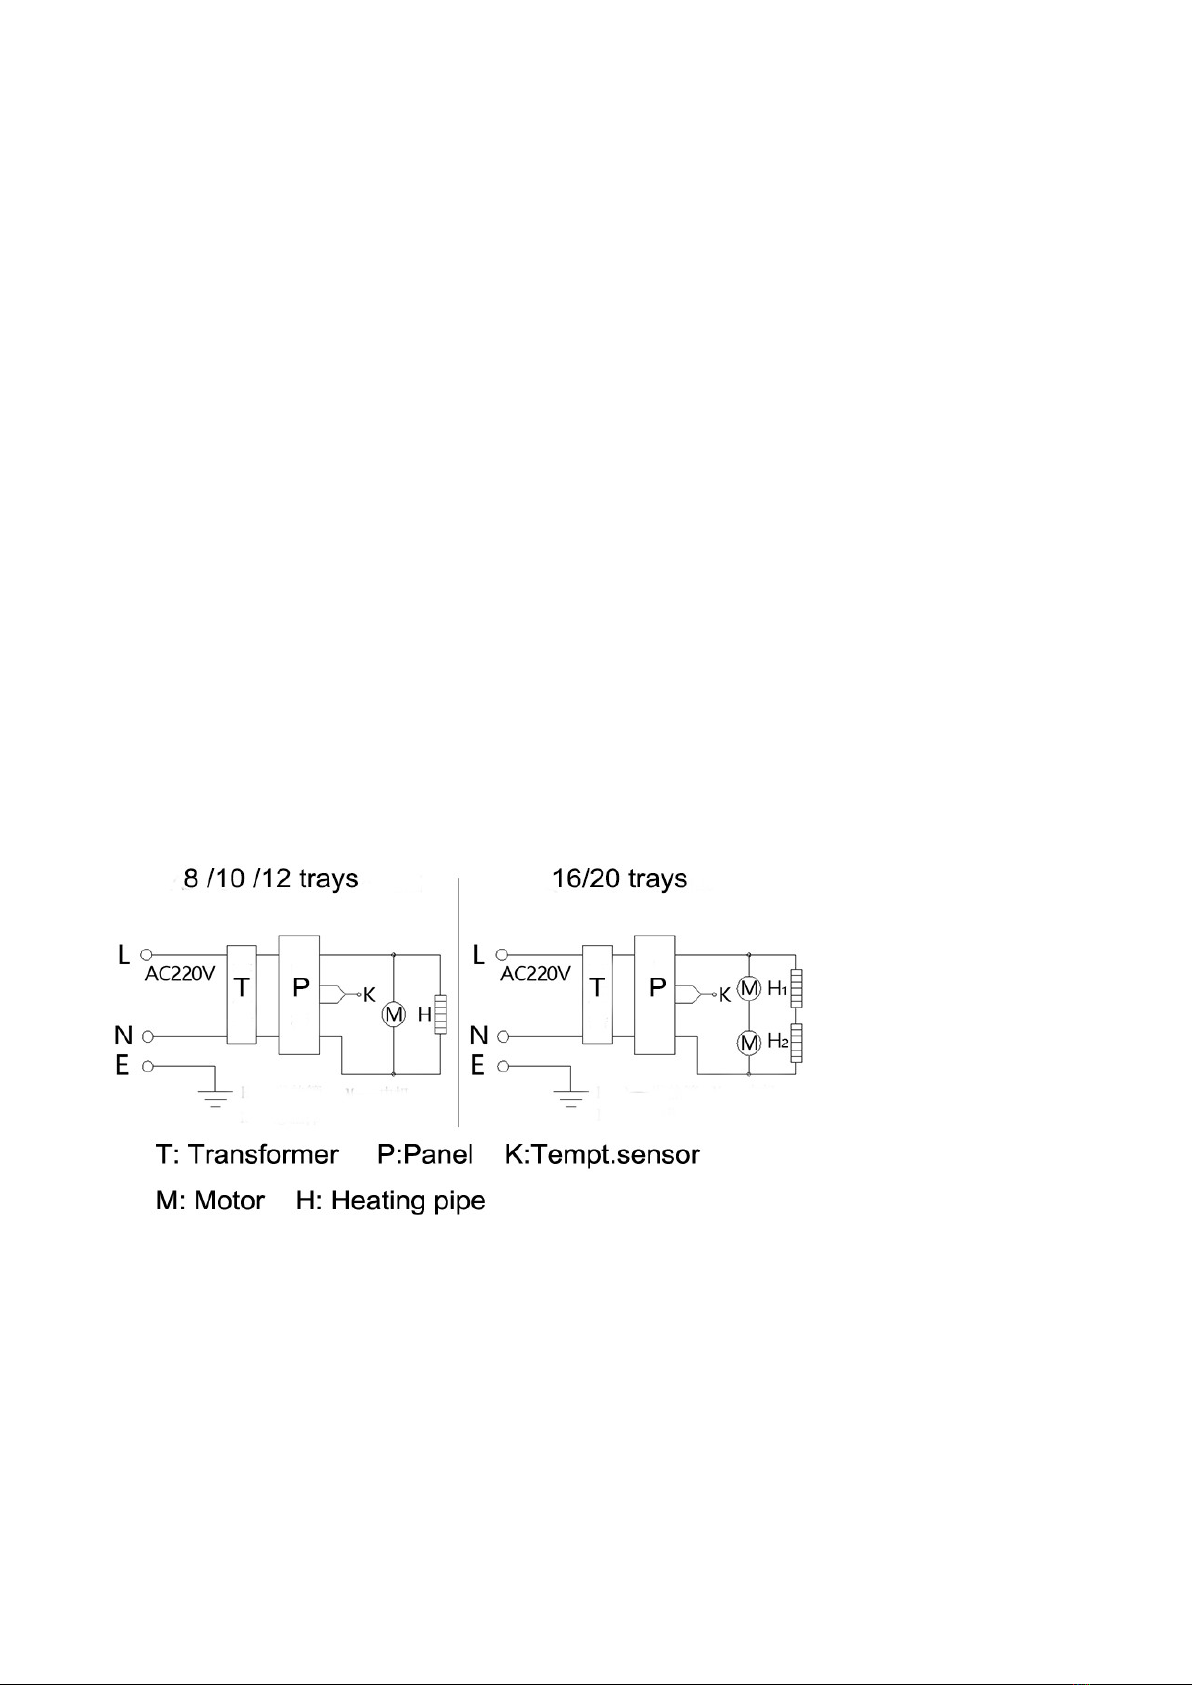
VI.Schema Circuito

8
User's Manual
(Please read these instructions carefully before use)

9
I.Technical Parameters
II.Operation
1.Temperature setting: press "Up" or "Down" to turn on the appliance, when the temperature picture
starts flashing you can adjust it. The temperature is adjustable : 40°C~90°C. After 5 seconds of setting, you
can keep it.
2. Timer Setting : Press "Setting" button in the power-on status, the "timing" panel will start flashing. Press
"Up" or "Down" button to adjust . You can adjust the timer from 1 minute to 99 hours. After 5 seconds of
setting, it will keep the set time.
After setting the time in the power-on state, press the "Timer" button, it will start counting down, visible in
the "timing" box. When the previously set time has elapsed, it will beep and press "Timer".
Model Product Name Dimension(
CM) Volt(V) Power(kW
)
ASQ-
CH8
8deck Fruit
dehydrator oven 40*46.5*42 220V 1.0
ASQ-
CH12
12deck Fruit
dehydrator oven 40*46.5*55 220V 1.0
ASQ-
CH16
16deck Fruit
dehydrator oven 40*46.5*68 220V 2.0
ASQ-
CH20
20deck Fruit
dehydrator oven 40*46.5*80 220V 2.0
10
III.General Warnings
1. After use, turn off the unit and disconnect from power.
2. If any leaks or malfunctions are found, turn the unit off immediately and call a service technician to
inspect and/or repair it.
3. The temperature of this appliance is between 40-90°C. It is recommended that the usual operating
temperature is 60-85 °C.
4. This equipment should be installed in an environment with good ventilation conditions of ≤45 °C.
5. The equipment should be well grounded to meet safety requirements.
IV.Installation Warnings
1. Check to see if the equipment is set up to operate at the voltage and frequency with which it will be
powered.
2. If the power cord is damaged, it should be replaced with an oil-resistant, YCW or YZW cord with a two-
color yellow-green ground wire.
3. The equipment should be placed in a stable place, the distance between the surface of the equipment
and flammable materials should be ≥ 50cm
4. The fixed wiring connected to the power cord of this equipment should have an open gap (contact
opening distance of 3mm or more) and a leakage protection switch disconnected on all poles according to
the wiring rules. It is recommended that a ground fault circuit interrupter be installed. Do not stack debris
in front of the switch for ease of operation.
5. There is a grounding bolt behind the furnace body, and copper core wire not less than 1.5mm2 is used to
reliably connect with the ground wire that meets safety standards.

11
6. After installation, check whether the wiring is loose, whether the voltage is normal, and whether the
safety ground is reliably connected.
7. Do not store flammable or explosive materials near the installation site. The ambient temperature is
below 45°C.
8. The installation of this equipment should be handled by an authorized technician .
V.Maintenance and Cleaning
1. Before cleaning, turn off the power supply to avoid accidents.
2. After daily operation, wipe with a damp cloth (do not use corrosive cleaners).
3. When cleaning the oven body, it is forbidden to wash directly with water (or water column), otherwise
water will be allowed to penetrate into the performance of the electrical equipment and affect the normal
operation of the product.
4. When not used for a long time, the equipment should be cleaned and placed in a well-ventilated place .
V.Circuit Diagram

12
Bedienungsanleitung
(Vor der Benützung bitte aufmerksam lesen)

13
I.Technische Daten
Modell
Produkt
Maße (CM)
Volt (V)
Leistung (Kw)
ASQ
-
CH
8
Dörrgerät für Obst
8 Einschübe
40*46.5*42
220V
1.0
ASQ
-
CH
12
Dörrgerät für Obst
12 Einschübe
40*46.5*55
220V
1.0
ASQ
-
CH
16
Dörrgerät für Obst
16 Einschübe
40*46.5*68
220V
2.0
ASQ
-
CH
20
Dörrgerät für Obst
20 Einschübe
40*46.5*80
220V
2.0
II.Funktion
1. Temperatureinstellung: Wenn das Gerät eingeschaltet ist drücken Sie auf die Taste “Hinauf” oder “auf
die Taste “Hinunter”. Wenn die Temperaturanzeige blinkt können Sie die gewünschte Temperatur
einstellen. Temperaturbereich: 40°C-90°C. Die eingestellte Temperatur wird innerhalb von 5 Sekunden
automatisch gespeichert.
2. Zeiteinstellung: Drücken Sie auf die Taste “Setting”. Beim Einschalten fängt die Zeitanzeige an zu blinken.
Mit den Tasten “Hinauf” und “Hinunter” können sie die gewünschte Zeit einstellen (1 Minute – 99
Stunden). Die eingestellte Zeit wird innerhalb von 5 Sekunden automatisch gespeichert.
Nachdem Sie die Zeit eingestellt haben, drücken Sie auf die Taste “Timer” und die Einstellzeit (auf dem
Display sichtbar) beginnt rückwärts zu laufen. Wenn die Zeit abgelaufen ist ertönt ein Piepton. Drücken Sie
auf die Taste “Timer”.

14
III.Warnhinweise
1. Schalten Sie das Gerät nach dem Gebrauch aus und trennen Sie es vom Stromnetz indem Sie den Stecker
aus der Steckdose ziehen
2. Wenn Sie eine undichte Stelle finden, ein Problem haben oder eine Funktionsstörung feststellen,
schalten Sie das Gerät sofort aus, ziehen Sie den Stecker aus der Steckdose und rufen Sie einen Techniker,
der es überprüft und/oder repariert.
3. Temperaturbereich: 40-90 °C. Empfohlene Betriebstemperatur: 60-85 °C
4. Dieses Gerät sollte nur in einem gut belüfteten Raum aufgestellt werden. (≤45 °C )
5. Das Gerät muss gut geerdet sein, um die Sicherheitsanforderungen zu erfüllen.
IV.Installation
1. Überprüfen Sie vor dem Einbau des Gerätes ob die Versorgungsspannung mit der Betriebsspannung des
Gerätes übereinstimmt! Bitte überprüfen Sie das Typenschild.
2. Wenn das Stromversorgungskabel beschädigt ist, muss es durch ein ölbeständiges YCW- oder YZW-Kabel
mit einer zweifarbigen gelb-grünen Erdungsleitung ersetzt werden.
3. Das Gerät sollte an einem stabilen Ort aufgestellt werden, der Abstand zwischen dem Gerät und
brennbaren Materialien sollte mindestens ≥ 50 cm betragen.
4. Die an das Stromkabel dieses Geräts angeschlossene feste Verkabelung muss einen Abstand (mindestens
3 mm) und einen gemäß den Anschlussvorschriften mehrpoligen abgeschalteten Fehlerstromschutzschalter
aufweisen. Es wird empfohlen, einen Fehlerstrom-Schutzschalter zu installieren. Stellen Sie keine
Gegenstände vor dem Schalter, um die Bedienung zu erleichtern.
5. Hinter dem Gerät befindet sich ein Erdungskabel, und es wird ein Kupferdraht mit einem Querschnitt von
mindestens 1,5 mm2 verwendet, um eine zuverlässige Verbindung mit dem Erdungskabel herzustellen, das
den Sicherheitsstandards entspricht.

15
6. Prüfen Sie nach der Installation, ob die Verkabelung locker ist, ob die Spannung normal ist und ob die
Sicherheitserdung zuverlässig angeschlossen ist.
7. Lagern Sie keine brennbaren oder explosiven Materialien in der Nähe des Aufstellungsortes. Die
Raumtemperatur sollte unter 45 °C liegen.
8. Die Installation dieses Geräts sollte von einem autorisierten Techniker durchgeführt werden.
V.Wartung und Reinigung
1. Um Unfälle zu vermeiden trennen Sie das Gerät vor der Reinigung von der Stromzufuhr.
2. Reinigen Sie das Gerät täglich nach dem Betrieb. Wischen Sie es mit einem feuchten Tuch ab und
verwenden Sie keine ätzenden Reinigungsmittel.
3. Tauchen Sie das Gerät nicht ins Wasser und bespritzen Sie es nicht um einen Stromschlag und Schäden
am Gerät zu vermeiden.
4. Wenn das Gerät längere Zeit nicht benutzt wird, sollte es gereinigt und an einem gut belüfteten Ort
aufgestellt werden.
VI.Schaltplan
Tray: Einschubbleche
T: Transformator
P: Schalttalfel
K: Temperatur – Sensor
M: Motor

16
H: Heizungsleitung
Manual del usuario
(Lea atentamente las instrucciones antes de utilizarlo)

17
I.Características técnicas
SERIE
Nombre del
producto
Dimensiones (CM)
Voltaje (V)
Potencia (W)
ASQ
-
CH
8
Horno
deshidratador de
frutas 8 estantes
40*46.5*42
220V
1.0
ASQ
-
CH
12
Horno
deshidratador de
frutas 12 estantes
40*46.5*55
220V
1.0
ASQ
-
CH
16
Horno
deshidratador de
frutas 16 estantes
40*46.5*68
220V
2.0
ASQ
-
CH
20
Horno
deshidratador de
frutas 20 estantes
40*46.5*80
220V
2.0
II.Funcionamiento
1. Ajuste de la temperatura: pulse "Up" o "Down" en el estado de encendido, cuando la pantalla de
temperatura empiece a parpadear, podrá ajustar la temperatura. La temperatura es ajustable:
40°C~90°C. Después de 5 segundos de ajuste, mantendrá la temperatura establecida.
2. Ajuste del temporizador : Al pulsar el botón "Setting" en el estado de encendido, el panel de
función del "timing" comenzará a parpadear. Pulse el botón "Up" o "Down" para ajustar . Es posible
ajustar el temporizador de 1 minuto a 99 horas. Después de 5 segundos de ajuste, mantendrá el
tiempo establecido.
Después de ajustar el tiempo en el estado de encendido, pulse el botón "Timer", la cuenta atrás
comenzará, visible en el cuadro "timing". Cuando haya transcurrido el tiempo previamente ajustado,
sonará una señal acústica de "beep", luego pulse "Timer".
18
III.Advertencias generales
1. Después del uso, apague el aparato y desconéctelo de la red eléctrica.
2. Si se detecta alguna fuga o mal funcionamiento, apague inmediatamente el aparato y llame a un técnico
para que lo inspeccione y/o repare.
3. La temperatura de este aparato oscila entre 40-90 °C. Se recomienda que la temperatura habitual de
funcionamiento sea de 60-85 °C.
4. Este equipo debe instalarse en un ambiente con buenas condiciones de ventilación de ≤45 °C.
5. El equipo debe ser colocado de forma que cumpla con los requisitos de seguridad.
IV.Instrucciones de instalación
1. Compruebe si el equipo está diseñado para funcionar con la tensión y la frecuencia con la que se
alimentará.
2. Si el cable de alimentación está dañado, debe sustituirse por un cable resistente al aceite, YCW o YZW,
con un cable de tierra bicolor amarillo-verde.
3. El equipo debe colocarse en un lugar estable, la distancia entre la superficie del equipo y los materiales
inflamables debe ser ≥ 50cm
4. El cableado fijo conectado al cable de alimentación de este equipo debe tener una distancia abierta
(distancia de apertura de los contactos de 3 mm o más) y un interruptor de protección contra fugas
desconectado en todos los polos de acuerdo con las normas de cableado. Se recomienda instalar un
interruptor de protección contra fugas a tierra. No apile residuos delante del interruptor para facilitar su
funcionamiento.
5. Hay un perno de conexión a tierra detrás del cuerpo del horno, y se utiliza un cable de núcleo de cobre
de no menos de 1,5 mm2 para conectar de forma fiable con el cable de tierra que cumple con las normas
de seguridad.
19
6. Después de la instalación, compruebe si el cableado está menos rígido, si la tensión es normal y si la
toma de tierra está bien conectada.
7. No almacene materiales inflamables o explosivos cerca del lugar de instalación. La temperatura
ambiente es inferior a 45 °C.
8. La instalación de este equipo debe ser realizada por un técnico autorizado.
V.Limpieza y mantenimiento
1.Antes de la limpieza, desconecte la fuente de alimentación para evitar accidentes.
2. Después del funcionamiento diario, limpie con un paño húmedo (no utilice detergentes corrosivos).
3. Cuando limpie el cuerpo del horno, no lo lave directamente con agua, ya que de lo contrario el agua
penetrará en las prestaciones del equipo eléctrico y afectará al funcionamiento normal del producto.
4. Cuando no se utilice durante un período prolongado, el equipo debe limpiarse y colocarse en un lugar
bien ventilado.
VI.Diagrama de cableado

20
Manuel de l'utilisateur
(Veuillez lire attentivement ces instructions avant de l'utiliser)
This manual suits for next models
4
Table of contents
Languages:
Other Gastrodomus Kitchen Appliance manuals

Gastrodomus
Gastrodomus TRF8 User manual

Gastrodomus
Gastrodomus HITOUCHPLUS5000 User manual

Gastrodomus
Gastrodomus DAG4 User manual

Gastrodomus
Gastrodomus HP100 Specification sheet

Gastrodomus
Gastrodomus WINE400LUX User manual

Gastrodomus
Gastrodomus VM320 User manual

Gastrodomus
Gastrodomus SLA350 User manual

Gastrodomus
Gastrodomus EPC-8L User manual

Gastrodomus
Gastrodomus WINE800SB User manual

Gastrodomus
Gastrodomus HITOUCH2700 User manual


