ARIETE 583 User manual

583 - 583/1 - 583/2
Blender
Liquidificador

Fig. 1
Fig. 2
Fig. 3
Fig. 4
Fig. 5 Fig. 6A Fig. 6B
B
D
E
G
A
F
C
H
I
L
M

Fig. 8
Fig. 7

EN
- 2 -
IMPORTANT SAFEGUARDS
READ THESE INSTRUCTIONS BEFORE USE.
The necessary precautions must be taken when using electrical appliances, and
these include the following:
1. Make sure that the voltage on the appliance rating plate corresponds to that of
the mains electricity.
2. Never leave the appliance unattended when connected to the power supply;
unplug it after every use.
3. Never place the appliance on or close to sources of heat.
4. Always place the appliance on a flat, level surface during use.
5. Never leave the appliance exposed to the elements (rain, sun, etc....).
6. Make sure that the power cord does not come into contact with hot surfaces.
7. This appliance must not be used by children. Keep the appliance and related cord
out of reach of children.
8. Appliances can be used by persons with reduced physical, sensory or mental capa-
bilities or lack of experience and knowledge if they have been given supervision or
instruction concerning use of the appliance in a safe way and if they understand the
hazards involved.
9. Children are not allowed to play with the appliance.
10. Never place the appliance body, plug or power cord in water or other liquids;
always wipe clean with a damp cloth.
11. Always disconnect the appliance from the supply if it is left unattended and before
assembling, disassembling or cleaning.
12. Switch off the appliance and disconnect from supply before changing accessories
or approaching parts that move in use.
13. Always make sure that your hands are thoroughly dry before using or adjusting
the switches on the appliance, or before touching the power plug or power con-
nections.
14. Never touch the moving parts.
15. Never place hands in the goblet when the appliance is plugged into the mains
power (Fig. 5).
16. The blades are very sharp; take care when cleaning.
17. Do not operate the appliance when it is empty.
18. Never use the appliance if the blade is damaged.
19. Place the foods for blending inside the blender goblet and fit the goblet onto the

EN
- 3 -
power base before plugging the appliance into the mains power.
20. The product was designed to work only when the blender goblet and lid are prop-
erly assembled. In case it does not occur, contact an authorized service centre.
21. Do not use the handle on the goblet to carry the blender.
22. Wait for the blade to stop completely before removing the cover.
23. To prevent accidents or damage to the appliance, always keep hands and cooking
utensils well away from blades and any moving parts.
24. To unplug the appliance, grip the plug and remove it directly from the power
socket. Never pull the power cord to unplug the appliance.
25. Should the power cord be damaged, have it be repaired by the manufacturer or
related service centre, otherwise by a similar skilled person, to prevent any risk.
All repairs, including power cord replacement, are to be carried out only by the
Service Centre or the technicians authorized by Ariete, to prevent any risk.
26. In case of using extension leads, these must be suitable for the appliance power
to avoid danger to the operator and for the safety of the environment in which the
appliance is being used. Extension leads, if not suitable, can cause operating
anomalies.
27. Do not threaten the safety of the appliance by using parts that are not original or
which have not been approved by the manufacturer.
28. This appliance is designed for HOME USE ONLY and may not be used for com-
mercial or industrial purposes.
29. This appliance conforms to the directives 2014/35/EU and EMC 2014/30/EU, and
to the regulations (EC) No. 1935/2004 of 27/10/2004 regarding material in contact
with foods
30. Any changes to this product that have not been expressly authorised by the
manufacturer may lead to the user’s guarantee being rendered null and void.
31. In the event that you decide to dispose of the appliance, we advise you to make
it inoperative by cutting off the power cord. We also recommend that any parts
that could be dangerous be rendered harmless, especially for children, who may
play with the appliance or its parts.
32. Packaging must never be left within the reach of children since it is potentially
dangerous.
33. We decline any responsability resulting from misuse or any other than those
covered in this booklet.
34. Only use this appliance for purpose it is designed for in order to prevent accidents
and damage.

EN
- 4 -
35. Keep this manual close by future consultation. Should you decide to give this
appliance to other people, please remeber to also include these instructions.
36. This appliance is intended to be used in household and similar applications such as:
- staff kitchen areas in shops, offices and other working environments;
- farm houses;
- by clients in hotels, motels and other residential type environments;
- bed and breakfast type environments.
37. Be careful when handing the sharp cutting blades, emptying the bowl and during
cleaning.
38. Be careful if hot liquid is poured into the food processor or blender as it can be
ejected out of the appliance due to a sudden steaming.
39. Details on how to clean the appliance, please refer to the section “CLEANING”
40. For disposing the appliance in an adequate manner, according to the
European Directive 2012/19/EC, please read the appropriate leaflet attached.
DO NOT THROW AWAY THESE INSTRUCTIONS
With its combination of professional and practical use, this blender is an irreplaceable kitchen aid:
- easy to use, thanks to the filler cap in the lid, which makes it possible to insert foods while the
blender is operating.
- ideal for instant recipe preparation.
- indispensable for obtaining excellent slush drinks and delicious smoothies.
DESCRIPTION OF THE APPLIANCE (Fig. 1)
A Measuring cap
B Lid
C Handle
D Graduated glass goblet
E Blades
F Motor unit
G Operation dial (Pulse - 0 - 1 - 2 - 3 - 4)
H Grinding mill container *
I Grinding mill blade *
L Multimill container *
M Multimill blade *
* OPTIONAL ATTACHMENT (NOT SUPPLIED IN PACK) - Refer to service and customer care
section to order

EN
- 5 -
BLENDER USE INSTRUCTIONS
- Make sure the appliance is unplugged and the operation dial (G) is on position “0”.
- Cut fruit and vegetable into small pieces and place them into the goblet (D) adding water or milk
in an amount, which does not exceed the MAX level indicated on the container.
WARNING:
If the mix is particularly liquid, do not exceed the 1.25 l level indicated on the goblet.
Position the lid (B) on the goblet by pressing it slightly until it fits in place completely (Fig. 2).
- Close the upper hole of the lid (B) by inserting the apposite cap (A) and rotating it clockwise (Fig.
3).
- Mount the goblet (D) on the motor unit (F) properly and rotate it clockwise making sure the safety
tab snaps into the apposite slot on the motor body (Fig. 4).
- Plug power cord into a socket.
- Start the appliance by turning the operation dial (G) clockwise up to the required speed to start
the blades.
By rotating the operation dial (G) counter-clockwise, the PULSE function is enabled.
If the appliance should fail to start, make sure that the goblet is correctly fitted. The appliance
is fitted with a device to prevent it from operating if the goblet is not fitted or if it has been fitted
incorrectly.
- To stop the appliance, turn the on dial (G) back to «0».
- During use, it is possible to add foods into the goblet, by lifting out the filler cap (A) after having
switched off the appliance.
- It may be necessary to switch the appliance off several times in order to remove food residues
from the goblet sides. In this case, switch the appliance off and unplug it.
- Take the lid (B) out and use the appropriate spatula to remove any remaining food inside the
goblet.
WARNING:
The blender has a max capacity of 1.25 L for liquids and it is advisable not to exceed this
limit. If it is used for solid food, the maximum capacity is 1.5 L.
Place the foods for blending in the container and fit it to the power base before plugging the
appliance into the mains power.
Never remove the lid (B) during use.
Always remove the blender lid cap (A) before blending warm liquids preventing the liquid
from splashing out of the goblet. Never pour hot liquids into the blender.
Do not operate the appliance for more than 1 minute. The best use is with short pulses for
few seconds.
When using the apposite spatula to remove any residues from the goblet sides, keep it well
away from the blade set to prevent any damage.
BLENDER DISASSEMBLY
- Unplug the appliance from the mains outlet and wait for the blades to come to a complete halt
before removing the goblet (D) from the base.
- Rotate and lift the goblet (D), remove the lid (B)..
- Pour the smoothy into a glass.

EN
- 6 -
USE OF MULTIMILL
Multimill blade unit (Fig. 6A)
- Insert the ingredients into the container (L).
note: Fill the container (L) with fresh ingredientes till MAX level (meat 75 g).
Don’t introduce any liquid.
- Close by rotating the multimill blade (M) on the container (L) clockwise (Fig. 7).
- Position the assembled grinder, tightly closed, onto the motor unit (F) and rotate it clockwise until
it locks (Fig. 8).
- Plug the appliance in and, through the operating dial (G), select the pulse functioning for 2-3 times
for a first grinding. Choose then “1” or “2” as operating speed for fresh ingerdients.
- For meat: Start with speed 3 for 2 second, and speed 4 for 3 second (max working time 5 sec).
- To remove the blade from container, rotate it counterclockwise and extract it
USE OF GRINDING MILL
Grinding mill blade unit (Fig. 6B)
- Insert the ingredients into the grinder container (H) till MAX level.
note: The max amount to insert into the container (H) is 50 g of coffee and spices for a max working
time of 30 seconds.
WARNING:
Use dried ingredients only.
- Close by rotating the coffee grinder blade (I) on the container (H) clockwise (Fig. 7).
- Position the assembled grinder, tightly closed, onto the motor unit (F) and rotate it clockwise until
it locks (Fig. 8).
- Plug the appliance in and, through the operating dial (G), select the pulse functioning for 2-3 times
for a first grinding. Choose then “1” or “2” as operating speed.
- To remove the blade from container, rotate it counterclockwise and extract it
CLEANING
Do not disassemble the appliance or try to intervene in any way inside it. Keep the appliance proper-
ly clean and tidy to ensure an optimal quality of prepared food and a longer life of the machine itself.
- The goblet (C), lid (B), measuring cup (A), grinding mill container (H) and multimill container (L)
can be washed in the top rack of the dishwasher.
- Use a slightly damp cloth to clean the motor unit.
Never clean with potentially abrasive products.
- Clean thoroughly the blade that can be removed from the goblet and from mill containers.
WARNING:
Never place the appliance body, plug or power cord in water or other liquids; always wipe
clean with a damp cloth.
Always switch off the product unplug the power cord from the electricity mains before fit-
ting or removing single attachments or before cleaning the appliance.
Particular care must be taken when cleaning the blade because it is extremely sharp.

PT
- 7 -
ADVERTÊNCIAS IMPORTANTES
LEIA ESTAS INSTRUÇÕES ANTES DE USAR O APARELHO.
Ao utilizar aparelhos elétricos, é necessário tomar as devidas precauções, entre
as quais:
1. Certificar-se que a voltagem elétrica do aparelho corresponda à voltagem desua
rede elétrica.
2. Não deixar o aparelho ligado à rede elétrica quando não estiver em uso;
desligue-o sempre após o uso.
3. Não colocar o aparelho sobre ou perto de fontes de calor.
4. Durante o uso, posicionar o aparelho sobre uma superfície horizontal e
estável.
5. Não deixar o aparelho exposto aos agentes atmosféricos (chuva, sol, etc.).
6. Prestar atenção para que o cabo elétrico não entre em contato com superfícies
quentes.
7. Este aparelho não deve ser utilizado por crianças. Mantenha o aparelho e o
seu cabo fora doalcance dascrianças.
8. Este parelho pode ser utilizado por pessoas com reduzidas capacidades
físicas, sensoriais ou mentais ou sem experiência e o necessário conhecimento
sobre o modo defuncionamento do aparelho desde que supervisionadas ou
previamente instruídas sobre a utilização segura do aparelho e os riscos
inerentes.
9. As crianças não devem utilizar o aparelho como brinquedo.
10. Nunca passe o corpo do aparelho, o plugue e o cabo elétrico por água ou
outros líquidos, use um pano úmido para a limpeza destas partes.
11. Desligue sempre o aparelho da tomada de alimentação elétrica quando
deixado sem vigilância e antes de montá-lo, desmontá-lo ou limpá-lo.
12. Desligue o aparelho e retire o plugue da tomada antes de montar/desmontar
os acessórios ou antes de se aproximar de partes móveis.
13. Assegure-se de estar sempre com as mãos bem secas antes de utilizar o
aparelho, regular os interruptores e antes de ligar o plugue na tomada e
efetuar as ligações dealimentação.
14. Não tocar as partes em movimento.
15. Nunca introduza as mãos no copo quando o aparelho estiver ligado à rede
elétrica (Fig. 5).
16. As lâminas são muito afiadas;tenha cuidado ao manuseá-las oulimpá-las.
17. Não fazer o aparelho funcionar vazio.

PT
- 8 -
18. Não utilizar o aparelho se as lâminas estiverem danificadas.
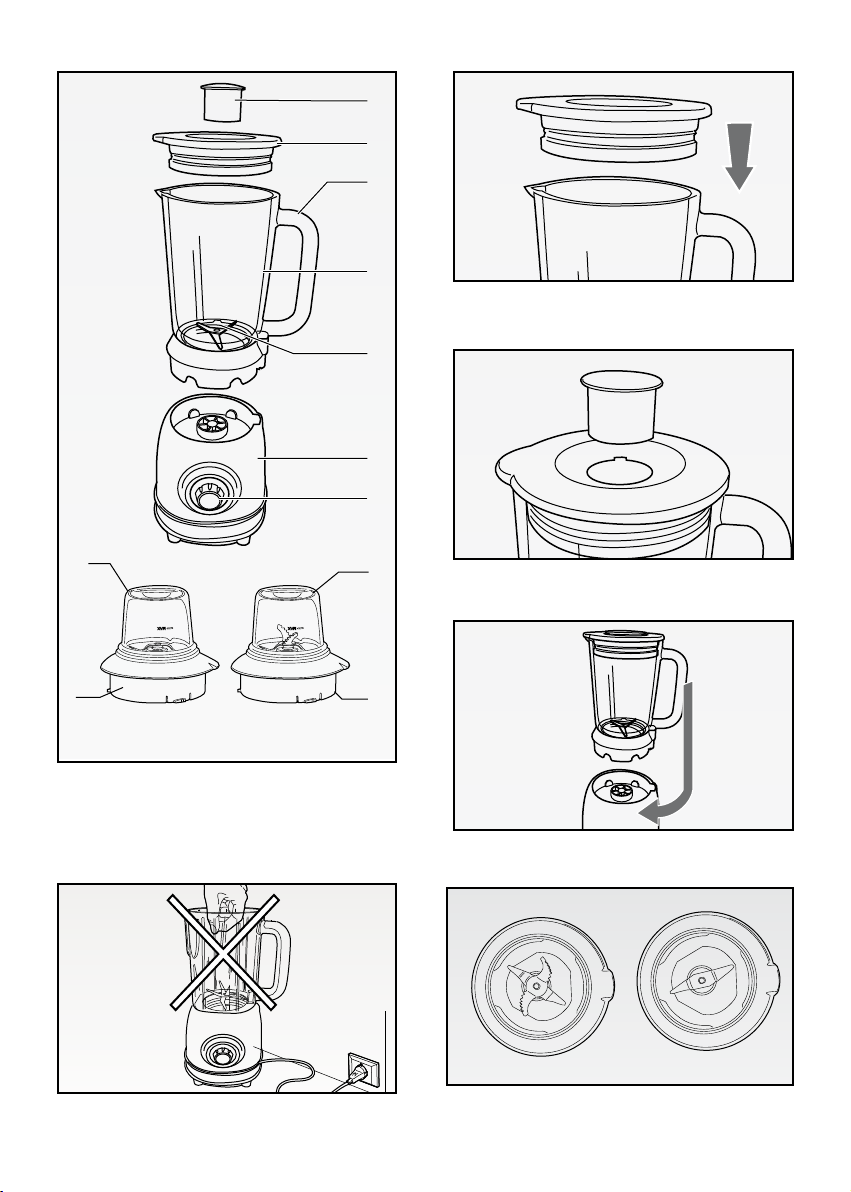
19. Prepare o copo do liquidificador com os ingredientes que vai bater e depois
encaixe-o no corpo do motor antes de ligar o plugue na tomada.
20. O aparelho foi concebido para funcionar somente se o copo do liquidificador
estiver bem posicionado. Se mesmo assim não funcionar, procure um centro de
assistência autorizado.
21. Não transporte ou levante o aparelho segurando pela alça do copo.
22. Antes de retirar a tampa,aguardar que aslâminasestejamcompletamente
paradas.
23. Para evitar acidentes e danos ao aparelho, mantenha sempre as mãos e os
utensílios decozinha afastados daslâminas e daspartes emmovimento.
24. Para desligar o plugue, segurá-lodiretamente e retirá-loda tomada na
parede. Nunca a desligar puxando-opelo cabo.
25. Se o cabo de alimentação estiver danificado, deve ser substituído pelo
Fabricante ou pelo seu serviço de assistência técnica ou, todavia, por uma
pessoa com qualificação similar, de modo a prevenir todo risco. Todas as
reparações, inclusive a substituição do cabo de alimentação, devem ser feitas
somente pelo Centro de Assistência da Ariete ou pelos técnicos autorizados
Ariete, de modo a prevenir todo risco.
26. O fabricante não recomenda o uso de extensão elétrica ou adaptador, pois eles
podem provocar danos ao aparelho e a tomada elétrica, bem como, provocar
acidentes ou incêndio.
27. Para não comprometer a segurança do aparelho, utilize exclusivamente peças
e acessórios originais ou aprovados pelo fabricante.
28. O aparelho foi concebido SOMENTE PARA USO DOMÉSTICO e não deve ser
utilizado para fins comerciais ouindustriais.
29. Este aparelho está em conformidade com a diretiva 2014/35/EU e EMC
2014/30/EU e com o regulamento (EC) N.º1935/2004 de 27/10/2004 sobre os
materiais em contato com os alimentos
30. Eventuais modificações deste produto não expressamente autorizadas pelo
fabricante podem comportar a perda da segurança e da garantia do seu uso
pelo usuário.
31. Caso se decida a descartar este aparelho, recomendamos que o deixe
inoperante, cortando o cabo de alimentação. Recomendamos também que
deixe seguras aspartes do aparelho que possam representar umperigo,
especialmente para as crianças, que podem utilizar o aparelho como um
brinquedo.

PT
- 9 -
32.Os elementos da embalagem não devem ser deixados ao alcance de crianças
pois são potenciais fontes de perigo.
33.O fabricante declina qualquer responsabilidade por má utilização do aparelho ou
por inobservância das instruções aqui descritas.
34.Para prevenir danos e acidentes, utilize este aparelho exclusivamente para a
finalidade para a qual foi concebido.
35.Mantenha estas instruções ao alcance da mão para futuras consultas. Em caso
de cessão deste aparelho a outras pessoas, inclua sempre estas instruções.
36.Este aparelho foi concebido para utilização doméstica e aplicações semelhan-
tes, como:
- área de refeições para o pessoal de lojas, escritórios e outros locais de trabalho;
- turismo rural;
- para ser utilizado por clientes de hotéis, motéis e outros tipos de alojamento;
- em pousadas.
37.Preste muita atenção ao manusear as lâminas de corte porque são muito afia-
das e ao efetuar as operações de esvaziamento e limpeza do copo;
38.Cuidado ao colocar líquidosquentesno liquidificador.
39.Para informações sobre a limpeza do aparelho, leia o capítulo “LIMPEZA”
CONSERVAR ESTAS INSTRUÇÕES
O liquidificador, aliando profissionalidade e praticidade de uso, é uma ajuda insubstituível na cozinha:
- fácil de usar graças à abertura na tampa que permite colocar os ingredientes durante o funcio-
namento.
- ideal para preparados instantâneos.
- indispensável para preparar rapidamente deliciosos shakes, bebidas e smoothies.

PT
- 10 -
DESCRIÇÃO DO APARELHO (Fig. 1)
ATampinha dosadora
B Tampa
C Cabo
D Copo de vidro graduado
E Lâminas
F Corpo do motor
G Botão de controle (Pulse - 0 - 1 - 2 - 3 - 4)
H Recipiente do moinho *
I Grupo de lâminas do moinho *
L Recipiente do moinho multiuso *
M Grupo de lâminas do moinho multiuso *
* ITEM OPCIONAL (NÃO FORNECIDO NA EMBALAGEM) - Consulte a seção de serviço e
atendimento ao cliente para verificar como adquirir.
INSTRUÇÕES DE USO DO LIQUIDIFICADOR
-Assegure-se de que o aparelho está desligado da tomada elétrica e que o botão de controle (G)
esteja na posição “0”.
Corte a fruta ou os legumes em pedaços pequenos e coloque-os no copo (D), adicionando água
ou leite em quantidade que não ultrapasse o nível máximo indicado no copo.
ATENÇÃO:
Se a mistura estiver particularmente líquida, não ultrapasse o nível de 1,25 litros indicado no
copo
.
- Coloque a tampa (B) no copo exercendo uma ligeira pressão até ao completo encaixe (Fig. 2).
- Feche o furo superior da tampa (B) com a tampinha (A) rodando-a no sentido horário (Fig. 3).
-Monte o copo (D) no corpo do motor (F) de modo correto e rode-o no sentido horário prestan-
do atenção para que a lingueta de segurança se encaixe na fenda no corpo do motor (Fig.
4).
-Insira o plugue do cabo de alimentação numa tomada de corrente elétrica.
-Acione o aparelho rodando o botão de controle (G) no sentido horário até à velocidade
desejada para acionar as lâminas. Rodando o botão de controle (G) no sentido anti-
horário, ativa-se a função PULSE.
No caso do aparelho não funcionar, verifique se o copo está posicionado corretamente.
Oaparelho tem um dispositivo que impede o funcionamento se o copo não estiver montado
ou se estiver montado de maneira errada.
- Para interromper o funcionamento, gire o botão de controle (G) para a posição «0».
- Durante a utilização, é possível adicionar alimentos no copo, tirando a tampinha (A), depois de ter
desligado o aparelho.
- Pode ser que seja necessário desligar o aparelho várias vezes para remover resíduos de alimento
das paredes do copo. Neste caso, desligue o aparelho e retire o plugue da tomada.
- Retire a tampa (B) e, com a ajuda de uma espátula, remova qualquer eventual resíduo de alimen-
to das paredes do copo.
ATENÇÃO:
A capacidade máxima do
copo
é de 1,25
litros
para líquidos e é aconselhável não passar
deste limite. No caso de alimentos sólidos, a capacidade máxima é de 1,5
litros
.

PT
-11 -
Prepare o
copo
com os
ingredientes
que vai bater e encaixe-o no corpo do motor antes de
ligar
o plugue
na tomada.
Nunca remova a tampa (B) durante o uso.
Antes de bater líquidos mornos, retire sempre a tampinha (A) e bata devagar para que o líqui-
do não
respingue
para fora do
copo
. Não
coloque
líquidos quentes no
copo
.
Não deixe o aparelho em funcionamento por mais de 1 minuto. A sua utilização ideal é com
breves
p
ulsos de poucos segundos.
Utilizando uma espátula para limpar eventuais resíduos das paredes do
copo
, mantenha-a
afastada das lâminas de modo a não danificá-las.
DESMONTAGEM DO LIQUIFICADOR
- Retire o plugue da tomada e espere que as lâminas estejam completamente paradas antes
de desencaixar o copo (D) da base.
- Rode e levante o copo (D), retire a tampa (B).
-Coloque o que foi batido num recipiente adequado.
UTILIZAÇÃO DO MOINHO MULTIUSO
Grupo de lâminas do moinho multiuso (Fig. 6A)
- Introduza os ingredientes no recipiente do moinho multiuso (L).
nota: Encha o recipiente (L) com ingredientes frescos até ao nível MÁX (carne 75 g).
Não coloque líquidos.
- Feche, rosqueando no sentido horário o grupo de lâminas (M) no recipiente (L) (Fig. 7).
- Posicione o moinho montado no corpo do motor (F) e gire-o no sentido horário até encaixá-lo
(Fig. 8).
- Ligue o plugue na tomada e, por meio do botão de controle (G), selecione o funcionamento
por pulsos 2-3 vezes para uma primeira moagem. Depois passe para “1” ou “2” como velocidade de
funcionamento para ingredientes frescos.
- Para moer carne: acione com a velocidade 3 por 2 segundos e com a velocidade 4 por 3 segun-
dos (tempo de funcionamento máximo de 5 segundos).
- Para remover o grupo de lâminas do recipiente, gire-o no sentido anti-horário e retire-o.
UTILIZAÇÃO DO MOINHO
Grupo de lâminas do moinho (Fig. 6B)
- Introduza os ingredientes no recipiente do moinho (H) até ao nível MÁX.
nota: A quantidade máxima a introduzir no recipiente (H) é 50 g de grãos e especiarias por um
tempo máximo de 30 segundos.
ATENÇÃO:
Utilize somente ingredientes secos.
- Rosqueie no sentido horário o grupo de lâminas (I) no recipiente do moinho (H) (Fig. 7).
- Posicione o moinho montado no corpo do motor (F) e gire-o no sentido horário até encaixá-lo
(Fig. 8).
- Ligue o plugue na tomada e, por meio do botão de controle (G), selecione o funcionamento
por pulsos 2-3 vezes para uma primeira moagem. Depois passe para “1” ou “2” como velocidade de
funcionamento.
- Para remover o grupo de lâminas do recipiente, gire-o no sentido anti-horário e retire-o.

PT
- 12 -
LIMPEZA
Não desmonte o aparelho ou tente efetuar qualquer alteração no mesmo. Mantenha o aparelho
sempre limpo e arrumado a fim de garantir a melhor qualidade dos batidos e uma maior duração
do aparelho.
- O copo (D), a tampa (B), a tampinha dosadora (A), o recipiente do moinho (H) e o recipiente do
moinho multiuso (L) podem ser lavados na máquina no cesto superior.
- Para a limpeza do corpo do motor, passe um pano úmido.
Nunca use produtos potencialmente abrasivos para a limpeza.
- Limpe com cuidado os grupos de lâminas que podem ser desencaixados do copo e dos
recipientes dos moinhos.
ATENÇÃO:
Nunca passe o corpo do aparelho,
o plugue
e o cabo elétrico por água ou outros líquidos
;
use um pano úmido para a limpeza destas partes.
Mesmo com o aparelho desligado, retire
o plugue
da tomada antes de montar ou desmontar
os componentes para efetuar a limpeza.
Tenha muito cuidado ao
manusear e
lavar a
s
lâmina
s
porque
elas são
muito afiada
s.


Cod. 6235101900 Rev. 0 del 22/02/2023
De’ Longhi Appliances Srl
Divisione Commerciale Ariete
Via San Quirico, 300
50013 Campi Bisenzio FI - Italy
E-Mail: [email protected]
Internet: www.ariete.net
IMPORTADO E DISTRIBUÍDO POR:
Karimex Comp. Elet. Ltda
Av. Vereador Abrahão João Francisco, 3.555
Ressacada – Itajaí/SC – CEP 88307-302
CNPJ 88.938.329/0007-34
SAC: (11) 4502-4596
www.karimex.com.br
637111
Other manuals for 583
1
This manual suits for next models
2
Table of contents
Languages:
Other ARIETE Blender manuals

ARIETE
ARIETE 0576 User manual

ARIETE
ARIETE Smoothy Tutti Frutti 425 User manual

ARIETE
ARIETE BLENDY PRO User manual

ARIETE
ARIETE 601 User manual

ARIETE
ARIETE Blendy 570 User manual

ARIETE
ARIETE 568 User manual

ARIETE
ARIETE Blendy metal User manual

ARIETE
ARIETE 898/1 User manual

ARIETE
ARIETE 898/1 User manual

ARIETE
ARIETE 583 User manual