10
IT
Notase la cialda non fosse inserita Eene nel ¿ltro
14
o se il porta¿ltro
10
non venisse Een aggan-
ciato, qpossiEile che dell‘acTua sgoccioli dal
porta¿ltro
10
Notanon rimuovere il porta¿ltro
10
durante
l‘erogazione di caffq In caso contrario sussiste
il pericolo di ustioni
Notase l‘acTua non gocciolasse dal porta¿ltro
10
puzessere segno di un‘intasatura del ¿ltro
13
,
14
In tal caso spegnere la macchina, aspettare alcuni
minuti e rimuovere molto lentamente il porta¿ltro
10
,
poiché l‘eventuale presenza di pressione residua
potreEEe provocare schizzi d‘acTua
Alla ¿ne dell‘erogazione del caffq, attendere circa
10 secondi prima di rimuovere il porta¿ltro
10
Per estrarre il porta¿ltro
10
, girarlo lentamente da
destra verso sinistra per evitare spruzzi di acTua
o caffq
Notarimuovendo il porta¿ltro
10
qpossiEile che
la cialda resti attaccata nella parte superiore
dell‘apparecchioPer rimuovere la cialda, inclinare
il porta¿ltro
10
come descritto in ¿g.e far cadere
la cialda nel porta¿ltro
10
Funzione Stand-By
Se il dispositivo qacceso ma nessuna funzione qattiva,
dopo circa 30 minuti si attiva la funzione di spegnimento
automaticoIn Tuesto caso l‘apparecchio si trova in
Stand-ByPer riaccendere l‘apparecchio, premere il
tasto ON OFF
3
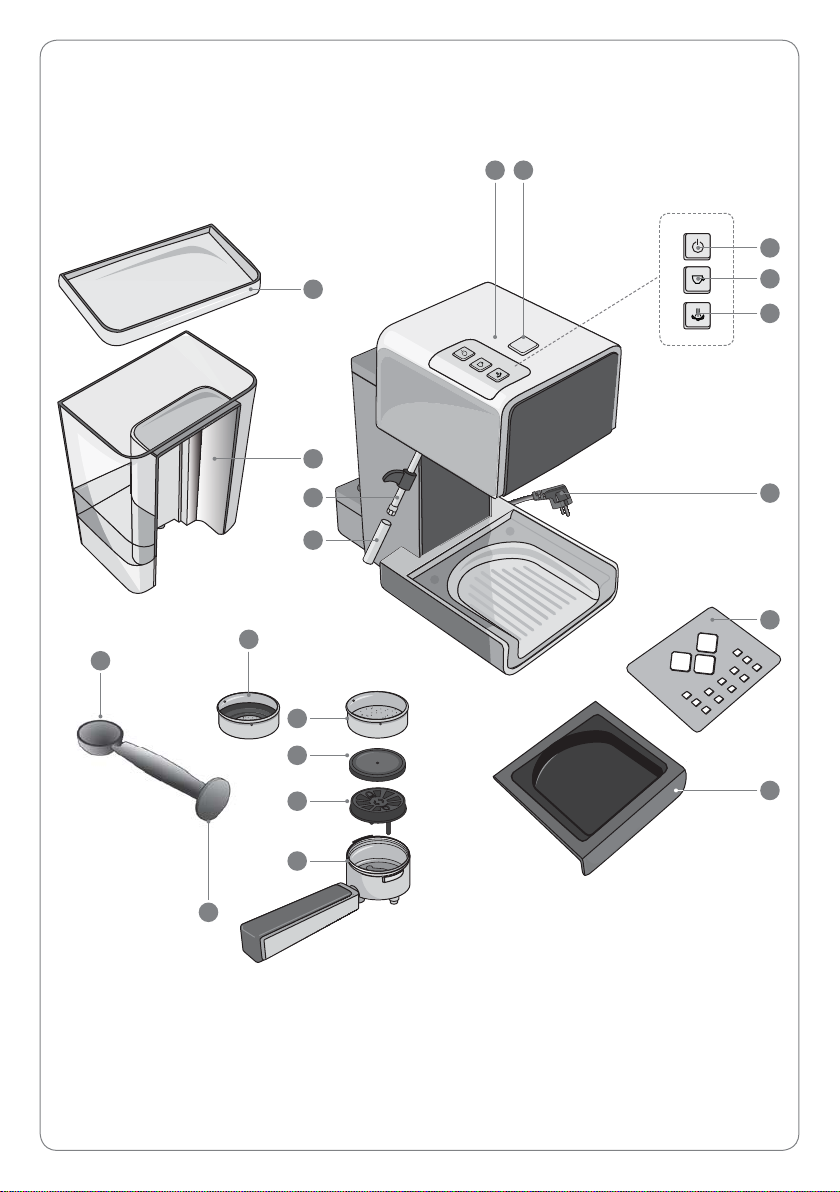
Riempimento del serEatoio
acTua durante l‘utilizzo
Notail serEatoio dell‘acTua
18
deve essere riempito
prima che l‘acTua sia completamente esaurita
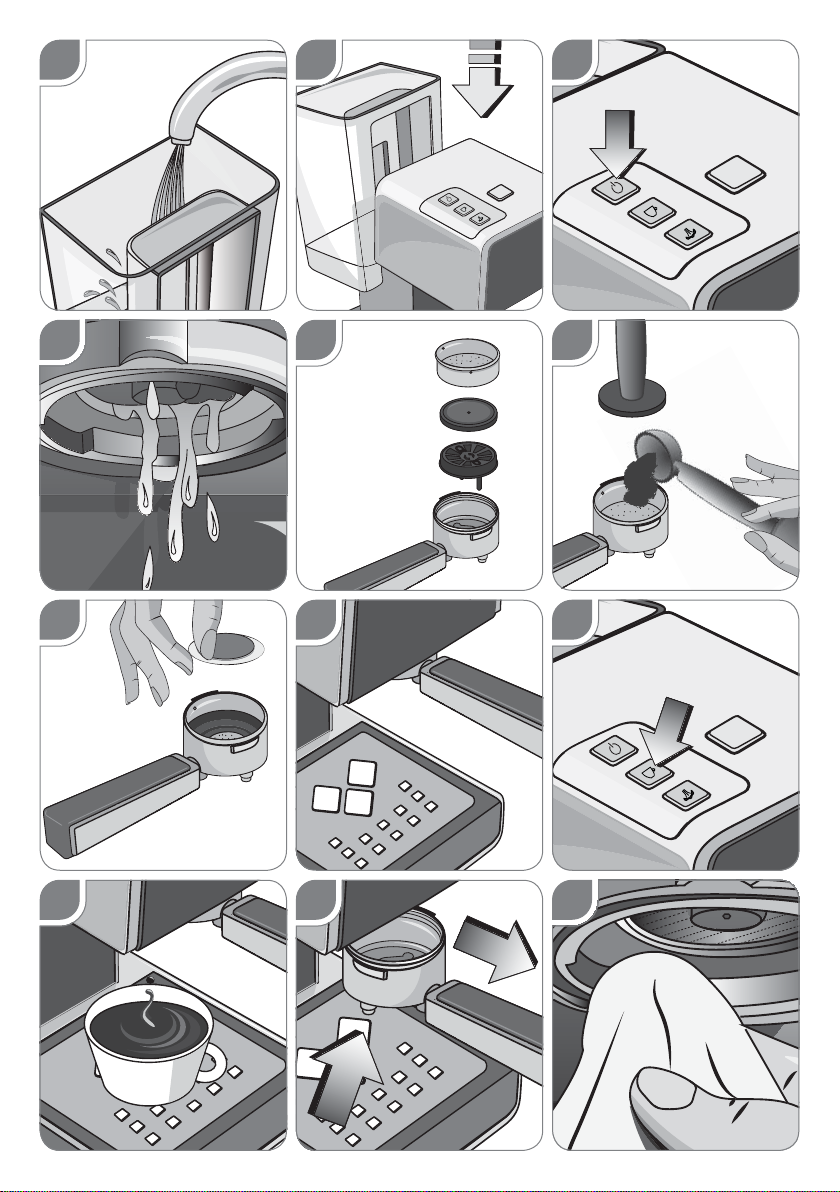
Premere il tasto ON OFF
3
per spegnere l‘ap-
parecchio (¿g&
Rimuovere la spina
6
dalla presa di corrente
Estrarre il serEatoio dell‘acTua
18
e riempirlo
con acTua fresca liscia (¿gA¿no alla tacca con
l‘indicazione ³0A;´
Inserire il serEatoio dell‘acTua
18
(¿gB
Notaassicurarsi che il serEatoio dell‘acTua
18
sia in corretta sedeIn caso contrario l‘erogazione
del caffqpotreEEe essere ostacolata
Inserire la spina
6
in una presa elettrica casalinga
tradizionale
Premere il tasto ON OFF
3
per accendere
l‘apparecchio
4ualora il serEatoio
18
fosse completamente vuoto,
potreEEe penetrare aria nel circuito impedendo
l‘erogazione di caffq Per riutilizzare l‘apparecchio,
sarà necessario spegnerlo e lasciare che si raf-
freddi
Posizionare un contenitore sotto l‘attacco del ¿ltro
e accendere l‘apparecchio tramite il tasto ON
OFF
3
Premere il tasto per l‘erogazione del caffq
4
e ri-
empire almeno una tazza d‘acTua per far ripartire
il circuito di Àusso dell‘acTua
Premere nuovamente il tasto per l‘erogazione di
caffq
4
per interrompere la fuoriuscita d‘acTua
L‘apparecchio riprende cosua funzionare corret-
tamente
&ome fare il &appuccino
Premere il tasto vapore
5
Attendere che il tasto vapore
5
smetta di lam-
peggiare e presenti luce ¿ssa
Notadurante l‘attesa qpossiEile che fuoriesca
del vapore dall‘attacco per il porta¿ltro
Immergere lo stilo erogatore di vapore
1
nel
contenitore con il latte da montare
Premere il tasto per l‘erogazione di vapore
2
¿no
a raggiungere il risultato desiderato
Per terminare l‘erogazione di vapore, lasciare il
tasto vapore
2
Per disattavare la funzione vapore, premere nuo-
vamente il tasto vapore
5
Riutilizzo per caffè
Per preparare un caffqsuEito dopo aver fatto il cap-
puccino, attendere che il tasto erogazione caffq
2
sia
illumini nuovamenteLa macchina qpronta per fare il
caffq Procedere Tuindi come spiegato nel paragrafo
³&ome fare il caffq´
&ONSIGLI 8TILI PER OTTENERE 8N B8ON
ESPRESSO ALL’ITALIANA