ARIETE 1389A User manual

COD. 4055108300 REV. 1 del 08/06/2016
MOD. 1389A
827070
De’ Longhi Appliances Srl
Divisione Commerciale Ariete
Via San Quirico, 300
50013 Campi Bisenzio (FI) - Italy
E-Mail: [email protected]
Internet: www.ariete.net
Macchina da caffè
Coffee maker
Machine a cafè
Kaffeemaschine
Máquina de café
Espressomachine
Καφετιερα
Кофеварка эспрессо

Fig. 8
RM N
Fig. 18
Fig. 4 Fig. 5
Fig. 12
Fig. 13 Fig. 14
I
D
EJH
C
Q
A
O P
Fig. 1
Fig. 2 Fig. 3 Fig. 15
Fig. 16
Fig. 9
Fig. 6
Fig. 11
F
B
Fig. 17
K
G
L
Fig. 10
Fig. 7

14
EN
WITH REGARD TO THIS MANUAL
Even if the appliances are made in conformity with the European regulatory specications in force
and therefore all potentially hazardous parts are protected. Carefully read these warnings and use
the appliance only for the use it is designed for in order to prevent accidents and damage. Keep this
manual close by for future consultation. If you should decide to give this appliance to other people,
remember to also include these instructions.
The information provided in this manual is marked with the following symbols indicating:
Danger for children Warning of burns
Danger due to electricity Warning – material damage
Danger of damage originating from other causes
INTENDED USE
You can use your Café Retró to prepare coffee and cappuccino; and thanks to the possibility of
dispensing hot water, you can also prepare tea and tisanes. This appliance is designed only and
solely for private use, and is therefore to be considered unsuitable for industrial or professional
purposes. No other use of the machine is contemplated by the manufacturer, which is exempt from
any liability for all types of damages caused by improper use of the machine. Improper use also
results in any form of warranty being forfeited.
RESIDUAL RISKS
The constructive characteristics of the appliance, covered by this publication, do not allow to pro-
tect the user from direct jet of steam or hot water.
Warning!
Burn Hazards - When hot water and steam are dispensed, do not direct
the jets towards others or towards yourself. Hold only the plastic part
of the tube.
IMPORTANT SAFEGUARDS
READ THESE INSTRUCTIONS CAREFULLY.
• This appliance is designed only for private use, and is therefore to be considered
unsuitable for commercial or industrial purposes.
• We decline any responsibility resulting from misuse or any use other than those
covered in this booklet.
• We suggest you keep the original box and packaging, as our free-of-charge
service does not cover any damage resulting from inadequate packaging of the
product when this is sent back to an Authorised Service Centre.
• The appliance complies with Regulation (EC) No 1935/2004 of 27/10/2004 on
the materials in contact with food.
Danger for children
• The appliance can be used by children aged 8 years and up only if they are

15
EN
monitored by a responsible person or if they have received instructions regard-
ing the appliance safe use and if they have understood the dangers which may
arise during the appliance use.
•
Cleaning and maintenance by the user must not be carried out by children unless
they are older than 8 years and are monitored during the operation. Children must be
supervised at all times to ensure they do not play with the appliance.
• Always keep the appliance and the power cord out of the reach of children under
the age of 8 years.
• Do not leave the packaging near children because it is potentially dangerous.
• In the event that this appliance is to be disposed of, it is suggested that the
power chord is cut off. It is also recommended that all potentially dangerous
components are rendered harmless to prevent children hurting themselves when
playing with the apparatus.
Danger due to electricity
• This appliance can be used by persons who have reduced physical sensory or
mental capabilities, or lack of experience and knowledge, only if they are moni-
tored by a responsible person or if they have received and understood instruc-
tions regarding the appliance safe use and if they have understood the dangers
which may arise during the appliance use.
• Before connecting the appliance to the mains check that the voltage shown on
the label located underneath the machine corresponds to the voltage of the local
mains.
• The use of extensions not approved by the manufacturer can result in damage
to property and personal injury.
•
Before lling the tank with water, unplug the appliance from the power outlet.
• If the power cord is damaged, it must be replaced by the manufacturer or by its
Technical Assistance Service or by a similarly qualied person in order to avoid
any hazard.
• Never put live parts into contact with water: It can cause a short circuit!
• Remove the plug from the power outlet before cleaning or maintenance.
• Do not immerse the appliance in water or other liquids.
• Always turn off the power and unplug the power cord plug from the power outlet
before lling the tank with water.
Danger of damage originating from other causes
• Do not lift the appliance by grasping its water tank or its tray, but only by grasping
its body.
• Choose an adequately illuminated and clean room with easily accessible power
outlet.
• Avoid pouring an excessive amount of water into the tank.
• Never leave the appliance unattended when it is connected to the power supply.

16
EN
• The appliance must be used and left at rest on a stable surface.
• The appliance must not be used if it has been dropped, if there are visible signs
of damage or leaks of water. Do not use the appliance if the power cord or the
plug are damaged, or if the appliance is faulty. To prevent any accident, all re-
pairs, including the replacement of the power cord, must be carried out by an
Authorised Service Centre or, in any case, by qualied personnel.
Warning of burns
• Never direct steam or hot water towards parts of the body; handle the steam/hot
water spout with care: Burns hazard!
• The external metallic parts of the appliance and the lter holder must not be touched
with the equipment in operation, as it could cause burns.
• If water does not come out of the lter holder, it may be because the lter is
clogged. Stop the brewing and wait ten seconds. Remove and disconnect the
lter holder because any remaining pressure could cause splashes or squirts.
Then clean as explained in the relevant paragraph.
Warning – material damage
• Place the machine on a steady surface where it can not be overturned.
• Never put any object other than the pods in the pod lter holder. This could cause
serious damage.
• Use only pods that show the E.S.E. standard brand.
• Do not use the machine without water because in this case the pump will burn.
• Never ll the water tank with hot or boiling water.
• Do not place the machine on very hot surfaces or near open ames to prevent
the body from being damaged.
• The cable must not touch the hot parts of the machine.
• Do not use sparkling (carbonated) water.
• Never put substances other than coffee powder in the lter. This could cause
serious damage.
• Do not leave the machine at temperatures below 0 °C / 32 °F, as the remaining
water in the boiler could freeze and cause damage.
• Do not use the appliance outdoors.
• Do not expose the appliance to atmospheric agents (rain, sun …).
• After disconnecting the power plug and after the hot parts have cooled, the ap-
pliance must be cleaned only with a non-abrasive cloth slightly moistened by
adding a few drops of mild, non-aggressive detergent (never use solvents that
damage plastic).
• For proper disposal of the product in accordance with the European Direc-
tive 2012/19/EC please read the dedicated leaet attached to the product.
•
SAVE THESE INSTRUCTIONS FOR FUTURE REFERENCE

17
EN
DESCRIPTION OF THE APPLIANCE
A - Filter holder
B - Drain pan
C - Perforated silicone disc (Thermocream ®)
D - 1 cup lter/pod
E - 2 cup lter
F - Power cord + Plug
G - Removable water tank
H - Maxi Cappuccino attachment and wand for water and steam supply
I - Removable cups grill
J - On/Off button
K - Drip basin
L - Coffee measure/presser
M - Steam dispensing knob
N - Boiler temperature light
O - Steam function switch
P - Boiler temperature thermometer (C° and F°)
Q - Coffee dispensing switch
R - On light
Identicationdata
In the label located under the support base of the machine there is the following identication data
of the machine:
• manufacturer and CE marking • electrical supply voltage (V) and frequency (Hz)
• model (Model.) • electrical power consumption (W)
• serial number (SN) • assistance toll-free phone number
When ordering at Authorized Service Centers, indicate the model and serial number.
PRELIMINARY PHASES FOR USE
Starting the appliance
Check that the domestic mains voltage is the same as the voltage indicated on the label of the
device. Then place the machine on a at surface. Wash the tank when used for the rst time and
ll it with cool tap water (MAX 1 litre), and then carefully push it into its seat (Fig. 3). The suction
tube must be inside the tank.
First start-up
After lling the tank with cool tap water, plug it into the electrical outlet, which must be equipped
with grounding unit. Switch on the machine by pressing the button (J) Fig. 1. The light (R) will turn
on to indicate that the machine is on.
If you are starting the machine for the rst time or after a period of time during which it has
not been used, it is recommended that at least one cup of water be allowed to pass through
the boiler’s hydraulic circuit.
Place a container with a capacity of at least half a litre under the coffee spout and Maxi Cappuc-
cino device (Fig. 5). Put switch (Q) on the coffee position ( ). Wait that water comes out from the

18
EN
coupling seat of the lter holder. Open the steam knob (M) and make water come out of the Maxi
Cappuccino device.
Stop dispensing setting the switch (Q) in the upper position. Close the steam knob. Wait for the light
(N) to turn on. At this point the coffee maker is ready to brew coffee.
HOW TO MAKE COFFEE
With powder coffee
Insert the dripper (B), the perforated silicone disc (C) and the 2 cup (E) or 1 cup (D) lter, in the
lter holder (A) (Fig. 6). The perforated silicone disc can be inserted only in one direction on the
dripper. Measure out the coffee in the lter and lightly press with the specially provided presser:
for two coffees completely ll two measuring units, while for one coffee ll only one. Insert the lter
holder into its seat. Tighten it securely by turning it from left to right, making sure it is correctly tted
to the ange (Fig. 8).
If too much ground coffee is put inside the lter, turning the lter holder may prove difcult
and/or you may get leaks from the lter holder when the coffee is being dispensed.
The lter ring should be preheated for a few minutes to ensure a nice, hot cup of coffee. This will
not be necessary for the following coffees.
Wait for the light (N) to turn on. Position the switch (Q) to coffee brewing ( ): coffee will ow from
the spouts of the lter holder. Stop dispensing setting the switch (Q) in the upper position. The
minimum serving of coffee is 50 ml.
Warning!
As in professional coffee machines, do not remove the lter holder
when the dispensing switch is ON (in coffee position ).
Warning!
After dispensing coffee wait about ten seconds before removing the
lter holder. To remove it, turn it slowly from right to left so as to prevent
splashes or spurts of water or coffee.
When warming up, your appliance may release small puffs of steam from the lter holder;
this is perfectly normal.
The indicator light (N) will switch off and on periodically, showing the intervention of the boiler ther-
mostat, which serves to maintain the best water temperature (around 100 °C / 210 °F for making
coffee, and about 150 °C / 300 °F to dispense steam).
When using the coffee maker for the rst time and thereafter, it is best to begin brewing coffee only
when the light (N) is on.
How to make coffee with pods
To make coffee with pods it is necessary to install the 1 cup/pod lter (D), supplied with the ma-
chine, as follows:
1 Place the pod in the lter ring (Fig. 17).
2 Push the pod with your ngers inward. The pod must be well centred and placed inside the lter.
3 Now it is possible to put the lter holder in its seat. Tighten the lter holder making sure it is
securely tted to the ange (Fig. 8).

19
EN
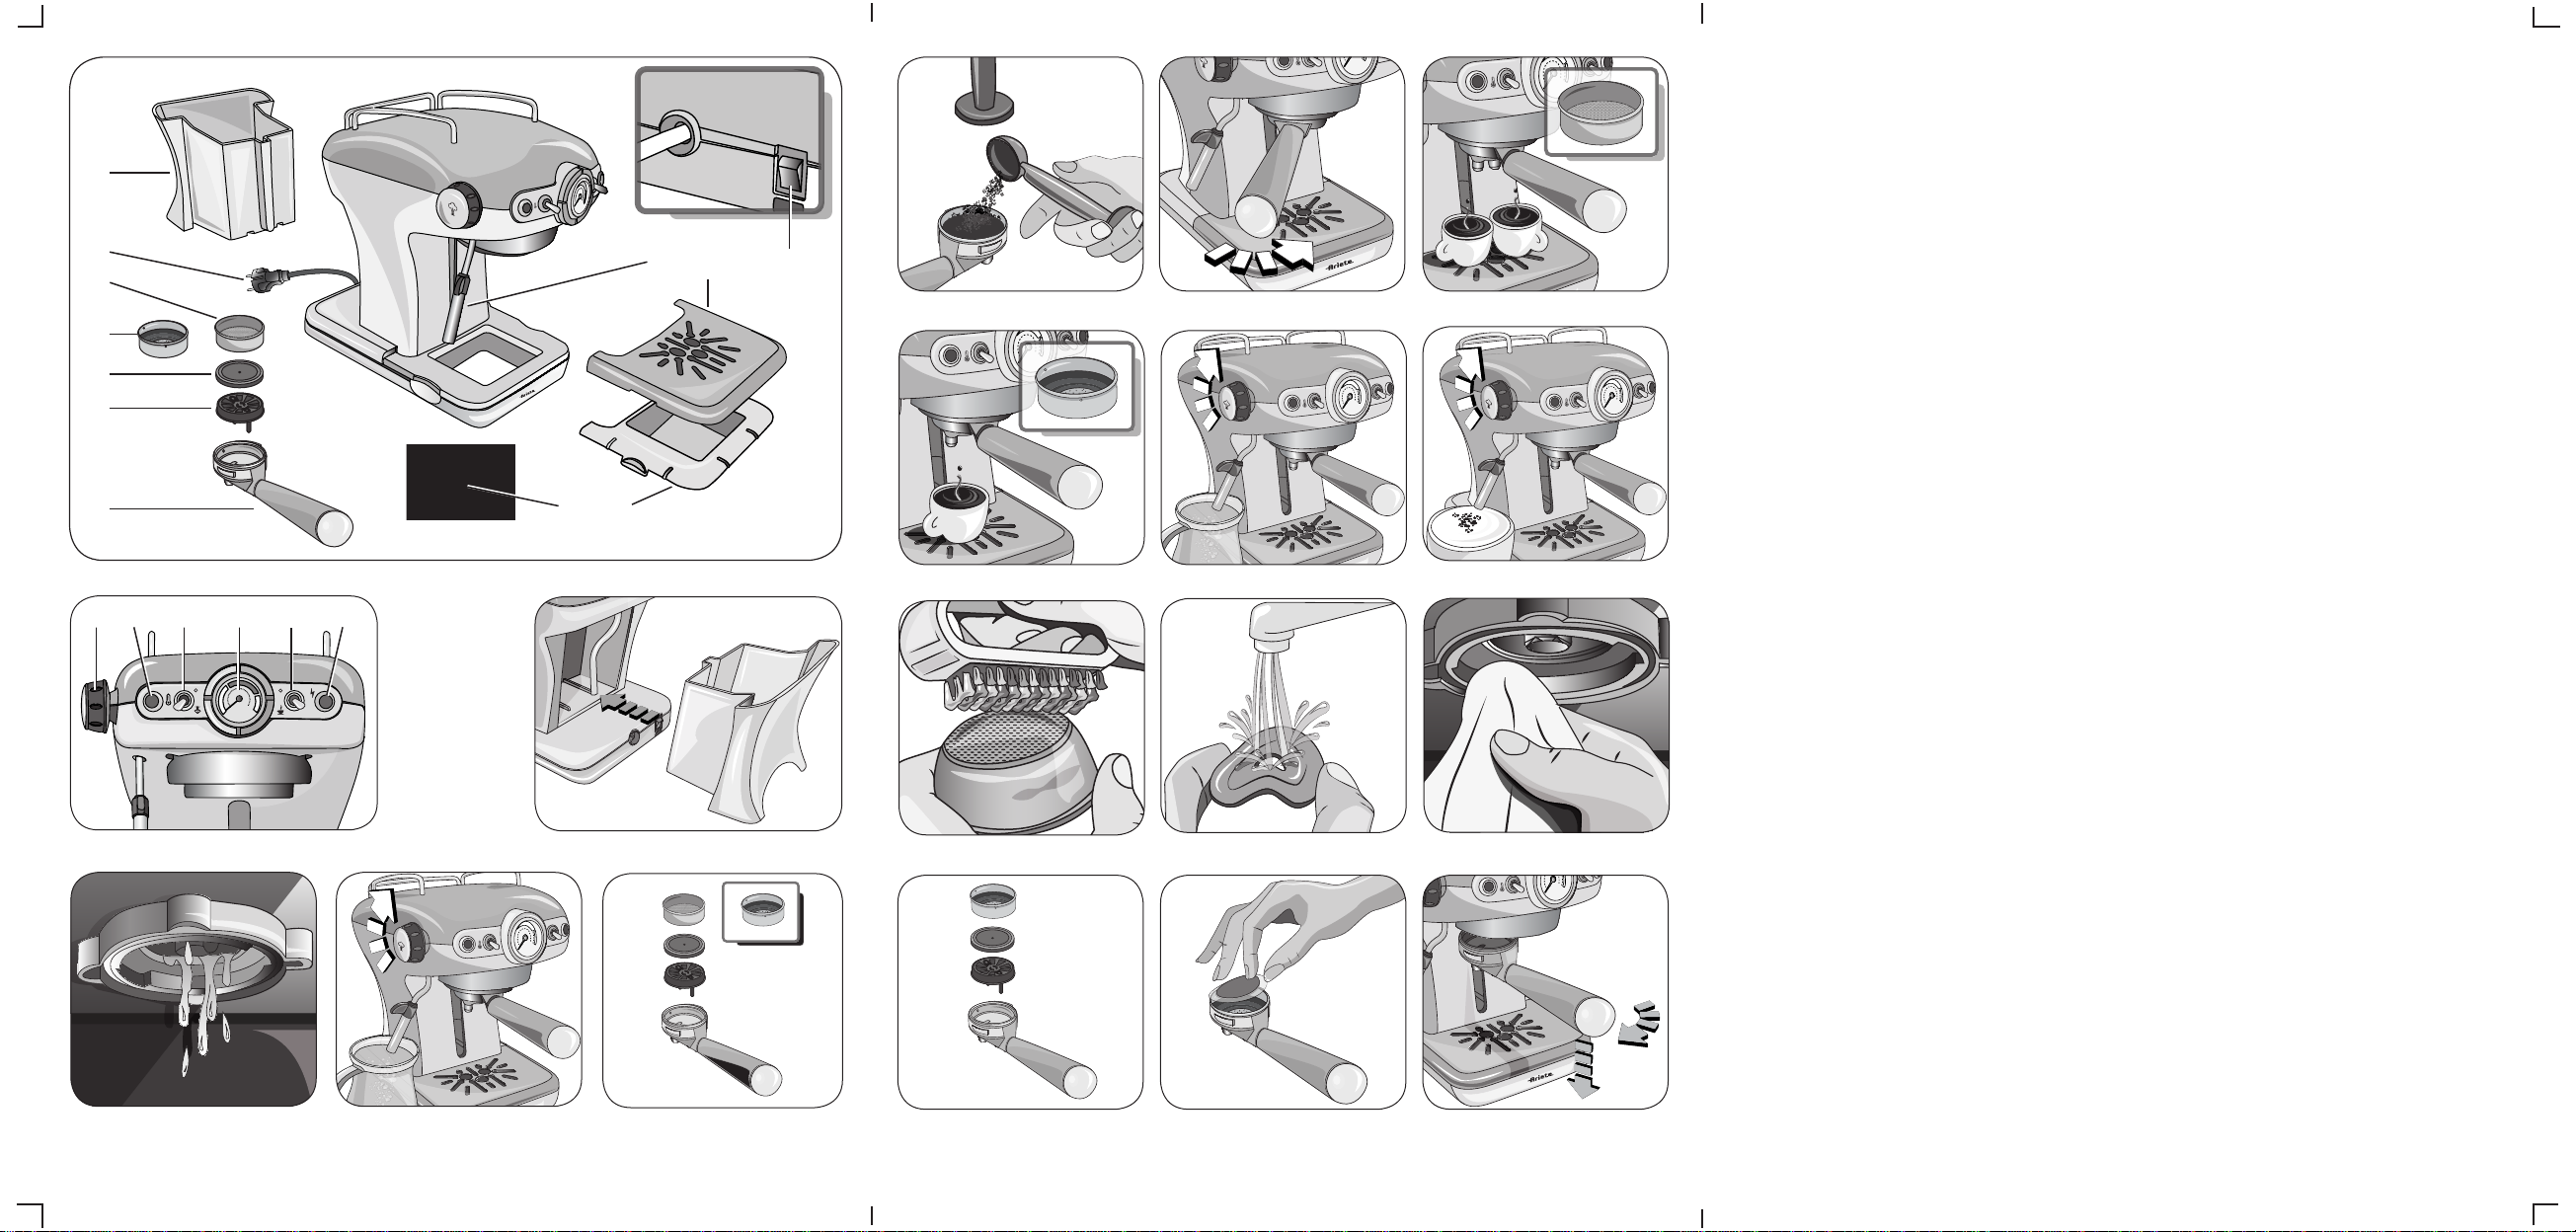
4 The pod could remain stuck in the upper part of the machine after making the coffee and when
removing lter holder. To remove it, tilt the lter holder (Fig. 18) so the pod can fall onto it.
To always have a good coffee, you must purchase pods that show the E.S.E. compatibility mark.
If the pod is not inserted well, or if the lter holder is not tightened rmly, a few drops of
water could leak from the lter holder.
Auto-off function
If the machine is turned on but not in use, the auto-off function operates after about 30 minutes.
This function puts the machine in standby. The ON indicator light (R) is off. To restart the machine
press again the power button (J).
Filling the water tank during use
No special operation is necessary when the water in the tank runs out as the machine is equipped
with a special self-priming device. Just unplug the machine, pull out the tank and ll it with fresh
cool water again.
HOW TO MAKE CAPPUCCINO
To prepare cappuccino, hot chocolate, or heat any other beverage, turn the switch (O) to the steam
position ( ) and wait that the indicator light (N) turns on to indicate that the boiler has reached the
right temperature to dispense steam (about 150 °C / 300 °F).
When warming up, your appliance may release small puffs of steam from the lter holder;
this is perfectly normal.
Place a glass under the Maxi Cappuccino device (H). Turn the steam knob (M): at rst a little water
will come out, immediately followed by a strong jet of steam.
Close the dispensing knob (M) to stop the jet of steam and put the pot of milk to be whipped under
the Maxi Cappuccino device (Fig. 12). Plunge the wand all the way into the pot of milk and again
open the steam dispensing knob (M) until you get the result you want. During these operations, you
will see that the indicator light (N) turns on and off periodically, indicating the action of the thermo-
stat which maintains the proper temperature of the boiler for steam dispensing.
It is opportune you start dispensing the steam only when the lamp is on. After each use,
dispense the steam for a few seconds to clear the outlet from any milk residue.
Close the steam knob (M). After preparing the cappuccino return the switch (O) in the upper posi-
tion to exclude the steam function.
MAKING FURTHER CUPS OF COFFEE
To prepare a cup of coffee right after making cappuccino, it is necessary to bring the boiler back
to the coffee preparation temperature by performing these operations: return the switch (O) in the
upper position to cool the boiler and wait that the light (N) goes out and comes on again. To cool
the heating unit more quickly, proceed as follows: place a glass under the Maxi Cappuccino device
(H). Turn the switch (Q) to position ( ); turn the steam knob (M): this will cause water to ow out,
until the warning light (N) turns back off. Now close the steam dispensing knob (M) and return the
switch (Q) in the upper position. Wait for the light (N) to turn on. The coffee maker is now ready to
brew coffee again.

20
EN
HOW TO MAKE TEA OR TISANES
After the steps described in chapter “Preliminary phase prior to use”, place a cup under the Maxi
Cappuccino device (H). Put the coffee switch (Q) in position ( ). Turn the steam knob (M); in this
way hot water will come out of the Maxi Cappuccino device. The maximum quantity for two cups
is 200 ml.
TIPS TO ACHIEVE A GOOD ITALIAN ESPRESSO
The ground coffee in the lter holder must be pressed slightly. A stronger or weaker coffee depends
on the coffee grinding level, on the quantity put into the lter holder and the pressing. A few seconds
are required for the coffee to be dispensed into the cups. If the dispensing time is longer, this means
that the coffee is ground too ne or that the coffee put into the lter holder has been pressed too
much.
CLEANING THE APPLIANCE
Warning!
All cleaning operations described below must be carried out with the
machine off and with the plug disconnected from the outlet.
Warning!
Regular maintenance and cleaning preserve and keep the machine ef-
cient for a longer amount of time. Never wash machine components in
the dishwasher. Do not use direct jets of water.
Warning!
Any intervention must be carried out with cold machine.
Cleaningthecoffeelters
Check that the holes are not clogged and if so, clean them with a small brush (Fig. 13). Let boiling
water ow from the lter holder with the lter inserted without the powder to dissolve or remove any
coffee residue or impurities.
Warning!
Remove and disconnect the lter holder slowly because any remaining
pressure could cause splashes or sprays.
It is advisable to thoroughly clean the lter about every 3 months using Ariete COFFEE CLEAN
detergent tabs, which can be found at retail stores and the Authorised Service Centres, following
the instructions inside the package. As an alternative, you can use a simple dishwasher detergent
tab (without added rinse aid or other chemical additives) as follows:
• Place a tablet of dishwasher detergent into the lter (without coffee) when the machine is very
hot (at least 5 minutes after heating).
• Connect the lter holder to the machine and place a container under the lter holder.
• Put the switch (Q) in the coffee position ( ) to start dispensing water, then dispense water for
15-20 seconds.
• Stop the dispensing and let the tablet work for at least 15 minutes, keeping the lter holder inserted

21
EN
on the machine.
• Repeat the water dispensing operation making the pump run for about 15-20 seconds and then
let it rest for another 15-20 seconds until two tanks of water have been used.
• Remove the lter holder from the machine, remove the lter and rinse well under running water.
• Switch off the machine, unplug the power cord from the power outlet and wipe the lter holder
hooking seat with a sponge to remove any detergent residue from the spray.
• Restart the machine, attaching the lter holder again and still dispensing at least 2 cups of water
to complete rinsing.
If the coffee machine is used daily, it is recommended to carry out the cleaning operation at least
every three months.
Cleaning the silicone disc
Wash the silicone disc (C) under running water, bending it slightly on the sides in order to free the
centre hole of any residue of coffee grounds that could clog it (Fig. 14).
Cleaningthelterholderseat
With use, it may occur that in the lter holder seat there is a sedimentation of coffee grounds, which
can be removed with a toothpick, a sponge (Fig. 15), or letting water run through without tting the
lter holder (Fig. 4).
Cleaning the Maxi Cappuccino device
Warning!
Perform the operation when the chrome-plated tube is cool to avoid
burns.
Unscrew the device (H) from the small pipe and wash it with running water. The small pipe can
be cleaned with a non-abrasive cloth. Screw the cappuccino maker back on as far as it will go. If
necessary, clean the small steam outlet hole again with a pin. After each use, dispense steam for a
few seconds to clear the outlet from any residues.
Tank cleaning
It is advisable to periodically clean inside the tank with a sponge or damp cloth.
Cleaning the grill and the drip tray
Remember to empty the drip tray from time to time (K).
Remove the grill (I) and wash it under running water; remove the tray (K) from the machine, empty
it and wash it under running water.
Cleaning the machine body
Warning!
Clean the xed parts of the machine using a damp non-abrasive cloth
to avoid damaging the body.
DESCALING
Good maintenance and regular cleaning preserve and keep the machine efcient for a longer pe-
riod, greatly reducing the risk of scale formation into the appliance. If despite this, after some time,
the appliance operation should be compromised, due to the constant use of hard and very hard wa-

22
EN
ter, it is possible to carry out the machine descaling operation in order to eliminate the malfunction.
For this purpose use only the citric acid-based descaling product NOCAL by Ariete. This product
can be easily found in the Ariete technical assistance service centres. Ariete is not liable for dam-
age to internal components of the coffee machine caused by the use of non-compliant products
due to the presence of chemical additives. If a descaling is required, observe the directions on the
instruction sheet of the descaling product.
SETTING THE MACHINE OUT OF SERVICE
If it is required to set the machine out of service, disconnect it electrically, empty the water tank and
the drip tray and clean it (see the “Appliance cleaning” chapter).
In case of scrapping it is necessary to provide for the separation of the various materials used in the
construction of the machine and dispose of them according to their composition and the provisions
of law in force in the country of use.
TROUBLESHOOTING
Warning!
If there are problems with operation, immediately turn off the machine
and unplug it from the socket-outlet.
Problems Causes Remedies
The coffee maker
does not supply
boiling water for
tisanes.
Air has probably entered the
circuit and deactivated the
pump.
Make sure the tank is properly inserted
and that the water is not below the
minimum level. Repeat the operations
described in the “Preliminary phases for
use” paragraph.
The steam exit hole on the
dispenser wand is clogged. Unclog any deposits that may have
formed in the hole of the dispenser wand
with a pin.
The machine does
not dispense
steam.
There is little water and the
pump does not suck. Check that the water level in the tank is
correct. If necessary, ll it with cool tap
water.
The steam exit hole on the
dispenser wand is clogged. Unclog any deposits that may have
formed in the hole of the dispenser wand
with a pin.
Coffee overow-
ing from the lter
edges.
Probably too much ground
coffee has been put into the
lter holder that has pre-
vented to fully tighten the lter
holder in its housing.
Remove and disconnect the lter holder
slowly because any remaining pressure
could cause splashes or sprays. Clean
the coupling seat with a sponge (Fig. 15).
Repeat the operation placing the correct
amount of coffee in the lter.
Ground coffee has remained
on the lter holder connection
seat.
Clean the seal with a toothpick or a
sponge (Fig. 15).

23
EN
Problems Causes Remedies
Coffee overow-
ing from the lter
edges.
The exit holes of the lter
containing coffee grounds are
clogged.
Remove and disconnect the lter holder
slowly because any remaining pressure
could cause splashes or sprays. Clean the
clogged lter holes with a small brush or a
pin. Clean the lter using Ariete COFFEE
CLEAN tabs following the instructions in
the package.
Faulty pod. Replace the pod in the lter holder.
Coffee is not
dispensed or is
dispensed too
slowly.
The holes of the perforated
disc in the lter holder cou-
pling seat are clogged.
Operate the machine without the lter
holder making water ow. If the water is
still not owing uniformly through all holes,
descale using the NOCAL Ariete product
available in the Ariete service centres fol-
lowing the instructions in the package.
The exit holes of the lter
containing coffee grounds are
clogged.
Remove and disconnect the lter holder
slowly because any remaining pressure
could cause splashes or sprays. Clean the
clogged lter holes with a small brush or a
pin. Clean the lter using Ariete COFFEE
CLEAN tabs following the instructions in
the package.
Too ne ground coffee blend. Try using coarser coffee blends.
Too pressed coffee blend. Press the coffee inside the lter using less
pressure.
The tank is not fully inserted. Fit the tank correctly push it completely
down.
There is little water and the
pump does not suck. Check that the water level in the tank is
correct. If necessary, ll it with cool tap
water.
Faulty pod. Replace the pod in the lter holder.
Broken pod. Remove the pod lter holder, clean the
seat with a sponge, and put a new pod
inside.
The coffee is too
watery and cold.
The mixture was ground too
coarsely. To obtain a more concentrated and hot-
ter coffee, you must use a more nely
grounded blend.
Anyhow, this problem is easily solved
thanks to the Thermocream® System,
which always guarantees hot coffee ac-
companied by a reach cream, even with
coarsely ground beans.
Other manuals for 1389A
4
Table of contents
Other ARIETE Coffee Maker manuals

ARIETE
ARIETE Miro 1339B User manual

ARIETE
ARIETE 1380 User manual

ARIETE
ARIETE 1381 User manual

ARIETE
ARIETE 1363 User manual

ARIETE
ARIETE PICASSO CIALDISSIMA User manual

ARIETE
ARIETE Caffe Novecento 1387 User manual

ARIETE
ARIETE Cialdissima 1336 User manual

ARIETE
ARIETE Mokita User manual

ARIETE
ARIETE 1389A User manual

ARIETE
ARIETE 1396 User manual

ARIETE
ARIETE cafe retro User manual

ARIETE
ARIETE Picasso 1365 User manual

ARIETE
ARIETE 1389A User manual

ARIETE
ARIETE Moka aroma 1358A User manual

ARIETE
ARIETE 1389 User manual

ARIETE
ARIETE Cafe Chic 1377 User manual

ARIETE
ARIETE 1340 User manual

ARIETE
ARIETE 1384 User manual

ARIETE
ARIETE 1389A User manual

ARIETE
ARIETE You&Me User manual