Arjo MLA4060 User manual

EN · ZH · DE · FR · IT · NL
⢪欽霹僈⛼ · Bedienungsanleitung · Mode d’emploi · Istruzioni per l’uso · Gebruiksaanwijzing
INSTRUCTIONS FOR USE
Passive Loop Slings
04
4
.S
L
L.
00
-
-I
NT
1
1_
8
04
4
4
.S
L
L
.
00
-
-I
I
NT
1
1
_
8
•
•
•
1
1/
/
2
0
1
9
1
1/
/
2
2
20
1
9

2
WARNING
To avoid injury, always read this Instructions for Use and accompanied documents
before using the product. Mandatory to read the Instructions for Use.
Design Policy and Copyright
® and ™ are trademarks belonging to theArjo group of companies. ©Arjo 2019.
As our policy is one of continuous improvement, we reserve the right to modify designs without prior notice. The content
of this publication may not be copied either whole or in part without the consent ofArjo.
Foreword
Thank you for purchasing Arjo equipment. Please read this Instructions For Use (IFU) thoroughly!
Arjo will not be held responsible for any accidents, incidents or lack of performance that occur as a result of
DQ\XQDXWKRUL]HGPRGL¿FDWLRQWRLWVSURGXFWV
Customer Support
If you require further information, please contact your local Arjo representative. The contact information is
located at the end of this IFU.
'H¿QLWLRQVLQWKLV,)8
WARNING Means: Safety warning. Failure to understand and obey this warning may result in
injury to you or to others.
CAUTION Means: Failure to follow these instructions may cause damage to all or parts of the
system or equipment.
NOTE Means: This is important information for the correct use of this system or equipment.
Contents
Foreword .............................................................2
Customer Support...................................................2
'H¿QLWLRQVLQWKLV,)8 ..............................................2
,QWHQGHG8VH .......................................................3
Patient/Resident Assessment .................................3
Expected Service Life .............................................3
Safety Instructions...............................................4
Safety Practises......................................................4
Parts Designation................................................4
Preparations........................................................5
%HIRUH)LUVW8VHVWHSV .......................................5
%HIRUH(YHU\8VHVWHSV .....................................5
After every use........................................................5
Select Sling Size..................................................5
8VLQJWKH$UMR0HDVXULQJ7DSH
VWHSV$FFHVVRU\ ..............................................5
6L]LQJ:LWKRXWD0HDVXULQJ7DSHVWHSV.............5
Sling Selection.....................................................
Transfer/Bathing......................................................
Transfer/Transport...................................................
Allowed Combinations.........................................
6DIH:RUNLQJ/RDG6:/.......................................
Loop Attachment & Detachment..........................8
$WWDFKWKH/RRSV6WHSV......................................8
'HWDFKWKH/RRSVVWHSV .....................................8
Applying the Sling................................................8
,Q%HGVWHSV.....................................................8
,Q&KDLU:KHHOFKDLUVWHSV...............................9
2Q)ORRUVWHSV ...............................................10
Removing the Sling ...........................................11
,Q%HGVWHSV...................................................11
,Q&KDLU:KHHOFKDLUVWHSV..............................12
Cleaning and Disinfection..................................12
&OHDQLQJ,QVWUXFWLRQVWHSV ...............................12
Flites – Do NOT wash...........................................12
Cleaning Chemicals..............................................13
Disinfection............................................................13
Care and Preventive Maintenance....................13
%HIRUHDQG$IWHU(YHU\8VH...................................13
When Soiled, Stained and Between Patients........13
Storage..................................................................13
Service and Maintenance......................................13
Troubleshooting.................................................14
7HFKQLFDO6SHFL¿FDWLRQV ....................................15
Label on the Sling..............................................
,ඖඛගකඝඋගඑඖඛ)ක8ඛඍ
EN

3
Intended Use
The Passive Loop Slings are products intended for
assisted transfer of patients/residents with limited
ability to move and require full or partially body
support during transfers. The Passive Loop Slings
must be used only on appropriate Arjo patient/
resident lifting devices.
7KHVOLQJPDGHRIPHVKPDWHULDO0/$LVDOVR
intended to be used when bathing.
7KHVOLQJPDGHRI$OO'D\PDWHULDO0/$$6LV
also intended to be seated on for longer periods of
time.
6OLQJVPDGHRIQRQZRYHQPDWHULDO0)$
0)$UHIHUUHGWRDV)OLWHVLVDSDWLHQWVSHFL¿F
non-washable sling intended to be used for a limited
period only. Flites must not be used for bathing and/
or showering a patient.
Passive Loop Slings are especially designed for
FHLOLQJOLIWVÀRRUOLIWVDQGDFFHVVRULHVPDGHE\$UMR
The Passive Loop Slings shall only be used by
appropriately trained caregivers with adequate
knowledge of the care environment, and in
accordance with the instructions outlined in the
,QVWUXFWLRQVIRU8VH,)8
The Passive Loop Slings is intended to be used in
hospital environments, nursing homes and other
healthcare facilities.
The Passive Loop Slings should only be used for the
SXUSRVHVSHFL¿HGLQWKLV,QVWUXFWLRQVIRU8VH$Q\
other use is prohibited.
Patient/Resident Assessment
We recommend that facilities establish regular
assessment routines. Caregivers should assess each
patient/resident according to the following criteria
prior to use:
• Patient/resident sits in wheelchair
• Has no capacity to support himself/herself at
all
• Cannot stand unsupported and is not able to
bear weight, not even partially
• Dependent on caregiver in most situations
• Physically demanding for caregiver
• Stimulation of remaining abilities is very
important
Or, for a patient/resident who:
• Is passive
• Might be almost completely bed ridden
• 2IWHQVWLႇRUFRQWUDFWHGMRLQWV
• Totally dependent on the caregiver
• Physically demanding for caregiver
• Stimulation and activation is not a primary
goal
6DIH:RUNLQJ/RDG6:/IRUPassive Loop Slings:
• 0/$$6NJOE
• 0/$0/$0/$0)$
0)$NJOE
The right type and size of slings should be used after
proper assessment of each patient/resident’s size,
condition and the type of lifting situation.
If the patient/resident does not meet these criteria an
alternative equipment/system shall be used.
Expected Service Life
The expected service life of Passive Loop Slings is
the maximum period of useful life and is dependent
on the actual use conditions. Therefore, before use,
always make sure that the sling does not show signs
RIIUD\LQJWHDULQJRURWKHUGDPDJHLHFUDFNLQJ
EHQGLQJEUHDNLQJ,IDQ\VXFKGDPDJHLVREVHUYHG
do not use the sling.
Flites are intended for a limited period only. By nature
of its design, Flites must be treated as a disposable
DQGUHVLGHQWVSHFL¿FSURGXFW
For washable Passive loop slings, the condition
LVDႇHFWHGE\WKHQXPEHURIZDVKLQJVZDVKLQJ
temperature, detergents, disinfectants, frequency of
use, patient weight and/or other factors.
The following Life Times of the slings can be
distinguished:
Expected Service Life:
• Flites – 2 weeks, based on 4 transfers per day
• Slings made of All day material – 1,5 years
• All other slings – 2 years
Shelf Life:
• 5 years
EN

4
Parts Designation
1. 6OLQJODEHOORFDWLRQRQWKHRXWVLGHRIWKHVOLQJ
2. 6WLႇHQHUSRFNHW
3. 6WLႇHQHU
4. Shoulder strap with loops
5. Leg strap with loop
/HJÀDS
Body section
8. Pulling handle
9. Head section
10.)OLWHV³'R127ZDVKXVHOLIW´ODEHOORFDWHGRQWKH
RXWVLGHRIWKHVOLQJ
11. Padding
12./HJVWLႇHQHU
13.Binding
Example of slings. Not all models are represented.
12
4
5
8
93
1
Safety Instructions
WARNING
To avoid injury, make sure that the patient
is not left unattended at any time.
WARNING
To avoid injury, always assess the patient
prior to use.
WARNING
To avoid falling, make sure that the user
weight is lower than the safe working load
for all products or accessories being used.
WARNING
To avoid injury, only store the equipment for
a short period of time. If stored longer than
stated in the IFU, it can cause weakness
and breakage in the material.
WARNING
To avoid injury, never let the patient smoke
when using the sling. The sling can catch
RQ¿UH
WARNING
To avoid injury, keep the equipment away
from sun/UV-light. Exposure to sun/UV-light
can weaken the material.
WARNING
To avoid injury, never wash a Flites. A Flites
is only intended for “single patient use”.
Safety Practises
• At any time, if the patient becomes agitated, stop
transferring/transporting and safely lower the
patient.
• Patient with spasm can be lifted, but great care
should be taken to support the patient ’s legs.
Serious incident
If a serious incident occurs in relation to this medical
GHYLFHDႇHFWLQJWKHXVHURUWKHSDWLHQWWKHQWKH
user or patient should report the serious incident to
the medical device manufacturer or the distributor.
,QWKH(XURSHDQ8QLRQWKHXVHUVKRXOGDOVRUHSRUW
the serious incident to the Competent Authority in the
member state where they are located.
10 11
12
13 1
EN

5
Preparations
Before First Use (6 steps)
1. Check all parts of the sling, see section “Parts
Designation” on page 4. If any part is missing
or damaged - Do NOT use the sling.
2. Read this IFU thoroughly.
3. Check that the sling is clean.
4. Choose a designated area where the IFU should
be kept and easily accessible at all times.
5. Make sure to have a rescue plan ready in case of
a patient emergency.
For questions, contact your local Arjo
representative for support.
NOTE
Arjo recommends the name of the patient is
written on the sling care label to avoid cross
contamination between patient s.
Before Every Use (7 steps)
1. Patient assessment must always determine the
methods used in everyday care, see “Intended
Use” on page 3.
WARNING
To avoid the patient from falling, make sure
to select the correct sling size according to
the IFU.
2. Check the allowed combinations against the sling,
spreader bar and lift, see “Allowed Combinations”
on page 6.
WARNING
To avoid injury, always make sure to inspect
the equipment prior to use.
3. Check all parts of the sling, see “Parts
Designation” on page 4. If any part is missing
or damaged - Do NOT use the sling. Check for:
• fraying
• loose stitching
• tears
• fabric holes
• soiled fabric
• damaged loops
• unreadable or damaged label
WARNING
To prevent cross-contamination, always
follow the disinfection instructions in this
IFU.
4. Check that the sling is clean. If the sling is
not clean see”Cleaning and Disinfection” on
page 12.
5. Always check the washing symbol on the Flites
label. If the Flites has been washed, throw the
Flites away. See “Flites – Do NOT wash” on
page 12.
If this symbol appears, do NOT use the
Flites. The Flites label indicates it has
been washed.
Before using the sling, read the lift IFU for
transfer, transport and bathing.
After every use
If the patient is leaving the hospital, throw away the
SDWLHQWVSHFL¿F)OLWHV
Select Sling Size
Using the Arjo Measuring Tape (4
steps) (Accessory)
The Arjo Measuring Tape is a sizing accessory
only intended as a guide and is an approximation.
Patient width and body proportions should also be
considered when selecting the correct size of Arjo
sling.
1. If possible, the patient should be in a seated
position.
2. Place the point marked Aon the measuring tape
RYHUWKHSDWLHQW¶VFRFF\[DJDLQVWVHDWSRVLWLRQ
A(See Fig. 1) and (See Fig. 2)
3. 0HDVXUHIURPFRFF\[VHDWSRVLWLRQAWRWKHWRS
RIWKHKHDGSRVLWLRQB(See Fig. 1).
4. The coloured area on the measuring tape that
is levelled with the top of the patient ’s head
indicates the required sling size. If the sling size
falls in between two sizes, it is recommended to
select the smaller size. (See Fig. 2)
Sizing Without a Measuring Tape
(2 steps)
1. Place the sling over the patient ’s back.
2. Make sure the sling covers the patient from
WKHWRSRIWKHKHDGSRVLWLRQBWRWKHFRFF\[
SRVLWLRQA(See Fig. 1)
EN

Fig. 1
Fig. 2
43 52 61 72.7 99.6 104.7 114.794.784.7
AB
COCCYX HEAD
cm
in
16,9 20.5 24 28.7 33.7 37.6 39.5 41.5 45.2
XXS XS S M L LL XL XXL
Sling Selection
The patient ’s physical disabilities, weight distribution and general physique needs to be taken into
consideration when selecting a sling.
Transfer/Bathing
Article
number Safe Working
Load Product Description Size
0/$ NJOE Mesh with head Support S, M, L, XL
Transfer/Transport
Article
number Safe Working
Load Product Description Size
MLA2000 NJOE With Head support S, M, L, XL
MLA2000A NJOE With Head support M, L, XL
MLAAS2000 NJOE All Day with Head Support S, M, L, XL
MLA3000 NJOE 6WDQGDUGSDGGHGORZEDFNTXLFN
¿W S, M, L, XL
MFA2100 NJOE Flites with head support
'LVSRVDEOHDQG3DWLHQW6SHFL¿F S, M, L, XL, XXL
MFA2000 NJOE 6WDQGDUG/RRS)OLWHV'LVSRVDEOH
DQG3DWLHQW6SHFL¿F S, M, L, XL,
$UWLFOHQXPEHUVZLWK³$VX[´HJ0/$$KDVD%$$%X\$PHULFDQ$FWFRPSOLDQWFRXQWU\RIRULJLQ
Allowed Combinations
WARNING
To avoid injury, always follow the allowed combinations listed in this IFU. No other
combinations are allowed.
Safe Working Load (SWL)
Always follow the lowest SWL of the total system. E.g. the 0LQVWUHOOLIWVSUHDGHUEDU has a SWL of 190 kg
OEDQGWKH0/$KDVD6:/RINJOE7KLVPHDQVWKDWWKH0LQVWUHOOLIWVSUHDGHUEDUKDV
the lowest SWL. The patient is not allowed to weigh more than the lowest SWL.
EN

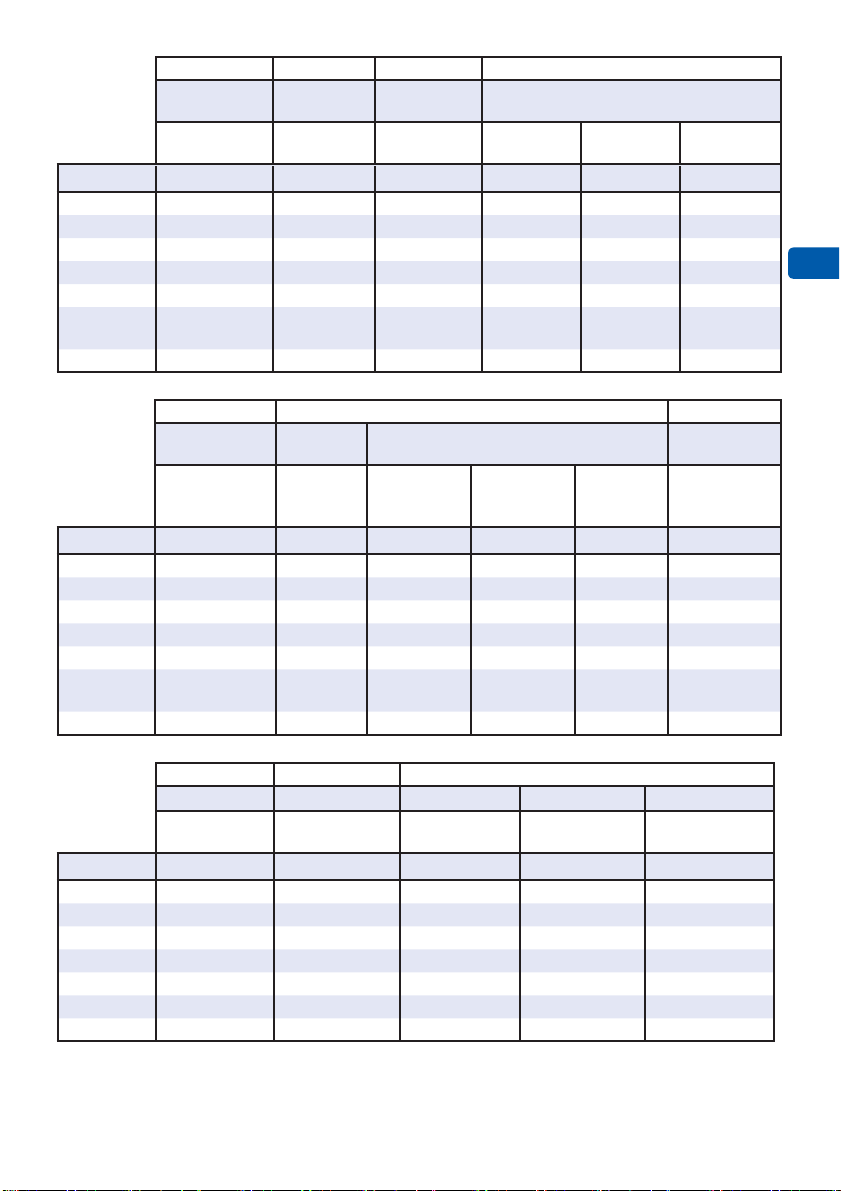
Lift Minstrel Maxi 500 Maxi Twin
SWL 190 kg
OE
NJ
OE NJOE
Spreader Bar 4 point 2 point 2 point
Small 2 point
Medium 4 point
Large
Sling SWL Size Size Size Size Size
MLA2000 NJOE M, L, XL S, M, L, XL S, M S, M, L, XL M, L, XL
MLA2000A NJOE M, L, XL M, L, XL M M, L, XL M, L, XL
MLAAS2000 NJOE M, L, XL S, M, L, XL S, M S, M, L, XL M, L, XL
0/$ NJOE M, L, XL S, M, L, XL S, M S, M, L, XL M, L, XL
MLA3000 NJOE M, L, XL S, M, L, XL S, M S, M, L, XL M, L, XL
MFA2100 NJOE S, M, L, XL,
XXL S, M, L, XL,
XXL S, M S, M, L, XL,
XXL S, M, L, XL,
XXL
MFA2000 NJOE M, L, XL M, L, XL * S, M S, M, L, XL M, L, XL
Lift Maxi Move Maxi Sky 440
SWL 125 kg
OE NJOE NJOE
Spreader Bar 2 point
Small 2 point
Medium
2 point loop
Walking
jacket 4 point Fix
Sling SWL Size Size Size Size Size
MLA2000 NJOE S, M S, M, L, XL S, M, L, XL M, L, XL S, M, L, XL
MLA2000A NJOE M M, L, XL M, L, XL M, L, XL M, L, XL
MLAAS2000 NJOE S, M S, M, L, XL S, M, L, XL M, L, XL S, M, L, XL
0/$ NJOE S, M S, M, L, XL S, M, L, XL M, L, XL S, M, L, XL
MLA3000 NJOE S, M S, M, L, XL S, M, L, XL M, L, XL S, M, L, XL
MFA2100 NJOE S, M S, M, L, XL,
XXL S, M, L, XL,
XXL S, M, L, XL,
XXL S, M, L, XL,
XXL
MFA2000 NJOE S, M S, M, L, XL S, M, L, XL M, L, XL M, L, XL
Lift 0D[L6N\ Maxi Sky 2
SWL NJOE NJOE NJOE NJOE
Spreader Bar 2 point
Medium 2 point
small 2 point
medium 4 point
Sling SWL Size Size Size Size
MLA2000 NJOE S, M, L, XL S, M S, M, L S, M, L, XL
MLA2000A NJOE M, L, XL M M, L M, L, XL
MLAAS2000 NJOE S, M, L, XL S, M S, M, L S, M, L, XL
0/$ NJOE S, M, L, XL S, M S, M, L S, M, L, XL
MLA3000 NJOE S, M, L, XL S, M S, M, L S, M, L, XL
MFA2100 NJOE S, M, L, XL, XXL S, M S, M, L, XL, XXL S, M, L, XL, XXL
MFA2000 NJOE M, L, XL S, M S, M, L S, M, L, XL
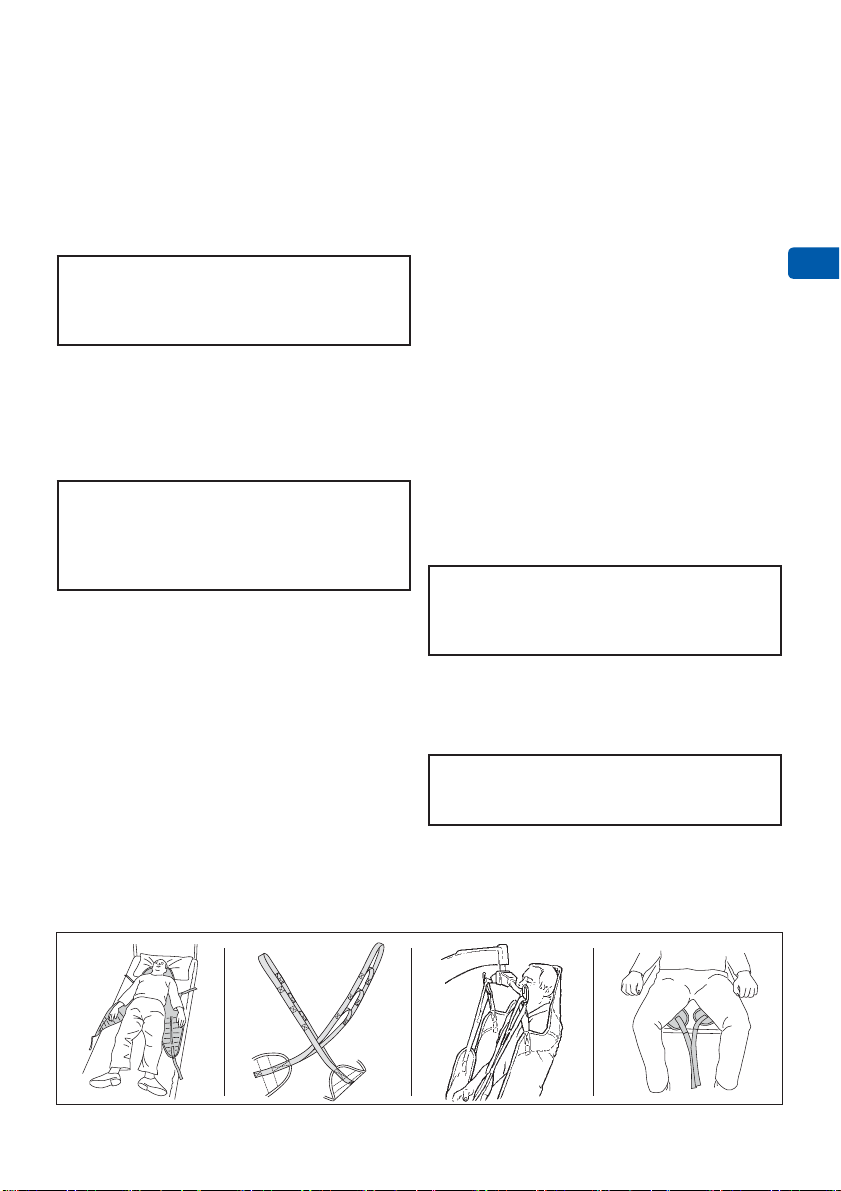
1RWIRUOLIWIURPÀRRU
EN

8
Applying the Sling
In Bed (22 steps)
1. Place the lift nearby.
2. Apply bed brakes and adjust the height of the bed
to an ergonomic position, if possible.
3. 7KHSDWLHQWQHHGVWROD\GRZQÀDWRQKLVKHU
back.
4. &KHFNWKDWWKHVWLႇHQHUVDUHFRPSOHWHO\LQVLGHWKH
VWLႇHQHUSRFNHWVLIDQ\
5. Fold the sling lengthwise along the centre line,
outside facing outside. The sling label is located
on the outside.
WARNING
To avoid injury during log roll, make sure
there is another caregiver present and/or
use the side rails on the opposite side of
the bed.
/RJUROOWKHSDWLHQW8VHORFDOWHFKQLTXH,IORJ
roll is not possible, use an Arjo sliding sheet/tube
for placing the sling. See respective 6OLGLQJVKHHW
tube IFU
Place the folded sling over the patient ’s side.
Make sure that the centre line is aligned with the
patient’s spine, starting at the coccyx. Place the
OHJÀDSVWRZDUGVWKHOHJV(See Fig. 6)
8. Fold down the top of the sling and tuck it under
the patient’s body.
9. Log roll the patient to the other side.
10.Pull out the remaining part of the sling from under
the patients body.
11. Return the patient to his/her back.
Continue with the steps on the next page.
Loop Attachment & Detachment
2 point spreader bar:
First attach the shoulder loops, then attach the leg
loops.
4 point spreader bar: First attach the shoulder loops
in the front hooks. Then attach the leg loops in the
back hooks
WARNING
Do not cross the shoulder straps.
Attach the Loops (5 Steps)
WARNING
Use the same loop length (loop colour) for
the shoulder straps and the same length
(loop colour) for the leg straps.
1. 3ODFHWKHORRSRYHUWKHVSULQJORDGHGODWFKA
(See Fig. 3)
2. Pull the loop down to force the latch to open.
3. Make sure that the spring loaded latch closes
completely with the loop inside. (See Fig. 3)
4. Make sure that the latch is moving freely.
5. Make sure loops and straps are not twisted.
NOTE
The loops lengths on the straps are used to
adjust the patient’s position and comfort.
• /RRSVFORVHUWRWKHVKRXOGHUV
more forward position
• /RRSVIXUWKHUDZD\IURPWKHVKRXOGHUV
more reclined position
• /RRSVFORVHUWRWKHOHJV
raised legs/bottom
• /RRSVIXUWKHUDZD\IURPOHJV
lowered legs/bottom
Detach the Loops (2 steps)
Make sure that the weight of the patient is taken up
by the receiving surface before removing the loop.
Method 1
1. Press the spring loaded latch open.
2. Remove the loop.
Method 2
1. Pull one side of the loop over the hook and spring
loaded latch. (See Fig. 4)
2. Pull down the loop. (See Fig. 5)
Fig. 3
A
Fig. 4 Fig. 5 Fig. 6
EN

9
12.3ODFHWKHOHJÀDSVXQGHUQHDWKWKHSDWLHQW¶VOHJV
13.Make sure that the: (See Fig. 7)
• VOLQJLVFHQWUHGDQGÀDWZLWKRXWFUHDVHV
• sling’s head support covers the neck/head
area, and
• sling pieces are not twisted underneath the
patient.
14.Cross the leg straps. Pull one strap through the
other. (See Fig. 8)
15.Place the lift next to the patient and apply the
brakes.
WARNING
To avoid injury to the patient, pay close
attention when lowering or adjusting the
spreader bar.
Attach the sling. (See Fig. 3)
Make sure the patient’s arms are:
• Sling with head support: placed inside the
sling.
• Low back sling: placed outside the sling.
18.Slightly lift the patient to create tension in the
sling. (See Fig. 9)
WARNING
To avoid the patient from falling, make sure
that the sling attachments are attached
securely before and during the lifting
process.
19.Make sure that:
• All loops are securely attached
• $OOVWUDSVDUHVWUDLJKWQRWWZLVWHG
• The patient lays comfortably in the sling.
20.If an adjustment is needed, lower the patient and
make sure that the weight of the patient is taken
up by the receiving surface before removing the
loops.
21.Release the brakes on the lift.
22.Transfer, transport and bathe the patient
according to the lift IFU.
In Chair/ Wheelchair (20 steps)
1. Place the lift nearby.
2. Apply the brakes on the wheelchair.
3. &KHFNWKDWWKHVWLႇHQHUVDUHFRPSOHWHO\LQVLGHWKH
VWLႇHQHUSRFNHWVLIDQ\
4. Stand in front of the patient and lean the patient
forward.
5. Place the sling over the patient’s back and head
with the inside of the sling against the patient.
The sling label is located on the outside.
Make sure that the centre line is aligned with the
patient’s spine and coccyx.
Tuck in the end of the sling at the coccyx or
DJDLQVWWKHVHDW8VHDQ$UMRVOLGLQJVKHHWWXEH
if needed.
8. Lean the patient back.
9. 3ODFHWKHOHJÀDSVXQGHUQHDWKWKHSDWLHQW¶VOHJV
(See Fig. 10)
10.Cross the leg straps. Pull one strap through the
other. (See Fig. 8)
11. Make sure the: (See Fig. 10)
• VOLQJLVFHQWUHGDQGÀDWZLWKRXWDQ\FUHDVHV
• sling’s head support covers the neck/head
area, and
• sling pieces are not twisted underneath the
patient.
12.Place the lift in front of the patient.
13.Apply the brakes on the lift.
WARNING
To avoid injury to the patient, pay close
attention when lowering or adjusting the
spreader bar.
14.Attach the sling. (See Fig. 3)
15.Make sure the patient’s arms are:
• Sling with head support: placed inside the
sling.
• Low back sling: placed outside the sling.
WARNING
Make sure straps are not caught by
wheelchair or lift castors.
Continue with the steps on the next page.
Fig. 7 Fig. 8 Fig. 9 Fig. 10
EN

10
Slightly lift the patient to create tension in the
sling. (See Fig. 11)
WARNING
To avoid the patient from falling, make sure
that the sling attachments are attached
securely before and during the lifting
process.
Make sure that:
• All loops are securely attached
• $OOVWUDSVDUHVWUDLJKWQRWWZLVWHG
• The patient lays comfortably in the sling.
18.If an adjustment is needed, lower the patient and
make sure that the weight of the patient is taken
up by the receiving surface before removing the
loops.
19.Release the brakes on the lift.
20.Transfer/transport/bathe the patient according to
the lift IFU.
On Floor (35 steps)
1. Make a clinical assessment of the patient. Do
not use the sling if the patient has a head, neck,
VSLQHRUKLSLQMXU\8VHDVFRRSVWUHWFKHULQVWHDG
See the Scoop Stretcher IFU.
2. Place a pillow under the patient’s head.
(See Fig. 12)
3. Make sure the patient is in an area that is
accessible for the lift. If needed, move the
patient by using an Arjo sliding sheet/tube. See
respective 6OLGLQJVKHHWWXEH,)8.
4. &KHFNWKDWWKHVWLႇHQHUVDUHFRPSOHWHO\LQVLGHWKH
VWLႇHQHUSRFNHWVLIDQ\
5. If the patient is able to sit up, continue to next
step. If not able to sit up, proceed to step 9.
Patient able to sit up: Stand behind the patient
and help him/her to a seated position.
Place the sling over the patient’s back and head
with the inside of the sling against the patient.
The sling label is located on the outside.
8. Make sure that the centre line is aligned with the
patient’s spine, starting at the coccyx or against
the seat. Continue to step 18.
9. Patient not able to sit up: Fold the sling
lengthwise along the centre line, outside facing
outside. The sling label is located on the outside.
10./RJUROOWKHSDWLHQW8VHORFDOWHFKQLTXH,IORJ
rolling is not possible, use an Arjo sliding sheet/
tube for placing the sling. See respective Sliding
VKHHWWXEH,)8.
11. Place the folded sling over the patient’s side.
Make sure that the centre line is aligned with the
patient’s spine, starting at the coccyx.
12.3ODFHWKHOHJÀDSVWRZDUGVWKHOHJV
(See Fig. 13)
13.Fold down the top of the sling and tuck it under
the patient’s body.
14.Log roll the patient to the other side.
15.Pull out the remaining part of the sling from under
the patient’s body.
Return the patient to his/her back.
3ODFHWKHOHJÀDSVXQGHUQHDWKWKHSDWLHQW¶VOHJV
18.Make sure that the: (See Fig. 14)
• VOLQJLVFHQWUHGDQGÀDWZLWKRXWFUHDVHV
• sling’s head support covers the neck/head
area,
• sling pieces are not twisted underneath the
patient.
19.Position the lift sideways with the lift legs wide
open. One caregiver needs to be close to the
patient’s head and hair. The other caregiver
needs to lift up the patient’s legs.
20.Position one lift leg next to the patient’s head and
the other lift leg under the patient’s legs. Make
sure the spreader bar is positioned over the
patient’s shoulders. (See Fig. 15)
21.Lower the spreader bar.
22.3ODFHWKHOHJÀDSVXQGHUQHDWKWKHSDWLHQW¶VOHJV
0DNHVXUHWKHOHJÀDSVDUHQRWWZLVWHG
23.Attach the shoulder loops. (See Fig. 3)
24.Cross the leg straps. Pull one strap through the
other. (See Fig. 8)
25.Make sure the patient’s arms are:
• Sling with head support: placed inside the
sling.
• Low back sling: placed outside the sling.
Continue with the steps on the next page.
Fig. 11 Fig. 12 Fig. 13 Fig. 14
EN

11
WARNING
To avoid injury to the patient, pay close
attention when lowering or adjusting the
spreader bar.
Move the lift/spreader bar closer to the patient’s
legs.
Attach the leg loops.
28.Apply the brakes on the lift.
29.Slightly lift the patient to create tension in the
sling
WARNING
To avoid the patient from falling, make sure
that the sling attachments are attached
securely before and during the lifting
process.
30.Make sure that:
• All loops are securely attached
• $OOVWUDSVDUHVWUDLJKWQRWWZLVWHG
• The patient lays comfortably in the sling.
31.If an adjustment is needed, lower the patient and
make sure that the weight of the patient is taken
up by the receiving surface before removing the
loops.
32.Make sure that:
• One caregiver pays attention to the patient’s
head and.
• that the other caregiver holds up the patient’s
feet to prevent them from hitting the lift leg.
33.Remove the pillow.
34.Release the brakes on the lift and bring the lift
legs together.
35.Transfer, transport and bathe the patient
DFFRUGLQJWRWKHOLIW,)8
Removing the Sling
In Bed (13 steps)
1. Position the patient over the bed. (See Fig. 16)
2. Apply bed brakes and adjust the height of the bed
to an ergonomic position, if possible.
WARNING
To avoid injury to the patient, pay close
attention when lowering or adjusting the
spreader bar.
3. Lower the patient onto the bed.
4. Make sure that the weight of the patient is taken
up by the receiving surface before removing the
loops.
5. Detach the sling.
Move the lift away from the patient.
3XOORXWWKHOHJÀDSVIURPXQGHUWKHSDWLHQW¶V
legs. (See Fig. 14)
8. If using an All Day sling and leaving it under the
patient, make sure to place the sling straps along
the side of the patient’s body. This prevents the
straps from getting caught in other objects.
WARNING
To avoid injury during log roll, make sure
there is another caregiver present and/or
use the side rails on the opposite side of
the bed.
9. /RJUROOWKHSDWLHQW8VHORFDOWHFKQLTXH,IORJ
rolling is not possible, use an Arjo sliding sheet/
tube for removing the sling. See respective
6OLGLQJVKHHWWXEH,)8
10.Tuck the sling under the patient’s body.
11. Log roll the patient to the other side and remove
the sling. (See Fig. 17)
12.Return the patient to his/her back.
13.Make sure the patient is in a comfortable and
secure position in the bed.
Fig. 15 Fig. 16 Fig. 17
EN

12
In Chair/Wheelchair (11 steps)
1. Apply the brakes on the wheelchair.
2. Position the patient over the chair/wheelchair.
3. Lower the patient into the chair/wheelchair.
4. Make sure that the patient’s lower back is
positioned all the way in against chair/wheelchair
to prevent the patient from sliding out.
WARNING
To avoid injury to the patient, pay close
attention when lowering or adjusting the
spreader bar.
5. Detach the sling. Make sure that the weight of the
patient is taken up by the receiving surface before
removing the loops.
Move the lift away from the patient
3XOORXWWKHOHJÀDSVIURPXQGHUWKHSDWLHQW¶VOHJV
and place them backwards along the patient’s
side. (See Fig. 18).
8. If using an All Day sling and leaving it under the
patient, make sure to place the sling straps along
the side of the patient’s body. This prevents the
straps from getting caught in the wheels of the
wheelchair.
9. Stand in front of the patient and lean the patient
forward.
10.Pull out the sling and lean the patient back up to
a comfortable and secure position.
11. Lean the patient back up to a comfortable and
secure position.
Cleaning and Disinfection
WARNING
To prevent cross-contamination, always
follow the disinfection instructions in this
IFU.
WARNING
To avoid material damage and injury, clean
and disinfect according to this IFU.
• No other chemicals are allowed.
• Never clean with chlorine.
• Chlorine will deteriorate the surface of
the material.
WARNING
To avoid injury, always remove the sling
before disinfecting the lift.
WARNING
To avoid injury, never wash a Flites. A Flites
is only intended for “single patient use”.
All Passive Loop slings, except the Flites, should
be cleaned when they are soiled and stained and
between patients.
Cleaning Instruction (7 steps)
(NOT Flites)
1. Detach the sling from the lift.
2. 5HPRYHWKHVWLႇHQHUVIURPWKHVWLႇHQHUSRFNHWV
if any.
3. Close all buckles and hook and loop attachment
on the slings and belts prior to washing.
4. Check the symbols on the product label for
cleaning recommendations.
5. 0DFKLQHZDVKWKHVOLQJDW&),QRUGHU
WRREWDLQVXႈFLHQWOHYHORIGLVLQIHFWLRQSOHDVH
wash according to local hygiene legislation.
If allowed according to the product label, tumble
GU\LQORZWHPSHUDWXUHPD[&)
Do NOT
• wash with rough surfaces or sharp objects
• steam
• use any mechanical pressure, pressing or
rolling
• use bleach
• use gas sterilization
• use autoclave
• dry clean
• ironing
3ODFHWKHVWLႇHQHUVEDFNLQWRWKHVWLႇHQHU
pockets, if any, before use.
Flites – Do NOT wash
The Flites is for single patient use.
Do NOT clean, wash, disinfect, wipe or sterilize the
Flites. If the Flites has been subjected to any such
treatment, it shall be discarded.
The Flites is marked with the “Do NOT wash” symbol.
(See Fig. 19)
If the Flites is washed, the “Do NOT use/lift” symbol
will appear. (See Fig. 20)
Fig. 18
Fig. 19 Fig. 20
EN

13
Cleaning Chemicals
)RUDOOVOLQJV127)OLWHVXVHFRPPRQFRPPHUFLDO
detergent without optical brightener.
No other chemicals are allowed e.g. chlorine,
softener, iodine based disinfectants, bromine and
ozone.
Disinfection
The only allowed disinfection is disinfection by
washing.
This does not apply to the Flites. Do NOT clean,
wash or disinfect the Flites.
Care and Preventive Maintenance
WARNING
To avoid injury to both patient and
caregiver, never modify the equipment or
use incompatible parts.
Before and After Every Use
Visually check all exposed parts
The caregiver shall inspect the sling before and after
every use. The complete sling should be checked for
all deviations listed below. If any of these deviations
are visible, replace the sling immediately.
• Fraying
• Loose stitching
• Tears
• Holes
• Discolouration and stains from bleaching
• Sling soiled or stained
• 8QUHDGDEOHRUGDPDJHGODEHO
• )RUDOOVOLQJVQRWWKH)OLWHV,IWKHVOLQJLVVRLOHG
or stained - wash the sling according to section
“Cleaning and Disinfection” on page 12. If the
soil or stains are still visible, replace the sling
immediately.
• For Flites: Make sure the “Do NOT wash” symbol
on the head support is intact. If damaged or
missing and the underlying red “Do NOT use/lift”
symbol appears, replace the sling immediately.
See “Label on the Sling” on page 16.
When Soiled, Stained and Between
Patients
Clean/Disinfect, All slings except the Flites
The caregiver should make sure that the sling is
cleaned according to “Cleaning and Disinfection” on
page 12, when it is soiled or stained and between
patients.
Flites
Washing or disinfection is not allowed. Do not wipe,
sterilize or soil the Flites. If the Flites has been
subjected to any treatment, it shall be discarded.
Storage
When not in use, the slings should be stored away
from direct sunlight where they are not subject
to unnecessary strain, stress or pressure, or to
excessive heat or humidity. The slings should be kept
away from sharp edges, corrosives or other things
that could cause damage on the sling.
Service and Maintenance
,WLVUHFRPPHQGHGWKDWTXDOL¿HGSHUVRQQHOLQVSHFW
WKHFRQGLWLRQRIWKHVOLQJWZLFHD\HDUHYHU\
PRQWKDFFRUGLQJWR,62
EN

14
Troubleshooting
Problem Action
The patient is not positioned correctly in
WKHVOLQJHJRQHVWUDSLVVKRUWHUWKDQWKH
RWKHU
• Make sure that both shoulder loops are attached to
the spreader bar at the same loop length.
• Make sure that both leg loops are attached to the
spreader bar at the same loop length.
• Make sure the straps are not twisted.
• Make sure the patient is seated on the inside of the
sling. The outside has a label for reference.
• Make sure the patient is centred in the sling.
The patient feels discomfort in the leg area
when seated in the sling. 0DNHVXUHWKDWWKHUHDUHQRFUHDVHVRQWKHOHJÀDSVRI
the sling.
7KHVOLQJLVGLႈFXOWWRDSSO\HJGXULQJ
ORJUROO
8VHDQ$UMRVOLGLQJVKHHWWXEHDFFRUGLQJWRLQVWUXFWLRQV
in respective IFU.
7KHUHDUHGLႈFXOWLHVDSSO\LQJWKHVKRXOGHU
loops.
• Place the patient in a more seated position in the bed
RURQWKHÀRRU3ODFHDSLOORZEHKLQGWKHSDWLHQW¶V
neck/back, outside of the sling.
• Raise the back rest of the bed, if available.
• Adjust the spreader bar to a more reclined position.
Pay attention to the patient’s head.
7KHUHDUHGLႈFXOWLHVDSSO\LQJWKHOHJORRSV • Bend the patient’s legs or place a pillow under the
SDWLHQW¶VNQHHV,IWKHVOLQJLVDSSOLHGRQWKHÀRRU
place the patient’s legs on the caregiver’s knee.
,WLVGLႈFXOWWRXVHWKHVOLQJLQFRPELQDWLRQ
with the lift and spreader bar.
8VHWKHVOLQJRQO\LQDFFRUGDQFHZLWKWKHFRPELQDWLRQV
described in section “Allowed Combinations” on
page 6.
The position of the patient in the sling
should be more reclined or seated. Adjust the loop lenghts. For example, loops closer to the
shoulders result in a more forward position.
The patient wishes to have extra support
for the neck. Place a pillow behind the patient’s neck, inside the sling.
The Flites is soiled, stained or wet. Dispose the Flites and replace it with a new one.
The Do not wash label is damaged or
missing and the underlying red “Do not
use/lift” label appears on the Flites. Dispose the Flites and replace it with a new one.
EN

15
7HFKQLFDO6SHFL¿FDWLRQV
General
6DIHZRUNLQJORDG6:/ 0D[LPXPWRWDOORDG See “Allowed Combinations” on page 6-7
Service life – Recommended period of use
All Day sling: 1,5 years*
Flites: 2 weeks, based on 4 transfers/day*
All other slings: 2 years*
* Refer to “Expected Service Life” on page 3.
Shelf life – Maximum period of storing new
unpacked product 5 years
Model and Type See “Sling Selection” on page 6
Operating, Transport and Storage Environment
Temperature &WR&)WR)2SHUDWLQJDQG6WRUDJH
&WR&)WR)7UDQVSRUW
Humidity ±DW&)2SHUDWLQJDQG6WRUDJH
±DW&)7UDQVSRUW
End of Life Disposal
Package The bag consists of soft plastic, recyclable to local
legislations.
Sling 6OLQJVLQFOXGLQJVWLႇHQHUVVWDELOL]HUVSDGGLQJPDWHULDO
any other textiles or polymers or plastic materials etc.
should be sorted as combustible waste.
Parts and Accessories
6WLႇHQHUV *;7%6DQG7%6
Measuring tape MTA1000
Weight Kg (lb)
Article number S M L XL XXL
0/$$ –
MLAAS2000 –
MLA3000 –
0/$ –
MFA2100
EN

Label on the Sling
Care and Washing Symbols
0DFKLQHZDVK&)
No bleaching allowed
No tumble drying allowed
Tumble drying
Does not apply to Flites
No ironing allowed
Do NOT wash the Flites
Only applies to Flites
No dry cleaning allowed
&HUWL¿FDWHV0DUNLQJV
CE marking indicating conformity with
European Community harmonised
legislation
Indicates the product is a Medical
'HYLFHDFFRUGLQJWR(80HGLFDO'HYLFH
5HJXODWLRQ
Flites Symbols
PATIENTSPECIFIC
DISPOSABLE SLING
2QO\RQ)OLWHV'LVSRVDEOHDQGSDWLHQW
VSHFL¿F
“Do NOT wash” symbol. Located on the
outside of the sling.
“Do NOT use/lift” symbol. The Flites has
been washed. Located on the outside of
the sling.
Symbol for Loop
8VHDORRSVSUHDGHUEDU
Article Number
REF
XXXXXX-X Article number with -X refers to
the sling size.
REF
XXXXXXX
If the article number is stated
without the size letter at the end,
it means the sling is a One Size.
Fibre Content
PES Polyester
PE Polyethylene
PP Polypropylene
Misc. Symbols
6DIH:RUNLQJ/RDG6:/
Patient’s name symbol
Record symbol
Read the IFU before use
REF Article number
Manufacturing date and year
Manufacturer name and address
EN

17
险デ
⚹鼙⯝「ⵌ⠟㹲㖈⢪欽❡ㅷ䗳곢ꢓ靀劥⢪欽霹僈⛼⟄⿺❡ㅷꥥ꣡涸俒咓կ霼⸉䗳ꢓ靀劥
⢪欽霹僈⛼կ
霃雦佟瘻ㄤ晜勉
® ㄤ™ 㾩✵ Arjo Ⱆ꧋㔙涸㉁叻կ© Arjo 2019.
䧮⟌涸㸺傋僽♶倗鵳遤佖鵳㔔姼䧮⟌⥂殆刿佖霃雦涸勉ⵄ䛓♶〥遤鸑濼կ劢絑 Arjo ず䠑♶䖤Ⰼ鿈䧴鿈ⴔ㢕ⵖ劥ⴀ
晜暟⚥涸ⰻ㺂կ
鎊
䠭靧䝠餝✈ Arjo 霃㢊կ霼鸑靀劥
⢪欽霹僈⛼ (IFU)
ARJO 㼆⟣⡦㔔劢絑䱇勉佖⸓❡ㅷ罜㼋荝涸䠑㢪ծ✲佦䧴䚍腊⚜㣟㖲♶䪬䬐⟣⡦餓⟣կ
㹐䨪佅䭯
㥵卓銳刿㢴⥌䜂霼翫禹䝠䔲㖑涸 Arjo ➿邍կ翫禹⥌䜂⡙✵劥
IFU
涸絕㽵կ
劥⢪欽霹僈⛼ (IFU) ⚥涸㹁⛐
险デ 邍爙㸝Ⰼ䚍险デկ㥵♶椚鍒䎇⚂♶黽㸛霪险デ〳腊⠔㼆䝠䧴➭➃鸣䧭➃魧⠟㹲կ
岤䠑✲고 邍爙㥵♶黽㸛鵯❈霹僈〳腊㼋荝侮⚡禹絡䧴霃㢊䧴Ⱖ⚥鿈ⴔ鿈⟝涸䰀㗁կ
岤䠑 邍爙鵯❈僽姻烁⢪欽劥禹絡䧴霃㢊涸ꅾ銳⥌䜂կ
湡䔶
鎊 ...................................................................17
㹐䨪佅䭯................................................................17
劥⢪欽霹僈⛼ (IFU) ⚥涸㹁⛐ ................................17
傁㹁欽鸀 ............................................................18
䝖罏/氻➃霉⠮........................................................18
곫雦⢪欽㼑ㄐ.........................................................18
㸝Ⰼ霹僈 ............................................................19
㸝Ⰼ錞薴................................................................19
⚚ꅾ✲⟝................................................................19
鿈⟝ぜ獦 ............................................................19
⢪欽ⲥ㢊 ............................................................20
ⴲ妃⢪欽6 ⚡姿낢...........................................20
嫦妃⢪欽7 ⚡姿낢...........................................20
嫦妃⢪欽た ............................................................20
鷥䭊じ⯶錞呔.....................................................20
⢪欽 Arjo 崵㽯4 ⚡姿낢꣡⟝...........................20
♶⢪欽崵㽯崵ꆀ2 ⚡姿낢....................................20
鷥䭊じ⯶ ............................................................21
鲮鵘/峤嵮...............................................................21
鲮鵘/鵘鳕...............................................................21
⯈雽絆ざ ............................................................21
㸝Ⰼ䪬ꅾ (SWL).....................................................21
鵶䱹♸䬒ꤑ梠.....................................................23
鵶䱹梠5 ⚡姿낢..................................................23
䬒ꤑ梠2 ⚡姿낢..................................................23
䎾欽じ⯶ ............................................................23
㖈䎯♳22 ⚡姿낢................................................23
㖈䏠喱/鲰喱♳20 ⚡姿낢....................................24
㖈㖑匣♳35 ⚡姿낢............................................25
䬒ꤑじ⯶ ............................................................26
㖈䎯♳13 ⚡姿낢................................................26
㖈䏠喱/鲰喱⚥11 ⚡姿낢.....................................27
幡峇ㄤ嶊嫫.........................................................27
幡峇霹僈7 ⚡姿낢..............................................27
Flites – ♶〳峤嶷 ...................................................27
幡峇欽⻊㷖ㅷ.........................................................28
嶊嫫 .......................................................................28
⥂Ⱞ♸䫡䚍絶䫡..............................................28
嫦妃⢪欽た.........................................................28
䒚腮䧴属寓⟄⿺䝖罏⛓ꢂ✽欽傞............................28
餞㶸 .......................................................................28
⥂Ⱞㄤ絶䫡 ............................................................28
佦ꥻ䱗ꤑ ............................................................29
䪮助錞呔 ............................................................30
じ⯶♳涸叻晥.....................................................31
⢪欽霹僈⛼
ZH

18
傁㹁欽鸀
鄄⸓䒭梠朐じ⯶
僽♧妴傋㖈㼆遤⸓腊⸂「ꣳ涸䝖罏/氻
➃鵳遤鳇⸔鲮鵘䎇⚂㖈鲮鵘傞銳Ⰼ䧴鿈ⴔ佅丒魧
⡤涸❡ㅷկ
鄄⸓䒭梠朐じ⯶
〫腊㖈鷓ざ涸 Arjo 䝖罏/氻
➃獴⡙劼♳⢪欽կ
ꅷ欽緸朐勞俱 (MLA4060) ⵖ䧭涸じ⯶⛲鷓ざ㖈巵嵮傞
⢪欽կ
ꅷ欽 All Day 勞俱 (MLAAS2000) ⵖ䧭涸じ⯶鷓ざ✵欽
䨪刿傞ꢂ㗂用կ
⢪欽ꬋ紼絉勞俱 (MFA2000ծMFA2100) ⵖ鸣涸じ⯶
〭⡲ Flites僽♧妴䝖罏⚁欽涸ծ♶〳峤涸じ⯶➑⣘ꣳ
㹁傞ꢂⰻ⢪欽կFlites ♶䖤欽✵䝖罏㖈嵮綾嵵岙䧴巵嵮կ
鄄⸓䒭梠朐じ⯶
⚁꡶⚹ Arjo ⵖ鸣涸㣔鲪獴⡙劼ծ㖑鲪
獴⡙劼ㄤ꣡⟝罜霃雦կ
鄄⸓䒭梠朐じ⯶
➑⣘㼆䫡椚梠㞯剣⯎ⴔ✫鍒䎇黽㸛⢪
欽霹僈⛼ (IFU) ⚥霹僈涸雲絅剣稇䫡椚➃プ⢪欽կ
鄄⸓䒭梠朐じ⯶
鷓ざ㖈⼕ꤎ梠㞯ծ䫡椚⚥䗱ㄤⰦ➭⨴䐀
䫡椚劼匬⚥⢪欽կ
鄄⸓䒭梠朐じ⯶
〫腊欽✵姼⢪欽霹僈⛼⚥䭷㹁涸欽鸀կ
犜姺欽✵Ⱖ➭湡涸կ
䝖罏/氻➃霉⠮
䧮⟌䒊雳⢪欽劼匬䒊用傈䌢霉⠮玐䎸կ䫡椚➃プ䎾㖈⢪
欽劥鄳縨呏䰘⟄♴叻ⲥ霉⠮嫦ぜ䝖罏/氻➃
• 䝖罏/氻➃㗂㖈鲰喱ⰻ
• 尵剣腊⸂佅丒魧⡤
• ♶腊荈遤畀用⛲偽岁䪬「荈䊹涸⡤ꅾ欨荛鿈
ⴔ⡤ꅾ
• 㖈㣐鿈ⴔ䞔ⲃ♴⣜饆䫡椚➃プ
• 魧⡤銳⣜饆䫡椚➃プ
• ⵞ慨ⶥ⡮腊⸂ꬋ䌢ꅾ銳
䧴罏欽✵痗ざ⟄♴勵⟝涸䝖罏/氻➃
• ⣜ꬑ➭➃
• Ⳝ⛖⽜䎯♶饰
• Ⱒ蒜絑䌢⬿湬䧴䮜綫
• 㸤Ⰼ⣜ꬑ䫡椚➃プ
• 魧⡤銳⣜饆䫡椚➃プ
• ⵞ慨ㄤ崞⻊♶僽⚺銳湡叻
鄄⸓䒭梠朐じ⯶
涸㸝Ⰼ䪬ꅾ (SWL)
• MLAAS2000190 kg (418 lb)
• MLA2000ծMLA3000ծMLA4060ծMFA2000ծ
MFA2100272 kg (600 lb)կ
姻烁霉⠮嫦ぜ䝖罏/氻➃涸⡤㘗ծ朐ⲃㄤ獴⡙梠㞯碫㘗
た䎾⢪欽碫㘗ㄤ錞呔鷓ざ涸じ⯶կ
㥵卓䝖罏/氻➃♶忘駈鵯❈勵⟝䎾⢪欽Ⱖ➭涸霃㢊/禹
絡❡ㅷկ
곫雦⢪欽㼑ㄐ
鄄⸓䒭梠朐じ⯶
涸곫劍⢪欽㼑ㄐ⚹剒⢪欽㼑ㄐ劍ꣳ
Ⱘ⡤》Ɀ✵㹊꣢⢪欽䞔ⲃկ㔔姼㖈⢪欽⛓⸉䗳烁⥂
じ⯶劢ⴀ梡熋䰀ծ丘鄬䧴Ⱖ➭䰀㗁鶺韌⽰鄬〡ծ䓮刼ծ
倗鄬կ㥵卓溏ⵌ⟣⡦姼碫䰀㗁䞔ⲃ霼⺡⢪欽じ⯶կ
Flites ➑腊⢪欽剣ꣳ傞ꢂկ㔔Ⱖ霃雦涸䚍餘䗳곢㼜
Flites ⡲⚹♧妃䚍ㄤ氻➃⚁欽❡ㅷ鵳遤㢅椚կ
㼆✵〳幡峤涸
鄄⸓䒭梠朐じ⯶
勻霹鵯》Ɀ✵幡峤妃
侨ծ幡峤庛䏞ծ幡峇ծ嶊嫫ծ⢪欽곸桧ծ䝖罏⡤ꅾㄤⰦ
➭㢴猫㔔稇㼆じ⯶朐ⲃ涸䕧ㆇ玐䏞կ
霼罌♴䨾涸じ⯶⢪欽㼑ㄐ
곫雦⢪欽㼑ㄐ
• Flites – 2 ワ4 妃鲮鵘/傈
• ꅷ欽 All Day 勞俱涸じ⯶ - 1 䎃⼱
• Ⱖ➭じ⯶ – 2 䎃
⥂㶸劍ꣳ
• 5 䎃
ZH

19
鿈⟝ぜ獦
1. じ⯶叻晥⡙✵じ⯶㢪鿈
2. ⸈䔂匣郍
3. ⸈䔂匣
4. 䌄剣鵶䱹梠涸肕䌄
5. 䌄剣鵶䱹梠涸艙䌄
6. 艙淼檪
7. 魧⡤鿈ⴔ
8. 䬘䩛
9. 㣢鿈
10.Flites♶〳峤嶷/⢪欽/䲿⼮叻晥⡙✵じ⯶㢪鿈
11. 㞅⯎
12.艙鿈⸈䔂匣
13.絓䌄
じ⯶爙⢾կ劢爙ⴀ䨾剣㘗〿կ
12
4
5
8
6
7
93
1
㸝Ⰼ霹僈
险デ
⚹鼙⯝➃魧⠟㹲䎾㨤絊剣⚁➃溏䫡䝖罏կ
险デ
⚹鼙⯝➃魧⠟㹲䎾㖈⢪欽㨤絊㼆䝖罏朐ⲃ鵳
遤霉⠮կ
险デ
⚹鼙⯝䶫⦝䝖罏⡤ꅾ♶䖤馄ⴀ䨾欽❡ㅷ⿺꣡⟝
涸㸝Ⰼ䊨⡲餏蚚կ
险デ
⚹鼙⯝➃魧⠟㹲➑䎾瀊劍㶸⪰霃㢊կ㥵卓㶸⪰傞
ꢂ馄鵂
IFU
⚥錞㹁涸傞ꢂⴭ⠔㼋荝勞俱倗鄬ㄤ
䔂䏞」䓳կ
险デ
⚹鼙⯝➃魧⠟㹲ⴗ⺡㖈⢪欽じ⯶傞雮䝖罏エ掆կ
じ⯶⠔㼋荝抠拇կ
险デ
⚹鼙⯝➃魧⠟㹲霼鼙⯝⯕/稘㢪⯕撑㼘ⵌ霃
㢊կ凐ꪪ✵⯕/稘㢪⯕⠔꣭⡛勞俱䔂䏞կ
险デ
⚹鼙⯝➃魧⠟㹲ⴗ⺡幡峤 Flitesկ♧⚡ Flites ➑
ꣳ♧ぜ䝖罏⢪欽կ
㸝Ⰼ錞薴
• 䔲䝖罏」䖤掓鬑♶㸝傞ꥥ傞⨢姺鲮鵘/鵘鷐䎇㸝Ⰼ
㖑佞⡛䝖罏կ
• 〳㼆汁䮜䝖罏獴⡙⡎䎾暵ⵆ岤䠑佅䩯䝖罏涸艙կ
⚚ꅾ✲⟝
㥵卓〄欰♸霪⼕毫㐼唒湱Ⱒ䎇䕧ㆇ欽䨪䧴䝖罏涸⚚ꅾ
✲⟝ⴭ欽䨪䧴䝖罏䎾㼜霪⚚ꅾ✲⟝䫣デ絛⼕毫㐼唒ⵖ
鸣㉁䧴ⴔꝈ㉁կ㖈妍湅欽䨪鵮䎾ぢⰦ䨾㖈䧭プ㕂涸⚺
盗䔲㽷䫣デ霪⚚ꅾ✲⟝կ
10 11
12
13 1
ZH

20
⢪欽ⲥ㢊
ⴲ妃⢪欽6 ⚡姿낢
1. 唬叅じ⯶涸䨾剣鿈⟝霼
痦19 곜涸鿈⟝ぜ獦
♧蒜կ㥵卓⟣⡦鿈⟝緃㣟䧴䰀㗁 - ♶䖤⢪欽じ⯶կ
2. ➫絈ꢓ靀劥
IFU
կ
3. 唬叅じ⯶僽や䎁ⲙկ
4. 㖈䭷㹁⡙縨㧆㊤㶸佞
IFU
⟄⤑ꥥ傞》ꢓկ
5. 烁⥂ⵖ㹁㥩䫟佹雦ⴢ⟄䝖罏ⴀ梡稒䚉䞔ⲃկ
6. 剣Ⱒ⟣⡦곿霼翫禹䝠䔲㖑涸 Arjo ➿邍⟄㼊宠
佅䭯կ
岤䠑
Arjo 䒊雳㼜䝖罏㨹ぜ叻岤㖈じ⯶⥂Ⱞ叻晥♳鼙
⯝䝖罏⛓ꢂ❜⿸䠭厩կ
嫦妃⢪欽7 ⚡姿낢
1. 㼆䝖罏霉⠮傞䗳곢㨤絊烁㹁傈䌢䫡椚⚥⢪欽涸倰
岁霼ꢓ
痦18 곜涸傁㹁欽鸀
կ
险デ
⚹鼙⯝䝖罏㗖衅霼⸉䗳呏䰘
IFU
鷥䭊姻烁涸じ
⯶㽯㼄կ
2. 唬叅じ⯶ծじ卹ㄤ獴⡙劼涸⯈雽絆ざ霼ꢓ
痦21 곜涸⯈雽絆ざ
♧蒜կ
险デ
⚹鼙⯝➃魧⠟㹲霼㨤絊烁⥂㖈⢪欽唬叅霃㢊կ
3. 唬叅じ⯶涸䨾剣鿈⟝霼ꢓ
痦19 곜涸鿈⟝ぜ
獦
♧蒜կ㥵卓⟣⡦鿈⟝緃㣟䧴䰀㗁 -♶䖤⢪欽じ⯶կ
唬叅
• 熋䰀
• 匠侔綟ざ
• 鄬〡
• 灶峯
• 䋒俱厩寓
• 鵶䱹梠䰀㗁
• 叻晥偽岁鳹雩䧴䰀㗁
险デ
⚹✫姺❜⿸䠭厩䗳곢㨤絊黽㸛劥
IFU
⚥涸嶊
嫫霹僈կ
4. 唬叅じ⯶僽や䎁ⲙկ㥵卓じ⯶♶䎁ⲙ霼ꢓ
痦27 곜涸幡峇ㄤ嶊嫫
կ
5. ⸉䗳唬叅 Flites 叻晥♳涸峤嶷叻䘋կ㥵卓䊺峤嶷
Flites霼⚗䒙 Flitesկ霼ꢓ
痦27 곜涸Flites –
♶〳峤嶷կ
6. 㥵卓ⴀ梡姼叻䘋霼⺡⢪欽 Flitesկ姼 Flites
叻䘋邍爙㸐䊺鄄峤嶷կ
7. ⢪欽じ⯶⛓霼ꢓ靀獴⡙劼
IFU
⟄✫鍒剣Ⱒ鲮
鵘ծ鵘鳕ㄤ巵嵮涸⥌䜂կ
嫦妃⢪欽た
㥵卓䝖罏猌䒓✫⼕ꤎⴭ⚗䒙霪䝖罏⚁欽涸 Flitesկ
鷥䭊じ⯶錞呔
⢪欽 Arjo 崵㽯4 ⚡姿낢꣡⟝
Arjo 崵㽯僽♧猫➑⣘罌涸崵ꆀ꣡⟝䲿⣘⠮皾⧩կ鷥
䭊姻烁錞呔涸 Arjo じ⯶傞鵮䎾罌贊䝖罏⡤㺈ㄤ魧勞
嫱⢾կ
1. 㥵卓〳腊䎾雮䝖罏㢅✵㗂㪧կ
2. 㼜崵㽯♳叻雵 A涸崵挿縨✵䝖罏涸㽵낧㢅/곝ꬑ䏠⡙
⡙縨 Aկ霼錛㕃 1ㄤ霼錛㕃 2
3. 崵ꆀ➢㽵낧/䏠⡙⡙縨 Aⵌ㣢곝⡙縨 B⛓ꢂ涸
䏞霼錛㕃 1կ
4. 崵㽯♳♸䝖罏㣢곝䎂룅涸䕙蒀⼓㚖䭷爙䨾じ⯶錞
呔կ㥵卓䭷爙涸じ⯶錞呔➝✵⚙⚡錞呔⛓ꢂⴭ䒊雳
鷥䭊鳅㼭錞呔կ霼錛㕃 2
♶⢪欽崵㽯崵ꆀ2 ⚡姿낢
1. 㼜じ⯶縨✵䝖罏胜鿈կ
2. 烁⥂じ⯶銻渷䝖罏㣢곝⡙縨 B荛㽵낧⡙縨 A⛓
ꢂ涸鿈⡙կ霼錛㕃 1
ZH
This manual suits for next models
6
Table of contents
Languages:
Other Arjo Mobility Aid manuals

Arjo
Arjo Voyager User manual

Arjo
Arjo Maxi Sky 440 User manual

Arjo
Arjo Maxi Twin User manual

Arjo
Arjo MAXI MOVE Installation guide

Arjo
Arjo Sara 3000 Installation guide

Arjo
Arjo Sara 3000 User manual

Arjo
Arjo Malibu User manual

Arjo
Arjo Maxi Sky 440 Installation guide

Arjo
Arjo MAXI MOVE Installation guide

Arjo
Arjo EASYTRACK 9330010 User manual
Popular Mobility Aid manuals by other brands

Ormesa
Ormesa Grillo Use and maintenance handbook

Invacare
Invacare 1514 Installation and operating instructions

Cobi Rehab
Cobi Rehab XXL-Rehab Stand Tall user manual

Otto Bock
Otto Bock z50 Service instructions

EZee Life
EZee Life CH2026 manual

Golden Technologies
Golden Technologies Buzzaround Extreme GB118EX Service guide