ARKSEN 048-GM-48371 User manual

NOTICE:
If your package is missing parts or you are having issues with assembly, please call us directly at
(949)-344-2588. Our customer service team will address any questions or concerns you may have.
Please have this manual open and ready for reference.
CUSTOMER SERVICE:
(949)-344-2588
8:00AM - 5:00PM PST (Monday - Friday)
www.arksenusa.com
Model# 048-GM-48371
OWNER’S MANUAL
5 GALLON WATER/ALCOHOL DISTILLER
ATTENTION! PLEASE READ THESE INSTRUCTIONS BEFORE USING THIS DEVICE
!

2
• Table of Contents
• Safety ................................................ 3
• Other items you will need (not included) ....................................................3
• Parts & Features ............................................................................4
• Using your Arksen Water/Alcohol Distiller ...................................................5
• Making distilled spirits: A 2 Stage Process: Fermenting & Distilling ...........................5
• Stage 1: Fermentation ......................................................................5
• Setting up for Fermenting ..................................................................6
• Attach Thermometer to Boiler Lid ...........................................................6
• Preparing the Bubble Airlock ...............................................................7
• Fermenting Conguration ..................................................................7
• Stage 2: Distillation.........................................................................8
• Setting up for Distilling .....................................................................8
• Attach Silicone Tubes to Condenser .........................................................8
• Connect Condenser to Boiler Lid. ...........................................................9
• Set up water ow to Condenser............................................................10
• Distilling Conguration
Method 1: Faucet cooling method .........................................................10
• Extending the Distillate Outlet (Inset) ......................................................10
• Distilling Conguration
Method 2: Water reservoir cooling method .................................................11
• Before Distilling: ..........................................................................12
• Distilling ..................................................................................12
• Mead Recipe ..............................................................................14
• Watermelon-Peach Moonshine Brandy.....................................................16

3
SAFETY
To reduce the risk of re or injury when using your distiller follow these precautions:
• If the Arksen Water/Alcohol Distiller is to be used for making distilled alcoholic beverages, it must
be used only by adults of legal drinking age. Never attempt to operate distiller while under the
inuence of alcohol, etc.
• Consult federal and state laws and obtain any permits required for distilling alcohol.
• Distilling outdoors is always preferred.
• Never use distiller over an open-ame heat source indoors. An electric heat source is preferred.
• Never leave hot or boiling liquids on a heat source unattended.
• Keep distiller and any heating unit out of reach and away from children.
• Use caution when removing Boiler Lid while heating any liquid within the Boiler.
• Do not heat or boil liquids in the distiller if all openings are blocked or closed. Steam and heat
must be allowed to escape through the condenser unit or one of the holes in the Boiler Lid
for safe operation. Failure to do so may result high pressure and explosion.
• Prevent alcohol vapor from leaking from the Distiller. Alcohol vapor is highly explosive.
Always check for, and address any leaks during the alcohol distilling process.
• To prevent liquid/mash contents of the boiler pot from overowing or being forced up into the
condenser copper tube or into the bubble airlock, always leave approximately 4” of air space
above the top of contents of the boiler pot.
• RISK OF METHANOL POISONING: Avoid consumption of Methanol (Methyl Alcohol)!
Methanol can cause blindness and be fatal. Carefully follow precautions in recipes for distilled
beverages. Discard the rst 4-7 oz (100-200ml) of liquid as it comes out of the Condenser
Distillate Outlet, for of each 5 gallons (20L) of fermented“mash”. These rst ounces are often
referred to as “heads” or “foreshots”. DO NOT CONSUME THEM.
OTHER ITEMS YOU WILL NEED (not included)
1. A continuous source of cool water. This can be achieved by one of two ways:
a) A hose connector for attaching a silicone tube to a home faucet or hose bib.
OR
b) A large container for use as a cool water reservoir and a submersible pump.
2. Containers (glass is best, avoid plastic) to collect your distilled product.
3. Large container for fermenting if you’d like to keep your Arksen Distiller available for distilling only.
4. Small wrench for loosening and tightening ttings.
5. White Vinegar to perform a “Vinegar Run” after assembling your Distiller. (Instructions on page 7)
!

4
A. Boiler
B. Boiler Lid
C. Stopper
D. Thermometer
E. Lid Latches (4)
F. Silicone Sealing Ring
G. Boiler Pot
H. Condenser
I. Distillate Outlet
J. Copper Coil
K. Roll of Teon Tape
L. Short Silicone Tube
M. Distillate Extension
Copper Tube
N. Bubble Airlock
O. Silicone hoses (2)
PARTS & FEATURES
J
L
H
I
Boiler
Condenser
A
B
O
N
C
MK
D
E
G
F

5
USING YOUR ARKSEN WATER/ALCOHOL DISTILLER
Before making your rst fermented and distilled beverages, or distilling water, perform the following:
• Wash all parts of your distiller with hot water and dish soap and dry completely.
• Perform a “Vinegar Run” described in the Distilling section (page 12).
• If distilling water only, perform a “Water Run” by distilling 1 gallon or more of clean water,
which will be discarded.
• Your Arksen Distiller can be used for the fermentation process, and then used for the distillation process.
• For fermenting, use the Fermenting Conguration, for Distilling use the Distilling Conguration.
• This product manual is not a complete guide to fermenting and distilling. In order to produce a satisfying
and safe product suitable for adult consumption, please consult books, recipes, and how-to resources and
videos on-line, in book stores and libraries.
• Caution: RISK OF METHANOL POISONING
Avoid consumption of Methanol (Methyl Alcohol)! Methanol can cause blindness and be fatal.
Carefully follow precautions in recipes for distilled beverages. Discard the rst 4-7 oz (100-200ml) of
liquid as it comes out of the Condenser Distillate Outlet, for of each 5 gallons (20L) of fermented
“mash”. These rst ounces are often referred to as “heads”or “foreshots”. DO NOT CONSUME THEM.
MAKING DISTILLED SPIRITS:
A 2 Stage Process: Fermenting & Distilling
STAGE 1: FERMENTATION
• Fermenting beverages into wine or beer is the rst step to then producing brandy, whiskey or gin.
The next step is distilling the results of fermentation, resulting in greater concentrations of alcohol, and
renement of color and avors. Distilling the result a second time further concentrates alcohol and clarity.
• Fermentation is the process of microorganisms, usually yeast, converting (metabolizing) sugars into
carbon dioxide and alcohol. The carbon dioxide bubbles out of the beverage, leaving behind alcohol. Beer,
Ale and Wine are fermented beverages which are complete at this stage. They do not need to go through
the second stage: distillation.
• A wide variety of foods can be fermented. Grains such as corn, wheat, barley, or rye, are used for many
beverages, such as beer and whiskey. Fruits, sugars, rice, and molasses are most often used to make wine,
brandy, rum, and other spirits. Potatoes are used to create vodka.
• Specic steps for fermenting can be found in the recipes on pages 14 -17.
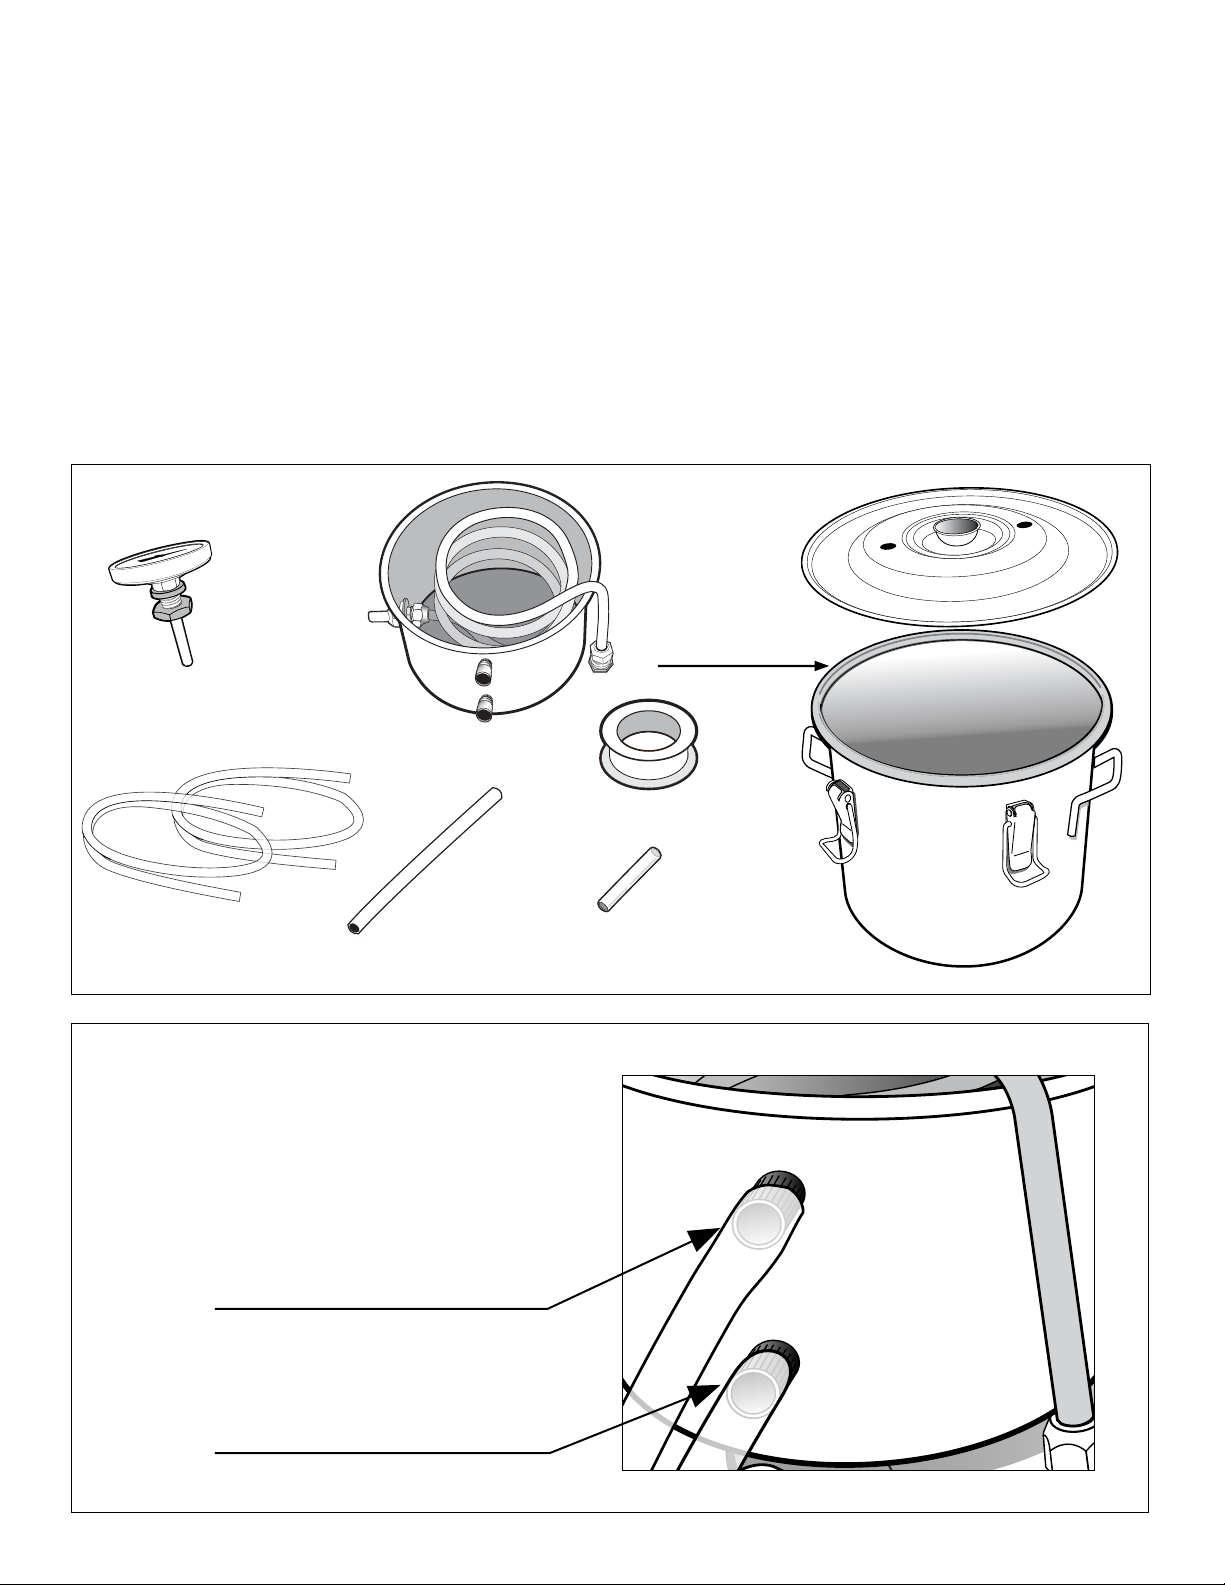
• Use the Fermenting Conguration on pages 6 and 7.
OR
• You can use a separate large container for fermenting. The fermentation process happens over several
days or weeks. You may wish to keep your Arksen Distiller available for distilling only. Use clean glass,
stainless steel or food-safe ceramic or plastic containers. It’s helpful to have 2 or more containers available.

6
Parts needed
1
1
0
1
2
0
1
3
0
1
4
0
1
5
0
1
6
0
1
7
0
1
8
0
1
9
0
2
0
0
2
1
0
2
2
0
2
3
0
2
4
0
2
5
0
2
6
0
2
7
0
2
8
0
2
9
0
+
1
1
0
1
2
0
1
3
0
1
4
0
1
5
0
1
6
0
1
7
0
1
8
0
1
9
0
2
0
0
2
1
0
2
2
0
2
3
0
2
4
0
2
5
0
2
6
0
2
7
0
2
8
0
2
9
0
Bubble
Airlock
Stopper Thermometer Boiler Pot
Silicone
Sealing Ring
Boiler Lid
Brass Nut
Silicone Washer
Attach Thermometer to Boiler Lid
SETTING UP FOR FERMENTING
• Wash all parts with dish soap and hot water before assembling.
Step 1. Slide silicone washer onto
thermometer stem. Slide
thermometer into either hole
in boiler lid.
Step 2. Thread brass nut on
thermometer stem under
the boiler lid. Firmly tighten.
(avoid over-tightening)

7
+
Preparing the Bubble Airlock
=
=
Fermenting Conguration
Step 1. Insert bottom end of Bubble
Airlock into stopper.
Step 2. Add a small amount of water
or sanitizing solution to half
ll the bubble airlock cavities.
Step 3. Insert the Bubble Airlock &
stopper into the available
hole in the boiler lid.
remove insert

8
WATER
IN
WATER
OUT
1
1
0
1
2
0
1
3
0
1
4
0
1
5
0
1
6
0
1
7
0
1
8
0
1
9
0
2
0
0
2
1
0
2
2
0
2
3
0
2
4
0
2
5
0
2
6
0
2
7
0
2
8
0
2
9
0
Condenser
2 Silicone
Tubes
Teon Tape
Thermometer
Short Silicone
Tube
Copper
Extension Tube
Boiler Pot
Boiler Lid
Silicon
Sealing Ring
STAGE 2: DISTILLING
Distillation of fermented beverages is the process of concentrating the alcoholic content by separating
much of the alcohol from the fermented product. Slowly heating the fermented beverage in the Arksen
Distiller causes the alcohol to vaporize, rise into the Copper Coil and then be cooled as it travels through the
condenser. The alcohol in the fermented beverage turns to vapor at about 173 F, before the water content
of the beverage turns to steam at 212 F. As the alcohol cools, it drips from the Condenser Distillate Outlet.
This more pure form of alcohol dripping from the Distillate Outlet (after the initial 4 - 7 oz) is ethanol. Read
the caution about methanol on page 3. See Distillation Conguration, page 10)
Attach Silicone Tubes to Condenser
Step 4. Slide one silicone tube onto the
upper tting of the condenser.
Twist tube until it ts snuggly.
Step 5. Slide the other tube onto the
lower tting of the condenser.
SETTING UP FOR DISTILLING
• Wash all parts with dish soap and hot water before assembling.
Parts needed

9
Step 1. Remove the brass nut and
silicone washer.
Silicone
Washer
Connect Condenser to Boiler Lid.
Silicone
Washer
Fixed-in-
place Nut
Brass Nut
Step 2. To ensure a complete seal, wrap Teon
Tape tightly around the threaded end
of the connector a few times.
Step 3. Slide the silicone washer up to the
xed-in-place nut. Then insert the
connector in the Boiler Lid. The silicone
washer remains above the Boiler Lid.
Step 4. Thread brass nut onto threads and
tighten (avoid over-tightening). The
brass nut will be on the underside of
the boiler lid.

10
WATER
IN
WATER
OUT
HEAT
SOURCE
DISTILLATE Hose Connector
(not included)
SET UP WATER FLOW TO CONDENSER
Provide a continuous source of cold water to the Condenser Pot. The cold water owing into the Condenser
Pot cools the distillate owing through the Copper Coil.
There are two methods:
Method 1. Home faucet method:
Locate loose end of the Condenser’s “Water Out”Tube.
Attach a hose connector (not included) to it.
Attach hose connector your home faucet.
Place the loose end of the “Water Out”Tube to drain into sink basin.
Distilling Conguration
Method 1: Faucet cooling method
Extending the Distillate Outlet:
Add Small Silicone Tube +
Copper Extension Tube
Small
Silicone
Tube
Copper
Extension Tube

11
WATER
IN
DISTILLATE
HEAT
SOURCE
WATER
OUT
Submersible Pump
(not included)
Distilling Conguration
Method 2: Water reservoir cooling method
Method 2. Water reservoir method:
Recirculate cold water from a cold-water reservoir:
Fill a large container with cold water.
Place a submersible pump (not included) into the container.
Connect the pump to the “Water In Tube”, which is connected to the Condenser.
The Condenser’s “Water Out Tube”will drain into the container.

12
BEFORE DISTILLING:
The Preliminary Runs
Vinegar Run (using the Distilling Conguration, page 8)
• The Vinegar Run cleans the parts of the distiller more thoroughly than soap and water.
Perform this before your rst use of your Arksen Distiller.
Step 1. Combine 1/2 gallon white vinegar and 1/2 gallon tap water in the Boiler Pot.
Step 2. Latch in place the Distiller Lid with the Condenser and Thermometer attached.
Step 3. Start cold water ow to the Condenser.
Step 4. Heat on medium to high heat until steaming, and liquid drips out of the distillate outlet.
Step 5. Turn o heat, allow to cool. Dispose of the distilled vinegar and water mixture.
Step 6. Follow this by performing the following“Sacricial Run”.
Sacricial Run (Final Cleaning Run & Christening of your still)
• The Sacricial Run clears the distiller parts of anything which might aect the purity of avors of your
distilled beverages or distilled water. This stage is considered a “rite of passage”.
• Follow instructions for making your rst batch of a distilled beverage.
Distill the rst batch, but discard and do not drink it.
Caution about the output of Distilled Beverages:
• RISK OF METHANOL POISONING
Avoid consumption of Methanol (Methyl Alcohol)! Methanol can cause blindness and be fatal.
Carefully follow precautions in recipes for distilled beverages. Discard the rst 4-7 oz (100-200ml) of
liquid as it comes out of the Condenser Distillate Outlet, for of each 5 gallons (20L) of fermented
“mash”. These rst ounces are often referred to as “heads”or “foreshots”. DO NOT CONSUME THEM.
DISTILLING
Distilling Water
Producing your own clean distilled water is easy with the Arksen Distiller. Before beginning, make sure all
parts of the distiller are clean and dry, as well as your containers for collecting the distilled water.
If distilling water only, perform a “Water Run” by distilling 1 gallon or more of clean water,
which will be discarded.
Pour up to 4 gallons of water into the Boiler Pot. Heat until steaming, and water drips out of the Distillate
Outlet, and into the container you’ve placed below.

13
Distilling Alcoholic Beverages
Step 1. Following a recipe, use the Distilling Congurations on pages 9 - 10.
Step 2. Pour your fermented product into the Boiler Pot.
(The fermented stage product for moonshine is called “mash”)
Step 3. Latch in place the Boiler Lid with the condenser and thermometer attached.
• Always check for, and address any leaks during the alcohol distilling process.
Frequently check the seal of the Condenser connection to the Boiler Lid for vapor/steam escaping.
Prevent alcohol vapor from leaking from the Distiller. Alcohol vapor is highly explosive.
Use caution to avoid burns - STEAM IS EXTREMELY HOT AND CAN CAUSE SEVERE BURNS.
Improve the seal of the Condenser Connector to the Boiler Lid
• Apply a thick mixture of our and water around the connection as a sealant. OR
• Disconnect the Condenser from the Boiler Lid.
Remove the existing Teon Tape.
Apply new Teon Tape, tightly wrapping the threaded end more times.
Reconnect the Condenser to the Boiler Lid and secure the Boiler Latches.
Begin heating your mash again, and check for leaks.
Regulating Temperature at the Condenser Connector
• Carefully monitor temperature to maintain an even temperature between 174 F and 190 F at the
Condenser Connector. A hand-held temperature scanner can be helpful for this. Allowing the temperature
to rise above this can result in the water content vaporizing, resulting in diluted, unsatisfactory output,
which might need to be distilled again.
• Drips and short intermittent streams are desirable coming from the Distillate Outlet but a constant stream
indicates the heating temperature is too high.
Maintain Cool/Cold water in the Condenser
• Use one of the two methods described in the section Set Up Water Flow to the Condenser on page 8.
• Frequently monitor the temperature of the water in the Condenser. Maintain cool or cold water. If the
water is warming to lukewarm, you should use colder water, add ice, or reduce the heat and refer to your
recipe or instructions before continuing.
Ending the Run
• After the temperature has become fairly constant without needing much manipulation, the distilling run
may be near it’s end. At the end of the run, the temperature at the Condenser Connector will drop quickly,
and liquid coming from the Distillate Outlet will quickly reduce or stop. These are signs the run is nished.
• Turn o heat and allow all parts of the Arksen Distiller to cool completely before cleaning all parts.
Cutting
• Clean, pure water may be added to water down or “cut” the concentration of alcohol in the distilled
spirits you have produced. This primarily adds volume, while still yielding a very satisfactory product. For
example: 1 quart of 160 proof moonshine may be cut to produce 2 quarts of a still very potent 80 proof
moonshine by adding 1 quart of water.

14
Re-Distilling
• A nished distilled product may be distilled a second time to further increase the proof (concentration) of
your distilled product.
Carbon Filtering
• Carbon lters may be used to remove unpleasant avors and contaminants. However, this process
will also remove the pleasant and possibly distinctive avors present. This process results in a neutral
moonshine that may then be mixed with fruits or wines, etc.
Flavoring
• An endless variety of avorings and sugars may be introduced to create a very distinct beverage.
Flavorings may remain in the product for days or weeks to achieve the desired intensity. The beverage
may then be strained through coee lters or similar lters to remove solids and improve clarity.
Aging
• Aging can further enhance avors and other qualities which dene many kinds of liquor and spirits, such
as Whiskey and Scotch. Storing the nal product in charred oak barrels, etc. for prolonged periods is a
time-honored technique. For the home distiller, aging may be achieved by placing a piece of carefully
charred white oak in a container with some moonshine for a prolonged time. This can enhance the color
and avor and become a basic beginner’s Whiskey.
MEAD RECIPE
A Fermented Beverage
Mead, also called honey wine is often regarded as the ancestor of all fermented drinks.
It is produced by fermenting a solution of honey and water.
Ingredients:
3.5 pounds of honey (any variety)
1 1/2 teaspoons of yeast
2 teaspoons of citrus juice (lemon, lime, or orange juice)
20 raisins
1 quarter teaspoon of cinnamon
1 whole clove
Equipment you’ll need:
Arksen Distiller Boiler Pot, Lid, Thermometer and Bubble Airlock
Funnel
Coee lters
2 Sterilized 1 gallon food safe plastic jugs (such as from spring water or milk)
Sterilized glass bottles
Hydrometer to determine alcohol content of the mash and judge when fermentation is complete.
How to use a hydrometer is not addressed in this product manual.

15
Directions: Preparing the “Mash/Wash”
Step 1. Pour 10 cups of plain water into the Boiler Pot
Step 2. Add the honey + citrus juice + raisins + cinnamon + whole clove.
Step 3. Heat on low to medium, stirring, until ingredients are dissolved and well incorporated.
Step 4. Add enough warm water to equal about one gallon of mixture.
Step 5. Let mixture cool to room temperature in uncovered Boiler Pot.
Step 6. When cooled, pour into another pot, back and forth to Boiler Pot to aerate the mixture.
Return it to the Boiler Pot.
Fermenting
Step 1. Add 1 teaspoon yeast The mixture will begin to bubble. Fermentation has started.
Step 2. Latch the Boiler Lid in place with Thermometer and Bubble Airlock and Stopper in place.
Step 3. Wrap Boiler Pot with towel or blanket to maintain warmth. Do not block the Bubble Airlock.
Step 4. Store in a warm, dark place. Give the Boiler Pot a few swirls each day for 1 week.
Step 5. After one week, open Lid and add remaining 1/2 teaspoon yeast. Latch Boiler Lid back in place.
Step 6. Wrap Boiler Pot again, return to warm, dark place and leave, undisturbed for 10 days.
Step 7. Bubbling will have likely stopped coming out of the Bubble Airlock at 10 days, if not, allow
Fermentation to continue until bubbling has stopped and fermentation is complete.
Step 8. Place in refrigerator for 24 hours to kill the yeast.
Step 9. Slowly pour the mixture into a 1 gallon jug, leaving sediment/residue in Boiler Pot. Wash Boiler Pot.
Step 10. Allow jug to sit for a few days, allowing any remaining sediment to settle to bottom.
Step 11. Pour Mead through coee lters as necessary to get a clear beverage.
Distilling
Mead is typically consumed after fermentation without continuing to the distillation process. However, it
may be distilled with the result sometimes referred to as“Honey Moonshine” or “Honeyshine”.
For Distilling, follow instructions in the Distilling Alcoholic Beverages, pages 12 -14 & refer to the
Distilling Congurations on pages 9 - 10.

16
WATERMELONPEACH MOONSHINE BRANDY
A Fermented & Distilled Beverage
This delicious moonshine, made with simple ingredients, results in a beverage full of complex avors. It’s
worth the wait of ve weeks’ fermentation time.
Fermentation time: 5 weeks
Makes approximately 5 gallons
Ingredients:
1 and 1/4 large watermelons
10 peaches
1 and 1/4 cup chopped golden raisins
The juice of 15 limes (juice only)
25 cups sugar
5 gallons clean, pure water free of chlorine and contaminants
1/2 oz Bread yeast, Wine yeast or distillers’yeast
Equipment Needed:
Arksen 5 gallon Boiler Pot, Lid, Bubble Airlock and Thermometer, or
Optional 5 gallon food safe bucket or other container
Large bowl
Wire mesh strainer or cheesecloth for straining cooked pulp
Nylon mesh straining bag for straining juice
Hydrometer to determine alcohol content of the mash and judge when fermentation is complete.
How to use a hydrometer is not addressed in this product manual.
Directions: Juicing and Cooking
Step 1. Cut the watermelon and peaches into medium size chunks. Discard the rind and seeds.
Step 2. Blend (or smash very well) the cut up watermelon and peaches to get the juice.
Step 3. Squeeze the juice from the blended fruit using a nylon straining bag or a ne mesh strainer.
Step 4. Save this strained juice to add in step 12.
Step 5. Save the pulp for step 6.
Step 6. Place the pulp from step 5 in the Arksen Boiler Pot or other large stock pot.
Step 7. Add 5 quarts water and bring to a boil. Boil for about 30 minutes.

17
Step 8. Strain pulp from boiled mixture using a ne mesh strainer or cheesecloth. Discard the pulp.
Step 9. Allow the boiled, pulp-free mixture to cool until lukewarm.
Step 10. Keep cooled mixture in the Boiler Pot or pour into your chosen fermentation container.
Preparing for Fermenting
Step 11. Add enough water to the strained, pulp-free liquid to result in 5 gallons total.
Step 12. Add the reserved juice (from step 4) + raisins + lime juice + sugar to the fermentation container.
Step 13. Stir together well.
Step 14. Cover the fermentation container with a cloth and let stand for 24 hours.
Fermenting
Step 15. Add 1/2 oz (4 1/2 teaspoons) yeast and stir well.
Step 16. Seal the fermentation container with a properly tted lid, and a Bubble Airlock.
(See Fermentation Conguration, page 6)
Step 17. Add water to the airlock according to the assembly instructions.
Step 18. Fermentation will take place and is evident by bubbles traveling up through the Bubble Airlock.
Step 19. Daily for 1 week, open and stir contents, close again and continue fermentation.
Step 20. Strain the raisins out of the fermenting mixture.
Resting
Step 21. Keep in the fermentation container tted with the lid and Bubble Airlock
Step 22. Let rest for 4 weeks (adding water to the Bubble Airlock as needed).
Distilling
To become Brandy, distillation is necessary.
For Distilling, follow instructions in the Distilling Alcoholic Beverages, pages 12 -14 & refer to the
Distilling Congurations on pages 9 - 10.
Table of contents
Other ARKSEN Distilling Equipment manuals