ARRI LMB 6x6 User manual

Lightweight Matte Box
LMB 6x6
USER GUIDE
Date: September 2018

2
Imprint
Copyright © 2018 Arnold & Richter Cine Technik GmbH & Co. Betriebs KG. All rights
reserved. No parts of this document may be reproduced without prior written consent of
Arnold & Richter Cine Technik GmbH & Co. Betriebs KG. Specications are subject to
change without notice. Errors, omissions, and modications excepted. ARRI, ALEXA,
AMIRA, LDS and LENS DATA SYSTEM are trademarks or registered trademarks of
Arnold & Richter Cine Technik GmbH & Co. Betriebs KG. All other brands or products are
trademarks or registered trademarks of their respective holders and should be treated as
such. Original version.
For further assistance
Arnold & Richter Cine Technik
GmbH & Co. Betriebs KG
Türkenstraße 89
80799 Munich, Germany
Email: [email protected]
Scope
This User Manual applies to the following product:
LMB 6x6 Pro Set 19 mm Studio (KK.0020233)
Risk levels and alert symbols
Safety warnings, safety alert symbols, and signal words in these instructions indicate
different risk levels:
CAUTION indicates a potentially hazardous situation, which, if not avoided, may
result in minor or moderate injury.
CAUTION!
NOTICE banners indicate non-hazardous additional information and do not
require safety alert symbols.
NOTICE

3
Table of Contents
1 Introduction ...........................................................................................................4
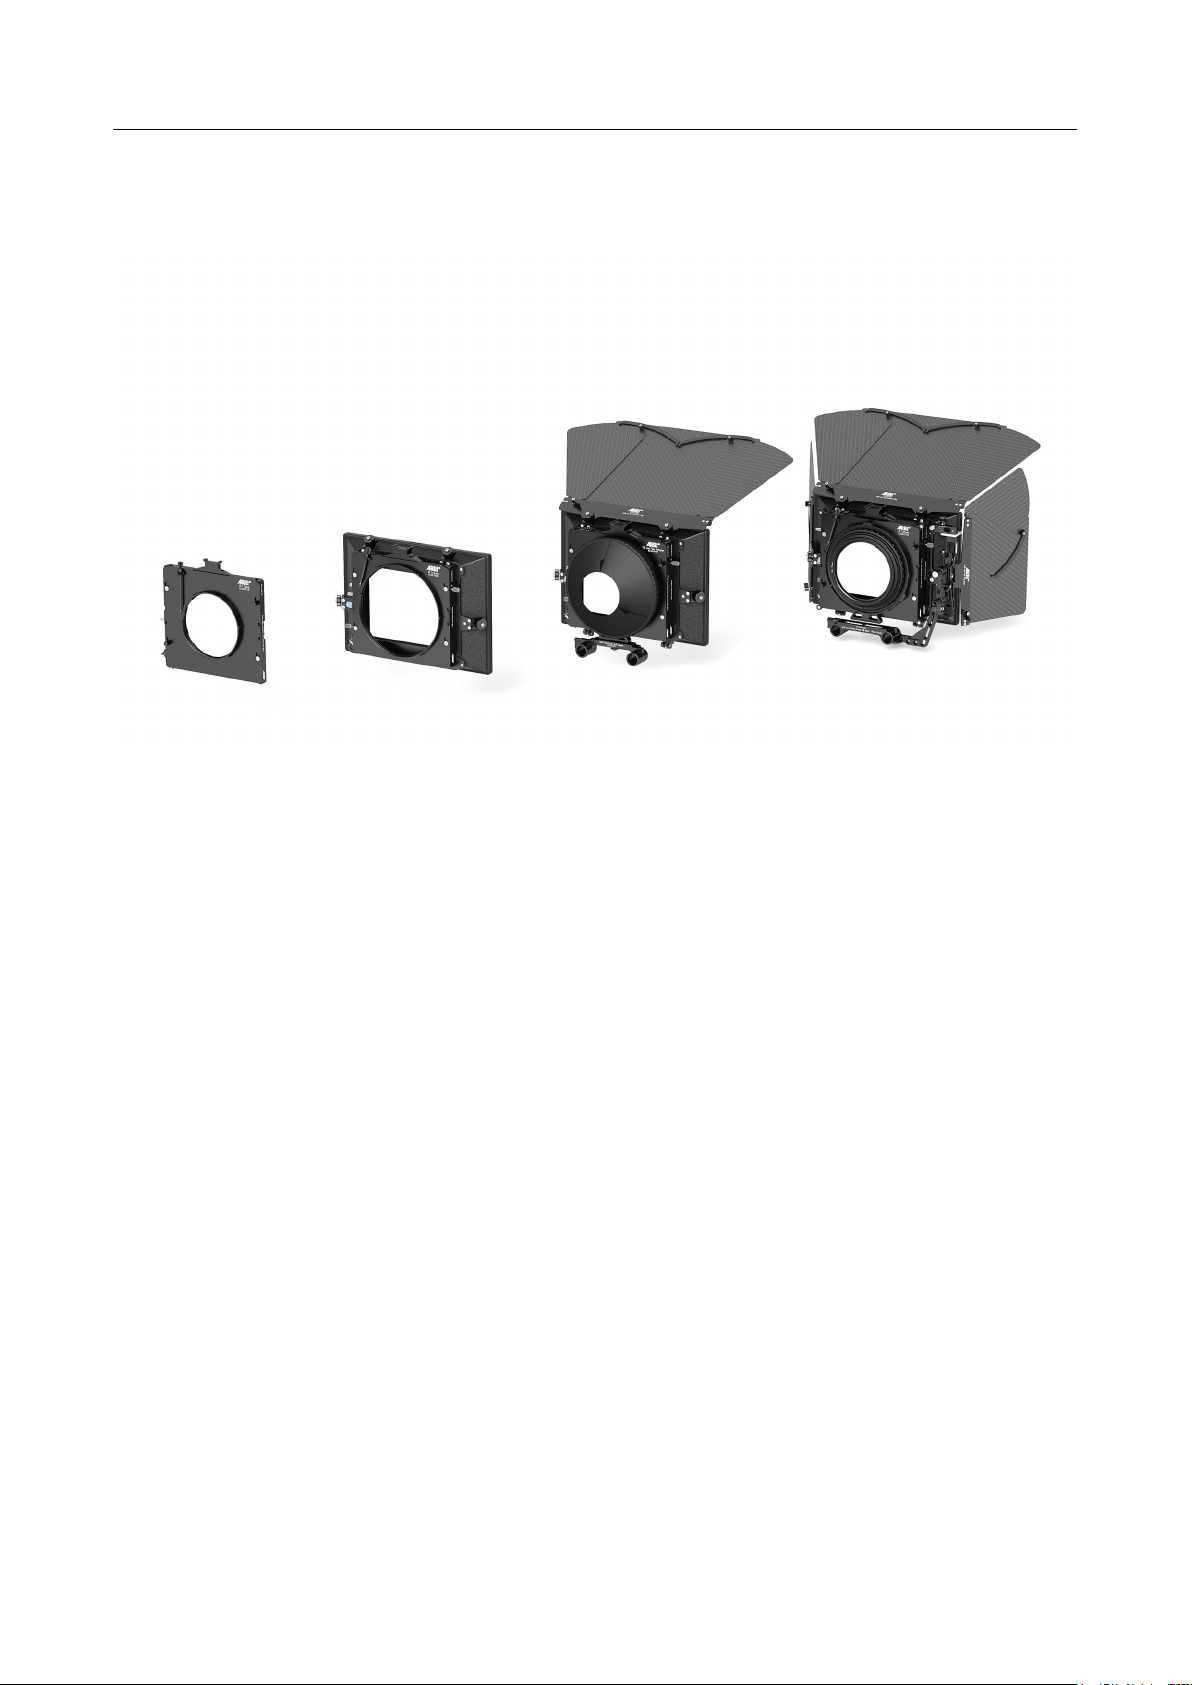
2 LMB 6x6 Overview.................................................................................................5
3 Instructions............................................................................................................8
3.1 Clamp Adapter ............................................................................................8
3.2 LMB 6x6 Clamp Adapter 143 mm ...............................................................9
3.3 LMB 6x6 Clamp Adapter 165 mm ...............................................................9
3.4 LMB 6x6 Tilt and Flex Adapter 80-156 mm...............................................10
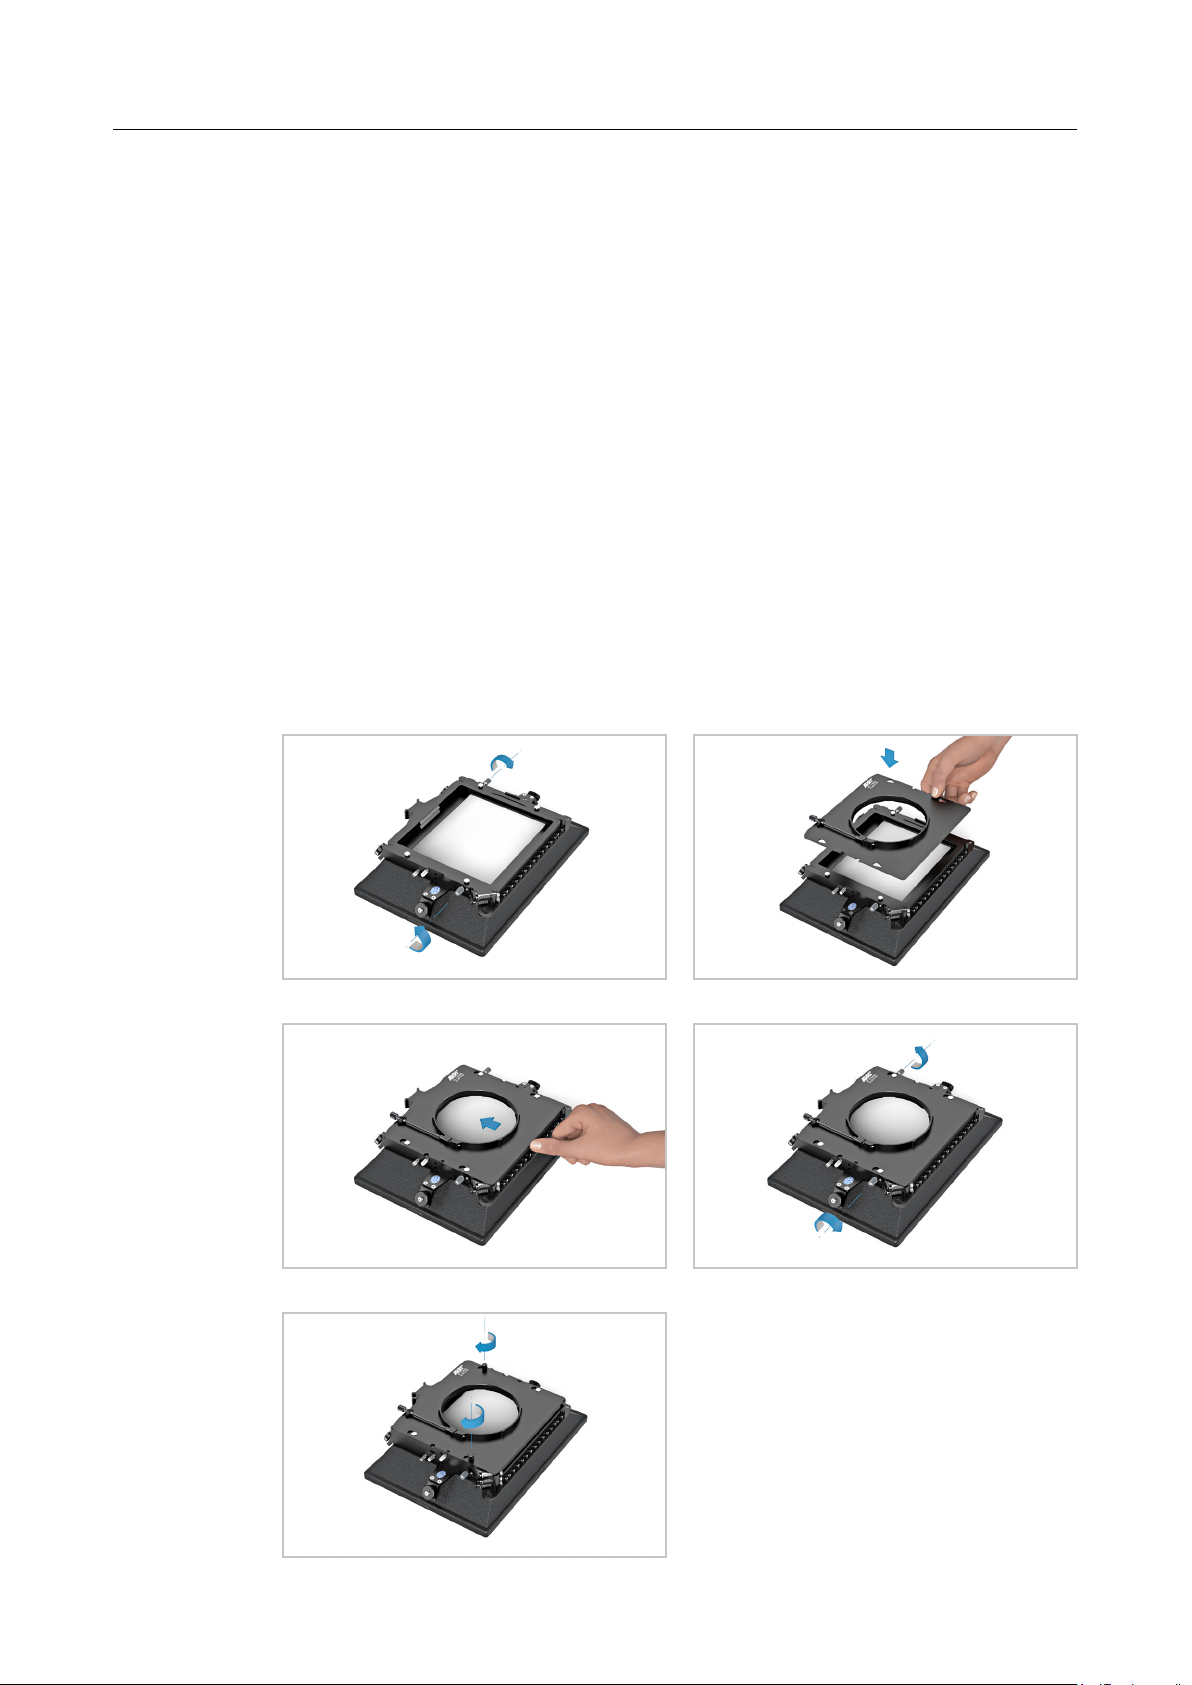
3.5 LMB 6x6 Extra Non-Rotatable Filter Stage...............................................12
3.6 LMB 6x6 Extra Rotatable Filter Stage.......................................................13
3.7 Filter Frame 6.6 x 6.6 inch .......................................................................15
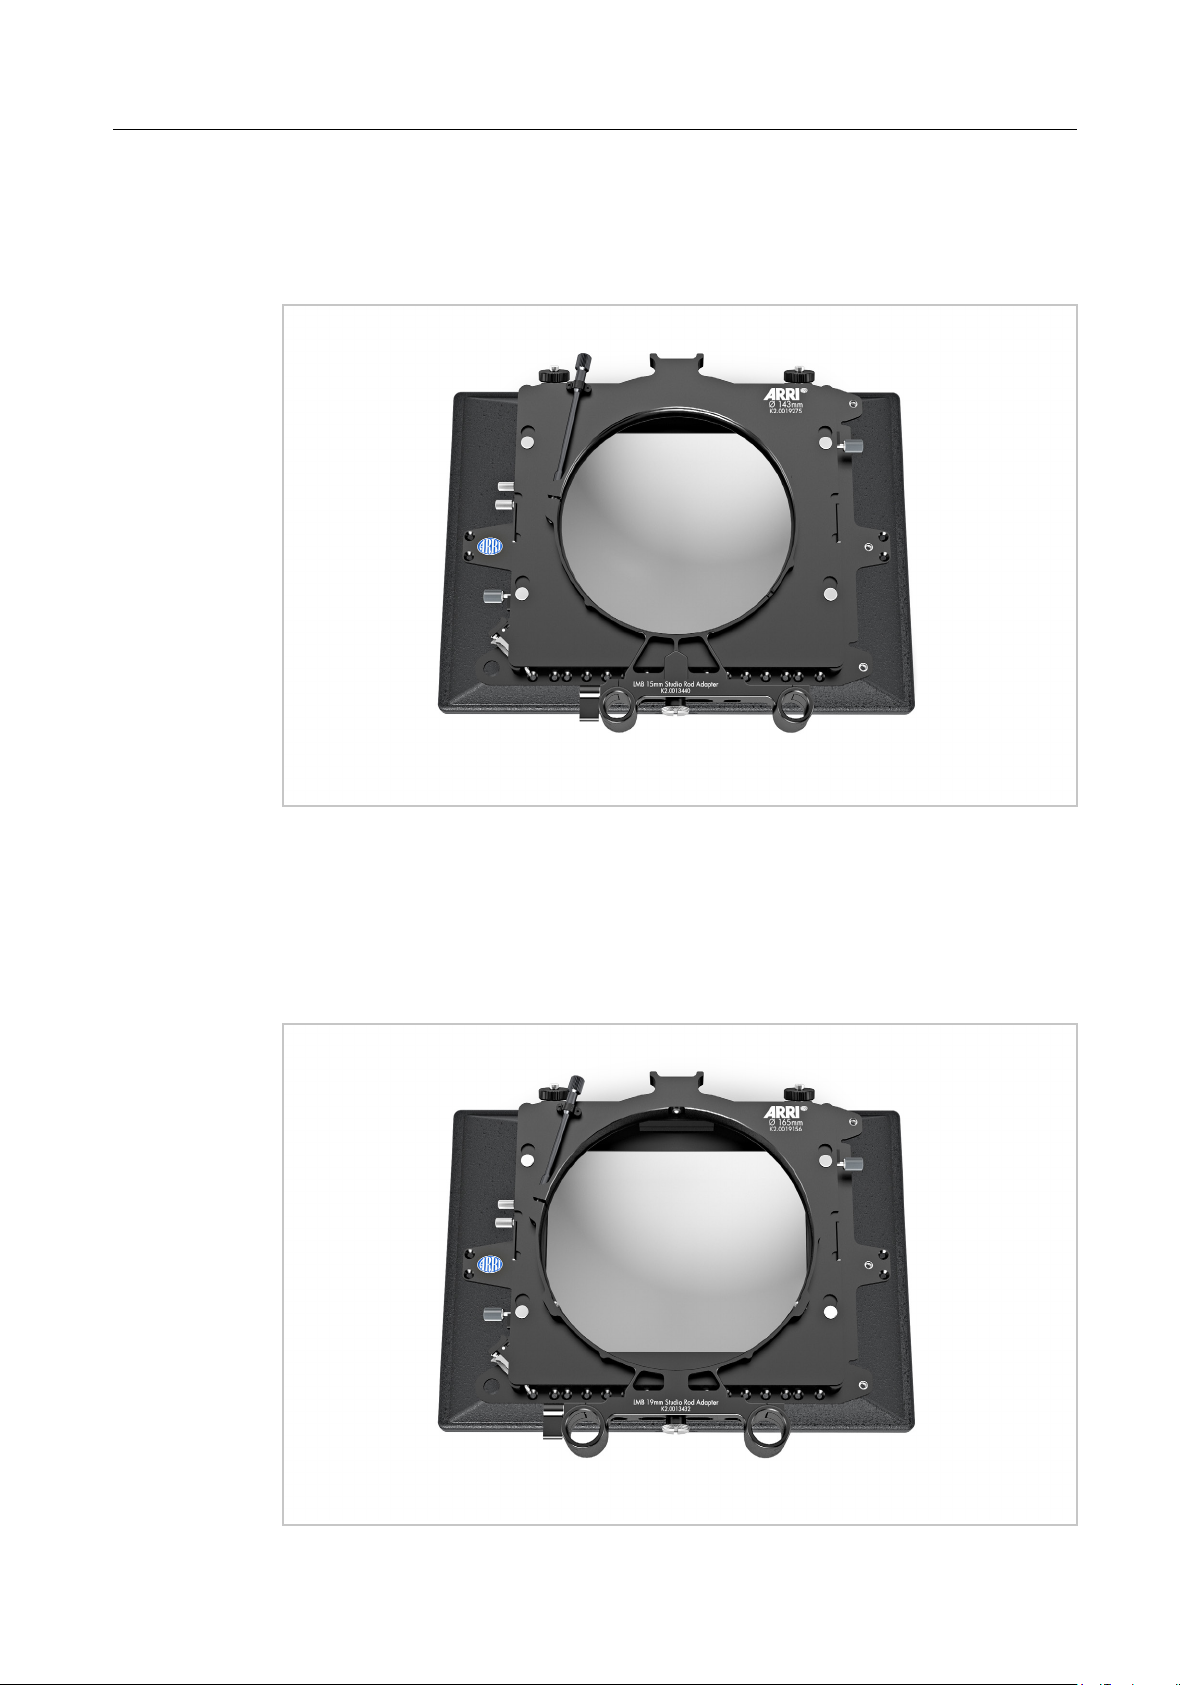
3.8 LMB 19 mm Studio Rod Adapter...............................................................16
3.9 LMB 15 mm Studio Rod Adapter...............................................................16
3.10 Tray Catcher .............................................................................................17
3.11 LMB 6x6 Swing Away Tilt Module (19 mm / 15 mm).................................18
3.12 LMB Accessory Adapter............................................................................21
3.13 LMB 6x6 Top, Bottom Flag........................................................................23
3.14 LMB 6x6 Side Flags .................................................................................24
3.15 Bottom Flag Holders .................................................................................25
3.16 LMB 6x6 Mattes (spherical / anamorphic).................................................25
3.17 Backplate with lter guides........................................................................26
3.18 Sunshade..................................................................................................26
4 Congurations.....................................................................................................27
4.1 Filter Congurations..................................................................................27
4.2 Mounting Congurations...........................................................................27
5 Buy Sets & Parts ................................................................................................28
5.1 Basic .........................................................................................................28
5.2 Sets...........................................................................................................28
6 Inlay for Peli Case 1637 ......................................................................................31
6.1 Bottom ......................................................................................................31
6.2 Top ............................................................................................................32
7 Legal Disclaimer..................................................................................................33
8 Service Contacts .................................................................................................34
Table of Contents

4Introduction
1 Introduction
The LMB 6x6 is designed for maximum modularity at a minimum weight, and can be tted
without the use of tools. Optimized for up to three 6.6 x 6.6 inch lters, the LMB 6x6 can
be used with 15 mm and 19 mm studio rod support.
To avoid unwanted reections the Matte Box can be tilted 10° up and down with the
optional Swing-Away Tilt Module. This module also allows fast and easy lens changes
without the need to dismantle the Matte Box.
For applications like Gimbal and Steadicam the additional non-rotatable and rotatable
lter stage can be used as an extreme lightweight set-up.
All common lens diameters are available as clamp adapters to t the matte box directly to
a lens.
Main Features
• For 6.6” x 6.6” lter size
• One product covering a wide range of applications
• Offers quick and easy set-up without tools
• Lightweight and streamlined

5Overview
2 LMB 6 x 6 Overview
+
2
89
7
11
12
8C
8B
8A
8E
8D
13
5
6
1
3
4
10

6Overview
1
LMB 6x6 Swing Away Tilt Mod.
19 mm Studio
Product Number K2.0019083
Page
18
2
LMB 6x6 Swing Away Tilt Mod.
15 mm Studio
Product Number K2.0019895
Page
18
3LMB 19 mm Studio Rod Adapter
Product Number K2.0013432
Page
17
4LMB 15 mm Studio Rod Adapter
Product Number K2.0013440
Page
17
5
LMB 6x6 Tilt and Flex Adapter
80-156 mm
Product Number K2.0019085
Page
10
6
LMB 6x6 Extra Non-Rotatable
Filter Stage
Product Number K2.0019133
Page
13
7
LMB 6x6 Extra Rotatable
Filter Stage
Product Number K2.0019159
Page
14
8LMB 6x6 Basic Module
Product Number K2.0019218
Page
26
8A Sunshade
Product Number K4.0019539
Page
25
8B LMB Flag Holders (pair)
Product Number K2.0013825
Page
15

7
8C Filter Frame 6.6 x 6.6 inch
Product Number K2.0019632
Page
17
8D Backplatewithlterguides Page
26
8E Mask 0 Page
26
9LMB 6x6 Side Flags
Product Number K2.0019216
Page
24
10 LMB 6x6 Top, Bottom Flag
Product Number K2.0019178
Page
23
11 LMB Accessory Adapter
Product Number K2.0013014
Page
21
12 LMB 6x6 Set of Mattes spherical
Product Number K2.0019253
Page
25
13 LMB 6x6 Set of Mattes anamorphic
Product Number K2.0019258
Page
25
LMB 6x6 Clamp Adapter 143 mm
Product Number K2.0019275
Page
9
LMB 6x6 Clamp Adapter 165 mm
Product Number K2.0019156
Page
12
Overview

8
3 Instructions
3.1 Clamp Adapter
The LMB 6x6 matte box adapts to various lens diameters via a series of
interchangeable clamp adapters and the Tilt and Flex Adapter.
Totaclampadapter:
• Open the grey screws at the left and the right side to unlock the clamp device (Fig. 1).
• Position the clamp adapter through the locking thumbscrews so it sits ush on the
lter stage (Fig.2).
• Slide the clamp adapter upwards (Fig. 3).
• 2-stage version: Tighten the clamp adapter using the two grey thumbscrews
positioned sideways at the lter stages (Fig. 4).
• 3-stage version: Tighten the clamp adapter using the two black locking thumbscrews
positioned at the back of the lter stage (Fig. 5).
Instructions
Fig. 1 Fig. 2
Fig. 3 Fig. 4
Fig. 5

9Instructions
3.2 LMB 6x6 Clamp Adapter 143 mm
Works with ARRI standard R2 rings when either the LMB 15 mm or 19 mm Studio Rod
Adapter is attached at the bottom of the LMB 6x6 Clamp Adapter 143 mm.
3.3 LMB 6x6 Clamp Adapter 165 mm
Works with ARRI standard R1 rings when either the LMB 15 mm or 19 mm Studio Rod
Adapter is attached at the bottom of the LMB 6x6 Clamp Adapter 165 mm.

10
3.4 LMB 6x6 Tilt and Flex Adapter 80-156 mm
The Tilt and Flex Adapter is a exible rubber donut compatible with lens diameters from
above 80 mm to less than 156 mm. It works perfectly with lenses where lens elements
are extending and can compensate the tilting angle when using the Swing Away Tilt
Modules from the LMB 6x6. An interface for both LMB 15 mm and LMB 19 mm Studio
Rod Adapters is integrated at the bottom.
Mounting Tilt LMB 6x6 Tilt and Flex Adapter 80-156 mm
• Open the grey screws at the left and the right side to unlock the clamp device (Fig. 1).
• Position the Tilt and Flex Adapter through the locking thumbscrews so it sits ush on
the lter stage (Fig. 2).
• Slide the clamp adapter upwards (Fig. 3).
• 2-stage version: Tighten the clamp adapter using the two grey locking thumbscrews
positioned sideways at the lter stages (Fig. 4).
• 3-stage version: Tighten the clamp adapter using the two black locking thumbscrews
positioned at the back of the lter stage (Fig. 5).
Fig. 1 Fig. 2
Fig. 3 Fig. 4
Fig. 5
Instructions

11
The Black Hole Donut is optimized for lenses with diameters between 95 and
136 mm.
Be sure that the Adapter ts perfectly on the lens.
Please take care that no pointed or sharp objects come into contact with the
LMB 6x6 Tilt and Flex Adapter.
NOTICE
Instructions
Mounting Tilt and Flex Adapter to the lens
• Mount the Basic Module to the Tilt and Flex Adapter
• Expand the rubber as far as necessary and turn it carefully around the lens.

12
3.5 LMB 6x6 Extra Non-Rotatable Filter Stage
The Extra Non-Rotatable Filter Stage makes it possible to use an additional 6.6 inch x
6.6 inch lter. For extreme lightweight applications such as Gimbal and Steadicam the
separate single lter stage works perfectly in conjunction with any clamp, or the Tilt and
Flex Adapter. Each lter frame is secured with an extra tray catcher which holds them
perfectly in place.
To attach the LMB 6x6 Extra Non-Rotatable Filter Stage
• Before tting the lter stage remove the rear clamp adapter.
• Open the grey screws at the left and the right side to unlock the clamp device (Fig. 1).
• Thread the Extra Non-Rotatable Filter Stage through the locking knobs (Fig. 2).
• Slide the lter stage upwards.
• Tighten the grey thumbscrews on both sides of the lter guides (Fig. 3).
If the lter stage won’t slide into the
clamp device, loosen the black screws
at the left side of the lter stage.
The 4 threads for the Sunshade from
the LMB 6x6 are integrated at the front
of the non-rotatable lter stage in order
to use the lter stage independent with
a clamp adapter at the back.
NOTICE
Instructions
Fig. 1 Fig. 2
Fig. 3

13
3.6 LMB 6x6 Extra Rotatable Filter Stage
The Extra Rotatable Filter Stage gives the possibility to rotate an additional 6.6 inch x
6.6 inch lter 360°. It attaches to the basic module by sliding to the rear and xed by two
thumb screws without the need for any tools. For extreme lightweight applications such
as gimbal and Steadicam the separate single lter stage works perfectly in conjunction
with any clamp or the Tilt and Flex Adapter. Each lter frame is secured with an extra tray
catcher which holds the lters in place perfectly.
Mountingtheextrarotatablelterstage
• Before tting the lter stage remove the rear clamp adapter.
• Open the grey screws at the left and the right side to unlock the clamp device (Fig. 1).
• Thread the third lter stage through the locking knobs.
• Slide the lter stage upwards.
• Lock the lter stage using the thumbscrews on both sides of the lter guides.
• The word “Top” is written on the rotatable lter stage to signify the right positioning
(Fig. 4).
Instructions
Fig. 1 Fig. 2
Fig. 3 Fig. 4
If the lter stage won’t slide into the
clamp device, loosen the black screws
at the left side of the lter stage.
Be aware that there are some limitations
with tilting when using the rotating lter
stage. It is mandatory to extend the
matte box slightly on the rods in the tilt
and ex arm when tilting is necessary.
NOTICE

14
The lter stage features an anti-friction coating and should not be greased or oiled.
NOTICE
How to use
• Insert a lter frame from the top of the matte box into the lter stage (Fig. 1).
• Rotate the lter stage to the required angle (Fig. 2).
• Fix the position with the metallic screw at the left side of the Extra Rotatable Filter
Stage (Fig. 3).
Fig. 1 Fig. 2
Instructions
Fig. 3

15
3.7 Filter Frame 6.6 x 6.6 inch
• Two lter frames are typically inserted from the top of the matte box with the clamp
adapter tted.
• If a third lter frame is needed, add a LMB 6x6 Extra Non-Rotatable Filter Stage
(please see description 3.5) or a LMB 6x6 Extra Rotatable Filter Stage (please see
description 3.6).
• Unlock the black screws at the left side of the lter-stage guides (Fig. 1).
• Slide the lter frames from the top downwards (Fig. 2).
• Lock the lter frame with the black screws at the left side of the stage guides.
• To protect the lters from falling out, close the tray catcher (please see description
3.10.).
Filter frames can be inserted from the bottom of the matte box if needed.
NOTICE
Fig. 1 Fig. 2
Instructions

16Instructions
3.8 LMB 19 mm Studio Rod Adapter
Tool-less screw in 19 mm studio support adapter to x the Matte Box to 19 mm studio
rods. Compatible with LMB 6x6 Clamp Adapter 165 mm, LMB 6x6 Clamp Adapter
143 mm and LMB 6x6 Tilt and Flex Adapter 80-156 mm.
• Secure the studio support without tools by using the thumbscrew.
• If necessary, use a screwdriver to tighten the studio support.
3.9 LMB 15 mm Studio Rod Adapter
Tool-less screw in 15 mm studio support adapter to x the Matte Box to 15 mm studio
rods. Compatible with LMB 6x6 Clamp Adapter 165 mm, LMB 6x6 Clamp Adapter
143 mm and LMB 6x6 Tilt and Flex Adapter 80-156 mm.
• Secure the studio support tool less with the thumbscrew.
• If necessary, use a screwdriver to fasten the studio support.

17Instructions
3.10 Tray Catcher
Each lter frame is secured with its own Tray Catcher holding them perfectly in place.
Two Tray Catchers are included in the basic module on the left side of the lter stage
guide. The Extra Non Rotatable Filter Stage and the Extra Rotatable Filter Stage do have
their own Tray Catcher.
How to use
• To secure the lter frames: Slide the black latch towards the lter stage (Fig. 1 so that
the spring-loaded mechanism will slide down (Fig. 2).
• To open the Tray Catcher: Slide the black latch towards the lter stage (Fig. 3) while
lifting the silver locking pin. Push the black latch forward to lock the silver locking pin
in place (Fig. 4).
Fig. 2
Fig. 3
Fig. 1
Fig. 4

18
3.11 LMB 6x6 Swing Away Tilt Module (19 mm / 15 mm)
This module offers a comfortable swing-away with extension for easier lens changes,
as well as an integrated tilt module that allows 10° up and down adjustments to avoid
unwanted reections.
• Secure the Swing Away Tilt Module with the three metallic screws at the right side of
the basic module.
• For more safety, use a 3 mm hex screwdriver to tighten the screws.
Fitting the matte box on rods
• Unlock the 19 mm or 15 mm support by turning the buttery nut counter-clockwise.
• Slide the matte box onto the rods.
• Lock both rods and the matte box by turning the buttery nut clockwise.
Horizontal adjustment
• Unlock the two 3 mm screws at the right side of the tilt module (Fig 1).
• Adjust the matte box into the desired positioning (Fig. 2).
• Mark the position with the two screws.
• Use the marker if you want to go back to the original position.
Instructions
Fig. 1 Fig. 2

19
Vertical adjustment
• Unlock the two 3 mm hex screws at the front of the tilt module.
• Adjust the matte box into the desired positioning.
• Mark the position with the two screws.
• Use the marker if you want to go back to the original position.
Extension
• Open the black buttery nut at the mini rods to slide the matte box forwards or
backwards (Fig. 1+2).
• Tighten the buttery nut once the matte box is in the desired position.
Before tting the matte box, install all rod-related accessories. Please ensure that
tting the matte box is the last step.
NOTICE
Fig. 1 Fig. 2
Fig. 1 Fig. 2
Instructions

20
Swing Away
• Loosen the Tilt and Flex Adapter or remove the lens rubber ring from the lens.
Alternatively, extend the matte box with the extension module.
• Pull the release plunger while opening the matte box to the right of the camera until it
locks automatically (Fig. 1+2).
• Pull the release plunger and swing the matte box back onto the lens until it locks
automatically.
• Adjust the matte box extension if necessary.
Tilt Module
• Turn the tilt control counter-clockwise for tilting up to 10° and clockwise for tilting down
up to 10° (Fig. 1).
• When the desired position is achieved, lock the tilt module with the locking nut (Fig. 2).
The Swing Away Tilt Module works perfectly in combination with the Tilt and Flex
Adapter.
NOTICE
Fig. 1 Fig. 2
Fig. 1 Fig. 2
Instructions
This manual suits for next models
1
Table of contents
Other ARRI Camera Accessories manuals

ARRI
ARRI IVS User manual

ARRI
ARRI Mattebox MB-20 User manual

ARRI
ARRI DEP-1 User manual

ARRI
ARRI Mattebox MB-20 User manual

ARRI
ARRI arrilux 400 lighthouse User manual

ARRI
ARRI 12xT1.3 User manual

ARRI
ARRI ALEXA Mini LF SUP 7.2 How to use

ARRI
ARRI ALEXA Mini LF SUP 7.1.2 How to use

ARRI
ARRI TRINITY 2 User manual

ARRI
ARRI cforce mini RF User manual