ASCOM EURIT 133 User manual

a The world in your hands
Ascom Eurit 133
Cordless ISDN telephone DECT
User’s Guide
Attention:
Please read the instruction manual as well as
the safety precautions before using. Keep the
instruction manual carefully!


Dear customer
Thank you for purchasing the Ascom Eurit 133.
About the set
In choosing the Ascom Eurit 133 you have acquired a cordless telephone that combines
the advantages of "untied telephoning" with the user comfort of the ISDN network. The
set itself is designed using modern digital technology to the standard for cordless
telephones (DECT) for connection to the public Euro ISDN network.
Besides the usual telephone features it also offers:
• The possibility of storing up to 150 names and numbers
• Last number redial for the last 15 call numbers
• Call register of 30 answered/unanswered call numbers
• 5 multiple subscriber numbers (MSN)
• Support for the following supplementary services:
– Hold/brokering
– Conference with three subscribers
– Call diversion
– Callback to busy subscriber
• Programming of 5 providers
Safety notes
Please read all the safety notes before putting the set into operation:
• Safety notes page 5
Operating the set
To make good use of all the features of your new Ascom Eurit 133 we recommend that
you read the following sections:
• Basic settings page 10
• Setting up users (programming multiple numbers) page 13
The most important notes on operating the set are provided in the following sections
:
• Installation and operation page 6
Note:
• ISDN functions are network-related services which, depending on the network
operator, may at present only be available in part or not at all (refer to the menu
structure in the Appendix)
• Sometimes texts appearing on the display differ from those in the user guide
(example: "Base stat. ringer" for base station ringer)
Enjoy your communication experience!
A1

Red light: lights up when a
line is seized, flashes when a
handset is logging on.
Green light: flashes while
batteries are being charged
Receiver
Explanations
Handset
Handset volume set to
"loud".
Microphone on the handset
is switched off.
Base station indicator.
Battery indicator
Display
Return key
Microphone
Battery charge contacts
Base station
A2
ABCD
ABCD
Display symbols
Internal key
Anna HG:2
23.07.99 10:55
7 5 u
W t Pm
ABCD
ABCD
ABC
Connect key
Global call key
Volume key "+" Loudspeaker
Volume key "–"
Connection indicator
Call register: the entry has
been answered.
Call register: the entry has
not been answered.
ABC Letters can be entered.
Loudspeaker
Fox key
(menu key)
Keypad
(numbers and letters)
Display symbols

A3
With the Ascom Eurit 133 you can optimally and comfortably use up to 5 multiple
subscriber numbers (MSNs) allocated by your service provider. This means that for a
handset you can allocate a subscriber number to up to 5 different subscribers and
configure special settings. These settings apply as soon as the respective user is selected
on the handset (change user). For detailed information see pages 13 and 36.
User benefit
•Call charge data can be acquired separately (for each subscriber number)
•The individually determined ringing tone and name signals a call to the respective
user.
•The following settings can be configured individually for each user or subscriber number:
–User name
–Ringing tone
–Identity restriction
–Call-waiting on/off
–Call forwarding on/off
–Acquire/display charge data
Application example
At home you would like to separate the private and business calls with separate cost
data acquisition and to be able to acoustically differentiate between incoming calls.
Your are using handset 1 predominantly in your home office and handset 2 predominantly
in the living areas.
➡An incoming call on 032 624 2411 is signalled on HS1 + HS2 with melody 1 (private).
➡An incoming call on 032 624 2412 is signalled only on HS1 with melody 3 (business).
Exchange
032 624 2411 (MSN A)
032 624 2412 (MSN B)
…
Base station A
Handset HS: 2
User A: private
melody 1
Handset HS: 1
Benutzer A: Privat
melody 1
User B: business
melody 3
User concept


1
20313553en_ba_a0
Quick reference user guide
This guide contains the main operating se-
quences. For more detailed information
please refer to the detailed user guide.
After pressing the fox key below "Pm" you
can select from the following functions:
Main menu in the On state
Change user
Calling Register
Keypad lock
Ringer off
Handset setting
BaseStat. setting
Service functions
Charges
Supl. services
Menu in the communication state
Park
Loudspeaker
Handset volume
DTMF transmission
Directory
Registering the handset
1. On the base station keep ipressed
for 5 seconds.
2. In the menu of the handset under
"BaseStat. setting" – "Log on" –
"on base station" prepare the
handset for registration.
Registering the handset on another
base station
1. Prepare the other base station
2. In the menu of the handset under
"BaseStat. setting" – "Log on" – "On
other system" prepare the handset
for log on.
Taking/ending a call
bPress the Connect key.
Dialling out
Press
b
then dial the number
or
select call number, then press
b.
(the character last entered can be deleted
with "b").
Internal call
Press i.
then dial the internal number.
Last number redial
Press Wand select the entry with
V, vthen press b.
Calling-Register
Press Pm .
V, vselect the desired
"Calling-Register".
V, vselect the desired .
Press b.
Directory entry
Press t.
Press NEW .
Enter subscriber number and name.
Enter any required options.
Dialling a number from the directory
Press t.
Enter the initial letter.
V, vsearch for entry.
iview entry.
Confirm with OK .
Press b.

2
20313553en_ba_a0
Quick reference user guide
Switching loudspeaker on base
station on/off
You are in the middle of a call.
Press Pm .
Select V, v"Loudspeaker".
Confirm with OK .
Making a call between two handsets
Press i.
Press 1… 6.
Make your call.
b
End your call
.
Connecting a call internally
You are in the middle of a call.
Press i.
Enter 1… 6internal subscriber
number.
Confirm with OK .
b
End your call
.
External inquiry
You are in the middle of a call.
Press R(inquiry).
Enter external subscriber number.
Confirm with OK .
Make your inquiry.
Brokering
You are making a call while keeping a
second call on hold.
1≥2 change to the other call partner.
2≥1 change to the other call partner.
Ending brokering
You are brokering.
Press Pm .
Select V, v"End active call".
Confirm with OK .
Conference with three subscribers
You are making a call
while keeping a second call on hold.
Press Pm .
Select V, v"3pty conference".
Confirm with OK .

3
20313553en_ba_a0
Table of contents
Explanations ................................... A2
Quick reference user guide ............... 1
Safety notes ....................................... 5
Contents of package ......................... 5
Accessories ........................................5
Setting up the telephone
and putting it into service ................ 6
Installation location/range .................. 6
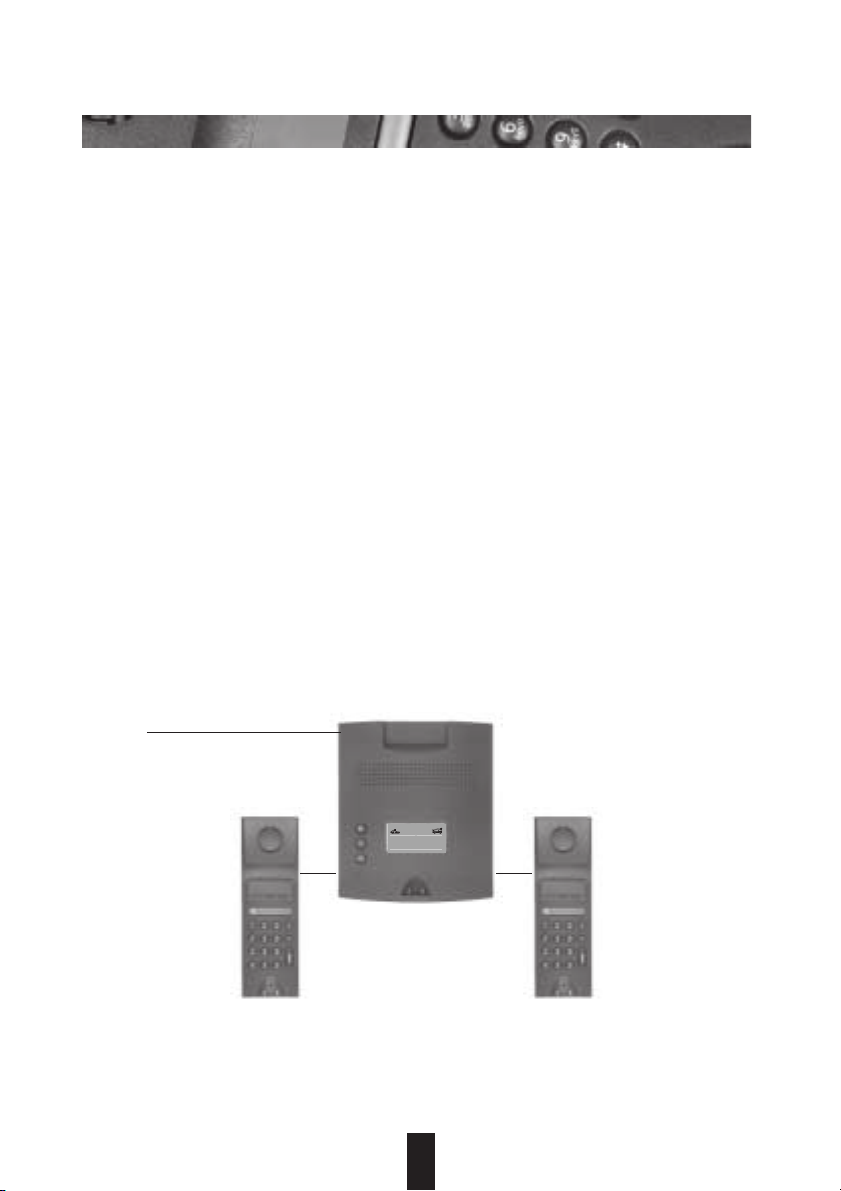
Connecting the base station ............... 7
Disconnecting the cords from
the base station .................................7
Inserting and charging the
battery cells in the handset ................. 8
Charging the battery cells ..................9
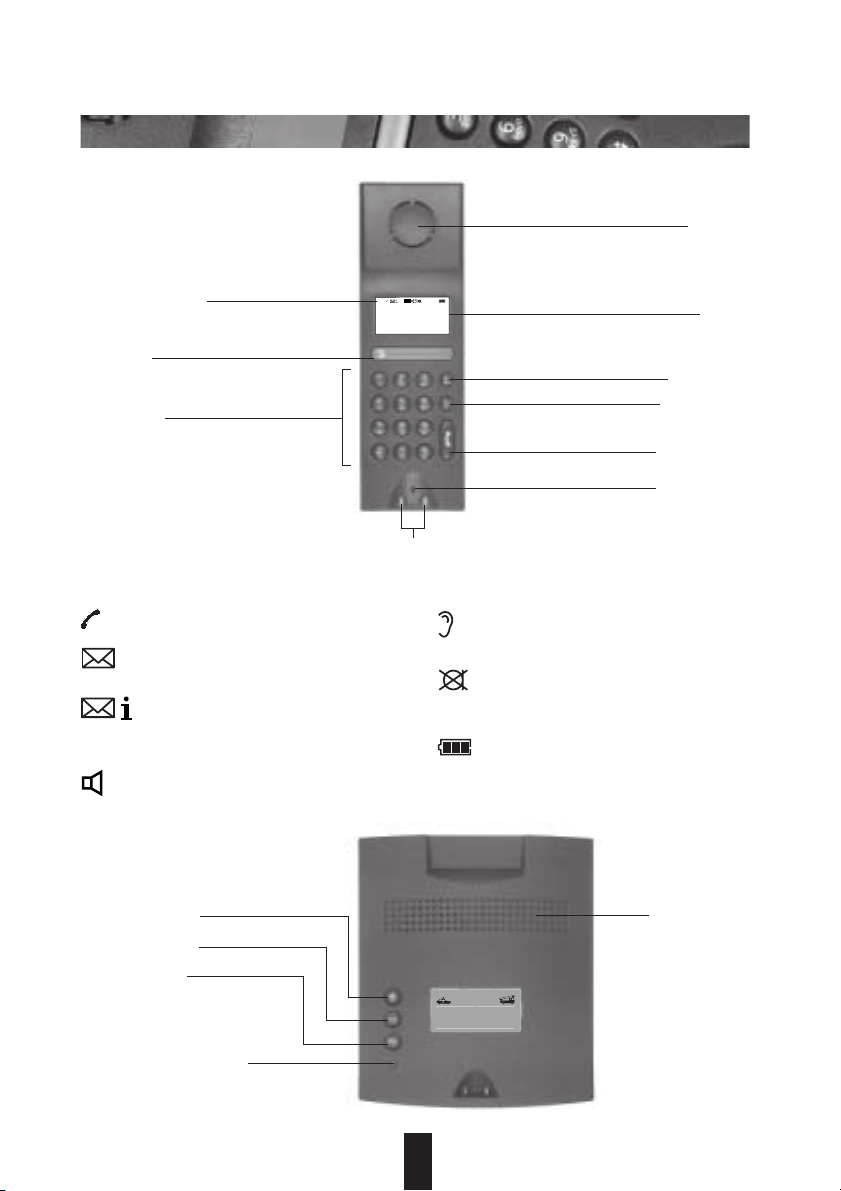
Battery indicator ................................. 9
Basic settings ................................... 10
Controls ...........................................10
Keying in names ............................... 11
Practical examples ............................ 12
Main menu ......................................12
User concept ....................................13
Setting up users ...............................13
User Table ........................................13
Handset: ON state ............................14
Switching the handset to the OFF state14
Ringer off .........................................14
Lock state (key lock) .........................14
External calls .................................... 15
Answering a call ............................... 15
Rejecting a call .................................15
Ending a call ....................................15
Off-line call preparation ....................15
Dialling with the numeric keypad .....15
Redial register .................................. 16
Callback to busy subscriber ..............16
Editing the Redial-Register ................ 16
Directory ........................................... 17
Storing an entry in the directory .......17
Setting options for an entry .............. 17
Selecting an entry in the
directory...........................................18
Editing/deleting a
private file entry ...............................18
Using a directory entry for
off-line call preparation ....................18
Transferring directory entries
to other handsets .............................19
Before the transfer ...........................19
Transmitting entries ..........................19
Receiving entries ..............................19
Calling-register ................................ 20
Selecting an entry from the
Calling-Register ................................20
Editing the calling-register ................20
Clearing the calling-register .............. 20
Provider dialling .............................. 21
Call by Call ....................................... 21
Shortcuts .......................................... 22
Shortcuts to functions ......................22
Programming shortcuts ....................22
Taking a shortcut .............................. 22
During the call, 1 connection .......... 23
Internal inquiry ................................. 23
External inquiry ................................23
Mute switch M ................................. 23
Menu in communication state ..........23
Parking ............................................23
Open listening at the base station ....23
Adjusting the handset volume ..........24
Keypad/Send DTMF ..........................24
Directory ..........................................24
Call waiting ...................................... 24
During the call, 2 connections ........ 25
Brokering (alternating calls) ..............25
Mute switch ..................................... 25
Menu in communication state ..........25
Conference with
three subscribers ..............................25
Internal calls ..................................... 26
Making calls between two handsets .26
Call handover to another handset ....26
Enquiry call to another handset ........26
Connecting, brokering,
three-party conference .....................26
Global call/paging ............................27
Activating call diversion ....................28

4
20313553en_ba_a0
Table of contents
Supplementary services .................. 28
Checking and clearing the call
forwarding status .............................28
Unparking ........................................28
Park call-id. ......................................28
Call charges and call duration ........ 29
Setting the factor .............................29
Setting the currency .........................29
Checking and clearing the totals ......29
Direct call (babyphone feature) ...... 30
Activating direct call .........................30
Initiating a direct call ........................30
Switching direct call off .................... 30
Preparing the base station
for registration .................................31
Operation with several handsets ... 31
Registering a handset .......................31
Logging a handset onto a
third-party base station (GAP)...........32
Logging a third-party handset
onto the base station .......................32
GAP uses .........................................33
De-registering a handset from
the base station ...............................33
Application example ......................... 34
Selecting the base station .................34
Handset settings .............................. 35
Setting the language ........................35
Selecting the battery type ................. 35
General Setting ................................ 35
Activating/deactivating the keyclick ..35
Range warning .................................36
Activating/deactivating
the charge check tone ......................36
Offhook answering .......................... 36
Lighting ...........................................36
Autom. DTMF ..................................36
Entering the user name ....................36
Handset volume ............................... 37
Handset ringer .................................37
Handset-PIN (Personal Identification
Number) ..........................................37
Multiple subscriber number (MSN) ...38
Allocating a multiple subscriber
number (MSN) .................................38
Multiple subscriber number settings .38
Identification restriction (CLIR) ..........38
Call-waiting .....................................38
Base station ringer ...........................38
Time and date ..................................39
Base station PIN (Personal
Identification Number) .....................39
PBX-related operation ..................... 40
Public access code ............................40
Incoming code .................................40
Autom. ECT .....................................40
Autom. keypad ................................40
Operation on several base stations ...40
Directory entries ............................... 40
Resetting the handset to the
default setting .................................. 41
Resetting the directory .....................41
Resetting the base station to the
default setting .................................. 41
Service functions ............................. 41
Software version ..............................41
General information ........................ 42
Troubleshooting ...............................42
Guarantee ........................................ 43
Cleaning – when necessary ..............43
Approval ..........................................43
CE labelling ......................................43
Technical Data .................................. 44
Index ................................................ 45
Tables ................................................ 46
Handset settings ..............................47
Menu tree (On state) ....................... 48
Labels for important numbers ........ 51
Guarantee voucher .......................... 53
Declaration of Conformity .............. 55

5
20313553en_ba_a0
Safety notes / Contents of package
Safety notes
The DECT cordless telephone is used for
transmitting voice via the analogue tel-
ephone network.
No other type of use is permitted and will
be regarded as contrary to the telephone’s
intended use.
The User Guide and its safety notes are an
integral part of the equipment and must
be handed over to the new owner when
reselling the equipment.
Warning!
Only use approved nickel-metal hydride
(NiMH) batteries or nickel-cadmium (NiCd)
batteries!
NiMH AAA: • Sanyo: HR-4U
• Panasonic: AAA P-03P
• Varta: VH 551 AAA
• Maxell: Ace HR-AAA
NiCd AAA: • Panasonic: P-25 AAAR
• Sanyo: N-4U
Using other battery cell types or non-re-
chargeable batteries/primary cells can be
dangerous and can lead to malfunctions
of and/or damage to the set. Ascom can-
not accept any liability in such cases.
•Make sure you have set the
battery type on the handset
correctly!
• Make sure the battery cells are fitted
correctly!
• Do not immerse the battery cells in
water; do not throw them into the
fire.
• Battery cells can become warm when
being charged; this is a normal and
harmless process.
• Do not use third-party charging
stations as they may damage the
battery cells.
• Only use the enclosed SNG 4 af power
supply unit for the base station and
the charging bracket.
• Before using the telephone, hearing-
aid users should be aware that radio
signals interfere with hearing aids and
can cause an unpleasant humming
noise if sufficiently loud
.
What’s included in the delivery
package and accessories
The delivery package contains the follow-
ing:
• Base station
• Handset
• 3 NiMH battery cells
• Plug-in main unit SNG 4 af
• Belt clip
• Connecting cord
• User Guide including Quick Reference
Note:
The plug-in main unit is located under the
fibre mould in the box.
Accessories
You can purchase the following accesso-
ries from your Ascom dealer:
• Charging station for the handset
• Additional handsets
• Additional base stations

6
20313553en_ba_a0
Installation location/range
Installation location
Do not position the base station on a me-
tallic surface or in the immediate vicinity of
other electronic appliances such as hi-fi
equipment, office equipment or microwave
ovens; this will prevent any mutual inter-
ference. Also avoid installing the base sta-
tion in the vicinity of heat sources, such as
radiators, or in direct sunlight. For the best
possible range we recommend a central
installation location at the centre of your
radius of action. Avoid installation in niches,
small rooms or behind steel doors. To pre-
vent radio feedback in other telephones,
we recommend the largest possible dis-
tance (min. 1 m) between the base station
or handset and the other telephone.
Setting up your telephone
Your telephone is designed to be used un-
der normal operating conditions. Modern
furniture is treated with an endless variety
of lacquers and plastic coatings. Some of
these substances may contain agents which
will attack or deform the plastic feet of the
base station. If the equipment feet are
chemically altered in this way, they may
leave unsightly marks on the surface of
furniture. Ascom cannot accept any liabil-
ity for damage of this kind. We recommend
that you use a non-slip underlay for your
telephone, especially on new furniture or
furniture treated with lacquer-based pre-
servatives.
Range
The radio range is up to 300 m in the open.
Ambient conditions can affect the range,
as can room and building-related factors.
The effective range is considerably lower
inside buildings than outdoors. Silent zones
can occur due to the digital transmission
in the frequency range used – and also
within the range, depending on the struc-
tural environment. In such cases the trans-
mission quality can be affected by repeated,
short call-interruptions. Normal call quality
can be restored simply by moving slightly
out of the silent zone. If the range is ex-
ceeded, the call will be disconnected shortly
afterwards (if necessary switch on range
warning tone).
Listening protection
The Ascom Eurit 133 transmits the voice
data between base station and handset in
encrypted form (scrambled). As a result any
tapping of your calls by other cordless tel-
ephones, radio receivers, scanners, etc., is
precluded.
Setting up the telephone and putting it into service

7
20313553en_ba_a0
Connecting the base station
Warning!
Make sure you do not confuse the plugs
of the connecting cord and plug-in mains
unit cord on the base station. If you do
connect up the wrong plugs, the base sta-
tion will not function and may be damaged.
Connecting cord
The connecting cord (1) has two different
plugs. Insert the smaller one into the socket
(telephone symbol) underneath your tel-
ephone until it snaps firmly into place. Feed
the cord through the moulded cable duct
provided. Connect the larger plug into your
telephone socket.
Mains unit cable
Fit the plug from the mains unit cable (2) –
until it clicks into place – into the socket
identified with the mains unit symbol, then
feed the cable through the moulded cable
duct provided. Now plug the plug-in mains
unit into a 230V outlet.
Note:
Your telephone will not function if the
mains unit is not plugged in or if the power
supply fails.
The telephone may only be used in con-
junction with an SNG 4 af mains unit, tested
in compliance with EN60950 Protection
Class 2.
Disconnecting the cords from
the base station
First unplug the mains unit from the 230V
mains socket. To release the plugs on the
connecting cord and mains unit cables,
press the snap-in clip towards the plug body
(using a small screwdriver for instance) and,
at the same time, pull the plug out by the
cable.
Setting up the telephone and putting it into service
(mains unit cable) 2 1 (connecting cord)
Base station

8
20313553en_ba_a0
Inserting and charging the
battery cells in the handset
Inserting the battery cells
1. Remove the battery compartment
cover by pressing it slightly and
sliding it downwards.
2. Insert the 3 battery cells into the
battery compartment (as shown).
Make sure the polarity is correct.
3. Slide the battery compartment cover
back until it clicks into place.
4. Switch the handset on by pressing
the connect key.
Setting up the telephone and putting it into service
Note:
If the battery cells are inserted incorrectly,
the handset will not function.
Do not use a mix of different types of bat-
teries.

9
20313553en_ba_a0
Note:
An audible acknowledgement tone at the
start of the battery charging process sig-
nals that the handset is correctly positioned
on the base station. If the battery cells are
completely discharged, the audible ac-
knowledgement tone will be heard only
once the battery cells have received a mini-
mum charge.
When the battery cells are first inserted,
the battery status is unclear. Correct indi-
cation is obtained only after a complete
charging cycle.
Do not use batteries/primary cells,
only NiMH or NiCd battery cells.
Do not place the handset on the base sta-
tion if the battery cells have not been fit-
ted.
Please observe the following to obtain
a long service life for your battery cells:
• Prior to initial use, NiMH battery cells
have to be charged without interrup-
tion for at least 12 hours.
• Make sure the charging contacts do
not come into contact with metallic or
greasy parts.
• After long periods out of operation
with the power switched off (e.g.
during holidays), charge the handset
(the battery cells) before putting the
set back into operation.
• Please dispose of defective battery
cells in the correct way (not in
domestic waste).
• Only remove the battery cells from the
handset to replace them with new
ones.
• Do not charge the battery cells out of
the handset.
Charging the battery cells
The battery cells are not charged when
supplied. To charge the batteries you need
to place the handset onto the base station.
An audible acknowledgement signal indi-
cates that the handset is correctly posi-
tioned.
A set of NiMH battery cells (550mAh) pro-
vides approx. 140 hours "standby" or
approx. 15 hours "continuous talk time".
The charging time is approx. 12 hours.
A set of NiCd battery cells (250mAh) pro-
vides approx. 70 hours "standby" or
approx. 7 hours "continuous talk time".
The charging time is approx. 6 hours.
The section "Handset settings" on page 35
describes how to select the battery type.
Note:
The batteries may be destroyed if the hand-
set is programmed for the wrong battery
type.
Battery indicator
The battery indicator on the display shows
the approximate charging status of the
battery cells:
flashing : battery charging
continuous : battery between
50% und 100%
continuous : battery between
30% und 50%
continuous : battery between
5% und 30%
continuous : battery below 5%
flashing : battery almost
discharged
continuous : battery status
unclear
Setting up the telephone and putting it into service

10
20313553en_ba_a0
Basic settings
Please note that the text in this user guide
may differ somewhat from the text on the
display.
Controls
(Keys + display see fold-out page)
Switching the handset on
Press the Connect key to switch the hand-
set on. The handset is now in the On state.
Display
In the On state the internal call number of
the handset as well as the date and time
are displayed and the three following func-
tions of the menu key are available:
Redial-Register, directory and main menu.
Display symbols
The following symbols/texts are used or displayed in the bottom display line:
Symbol / text Function
Pm Main menu
iInformation
WRedial-Register
aCalling-Register answered
ai Calling-Register unanswered
tDirectory
Pt Store a call number in the directory
ABCb Edit an entry
PL Delete an entry
Å/ åSwitch between upper case and lower case characters
o YCancel selection (empty square / circle)
x XSelect, Select (filled-in square / circle)
bDelete last character (backspace)
UChange user
>,<,V,vCall up further menu items
≥/ ≤Increase / decrease setting
9Reject a call
7Call forwarding activated
5Callback to busy subscriber
RInquiry
Microphone ➔mute switch
1≥2 / 2≥1 Brokering 1 to 2 / brokering 2 to 1
OK NEW Confirm selection
YES NO Answer dialogue
uRinging tone off
≥G Accept call waiting during the call
ZActivate automatic last number redial

11
20313553en_ba_a0
Basic settings
Fox key (menu key)
Has several functions. In the bottom dis-
play line, up to three symbols/texts can be
displayed. If you want a function to be car-
ried out, press the Fox key directly below
the desired symbol.
Return key
Every time you press a key you take one
step back in the menu. Keep the key
pressed to get to the On state.
Internal key
For making calls to further handsets (inter-
nal calls).
Connect key
• To set up calls to external call partners
• To take and end incoming calls
• To switch the handset on
• In the menu: cancel the operation and
return to the On state.
Numeric keys
To enter numbers and letters.
Keys
When you first
Alphanumeric entry, Alphanumeric entry,
press the key upper case lower case
1 Number 1 - . ? ! , : ; 1 ' " - . ? ! , : ; 1 ' "
2 Number 2 A B C 2 Ä À Á Å Æ Ç a b c 2 ä à á å æ ç
3 Number 3 D E F 3 È É Ê d e f 3 è é ê
4 Number 4 G H I 4 Ì Î Í ˙ı ˇ
Gg h i 4 ì î í ı ˘g
5 Number 5 J K L 5 j k l 5
6 Number 6 M N O 6 Ö Ò Ó Ø Ñ m n o 6 ö ò ó ø ñ
7 Number 7 P Q R S 7 ¸S p q r s 7 ß ¸s
8 Number 8 T U V 8 Ü Ù Ú t u v 8 ü ù ú
9 Number 9 W X Y Z 9 w x y z 9 ÿ
0 Number 0 + 0 + 0
* Character *
* ( ) = % @ & $ £ ¥ * ( ) = % @ & $ £ ¥
# Character # blank space # blank space #
Keying in names
Below the numbers of the keypad there are
letters. To select a letter press the respec-
tive key once or several times. After you
have entered an upper case letter or a blank
space the system automatically switches to
lower case.

12
20313553en_ba_a0
Basic settings
Main menu
In the On state "Pm" provides the follow-
ing functions:
You are now in the menu "Handset set-
tings".
Now scroll to the menu item "Language"
and press "OK".
You are now in the sub menu "Language".
Select the desired language with "V" or
"v" and confirm the selection by pressing
"X".
The new language is set.
Press the return key "u" to return one
step at a time or press it for longer to re-
turn to the On state.
Note:
If you press the Connect key or if there is
an incoming call, the procedure is can-
celled.
Practical examples
Selecting a language:
Below the display
"
Pm
"
press the Fox key.
You are now in the main menu. Scroll to
the menu item "Handset settings" by press-
ing the Fox key below "<" or ">" several
times.
Confirm the selection by pressing "OK".
Calling-Register
Keypad lock
Ringer off
Handset settings
BaseStat. setting
Service functions
Charges
Supl. services
Change user 1)
{{{{{{{{{{{{{{{{{{{}
{{{{{{{{{{{{{{{{{{{}
ABCD
Handset settings
>< OK
{{{{{{{{{{{{{{{{{{{}
ABCD
BCD
Handset settings
Username
Language¤¤¤¤¤¤¤
V OK v
{{{{{{{{{{{{{{{{{{{}
ABCD
Language
Y|Italiano
X{Englisch¤¤¤¤¤¤
V v
X
1) If no user is programmed, "Change
user" is not displayed.

13
20313553en_ba_a0
Basic settings
User concept
With your Ascom Eurit 133 you can set up
a maximum of five users on one handset,
e.g. with one user name "Private",
"Daughter" and "Business". If two user
names have been programmed, "Change
user" appears after pressing the menu key
"Pm", and with the Fox key "U"you can
select the desired user (Private, Daughter,
or Business).
Setting up users
Important:
To be able to take advantage of all the func-
tions of your Ascom Eurit 133, you have to
set up at least one user, i.e. program at least
one multiple subscriber number [MSN].
Note:
If no multiple subscriber number (MSN) is
allocated to the handset, the telephone
always dials via the same MSN; in the case
of incoming calls all registered handsets
always ring.
You determine the designation of the user
(Private, Daughter etc.) under "Handset
settings". In the case of incoming calls, the
set then immediately signals whom the call
is intended for.
Handset settings
Username
User A
. . .
BaseStat. setting
MSN setting
Number MSN
MSN A
…
User Table
In the table provided (pp. 46/47) you should
record the settings which you have selected
for the base station and the handset.

14
20313553en_ba_a0
Basic settings
Lock state (key lock)
In the lock state the keyboard is locked.
Incoming calls are signalled and can be
answered by pressing the Connect key. To
make an outgoing call you need to switch
the handset from the lock state to the On
state.
Handset: ON state
Switching the handset to the
OFF state
When the handset is OFF, incoming calls
are not signalled.
To turn the handset ON, press the Connect
key.
Ringer off
The ringing tone on the handset is switched
off. A call is only signalled on the display
and can be answered in the usual way.
The menu item changes to "Ringer on" and
the ringing tone can be activated again.
Note:
The ringing tone of the base station and of
other handsets is not switched off.
Keypad lock
Handset off
Handset settings
Handset off
Table of contents
Other ASCOM Cordless Telephone manuals

ASCOM
ASCOM DT290 User manual

ASCOM
ASCOM IP-DECT User manual

ASCOM
ASCOM i63 User manual

ASCOM
ASCOM 9D24 TALKER - User manual

ASCOM
ASCOM Avena 122 plus User manual

ASCOM
ASCOM d62 Talker Instruction sheet

ASCOM
ASCOM 9p23 User manual

ASCOM
ASCOM 9D24 TALKER - User manual

ASCOM
ASCOM OFFICE T User manual

ASCOM
ASCOM d83 User manual