ASI EZFILL 0390-1A Product manual

1408201234 Rev J 05 August 2015
EZFILL™ SOAP DISPENSER
AUTOMATIC DECK MOUNTED
SOAP DISPENSER FOR
EZFILL™ TOP FILL MULTIFEED KIT
WITH 1.32 GAL . (5L) CONTAINER
INSTALLATION AND MAINTENANCE GUIDE
Model 0390-(n)*

1408201234 Rev J 05 August 2015
1
TABLE OF CONTENTS
2 SUFFIX CODE INDEX AND APPLICATIONS
3 PRE-INSTALLATION INFORMATION
4 PACK CONTENTS
5 TECHNICAL DATA
6-8 INSTALLATION
9 BATTERY REPLACEMENT INSTRUCTIONS
9 MAINTENANCE
10 TROUBLESHOOTING
11 SPARE PARTS LIST
12 WARRANTY
13-14 EZ FILL™ REMOTE CONTROL
Unit Install Date
Unit Location in Facility
Unit S/N (From Label)
Supplied By
Original PO No.
ASI Order No.

1408201234 Rev J 05 August 2015
2
Space Provided For Owner Notes
*SUFFIX CODE INDEX AND APPLICATION
Model № Sux Service Application
Universal Model, Battery Operation
USA/UK/EU Interchangeable Plug Model, AC Adapter Operation
AU Model, AC Adapter Operation
Universal Model, Battery Operation, Six Pack
USA/UK/EU Interchangeable Plug Model, AC Adapter Operation, Six Pack
AU Model, AC Adapter Operation, Six Pack
1A
1AC
3AC
6-1A
6-1AC
6-3AC
Schedule of Model № Sux Codes to replace (n) in Model № and Application

1408201234 Rev J 05 August 2015
3
PRE-INSTALLATION INFORMATION
CHECK CONTENTS
Separate all parts from the packaging and check each part with the
PACK CONTENTS section.
Make sure all parts are received and separated before discarding any
packaging material.
If any parts are missing, do not attempt to install the system until you
obtain the missing parts.
IMPORTANT
Ensure there is adequate space and clearance under the vanity to
accommodate the SD Mounting Shank and Basin Nut in the desired
location before drilling the hole in the counter top.
Ensure there is adequate space to place the pump within reach of the
Com Cable from the SD Shank.
Keep in mind that the location of the user hands, while using the faucet
nearby, should not interfere with the soap dispenser sensor detection
area.
CAUTION
Do not install the soap dispensers facing a mirror or any other electronic
system operated by an infrared sensor.
To prevent reection problems, it is recommended to keep a minimum
distance of 5’ (1.5M) between the soap dispenser sensor and any other
directly facing objects.

1408201234 Rev J 05 August 2015
4
Identify the items and conrm that parts are included.
Automatic SD Body and
vanity mounting hardware
with power cord, Com Cable
w/inline plug connector and
black soap supply tube 1/4”
dia. (Ø6) Nylon ex 36” (914)
long with connector.
Clear 5/16” dia. (Ø8) Flex tube
118” (3000) Supplied coiled and
permanently attached to pump
housing for multifeed Model
numbers 0390-(n)
EZFILL™ pump assembly
with wall bracket, Com Cable
w/inline socket connector,
soap supply tube and
mounting hardware.
Escutcheon
Flange w/O-Ring
Gasket
Basin Nut
Power Plug
Soap
Supply Tube
Connector
Com Plug
Com Socket
Battery Box
6Dx1.5V=9V
Transformer
12V from 100~240 VAC
Power Supply Option
One (1) ONLY either per model
Plug Adapter
conguration per model
PACK CONTENTS EZFILL™ SOAP DISPENSER 0390-(n)

1408201234 Rev J 05 August 2015
5
TECHNICAL DATA
AC Adapter Cong Plug
Per Option (see TDS)
Battery Box w/Extension Cable
per Model Option (see TDS)
All Dim’s inch (mm) NTS
Note Polarity
Power Socket Power Plug
Note Plug
Polarity
Com Socket Com Plug
2-61/64”
(75)
1-1/2” Dia
(Ø38)
4-3/32”
(104)
0-2-1/16”
(0-52)
3-1/4”
(83)
1-3/16”
(30)
Fill
Prime
Button
2-7/8”
(73)
2-3/16”
(55)
8-5/8”
(219)
3-25/32”
(96)
2”
(51)
2”
(51)
Wall Brkt
w/Hdwr
5-3/32”
(129)
36” (914)
29/32” Dia (Ø23)
Model 0390-(n) EZFILL™ Soap Dispenser and Soap Pump for Multifeed System
Soap Viscosity
100-3800cP (mPa•s)
Soap pH
5.5 – 8.5
Soap Type
clear liquid no abrasives
1-7/32
(31)

1408201234 Rev J 05 August 2015
6
INSTALLATION
STEP 1 - INSTALLING THE EZFILL™ SOAP DISPENSING SYSTEM SOAP DISPENSER
1
2
3
4
Drill a hole in the counter top at the
designated location.
Remove and retain the basin nut and
the gasket from the base of the soap
dispenser body, sliding completely
over and o the soap tube, Com and
Power Cables.
Place the soap dispenser shank through
the escutcheon ange (with O-ring
down) into the hole in the counter top.
Slide the gasket, disk and nut over the
black soap tube and both cables and
thread onto the shank and secure it to
deck underside.
Fix the pump to the desired location by
securing the support with the supplied
screws.
For ease of installation preference,
optionally swap steps 3 and 4 while
ensuring pump is within reach range of
Com cable.
Black Nylon 1/4”dia. (Ø6) tube 36”(914)
long is supplied permanently attached
to dispenser head.
Assemble the tube to the connector
on pump by pushing it on(provided on
end of black tube).
Plug the Com cable into the Socket
cable (See Step 8)
MAX 1-3/16”
(Ø30)
MIN 1-1/32”
(Ø26)
36” (914)
tube length
1-1/8” Dia (Ø28)Recommended hole size
36” (914)
tube length

1408201234 Rev J 05 August 2015
7
INSTALLATION
Cut the 5/16”dia (Ø8) soap supply clear
tube coming from the EZFILL™ Pump-
Motor to the right length as required by
the installation.
Connect the EZFill™ Pump-Motor clear
5/16” dia. (Ø8) soap supply tube to any
available locking bushing in the soap tank
cap (see 0390 OM & IG).
Connect the Com Cable motor connector to the mating plug from
dispenser (If not already connected in Step 3 above). Please note
that since the connector is water proof, some friction will apply.
Important: the 4 contacts connector should be inserted fully so that the
white O-ring is not visible and a clicking sound is heard.
NOTICE: If the 4 contacts connectors are not connected properly, the motor
will run continuously.
Remove the protective sticker
covering the sensor. Keep away
from the sensor range.
NOTE: The Multifeed Kit enables soap distribution for up to six (6) soap
dispensers simultaneously. When installing less than a full complement
of soap dispensers, make sure to insert and clamp the 5/16” dia x 1” long
(Ø8x25) plugs into the remaining empty holes provided.
Make sure the end of the tubes are about 1”(25)
longer than required to reach the tank bottom.
5
6
O-RING VISIBLE –
IMPROPERLY CONNECTED
ONLY THE GROOVES ARE VISIBLE -
CONNECTED PROPERLY
7
8
Soap Supply
Tube
Fill
Hose
CONNECTING THE POWER SOURCE

1408201234 Rev J 05 August 2015
8
INSTALLATION
9
CONNECTING THE POWER SOURCE
a. For battery versions:
install the battery box at the
wall underneath the sink
and connect the battery
connector.
Ensure adequate clearance
to allow removal of the top
cover and the battery
carrier tray when battery
change is required.
b. For AC Adapter versions:
plug the adapter into the
power socket and connect
the adapter DC connector.
NOTICE: See 0390-TF OM & IG and TDS to ll system with soap. Check for
leaks at all liquid connections.
FROM
THE SOAP DISPENSER
OBSERVE
POLARITY
OBSERVE
POLARITY
FROM THE TRANSFORMER TO THE SOAP DISPENSER
TO THE
BATTERY BOX

1408201234 Rev J 05 August 2015
9
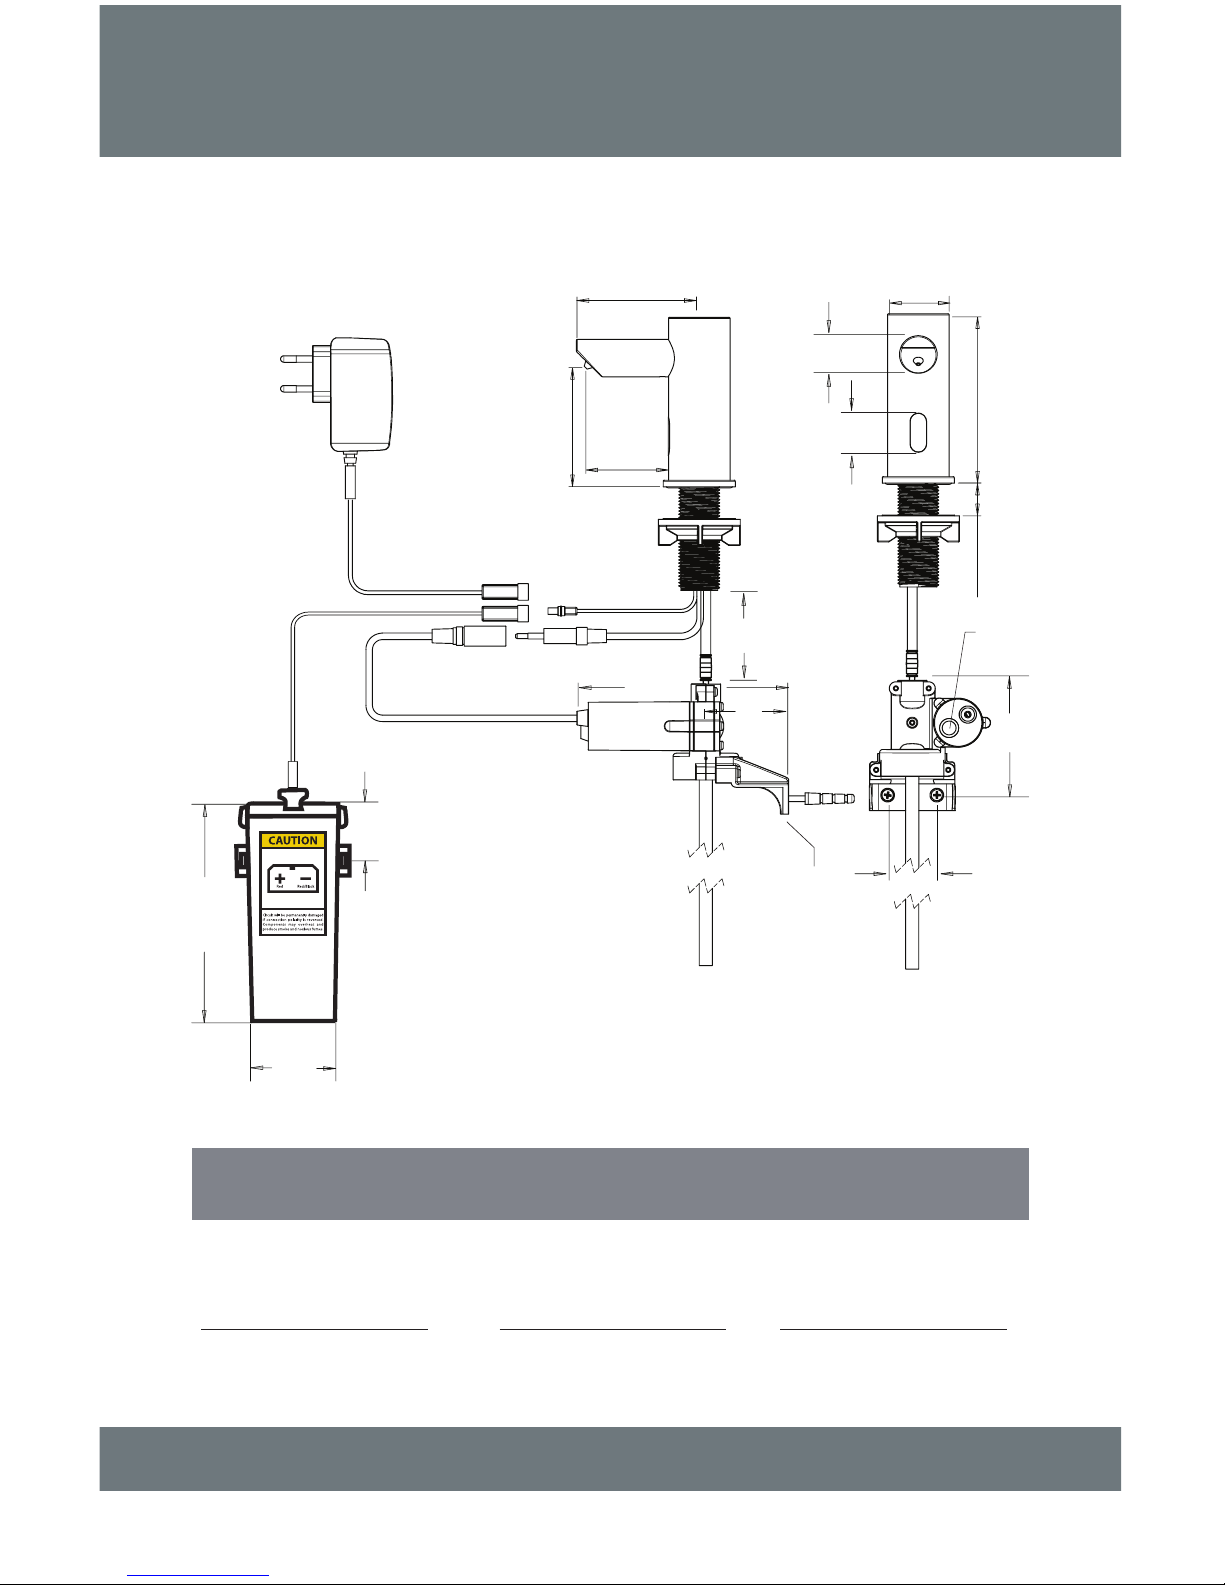
BATTERY REPLACEMENT INFORMATION
Battery models only
When the batteries weaken, the red indicator light will blink at a constant
rate when the user’s hands are within the sensor range. The batteries must be
replaced within two weeks.
To replace the batteries:
1. Carefully open the battery box, use Phillips drive #2 to remove cover screws
(Fig. 1&2, below)
2. Remove the old batteries from carrier tray (Fig. 3)
3. Replace the used batteries with new D batteries in same polarity (Fig. 3)
DO NOT use steel wool or cleansing agents containing alcohol, acid, abrasives,
or the like. Use of any cleaning or maintenance products containing these
substances could damage the surface of the soap dispenser. For surface
cleaning use ONLY soap and water, then wipe dry with a clean cloth or towel.
When cleaning bathroom tiles or counters, protect the soap dispenser from
any splattering of harsh cleansers.
Care and cleaning of chrome and special nishes- see also PCM document.
NOTE: Do not mix used batteries with new ones.
4. Close the box and re-tighten the screws (Fig. 4) and reconnect battery cable.
1 2 3 4
Important: Spent batteries should not be discarded of with
normal household waste. Contact your local authority for
information on waste disposal and recycling.
MAINTENANCE

1408201234 Rev J 05 August 2015
10
TROUBLESHOOTING
PROBLEM INDICATOR CAUSE SOLUTION
SOAP QUANTITY
DIMINISHED Low volume dispense
Red light in the sensor
flashes continuously
when the user’s hands
are within the sensor
range.
No soap dispensed.
Red light in the sensor
does not flash (once)
When user’s hands
are within the sensor
range.
NO SOAP COMING OUT
OF THE SPOUT
Voltage of batteries
likely below 1.47V per
cell.
The soap tank has
been filled but soap
has not reached the
spout.
SOAP DISPENSING
FROM THE SPOUT
CONTINUOUSLY
Steady stream of
droplets is dispensing.
The Com Cable
between the pump
assembly and soap
dispenser is not
connected properly.
Connect the Com
Cable plug and socket
properly so that the
white O-ring is not
visible. Refer to page
7 instructions.
Press the refill button
on the pump until
soap starts to come
out of the spout
again, or press remote
“Fill” button.
Connect the Com
Cable plug and socket
properly so that the
white O-ring is not
visible. Refer to page
7 instructions.
The connector
between the motor
and the dispenser
head is not properly
engaged.
Red light flashes
(once) and the motor
operates.
Soap solidification at
the supply tube.
Fill the tank with
warm water at
120~140°F (49-60°C)
and run the pump
constantly until soap
is dispensed.
Connectors between
the dispenser head
and the pump
assembly and/or the
power supply are
disconnected or not
properly connected.
Connect the plugs and
sockets correctly.
Replace batteries. See
page 9.
Voltage of batteries
is low
Soap level is below
supply tube.
Batteries are
completely depleted.
Replace batteries. See
page 9.
Sensor is picking up
reflections from the
washbasin or another
object.
Eliminate cause of
reflection.
Refer to 0390-TF OM
and refill the soap
tank.
Replace batteries

1408201234 Rev J 05 August 2015
11
SPARE PARTS LIST
EZFILL™ Multi Feed Kit W/5 Liter Container ...........................................
Mounting Bracket for EZFILL™ Multi Feed Tank ...............................
EZFILL™ Battery Pack ................................................................................
EZFILL™ Battery Pack (0390-BP) Extension Cable/1M Male
to Female Connectors ............................................................................
EZFILL™ Remote ............................................................................................
EZFILL™ 5-Liter Plastic Container ...................................................
EZFILL™ Disc Cover for Top Fill Port .................................................
0390
0390-BR
0390-BP
0390-EBC
0390-R
0391-SCON
0390-TMC

1408201234 Rev J 05 August 2015
12
WARRANTY
We are pleased to oer this warranty covering ASI products furnished for your
project.
This warranty replaces any other warranties or product descriptions, whether
expressed or implied, written or oral.
It is understood that the products for this project have been selected and inspected
by the purchaser, and have been accepted without qualication by the purchaser
as merchantable, t for the intended use, and satisfy the specications.
THESE ASI PRODUCTS ARE WARRANTED TO BE FREE OF DEFECTS IN MATERIAL
OR WORKMANSHIP FOR A PERIOD OF ONE (1) YEAR FROM DATE OF INVOICE.
BABY CHANGING STATIONS, IF INCLUDED ON THIS PROJECT, ARE WARRANTED
TO BE FREE OF DEFECTS IN MATERIAL OR WORKMANSHIP FOR A PERIOD OF
FIVE (5) YEARS FROM DATE OF INVOICE.
MIRRORS, IF INCLUDED ON THIS PROJECT, ARE WARRANTED AGAINST SILVER
SPOILAGE UNDER NORMAL INDOOR ATMOSPHERIC CONDITIONS FOR A PERIOD
OF FIFTEEN (15) YEARS FROM DATE OF INVOICE.
DRYER MODELS IF INCLUDED ON THIS PROJECT ARE WARRANTED TO BE FREE
OF DEFECTS IN MATERIAL OR WORKMANSHIP FOR A PERIOD BETWEEN FIVE (5)
AND TEN (10) YEARS, FROM DATE OF INVOICE. PLEASE REFER TO INDIVIDUAL
TECHNICAL DATA SHEET FOR DRYER WARRANTY.
EZ FILL™ SOAP DISPENSER WILL BE FREE OF DEFECTS IN MATERIAL AND
WORKMANSHIP DURING NORMAL USE FOR (2) TWO YEARS FROM THE DATE OF
INVOICE.
Should the product fail under this warranty, the sole remedy, at the seller’s option,
will be to repair the defective product, refund the purchase price, provide an
equivalent new or refurbished product or provide parts only.
ASI AND/OR SELLER DISCLAIM ANY LIABILITY FOR SPECIAL, INCIDENTAL OR
CONSEQUENTIAL DAMAGES. This warranty excludes product damage due to
incorrect installation, improper maintenance, wear and tear, battery spoilage,
product abuse, or product misuse, whether performed by a contractor, service
company, or the consumer.
ASI will not be responsible for labor costs associated with the removal, replacement,
repair by others, reinstallation, renovation or return of its products.

1408201654 Rev C 27 July 2015
EZFILL™ REMOTE CONTROL
REMOTE CONTROL FOR ALL MODELS
0390-(n) AND 0391-(n) AUTOMATIC
VANITY MOUNTED SOAP DISPENSERS
INSTALLATION AND MAINTENANCE GUIDE
Model 0390-R

1408201654 Rev C 27 July 2015
OPERATION
1- SOAP VOLUME
3- TEMPORARY OFF FUNCTIONS
4- STARTING SOAP LINE AFTER REFILLING
SOAP TANK
2- ADJ
If desired, use the remote control to adjust the soap dispenser settings. Hold the
remote control straight in front of the sensor at a distance of about 4-6” (10-15cm).
User Hint: Holding the soap dispenser remote control out of the recommended range (too
close or too far) may interfere with the remote’s activation.
Confirmation: continuous blink of the red light in the sensor eye.
*The exact soap dispense volume depends on the soap viscosity. Factory setting is 0.03 oz (0.8 ml).
This function allows reverting to soap dispense volume
factory setting.
Confirmation: 2 blinks of the red light in the sensor eye.
This function is ideal to perform any kind of activity in front
of the sensor without operating the system (for example,
cleaning). The soap dispenser will remain o for one (1)
minute when this button is pressed once.
To cancel this function and to return to normal operation
press the On/O button again or wait one (1) minute.
Confirmation: OFF – 2 fast blinks, ON – 4 fast blinks
Once the soap tank has been filled \ re-filled, press
the FILL button. The pump will run for one (1) minute
to allow the soap to start coming out of the soap
dispenser spout.
To stop this activity press the FILL button again. If the
soap has not started coming out of the spout, check
for leaks and / or kinked or blocked or disconnected
tubing. If all ok, then press the FILL button again.
Repeat as necessary.
Choose the function you want to adjust by pressing on the function button as follows:*
The 1-4 drop keys allow the owner to control the desired soap dispense volume.
.004 to .013 oz
(0.2 to 0.4 ml)
1234
.023 to .030 oz
(0.7 to 0.9 ml)
.041 to .054 oz
(1.2 to 1.6 ml)
.071 to .078 oz
(2.1 to 2.3 ml)
14
3
1
2
4

1408201234 Rev J 05 August 2015
441 Saw Mill River Road, Yonkers, NY 10701 . (914)476-9000 . Web: americanspecialties.com
This manual suits for next models
5
Table of contents
Other ASI Dispenser manuals

ASI
ASI FS-0700 User manual

ASI
ASI EZFILL 0393 Series User manual

ASI
ASI EZ FILL Operating manual

ASI
ASI 0363 User manual

ASI
ASI 0390 Product manual

ASI
ASI 8374 User manual

ASI
ASI EZ FIL 0390-(n) User manual

ASI
ASI EZ-Fill 10-0390 Configuration guide

ASI
ASI EZFILL 0391 Series Product manual

ASI
ASI FS-0500 User manual
Popular Dispenser manuals by other brands

Hupfer
Hupfer Powerstapler PSUH operating instructions

DEMA
DEMA Super Sink Series Installation and setup guide

Restroomdirect
Restroomdirect Bobrick SureFlo B-850 Instructions for installation, operation, maintenance

Tork
Tork Image Design 460010 manual

Ratiomed
Ratiomed MEG 289.1020 quick start guide

Avery Dennison
Avery Dennison ALS 306 installation manual