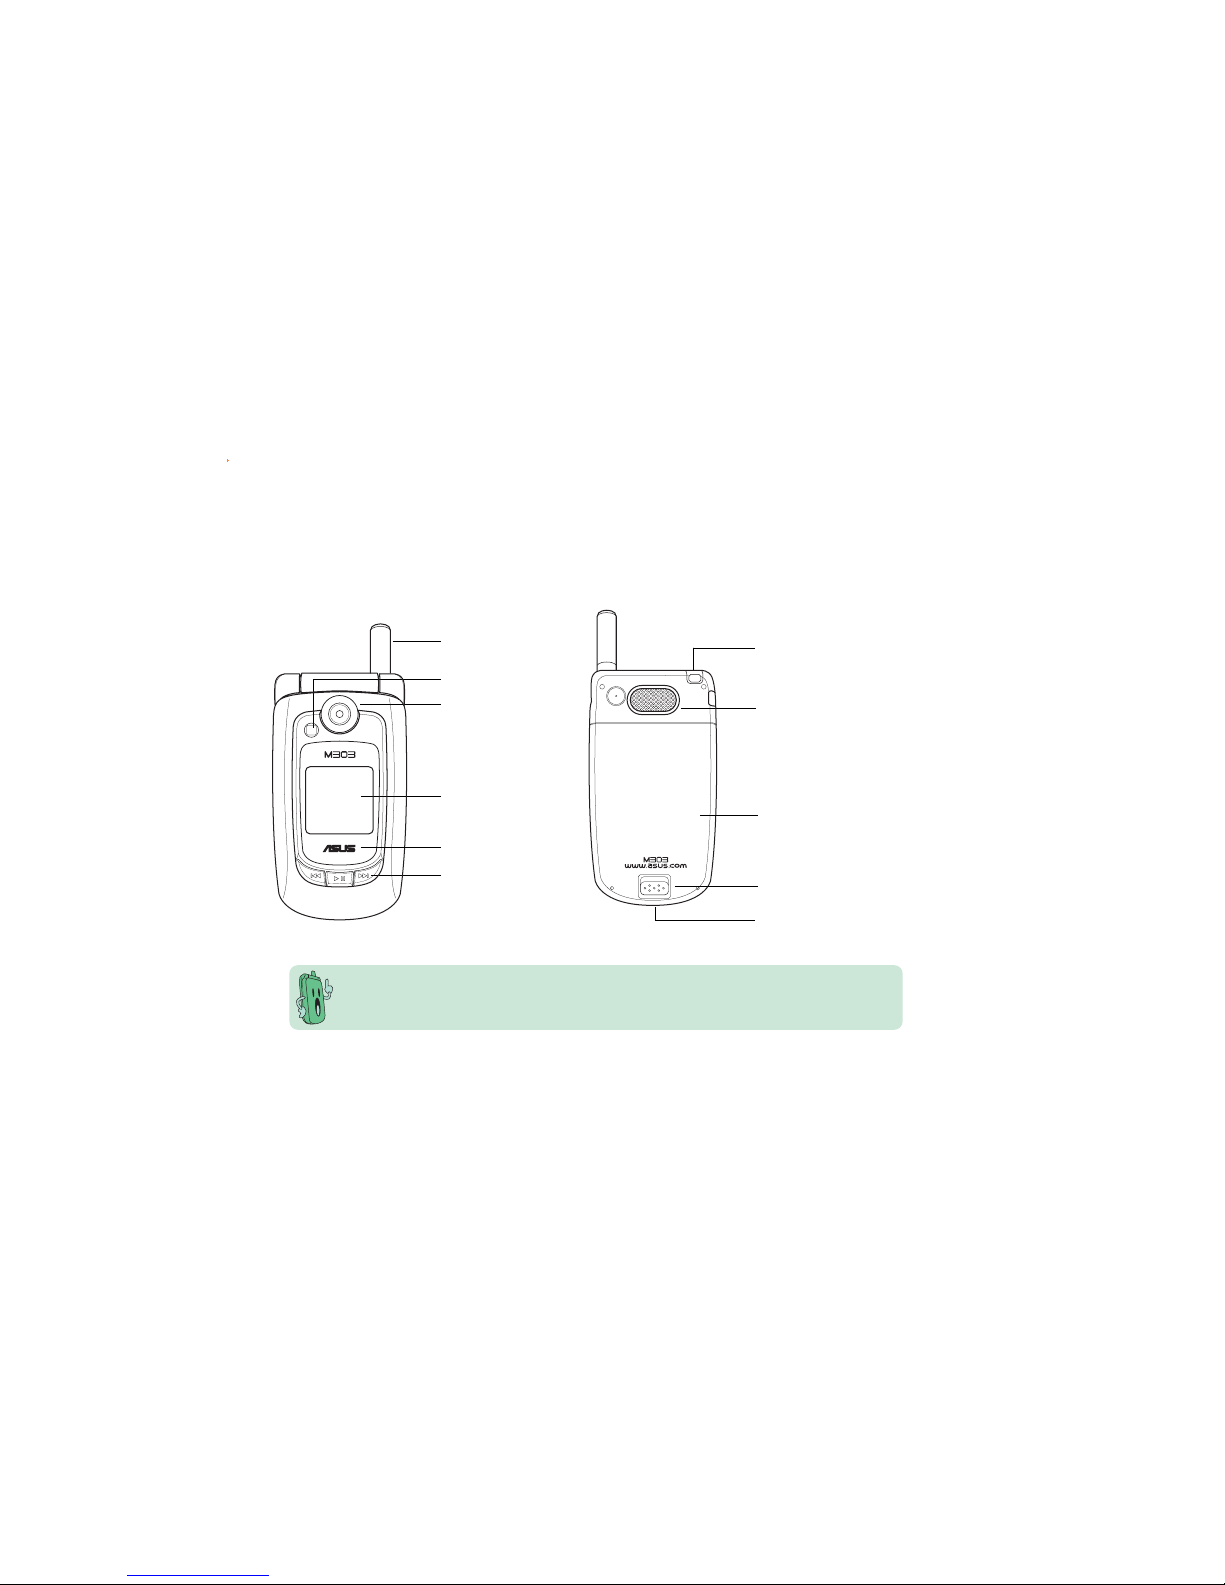
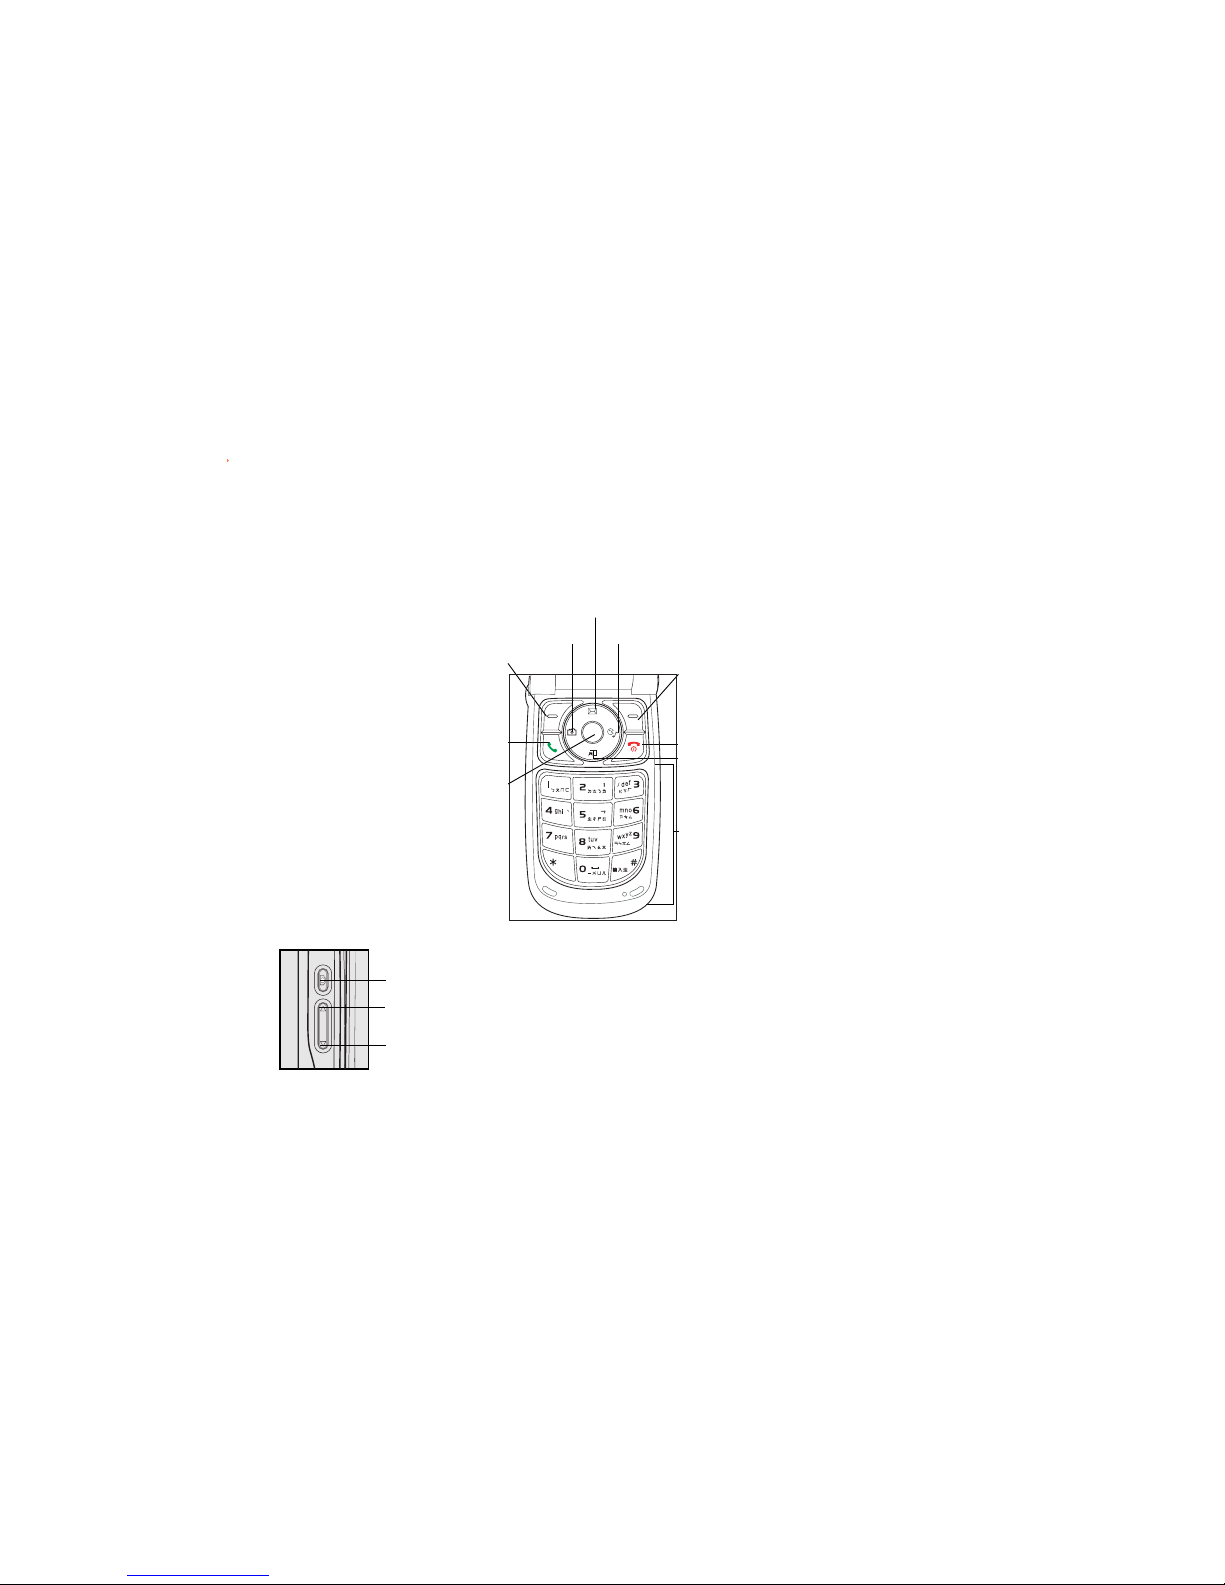
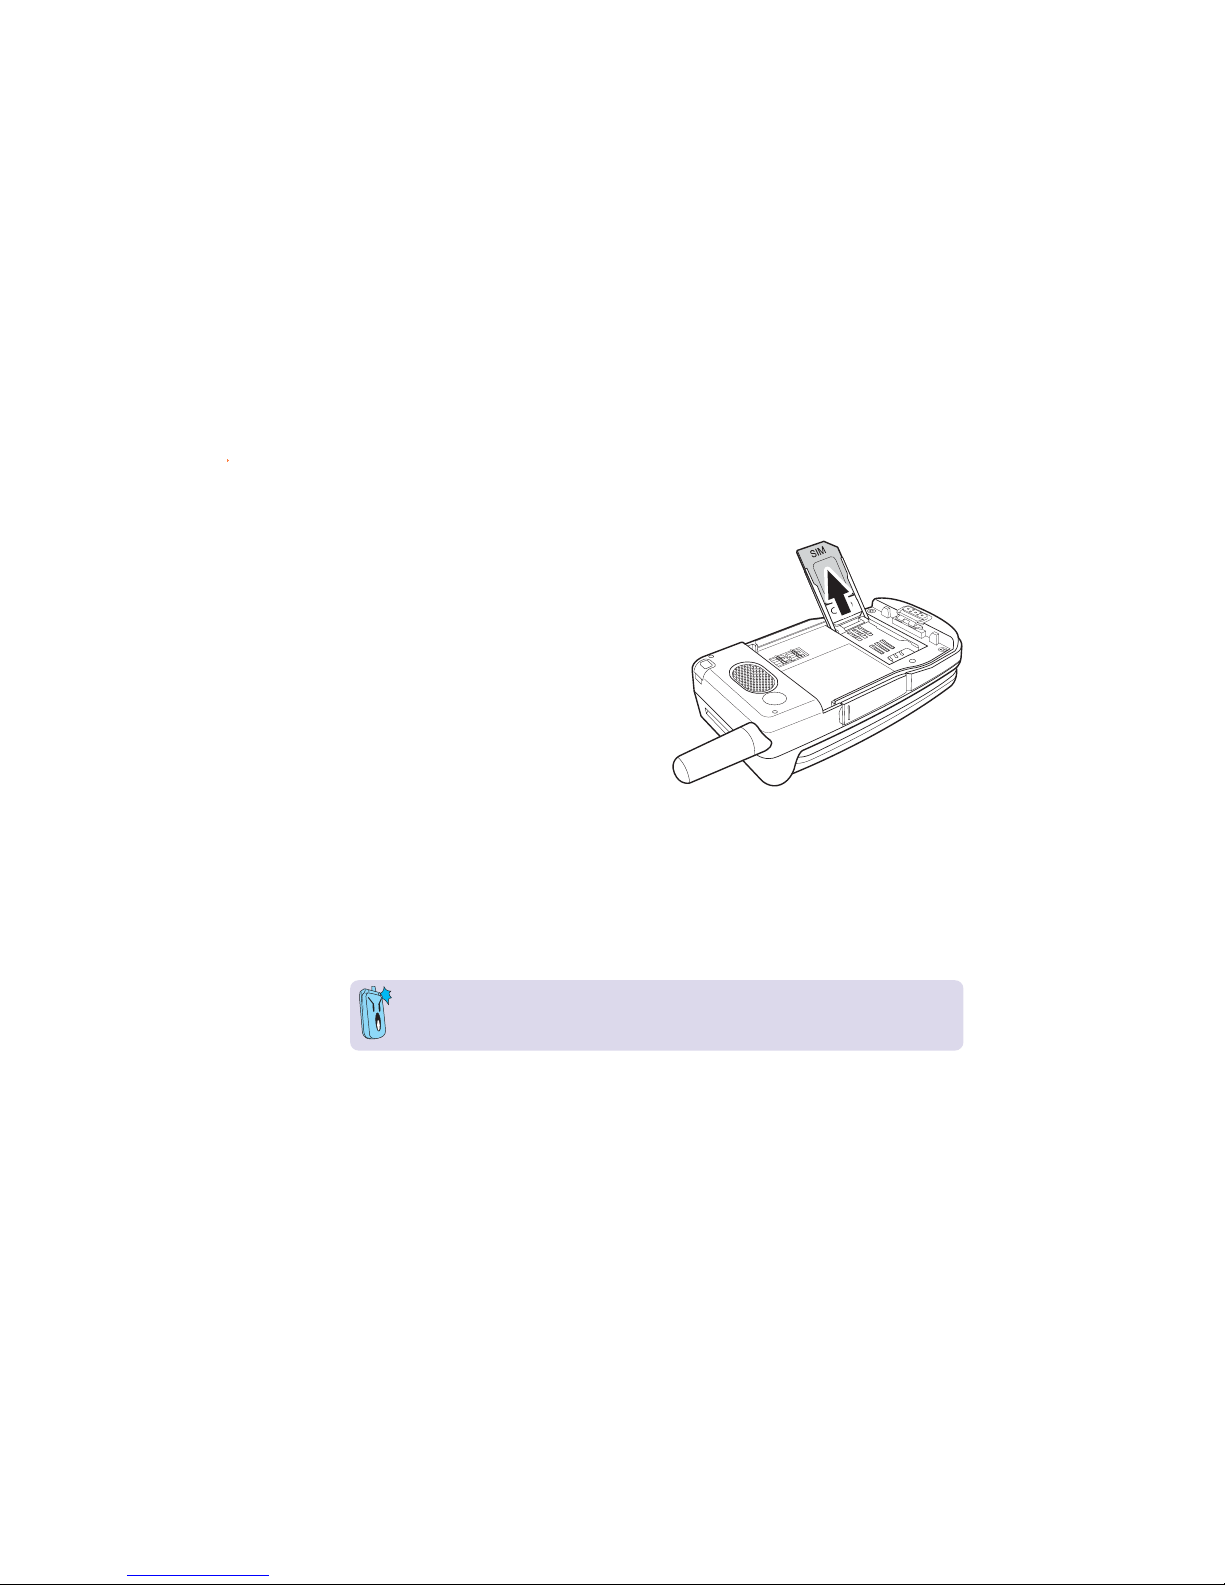
Asus M303 Installation guide

ASUS M303ASUS M303
ASUS M303ASUS M303
ASUS M303
2 BASIC INFORMATION2 BASIC INFORMATION
2 BASIC INFORMATION

Chapter summaryChapter summary
Chapter summary
Phone layout ..................................................................................... 11
Function keys .................................................................................... 13
Multi-color LED indicator ................................................................... 14
Subscriber Identity Module (SIM) card .............................................. 15
Battery .............................................................................................. 17
Battery power levels .................................................................. 17
Installing and removing the battery ........................................... 18
Charging the battery.................................................................. 20
Signal strength .................................................................................. 22
LCD displays ...................................................................................... 22
Camera .............................................................................................. 23
Switching the phone ON or OFF ........................................................ 24

Phone layout
AntennaAntenna
AntennaAntenna
Antenna
CameraCamera
CameraCamera
Camera
FlashFlash
FlashFlash
Flash
External displayExternal display
External display
Cover and built-inCover and built-in
Cover and built-in
battery*battery*
battery*battery*
battery*
Back cover latchBack cover latch
Back cover latch
Strap holderStrap holder
Strap holder
MP3 controlsMP3 controls
MP3 controls
Front ViewFront View
Front View Back ViewBack View
Back ViewBack View
Back View
* The battery comes uninstalled on your mobile phone. Refer to the battery
installation section for instructions on how to install the battery.
LED indicatorLED indicator
LED indicator
SpeakerSpeaker
SpeakerSpeaker
Speaker
Power adaptor/Power adaptor/
Power adaptor/
USB socketUSB socket
USB socket

Side View (Left)Side View (Left)
Side View (Left)
Phone layout
Camera/VoiceCamera/Voice
Camera/Voice
dial buttondial button
dial button
Volume up buttonVolume up button
Volume up button
Volume down buttonVolume down button
Volume down button
˘
abc
ɺɻɼ
ʄʅʆʇ
,
0ࡻ
jkl
@
EarpieceEarpiece
EarpieceEarpiece
Earpiece
Main displayMain display
Main display
Navigation/Navigation/
Navigation/
Quicklaunch keysQuicklaunch keys
Quicklaunch keys
AlphanumericAlphanumeric
Alphanumeric
keyskeys
keyskeys
keys
MicrophoneMicrophone
Microphone
Soft key (left)Soft key (left)
Soft key (left)
Call keyCall key
Call keyCall key
Call key
Flip topFlip top
Flip topFlip top
Flip top
Soft keySoft key
Soft keySoft key
Soft key
(right)(right)
(right)(right)
(right)
On/Off/EndOn/Off/End
On/Off/End
callcall
callcall
call keykey
keykey
key
Front View (Open flip top)Front View (Open flip top)
Front View (Open flip top)
HeadphoneHeadphone
HeadphoneHeadphone
Headphone
JackJack
JackJack
Jack
MiniSD Card Slot
Side View (Right)Side View (Right)
Side View (Right)

Function keys
When the phone is in idle mode, you can press the following function keys to launch some of
the most common phone functions.
Displays the phone book when in idle
mode; performs various functions
depending on the menu level and
screen display
Ends a call; turns the phone ON or OFF
Enters numbers, alphanumeric
characters, and symbols
Launches the phone menu; performs
various functions depending on the
menu level and screen display
Displays the SMS/MMS inbox
Displays the Fun menuDisplays the Camera menu
Answers a call; displays dialed numbers
Puts the phone in active mode;
selects an option; enters data; long
press to launch WAP; shows the
wallpaper in full screen mode
Displays your shortcuts
Press once to launch the camera. Long press to launch the voice command function.
Press this button to decrease the ring tone volume.
Side keysSide keys
Side keysSide keys
Side keys
Press this button to increase the ring tone volume.
˘
abc
ɺɻɼ
ʄʅʆʇ
,
0ࡻ
jkl
@

Multi-color LED indicator
The phone comes with a multi-color LED located below the external display. This LED displays
the phone, message, or call status in four different color indications.
LED indicatorLED indicator
LED indicator
Aside from the four-color LED indicator, seven colors are available for caller
identification. You may assign a specific LED color to a phone book entry. See Chapter 9
“Organizing your stuff” for details.
ColorColor
ColorColor
Color StatusStatus
StatusStatus
Status
Purple (flashing) Default (Idle)
Red Battery is charging
Red (flashing) Battery low warning
Green Battery is fully charged
Green (flashing) Missed call
New SMS/MMS message

Subscriber Identity Module (SIM) card
The phone operator provides you with a Subscriber Identity Module (SIM) card that stores your
mobile phone number, phone book entries, SMS/MMS messages, graphics, etc. Install the SIM
card before you install the battery.
The SIM card usually comes embedded on a plastic card. Read the SIM card documentation
before removing the SIM card. Remove any rough edges on the SIM card before you install
it to the phone.
To install the SIM card:
1. Lift the SIM card case.
BB
BB
B
AA
AA
A
11
11
122
22
2
2. Slide the SIM card in the grooves on the
underside of the case.
The metallic side should face down (A). The
notched edge should be at the top (B).
3. Close the SIM card case.

To remove or replace a SIM card:
1. If a battery is installed, first remove the it
according to the instructions in the battery
section which follows.
2. Place your finger on the notched side of
the SIM card and push the SIM card and
case upwards.
3. Carefully pull the SIM card out from the SIM
card slot. Set the SIM card aside.
4. Replace the SIM card according to the
instructions in the previous section.
• Keep SIM cards out of children’s reach.
• Be careful when handling, inserting, or removing a SIM card to avoid damaging its
contacts.

Battery power levelsBattery power levels
Battery power levels
The battery icon on both displays helps you
keep track of the remaining battery power, so
you will know when to charge the battery.
Take note of the battery icon indicating the
battery power levels.
Icon IndicationIcon Indication
Icon Indication
Battery is 55% to 100% full
Battery is 25% to 55% full
Battery is 10% to 25% full
Battery is 0% to 10% full
Battery has low power.
Charging is needed.
Battery
A rechargable Lithium-Ion battery powers your mobile phone. The battery is built into the
back cover. Make sure that the battery is fully charged before using the phone for the first
time. Initial battery charging may take about eight (8) hours. You can charge the battery
when the phone is either on or off.
A battery icon on the main and external displays indicates the battery power level. Refer to
the table below for battery icon indications.
Dispose of old or defective batteries properly.

Removing and installing the batteryRemoving and installing the battery
Removing and installing the battery
Follow these instructions to install the battery to the mobile phone.
To remove the back cover and built-in battery:
1. To remove the back cover, push the back
cover latch forward with your thumb (A).
2. Continue to hold the latch forward and
place one finger in the notch under the
latch (B).
3. Lift the cover upwards.
AA
AA
A
BB
BB
B

To install or replace the battery:
These illustrations are for reference only and may not exactly show the actual unit. Colors
were used for emphasis.
1. Align the notches of the back cover with
the notches in the phone.
2. Make sure the cover is aligned correctly,
then press downward. The back cover latch
snaps into place, securing the cover.

Charging the batteryCharging the battery
Charging the battery
Make sure that the battery is properly installed before charging.
Disconnect the charger from the power source and the plug from the mobile phone
when charging is complete.
To charge the battery:
1. Connect the charger to a power source.
2 Flip open the I/O connector cover on the
side of the phone.
3. Connect the power cable plug to the I/O
connector.
11
11
1
22
22
2
33
33
3

When the phone is onWhen the phone is on
When the phone is on
The battery icon on both external and main
displays animates to indicate that the battery
is charging. It takes about two to three hours
to fully charge the battery. A message
appears on the display to tell you that the
battery is fully charged. The battery icon now
shows four green bars.
When the phone is offWhen the phone is off
When the phone is off
Both displays show an animated battery icon
to indicate the battery is charging. When the
battery is fully charged, both displays show a
fully charged battery icon.
External displayExternal display
External display Main displayMain display
Main displayMain display
Main display
Battery is chargingBattery is charging
Battery is charging Battery is fullyBattery is fully
Battery is fullyBattery is fully
Battery is fully
chargedcharged
chargedcharged
charged

2222
2222
22
LCD displays
This phone includes two LCD displays: external and main. Both displays are illuminated by a
backlight that automatically turns on or off after a certain period of time depending on your
setting. Refer to the next chapter for details on adjusting the LCD backlight.
Do not apply too much pressure on the phone to avoid damaging the LCD displays. Avoid
putting the phone in your pockets, cramped bags, and in areas where it is pressed on hard
surfaces.
Signal strength
Your phone has an external antenna and
signal strength icon in both main and
external LCD displays to indicate the signal
level. Refer to the table for signal strength
indications.
The signal strength depends on your proximity to your phone operator signal station. Ask
assistance from your phone operator if the signal level in your location is weak or
fluctuating.
IconIcon
IconIcon
Icon IndicationIndication
IndicationIndication
Indication
No service (dead spot)
Poor signal
Low signal
Fair signal
Good signal
Strong signal (ideal)
Emergency outgoing calls only;
No SIM card installed

2323
2323
23
SpecificationSpecification
Specification DescriptionDescription
DescriptionDescription
Description
SensorSensor
SensorSensor
Sensor CMOS type
PixelPixel
PixelPixel
Pixel 300K
Self-captureSelf-capture
Sel f-capture Supported thru the external display
Preview functionPreview function
Preview function Supported
TimerTimer
TimerTimer
T i m e r Supported
Low light supportLow light support
Low light support Built-in flash
Digital ZoomDigital Zoom
Digital Zoom Supported
Multi-captureMulti-capture
Mul ti- capture Supports 4, 6, 9, and 16 captures
VideoVideo
VideoVideo
V i d e o 15-second AVI video (no audio)
CameraCamera
CameraCamera
Camera
Camera
Your phone comes with a built-in camera that allows you to capture, edit, and share photos
and videos with other mobile phone, PDA, notebook, or PC users. Refer to Chapter 5 “Having
fun” for more information.

Switching the phone ON or OFF
To turn ONON
ONON
O N the phone:
1 Open the phone flip top to access the keypad.
2. Press and hold for a few seconds until the display turns on.
3. If you are asked for a Personal Identification Number (PIN) code, key-in the code using the
keypad, then press . The main display shows the idle screen.
To turn OFFOFF
OFFOFF
O F F the phone:
1. Open the phone flip top.
2. Set the phone in idle mode, then press and hold for a few seconds until the display
turns off.
• Some SIM cards come with a default PIN code. Read the SIM card documentation
before entering the PIN code.
• The phone allows you to enter the PIN code in three attempts. You must enter the
PIN Unlocking Key (PUK) if you fail to key-in the correct PIN in three attempts. The
PUK is provided by your phone operator.

This chapter provides information on
the display layout, screen icons, and
basic phone operations so you can
start using your mobile phone.
M303M303
M303M303
M303
Getting StartedGetting Started
Getting Started

2626
2626
26
Chapter summaryChapter summary
Chapter summary
Display layout ................................................................................... 28
Other display modes .................................................................. 29
Indicator icons ................................................................................... 30
Main menu ......................................................................................... 32
Navigating the main menu ......................................................... 33
Sub-menu .......................................................................................... 33
Changing initial settings .................................................................... 34
Setting the date and time.......................................................... 34
Setting the time zone ................................................................ 35
Setting the date format ............................................................. 36
Setting the time format ............................................................. 37
Selecting a language .................................................................. 38
Creating a greeting text ............................................................ 39
Basic operations ................................................................................ 40
Placing a local call ...................................................................... 40
Placing an international call ........................................................ 41
Calling a number from your phone book .................................... 42
Calling a recently dialed number ................................................ 42
Initiating a conference call ......................................................... 45
Answering a call ......................................................................... 52

2727
2727
27
Adjusting the ring volume .......................................................... 53
Saving a phone number in the phone book ................................ 54
Entering text .............................................................................. 56

2828
2828
28
Display layout
The phone display area has three parts when in idle mode.
Text and graphic areaText and graphic area
Text and graphic area
In idleidle
idleidle
i d l e mode, this area
shows the name of the
service provider, the date
and time (if you chose to
display them), manner,
and your selected
wallpaper.
In either menumenu
menumenu
menu,
sub-menusub-menu
sub-menusub-menu
sub-menu, or functionfunction
functionfunction
function
modes, this area displays
text, graphics, or both.
Icon/Title barIcon/Title bar
Icon/Title bar
In idleidle
idleidle
i d l e mode, this bar shows
the indicator icons.
In either menumenu
menumenu
menu,
sub-menusub-menu
sub-menusub-menu
sub-menu,
or functionfunction
functionfunction
fu n c t i o n modes, this bar
shows the name of the
currently selected menu,
sub-menu, or function.
Soft key barSoft key bar
Soft key bar
This bar shows the current
functions of the left and
right soft keys. The
functions vary depending on
the selected menu.
The soft key bar also displays the available functions of the 4-way navigation keys when in
sub-menu or function display. The arrows (left/right/up/down) appears or disappears
depending on the current sub-menu, function, or application. When a directional arrow
appears, you can press the corresponding button on the navigation key to move the cursor or
selection to that direction.
Other manuals for M303
1
Table of contents
Other Asus Cell Phone manuals

Asus
Asus P735 User manual

Asus
Asus ROG-PHONE 05 User manual

Asus
Asus Padfone X mini Guide

Asus
Asus ZenFone 4 Selfie Pro User manual

Asus
Asus P527 - Smartphone - GSM User manual

Asus
Asus J206 User manual

Asus
Asus I007D User manual

Asus
Asus ZenFone 3 Ultra User manual

Asus
Asus ROG PHONE 7 User manual

Asus
Asus P750 User manual