manuals.online logo
Brands
  1. Home
  2. •
  3. Brands
  4. •
  5. Audiovox
  6. •
  7. Automobile Electronic
  8. •
  9. Audiovox CMOS2 User manual

Audiovox CMOS2 User manual

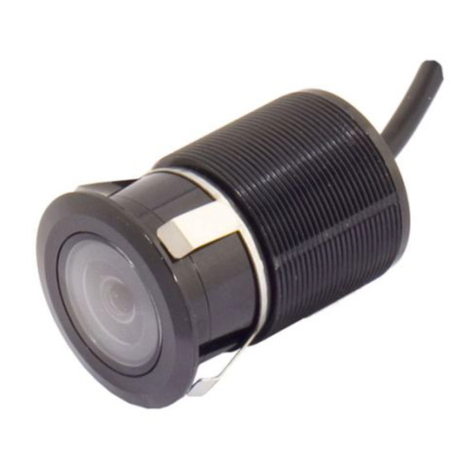
Instruction Manual for CMOS2
5-in-1 Rear-view Camera
Dear Customer,
CONGRATULATIONS! This 5-in-1 high resolution
rear-view camera kit when used as described can
be installed in 5 different ways and will improve your
ability to see what behind you car, CRV or mini-van.
We have taken numerous measures in quality
control to ensure that your products arrive in top
condition and will perform to your satisfaction.
Before You Install
Automotive video equipment installations can be
difficult at times, even to the most experienced
installation technicians. If you are not confident
working with 12 volt DC vehicle wiring, removing and
reinstalling interior panels, carpeting or other
components of your vehicle, contact the vehicle’s
manufacturer or consider having the system
installed professionally.
Parts
1. Camera main body with 70” power and signal
cable.
Parts name list:
1. Camera main unit.
2. Trim Ring.
3. Main ring.
4. Slim angle ring.
5. Angle ring.
6. Locking ring.
7. Long butterfly
bracket.
8. Short butterfly
bracket.
9. Surface Mount
bracket.
2. Parts package listed below:
This camera kit can be in the following installations:
a. Bumper Mounted
b. Traditional Drilled/Angled Mount
c. With Long butterfly Style bracket
d. With Short butterfly Style bracket
e. Surface Mounted style
Note: The Trim Ring (Part no #2) can be painted in
any color and then replaced to match the Vehicle
Color. DO NOT PAINT ON THE CAMERA.
Installation Instructions:
A. Bumper Mounted
Before you drill a hole on the rear bumper, you must
check what is behind where you are drilling. If there
are any vehicle components, such as electrical
parts or fuel system components behind where you
are drilling, you must take whatever precaution
necessary not to damage them. Insure you have
enough depth for the camera housing.
1. You will only need #2 attached to
The camera.
2. Use a 15/16” diameter hole saw to
drill a hole on the rear bumper.
3. Insert the camera cable into the hole and
carefully feed through the hole. Route the cable
into the trunk or Tail Light Housing area.
4. Connect the camera power cable: Red to
reverse lamp power +12V and black to ground
5. Connect the monitor and camera using a video
coax cable. Note: DO NOT USE AN AUDIO RCA
CABLE.
B. Traditional Drilled/Angled Mount
1. Parts # 3, 4, 5, &6 may be used
depending on the mounting location
selected. Use any combination to adjust to your
required mounting angle.
2. Use a 15/16” diameter hole saw to
drill a hole where you are mounting the camera.
3. Insert the camera cable into the hole and
carefully feed through the hole. Route the cable
into the trunk or Tail Light Housing area.
4. Connect the camera power cable: Red to
reverse lamp power +12V and black to ground
5. Connect the monitor and camera using a video
coax cable. Note: DO NOT USE AN AUDIO RCA
CABLE.
c. Long butterfly style bracket
1. Parts #2, #1 #3, #7, #4, #5 and #6 May be used,
The Butterfly mount can be at any position on the
camera.
2. Mount the camera using two screws; always look
before you screw into the vehicle to insure there is
nothing located behind your mounting location.
3. Route the cable into the trunk or Tail Light Housing
area.
4. Connect the camera power cable: Red to
reverse lamp power +12V and black to ground
5. Connect the monitor and camera using a video
coax cable. Note: DO NOT USE AN AUDIO RCA
CABLE.
D. Short butterfly style bracket
1. Parts #2, #1, #3, #4, #5, #8 and #6 May be used.
The Butterfly mount can be at any position on the
camera.
2. Mount the camera using two screws; always look
before you screw into the vehicle to insure there is
nothing located behind your mounting location.
3. Route the cable into the trunk or Tail Light Housing
area.
4. Connect the camera power cable: Red to
reverse lamp power +12V and black to ground
5. Connect the monitor and camera using a video
coax cable. Note: DO NOT USE AN AUDIO RCA
CABLE.
E. Surface Mounted Plastic bracket
1. Combine Parts #2, #1, #9, #2 and #6.
2. Mount the camera using two screws; always look
before you screw into the vehicle to insure there is
nothing located behind your mounting location.
3. Route the cable into the trunk or Tail Light Housing
area.
4. Connect the camera power cable: Red to
reverse lamp power +12V and black to ground
5. Connect the monitor and camera using a video
coax cable. Note: DO NOT USE AN AUDIO RCA
CABLE.

Other Audiovox Automobile Electronic manuals

Audiovox TR93 User manual

Audiovox

Audiovox TR93 User manual

Audiovox Prestige APS-45B User manual

Audiovox

Audiovox Prestige APS-45B User manual

Audiovox CMT405 User manual

Audiovox

Audiovox CMT405 User manual

Audiovox ACAB104 User manual

Audiovox

Audiovox ACAB104 User manual

Audiovox CMT9300 User manual

Audiovox

Audiovox CMT9300 User manual

Audiovox Pursuit PRO 9845 User manual

Audiovox

Audiovox Pursuit PRO 9845 User manual

Audiovox Auto Security AA-9103N User manual

Audiovox

Audiovox Auto Security AA-9103N User manual

Audiovox REMIRS User manual

Audiovox

Audiovox REMIRS User manual

Audiovox CarStream User manual

Audiovox

Audiovox CarStream User manual

Audiovox CarStream Troubleshooting guide

Audiovox

Audiovox CarStream Troubleshooting guide

Audiovox CMT400 User manual

Audiovox

Audiovox CMT400 User manual

Audiovox Code Alarm PROFESSIONAL SERIES CA 5550SST User manual

Audiovox

Audiovox Code Alarm PROFESSIONAL SERIES CA 5550SST User manual

Audiovox Pursuit PT100 Service manual

Audiovox

Audiovox Pursuit PT100 Service manual

Audiovox A-ACC-BMW-DSP Owner's manual

Audiovox

Audiovox A-ACC-BMW-DSP Owner's manual

Audiovox SBAR - SBAR Bar-Type Chrome Back-up Sensor Instruction Manual

Audiovox

Audiovox SBAR - SBAR Bar-Type Chrome Back-up Sensor Instruction Manual

Audiovox XADV2 User manual

Audiovox

Audiovox XADV2 User manual

Audiovox CMT-500 User manual

Audiovox

Audiovox CMT-500 User manual

Audiovox ACA200 User manual

Audiovox

Audiovox ACA200 User manual

Audiovox ACA240 Instruction Manual

Audiovox

Audiovox ACA240 Instruction Manual

Audiovox Prestige 128-8602 User manual

Audiovox

Audiovox Prestige 128-8602 User manual

Audiovox Pursuit PRO 9232 User manual

Audiovox

Audiovox Pursuit PRO 9232 User manual

Audiovox CNP2000UC - XM Direct 2 Main User manual

Audiovox

Audiovox CNP2000UC - XM Direct 2 Main User manual

Audiovox CMT-3000 User manual

Audiovox

Audiovox CMT-3000 User manual

Audiovox ACA240 Instruction Manual

Audiovox

Audiovox ACA240 Instruction Manual

Popular Automobile Electronic manuals by other brands

Nokia 6090 user guide

Nokia

Nokia 6090 user guide

Bend-Pak Autostacker PL-6SR Installation and operation manual

Bend-Pak

Bend-Pak Autostacker PL-6SR Installation and operation manual

Advent CAMTRK installation manual

Advent

Advent CAMTRK installation manual

Lexus LS 460 manual

Lexus

Lexus LS 460 manual

Mercedes-Benz Car receiver installation instructions

Mercedes-Benz

Mercedes-Benz Car receiver installation instructions

Saab 32 025 603 installation instructions

Saab

Saab 32 025 603 installation instructions

VDO DIGITAL TACHOGRAPHS - Guidelines

VDO

VDO DIGITAL TACHOGRAPHS - Guidelines

Sirius XM RAdio Lynx LV1 quick start guide

Sirius XM RAdio

Sirius XM RAdio Lynx LV1 quick start guide

Autel MaxiTrip TP100 manual

Autel

Autel MaxiTrip TP100 manual

iPark IPTSR400 manual

iPark

iPark IPTSR400 manual

Rise Vigilant 500/I installation manual

Rise

Rise Vigilant 500/I installation manual

Pioneer AVG-VDP1 installation manual

Pioneer

Pioneer AVG-VDP1 installation manual

Phonocar 6/905 installation instructions

Phonocar

Phonocar 6/905 installation instructions

Car Solutions AUDI 4G PAS manual

Car Solutions

Car Solutions AUDI 4G PAS manual

KAP BENTLEY 2012 TD instruction manual

KAP

KAP BENTLEY 2012 TD instruction manual

Motorola VC70N0 Product reference guide

Motorola

Motorola VC70N0 Product reference guide

Cadillac CT6 SUPER CRUISE 2018 Convenience/personalization guide

Cadillac

Cadillac CT6 SUPER CRUISE 2018 Convenience/personalization guide

VDO VIEWLINE 110 MM - MOUNTING 11-09 installation instructions

VDO

VDO VIEWLINE 110 MM - MOUNTING 11-09 installation instructions

manuals.online logo
manuals.online logoBrands
  • About & Mission
  • Contact us
  • Privacy Policy
  • Terms and Conditions

Copyright 2025 Manuals.Online. All Rights Reserved.