auna AMP-H260 User manual

www.auna-multimedia.com
AMP-H260
HiFi-Verstärker mit BT
HiFi Amplier with BT
Amplicateur Hi avec BT
Amplicador HiFi con BT
Amplicatore HiFi con BT
10035180


3
DE
TECHNISCHE DATEN
Artikelnummer 10035180
Stromversorgung 230 V~ 50 Hz
RMS-Leistung 2 x 120 W RMS
3 x 50 W RMS
Speichermedien USB, MMC
Microfoneingänge 2
Sehr geehrter Kunde,
wir gratulieren Ihnen zum Erwerb Ihres Gerätes.
Lesen Sie die folgenden Hinweise sorgfältig
durch und befolgen Sie diese, um möglichen
Schäden vorzubeugen. Für Schäden, die durch
Missachtung der Hinweise und unsachgemäßen
Gebrauch entstehen, übernehmen wir keine
Haftung. Scannen Sie den QR-Code, um Zugri auf
die aktuellste Bedienungsanleitung und weitere
Informationen rund um das Produkt zu erhalten.

4
DE
SICHERHEITSHINWEISE
Erklärung der Symbole auf dem Gerät
CAUTION
RISK OF ELECTRIC SHOCK
DO NOT OPEN
WARNUNG: UM DIE GEFAHR EINES STROMSCHLAGS UND EINER
PERSONENVERLETZUNG ZU VERRINGERN, DAS GEHÄUSE NICHT ÖFFNEN. KEINE FÜR
DEN BENUTZER ZU WARTENDEN TEILE IM GERÄT. WENDEN SIE SICH IM FALLE EINER
REPARATUR NUR AN QUALIFIZIERTES PERSONAL.
Das Blitzsymbol mit dem Dreieck macht Sie auf gefährliche elektrische
Spannung in diesem Gerät aufmerksam, die hoch genug ist, um eine
Stromschlaggefahr darzustellen. Das Gehäuse nicht önen!
Das Ausrufezeichen mit dem Dreieck macht Sie darauf aufmerksam,
dass in der Dokumentation für das Gerät wichtige Bedienungs- und
Wartungshinweise enthalten sind.
Kinder ab 8 Jahren, psychisch, sensorisch und körperlich eingeschränkte
Menschen dürfen das Gerät nur benutzen, wenn sie vorher von einer für
sie verantwortlichen Aufsichtsperson ausführlich mit den Funktionen und
den Sicherheitsvorkehrungen vertraut gemacht wurden und die damit
verbundenen Risiken verstehen.
Pege
• Halten Sie den Verstärker trocken. Falls er nass wird, wischen Sie ihn
sofort trocken.
• Verwenden Sie den Verstärker ausschließlich in Umgebungen mit einer
guten Luftzirkulation.
• Schützen Sie den Verstärker vor Staub und Schmutz.
• Gelegentlich mit einem feuchten Tuch wischen, und das Gerät sieht aus
wie neu.
• Verwenden Sie keine scharfen chemischen Reinigungsmittel oder
Lösungsmittel.

5
DE
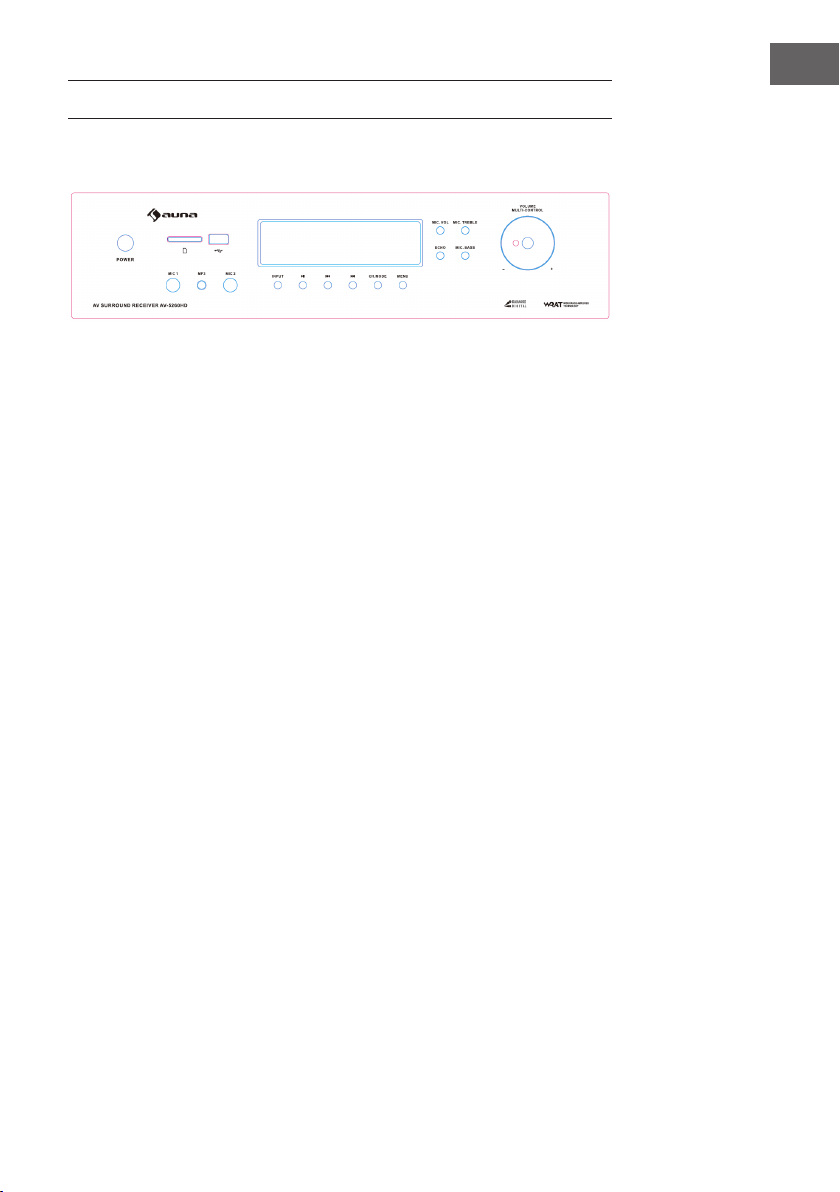
EIGENSCHAFTEN UND BEDIENELEMENTE
1 POWERDen Verstärker ein- oder ausschalten.
2 SD CARD Stecken Sie Ihre SD-Karte hier ein.
3 USB USB-Anschluss zur Wiedergabe von USB-Speichermedien
4 MIC1 Mikrofonanschluss 1
5 MP3 MP3-Anschluss
6 MIC2 Mikrofonanschluss 2
7 INPUT Durch mehrfaches Drücken dieser Taste kann zwischen allen
Eingabemodi hin und her gewechselt werden.
8 PLAY/PAUSE: Drücken Sie zur Wiedergabe einmal diese Taste; drücken
Sie die Taste zum Pausieren erneut.
9 PREV Drücken Sie diese Taste, um zum vorherigen Titel zu gelangen.
10 NEXT Drücken Sie diese Taste, um zum nächsten Titel zu gelangen.
11 CH. MODE Drücken Sie diese Taste, um zwischen den gespeicherten
Audioausgabemodi hin und her zu wechseln.
12 MENU Drücken Sie zunächst diese Taste und stellen Sie anschließend
mit dem Lautstärkeregler den Bass, die Höhen, Balance und die
Hauptlautstärke ein.
13 Mic VOL. Drücken Sie diese Taste und drehen Sie zur Lautstärkereglung
des Mikrofons anschließend am Lautstärkeregler
14 MIC TREBLE Drücken Sie diese Taste und drehen Sie anschließend zur
Einstellung der Mikrofontonhöhe am Lautstärkeregler
15 MIC ECHO Drücken Sie diese Taste und drehen Sie anschließend am
Lautstärkeregler, um das Echo des Mikrofons anzupassen
16 MIC BASS Drücken Sie diese Taste und drehen Sie am Lautstärkeregler,
um den Bass des Mikrofons anzupassen
17 VOLUME Einstellung der Hauptlautstärke
Vorderseite
47
58
69 10 11
13
12
14
15 16
17
1
23

6
DE
Rückseite
1 DVD-Player-Anschluss
Anschluss eines DVD-Playes oder eines anderen Geräts über Cinch
2 Subwoofer-Anschluss
Anschluss für einen Subwoofers
3 Optischer Eingang
Hier das optisches Signal verbinden.
4 Koaxial-Eingang
Hier eine Quelle über ein Koaxialkabel anschließen
5 HDMI-Eingang
Hier ein HDMI-Signal über ein HDMI-Kabel anschließen.
6 HDMI-Ausgang
Verbinden Sie diesen Ausgang mit dem HDMI-Eingang des Fernsehers
oder Bildschirms.
7 Lautsprecheranschlüsse
Schließen Sie hier Ihre Surround-Lautsprecher an.
12 7
34 5 6

7
DE
Fernbedienung
Drücken Sie diese Taste zum Starten der Wiedergabe; drücken Sie diese
Taste zum Pausieren der Wiedergabe erneut.
Drücken Sie zum Stoppen der Wiedergabe diese Taste.
INPUT Drücken Sie zur Auswahl des gewünschten Eingabemodus mehrfach
diese Taste.
Drücken Sie diese Taste, um zum vorherigen Sender/Titel zu gelangen.
Drücken Sie diese Taste, um zum nächsten Sender/Titel zu gelangen.
Wiederholen/ Zufallswiedergabe Drücken Sie diese Taste einmal, um den
aktuellen Titel zu wiederholen. Drücken Sie die Taste erneut, um alle Titel zu
wiederholen. Wenn Sie die Taste ein drittes Mal drücken, werden alle Titel
in zufälliger Reihenfolge wiedergegeben.
DISPLAY Anzeige

8
DE
M.TR-/M.TR+ Wenn Sie diese Taste drücken, wird die Tonhöhe gesenkt/
erhöht.
VOL+/VOL- Erhöhen/Senken der Hauptlautstärke.
M.BA-/M.BA+ - Senken/Erhöhen der Balance des Tonausgangs.
MUTE Stummschalten
OK BA-/OK BA+ Senken/ Erhöhen des Mikrofonbasses.
EQ MODE Durch mehrfaches Drücken dieser Taste kann der gewünschte
Equalizermodus eingestellt werden.
LOUDNESS Drücken Sie diese Taste, um die erhöhte Lautstärke zu
aktivieren. Drücken Sie diese Taste zum Deaktivieren erneut.
CH MODE Drücken Sie mehrfach diese Taste, um einen der gespeicherten
Audioausgabemodi zu wählen.
SL & SR Lautstärkeregler Drücken Sie zum Senken der Lautstärke der
linken/rechten Lautstärkekanäle die Tasten SL VOL-/SR VOL-. Drücken Sie
zum Erhöhen der Lautstärke der linken/rechten Lautstärkekanäle die Tasten
SL VOL+/SR VOL+.
C.VOL-/C.VOL+ Senken/Erhöhen der Lautstärke der umgebenden
Lautstärkekanäle.
SW.VOL-/SW.VOL+ Senken/Erhöhen der Lautstärke des Subwoofers.
OK TR-/OK TR+ Senken/Erhöhen der Mikrofontonhöhe
OK BA-/OK BA+ Drücken Sie diese Tasten zum Senken/Erhöhen des
Mikrofonbasses.
OK VOL-/OK VOL+ Senken/Erhöhen der Mikrofonlautstärke
ECHO-/ECHO+ Senken/erhöhen des Mikrofonechos
Verzögerungstasten Drücken Sie eine dieser Tasten zur Verzögerung der
entsprechenden Einstellung

9
DE
BT-VERBINDUNG
Aktivieren Sie die BT-Funktion auf Ihrem mobilen Endgerät und stellen Sie
den BT-Modus am Gerät ein. Suchen Sie auf Ihrem mobilen Endgerät nach
verfügbaren BT-Geräten in der Nähe. Önen Sie die Geräteliste und wählen
Sie „AMP-H260“ aus, um die Geräte miteinander zu koppeln. Die Eingabe
eines Passworts ist nicht erforderlich.
Hinweis: Ihr Gerät wird nur dann in der Geräteliste angezeigt, wenn Sie den
BT-Modus eingestellt haben.
FEHLERBEHEBUNG
Fehler Grund Lösung
Kein Ton
Die Audioquelle oder die
Lautsprecher sind nicht
richtig angeschlossen.
Überprüfen Sie die
Verkabelung.
Die Gesamtlautstärke ist
auf Min. eingestellt.
Regeln Sie die Lautstärke
auf eine höhere
Einstellung.
Die Lautsprecherkabel
haben die falsche
Impedanz.
Überprüfen Sie, dass die
Lautsprecherkabel die
richtige Impedanz haben.
Der Verstärker hat sich
abgeschaltet.
Schalten Sie den
Verstärker aus und
lassen ihn abkühlen.
Gewährleisten Sie eine
gute Luftzirkulation und
schalten das Gerät dann
wieder ein.
Rückkopplung
Das Mikrofon und die
Lautsprecher sind zu dicht
beieinander.
Positionieren Sie das
Mikrofon und die
Lautsprecher neu.

10
DE
HINWEISE ZUR ENTSORGUNG
Bendet sich die linke Abbildung (durchgestrichene
Mülltonne auf Rädern) auf dem Produkt, gilt die
Europäische Richtlinie 2012/19/EU. Diese Produkte
dürfen nicht mit dem normalen Hausmüll entsorgt
werden. Informieren Sie sich über die örtlichen
Regelungen zur getrennten Sammlung elektrischer
und elektronischer Gerätschaften. Richten Sie sich
nach den örtlichen Regelungen und entsorgen
Sie Altgeräte nicht über den Hausmüll. Durch die
regelkonforme Entsorgung der Altgeräte werden
Umwelt und die Gesundheit Ihrer Mitmenschen
vor möglichen negativen Konsequenzen geschützt.
Materialrecycling hilft, den Verbrauch von Rohstoen
zu verringern.
Das Produkt enthält Batterien, die der Europäischen
Richtlinie 2006/66/EG unterliegen und nicht mit
dem normalen Hausmüll entsorgt werden dürfen.
Bitte informieren Sie sich über die örtlichen
Bestimmungen zur gesonderten Entsorgung
von Batterien. Durch regelkonforme Entsorgung
schützen Sie die Umwelt und die Gesundheit Ihrer
Mitmenschen vor negativen Konsequenzen.
KONFORMITÄTSERKLÄRUNG
Hersteller:
Chal-Tec GmbH, Wallstraße 16, 10179 Berlin,
Deutschland.
Dieses Produkt entspricht folgenden Europäischen
Richtlinien.
Die vollständige Konformitätserklärung des
Herstellers nden Sie unter folgendem Link:
https://use.berlin/100351800

11
EN
TECHNICAL DATA
Item number 10035180
Power supply 230 V~ 50 Hz
RMS power 2 x 120 W RMS
3 x 50 W RMS
Storage media USB, MMC
Microphone inputs 2
Dear Customer,
Congratulations on purchasing this device. Please
read the following instructions carefully and follow
them to prevent possible damages. We assume
no liability for damage caused by disregard of the
instructions and improper use. Scan the QR code
to get access to the latest user manual and more
product information.

12
EN
SAFETY INSTRUCTIONS
Explanation of the symbols on the appliance
CAUTION
RISK OF ELECTRIC SHOCK
DO NOT OPEN
WARNING: TO REDUCE THE RISK OF ELECTRIC SHOCK; DO NOT REMOVE THE COVER
OR BACK. NO USER-SERVICEABLE PARTS INSIDE: REFER SERVICING TO QUALIFIED
PERSONNEL.
The lightning symbol is intended to alert you to the presence of
uninsulated, dangerous voltage within this product‘s enclosure that
might be of suicient magnitude to constitute a risk of electric shock.
Do not open the product case.
The exclamation symbol is intended to inform you that important
operating and maintenance instructions are included in the literature
accompanying this product..
Children over the age of 8 and persons with reduced physical, sensory
or mental capabilities or those with a lack of experience and knowledge
may only use the device if they are instructed on how to do so by a person
responsible for their safety, or if they are supervised and understand the
hazards associated with the use of the device.
Care
• Keep the amplier dry. If it gets wet, wipe immediately.
• Use the amplier only in well-ventilated installations.
• Handle the amplier away from dust and dirt.
• Wipe occasionally with a damp cloth to keep it looking new.
• Do not use harsh chemical, solvents or detergents

13
EN
FEATURES AND CONTROLS
1 Power: Press this switch to turn on/o the unit.
2 SD CARD Input: Connect your SD card here.
3 USB Input: Connect your USB here.
4 MIC INPUT 1: Connect your microphone here.
5 MP3 INPUT: Connect your mp3 player here.
6 MIC INPUT 2: Connect your microphone here.
7 Input: Press this button to switch among all input modes.
8 Play/Pause: Press this button to play. Press again to pause.
9 Previous: Press this button to go back to previous track.
10 Next: Press this button to go to next track.
11 CH.MODE: Press this button to switch among preset audio output
modes.
12 MENU: Press this button rst and use the volume knob to adjust bass,
treble, ballance and main volume.
13 MIC Volume : Press this button and use the volume knob to adjust the
volume of microphone.
14 MIC Treble : Press this button and use the volume knob to adjust the
treble of microphone.
15 MIC Echo : Press this button and use the volume knob to adjust the echo
of microphone.
16 MIC Bass : Press this button and use the volume knob to adjust the bass
of microphone.
17 Volume: Use this knob to adjust the volume of main output.
47
58
69 10 11
13
12
14
15 16
17
1
23

14
EN
Back
1 DVD Input: Connect your DVD player or other RCA signal source here.
2 Sub Output: Connect this output to the passive input of subwoofer.
3 Optical Input: Connect your optical signal here.
4 Coaxial Input: Connect your coaxial signal source here.
5 HDMI Inputs: Connect your HDMI signal source here.
6 HDMI Output: Connect this output to the HDMI input of the TV or
display.
7 Speaker Outputs: Connect your speakers here.
12 7
34 5 6

15
EN
Remote Control
Play/Pause In USB/SD/Bluetooth mode, press this key to play. Press again
to pause.
STOP Press this key to stop the playing.
INPUT Press this key to switch among all input modes.
Previous Press this key go back to previous track or station.
Next Press this key to go to next track or station.
Repeat/Random Press this key to repeat current track. Press again go
repeat all tracks. Press the third time to play random tracks.
Display No function
Main Treble Press either these keys to increase or decrease the treble of

16
EN
microphone.
Master Volume Controls Press either these keys to increase or decrease
the master volume level.
Balance Press either these keys to adjust the balance of output.
Mute Press this key to mute the output.
Main Bass Press either these keys to increase or decrease the bass of
microphone.
EQ MODE Press this key to switch among all preset equalization modes.
LOUDNESS Press this key to enable loudness. Press again to disable.
CHANNEL MODE Press this key to switch among preset audio output
modes.
SL & SR Volume Controls Press either these keys to increase or decrease
the volume of surrounding left and right channels.
CEN Volume Controls Press either these keys to increase or decrease the
volume of surrounding center channel.
SW Volume Controls Press either these keys to increase or decrease the
volume of sub output.
MIC Treble Press either these keys to increase or decrease the treble of
microphone.
MIC Bass Press either these keys to increase or decrease the bass of
microphone.
MIC VOLUME Press either these keys to increase or decrease the volume of
microphone.
ECHO Press either these keys to increase or decrease the echo of
microphone.
Delay Controls Press either these keys to set the delay to corresponding
setup.

17
EN
BT OPERATION
External devices which have a built-in BT feature can be connected to this
amplier wirelessly to play through the amplier‘s speakers. If your amp
is connected to speakers, you will hear audible tones which will help for
connecting.
1. Press the INPUT button on the device or on the remote control until the
BT mode is set.
2. Turn on BT on the external device.
3. Search for available BT devices. Make sure that you are within the
reception range. Select "AMP-H260" from the list of available devices.
4. If BT pairing is successful, you have established a BT connection.
5. You can now play music on the external device.
TROUBLESHOOTING
Problem Possible Reason Solution
No sound
Sound source or speakers
may not be connected
properly.
Check all connections.
Master volume control
may be set to a minimum.
Adjust the volume control
to a higher setting.
The speaker's wire might
be the wrong impedance.
Make sure that the
speakers that you have
connected to the amp are
matching in impedance.
The amplier is shutting
down or powering o
Turn the amplier o and
let it cool, make sure that
the amplier is properly
ventilated, and then turn
it back on..
Feedback Microphone and speakers
are to close together
Reposition the
microphone and speakers

18
EN
DECLARATION OF CONFORMITY
Producer:
Chal-Tec GmbH, Wallstraße 16, 10179 Berlin, Germany.
This product is conform to the following European
Directives:
2011/65/EU (RoHS)
2014/53/EU (RED)
The complete declaration of conformity of the
manufacturer can be found at the following link:
https://use.berlin/10035180
DISPOSAL CONSIDERATIONS
According to the European waste regulation
2012/19/EU this symbol on the product or on its
packaging indicates that this product may not be
treated as household waste. Instead it should be taken
to the appropriate collection point for the recycling of
electrical and electronic equipment. By ensuring this
product is disposed of correctly, you will help prevent
potential negative consequences for the environment
and human health, which could otherwise be caused by
inappropriate waste handling of this product. For more
detailed information about recycling of this product,
please contact your local council or your household
waste disposal service.
Your product contains batteries covered by the
European Directive. 2006/66/EC, which cannot be
disposed of with normal household waste. Please
check local rules on separate collection of batteries.
The correct disposal of batteries helps prevent
potentially negative consequences on the environment
and human health.

19
FR
FICHE TECHNIQUE
Numéro d'article 10035180
Alimentation 230 V~ 50 Hz
Puissance RMS 2 x 120 W RMS
3 x 50 W RMS
Supports de stockage USB, MMC
Entrées de micro 2
Chère cliente, cher client,
Toutes nos félicitations pour l’acquisition de ce
nouvel appareil. Veuillez lire attentivement et
respecter les instructions de ce mode d’emploi an
d’éviter d’éventuels dommages. Nous ne saurions
être tenus pour responsables des dommages dus
au non-respect des consignes et à la mauvaise
utilisation de l’appareil. Scannez le QR-Code pour
obtenir la dernière version du mode d'emploi ainsi
que d'autres informations concernant le produit.

20
FR
CONSIGNES DE SÉCURITÉ
Explication des symboles sur l'appareil
ATTENTION
RISQUE DE CHOC ÉLECTRIQUE NE PAS OUVRIR
ATTENTION : POUR RÉDUIRE LES RISQUES DE CHOCS ÉLECTRIQUES, NE DÉMIONTEZ
AUCUN CACHE. L'APPAREIL NE CONTIEN AUCUNE PIÈCE À ENTRETENIR. ADRESSEZ-
VOUS UNIQUEMENT À DES PERSONNELS QUALIFIÉS POUR LA MAINTENANCE.
MISE EN GARDE : POUR RÉDUIRE LE RISQUE D'INCENDIE ET DE CHOC ÉLECTRIQUE,
NE PLONGEZ PAS L'APPAREIL DANS L'EAU ET NE L'EXPOSEZ PAS À LA PLUIE OU À
L'HUMIDITÉ.
L'éclair avec la èche à l'intérieur du triangle équilatéral est destiné à
alerter l'utilisateur de la présence de tension dangereuse non isolée
à l'intérieur du boîtier, d'une magnitude suisante pour constituer un
risque de choc électrique aux personnes. N'ouvrez jamais le boîtier !
Le point d'exclamation point dans le triangle équilatéral est destiné
à alerter l'utilisateur de la présence d'importantes instructions
d'utilisation et d'entretien et de maintenance dans les documents qui
accompagnent ce produit.
Les enfants à partir de 8 ans ainsi que les personnes aux capacités
physiques, mentales ou sensorielles réduites ne doivent utiliser
l’appareil qu'après avoir été familiarisés par une personne responsable
de leur sécurité aux fonctionnalités et aux mesures de sécurité et qu'ils
comprennent les risques associés.
Entretien
• Gardez l'amplicateur au sec. S'il est mouillé, essuyez-le
immédiatement.
• N'utilisez l'amplicateur que dans des environnements où la circulation
d'air est bonne.
• Protégez l'amplicateur de la poussière et de la saleté.
• Essuyez-le de temps en temps avec un chion humide pour que
l'appareil reste comme neuf.
• N'utilisez pas de produits de nettoyage chimiques ou de solvants
agressifs.
This manual suits for next models
1
Table of contents
Languages:
Other auna Amplifier manuals

auna
auna AMP-2 BT Series User manual

auna
auna AMP-CD950 DG User manual

auna
auna 10003555 User manual

auna
auna Amp-218 BT User manual

auna
auna Amp4 BT SE User manual

auna
auna AMP-5100 User manual

auna
auna AMP Pro BT User manual

auna
auna AMP-CD608 User manual

auna
auna Amp4 BT SE User manual

auna
auna Amp-5 BT User manual

auna
auna AV2-CD608 BT User manual

auna
auna Drive User manual

auna
auna AV2-CD508 User manual

auna
auna AV2-CD850BT User manual

auna
auna AV2-CD508 User manual

auna
auna Amp-3800 USB User manual

auna
auna Amp VT User manual

auna
auna AMP-4000 DAB User manual

auna
auna AMP-9200 User manual

auna
auna Intelligence Amp User manual