Avaya AWH-55USB User manual

0 0 0
AVAYA AWH55/65-USB
WIRELESS HEADSET SySTEm
USER GUIDE

3
REGISTER YOUR PRODUCT ONLINE
Visit www.plantronics.com/productregistration to register your AWH 55/65-USB product
online so we can provide you with the best possible service and technical support.
TABLE OF CONTENTS
PACKAGE CONTENTS
Package Contents 3
Features 4
Setup 6
Charging 7
Positioning 7
Installing PerSonoCall Software 8
Configuration and Status 9
Adjusting Fit 10
Making/Answering/Ending Calls 11
Adjusting Volume, Initiating Flash 12
Muting a Call, Initiating Smart Button 12
Traveling with AWH 55/65-USB 13
Headset Controls 14
Base Indicator Lights 15
Troubleshooting for AWH 55/65-USB 15
Subscription 18
System Reset 18
Battery Replacement 19
Technical Assistance 20
Regulatory Notices 21
Headset and Wearing Options
Base
Headset
Earloops
Headband
AC Charger
Software
PerSonoCall®
Software CD
Please refer to the separate Safety Instructions booklet for important product safety
information prior to installation or use.
This User Guide provides instructions on the setup and usage of the Avaya AWH 55/65-USB
wireless headset system. Before getting started, please review the safety booklet included
in your package. For additional help, service or support information,refer to the
product warranty card or visit www.avayaheadsets.com.
WELCOME

0 04 5
FEATURES
Back and Side
AC Charger Port
Subscription
Button Access
Hole (paperclip
required)
Front
Charge Contacts
Headset Docking Cradle
Charge Indicator Light (red) Status Indicator Light (green)
CS55
CS50
Front:
Rear:
Listening
Volume/Mute
Talk Indicator Light
Speaker
Battery Cover
Call Control Button
Microphone
Handset Lifter Arm
Ringer Microphone
Jack (remove cover)
Height Switch
Accessory Jack
Power Cord
Headset
Handset Lifter
Telephone Cord Jack
Telephone Handset Jack
Speaking Volume
Major Adjust
AC Charging Jack
Handset Lifter Jack
Base - Top View Base - Bottom View
Charging Cradle
Front:
Rear:
Indicator Lights
Talking (Green)
Power (Red)
Charging (Amber)
Listening Volume
Major Adjust
Telephone Cord
Telephone
Configuration Dial
IntelliStand
™
On/Off Switch
(to automate call
control button)
Speaking Volume
Minor Adjust
Base
Ringer Switch (On = up position)
(Off = down position)
Stand Pegs
Headset
Front:
Listening Volume/Mute/
Flash/Smart Button
Call Control Button
Talk Indicator Light
Rear:
Speaker
Battery Cover
Microphone
USB Connector

1. Slide headset into charging cradle.
2. Gently press down on the headset to ensure that headset is in correct position. Red charge
indicator light on base will illuminate while charging and will go completely off when
fully charged.
AC Charging Only:
When your computer is powered off, the AWH 55/65-USB will not charge, and the headset
standby time will decrease. Using the optional AC adapter will ensure your headset remains
charged.
USB Charging Only:
When your computer is powered on, the AWH 55/65-USB will charge via the USB connection.
To install base unit, first thread the USB cable through the bottom of the base so it rests
in notch. Then attach the stand by inserting the stand pegs into the holds on the underside
of the base unit.
Connect USB connector to a free USB port on your computer. A USB hub can be used
but be sure it can supply sufficient power (250mA) to charge the headset.
Alternatively, the velcro strips included can be used to attach the base unit to a PC monitor.
However, if that causes noise or interference problems, see “Positioning” on page 7.
The optional AC charger can be used.
6 7
SETUP CHARGING
POSITIONING
The minimum recommended separation distance is shown above.
IMPORTANT: Incorrect positioning can cause noise and interference.
1
2
3
6“
30CM
15cm
1
2
1 hour = minimum charge
to continue setup
3 hours = full charge

0 08 9
Avaya PerSonoCall®software provides the link between your AWH 55/65-USB headset and
compatible softphone applications on your computer. PerSonoCall software provides the
ability to remotely detect and answer/end a call from your softphone application via the
headset call control button.
In addition PerSonoCall provides some basic configuration and status information about
the system.
Check the PerSonoCall compatibility list at www.plantronics.com/personocall for the
most current information on softphone compatibility. If your softphone is not currently
supported by PerSonoCall, please refer to page 11.
1. With the CD inserted, go to the PerSonoCall main screen and click on “Install the
PerSonoCall Software.”
2. Your softphone may require you to choose which audio device you wish to use. Please
refer to softphone documentation for details.
NOTE: Once the AWH 55/65-USB is installed, it becomes the default audio device in your
computer. You can set preferences manually in the Windows®operating system through the
Sounds and Audio Devices option in the control panel under the Audio tab.
NOTE: Once installed we recommend that you set PerSonoCall to launch whenever the
Windows®operating system starts.
After installing and running the software, one of the four system tray icons will appear
in the tray bar at the bottom of your screen showing status of headset communication
with PerSonoCall.
: No headset detected
: Headset detected, no radio link to base
: Headset detected, and radio link to base active
: Headset detected, and radio link to base is locked on
System Tray Icons
Right click on the headset system tray icon and choose “Options”. This will bring
up the PerSonoCall Basic Options and Current Status Screens.
Refer to online application help for explanation details on the PerSonoCall software.
CONFIGURATION AND STATUS
INSTALLING PERSONOCALL SOFTWARE

10 11
To make a call:
Press the call control button on the headset. The status indicator lights on both the base
and the headset should go on, indicating a successful link. Dial using softphone.
To answer a call:
Press the call control button on the headset to answer a call. When the ringer switch on
the side of the base is on (in the up position), the base will ring with an incoming call –
so you can receive notification of a call even when not wearing the headset. The feature is
disabled when the ringer switch is in the down position.
To end a call:
Press the call control button on the headset.
To switch between calls:
Some softphones support a feature known as “flash.” This allows you to place the current
call on or off hold, or to toggle between calls. To do so, rock the headset volume control
either way for more than 2 seconds. See diagram under “Adjusting Volume, Initiating Flash”
on page 12.
When using PerSonoCall, the radio link between the headset and the base will only be
active during a call. This is the default setting intended to preserve the battery life of the
headset. However, you may wish to have the radio link active when not on a call so you
can listen to other audio sources, such as streaming audio on your PC. You can open the
radio link at any time by pressing the call control button on the headset.
NOTE: Locking the radio link on for extended periods of time will significantly reduce the
standby and talk time of the headset.
For Softphones Not Compatible with PerSonoCall
Check the PerSonoCall compatibility list at www.plantronics.com/personocall for the most
current information on softphone compatibility.
If your softphone is not currently supported by PerSonoCall, remote detection and answer/
end via the headset does not function. Pressing the call control button on the headset
will only open and close the radio link providing audio; you must answer the call from
the softphone.
MAKING/ANSWERING/ENDING CALLSADJUSTING FIT
Snap speaker into retaining ring of
desired wearing option (headband
or earloop).
1. Adjust headband to fit.
2. Rotate headset in retaining ring
until microphone is pointing toward
your chin.
1
2
2
Wearing Options
Retaining
Ring
1
2

0 0
ADJUSTING VOLUME, INITIATING FLASH
Rock the headset volume control back and forth to adjust listening volume.
To adjust the listen or speak volume of the softphone, please refer to the softphone user
documentation.
To adjust the listen or speak volume of the audio device on the computer, use the Sound
and Audio Devices section on the control panel in Windows.
®
To initiate the Flash function (see page 11 “To switch between calls”), rock the volume
control to either side for more than 2 seconds.
MUTING A CALL,
INITIATING SMART BUTTON
To mute headset, briefly press the listening volume/mute button straight in. Press again
to unmute.
You will hear 3 rapid beeps every 15 seconds to indicate mute is on.
To initiate the smart button, press and hold the listening volume/mute button for more
than 2 seconds.
12 13
TRAVELING WITH AWH 55/65-USB
You have the option to easily disassemble the AWH 55/65-USB for travel.
CS55
CS50
Front:
Rear:
Listening
Volume/Mute
Talk Indicator Light
Speaker
Battery Cover
Call Control Button
Microphone
Handset Lifter Arm
Ringer Microphone
Jack (remove cover)
Height Switch
Accessory Jack
Power Cord
Headset
Handset Lifter
Telephone Cord Jack
Telephone Handset Jack
Speaking Volume
Major Adjust
AC Charging Jack
Handset Lifter Jack
Base - Top View Base - Bottom View
Charging Cradle
Front:
Rear:
Indicator Lights
Talking (Green)
Power (Red)
Charging (Amber)
Listening Volume
Major Adjust
Telephone Cord
Telephone
Configuration Dial
IntelliStand
™
On/Off Switch
(to automate call
control button)
Speaking Volume
Minor Adjust
Gently push
side-to-side
to disassemble
Disassembled unit
To conserve headset power and to comply
with air travel regulations, you should
turn off the headset by simultaneously
pressing both the call control button and
listening volume/mute button for 5 seconds.
When the green talk indicator light on
headset blinks, release both buttons.
To turn headset back on, press the call
control button. The talk indicator light
will quickly flash green.
NOTE: Once turned off, a single press on any button will turn the headset back on. Beware that
if not stowed properly, the AWH 55/65-USB headset may inadvertently turn back on.
Major Adjust
Minor Adjust
Headset Mute

BASE INDICATOR LIGHTS
Action Light
Charging Red light illuminates brightly
Fully charged Red light goes off
Muted Green light flashes quickly
Headset not in base Red light illuminates softly
Headset link active Green light flashes slowly
Headset link inactive Solid green light
Status Indicator Light (green)
Charge Indicator Light (red)
• Check that the USB cable is connected to a
powered computer.
• Check that the computer is turned on and not in
standby or hibernation mode.
• If using a USB hub, check that the AC power supply
is correctly connected and that the hub can supply
250mA to charge the headset.
• If using the AC charger, check that the AC charger
jack is connected to the base unit, that the AC charger
is securely connected to a working wall outlet, and
that it is the model supplied by Plantronics.
I plugged everything in but the
indicator lights won’t come on.
Problem Solution
HEADSET CONTROLS
14 15
Rock in one direction
for more than 2 seconds
Flash
Short key press
straight in
Mute
Ascending/descending
tones, 2 tones at limit
Rock back and forth
Listening volume
Action Tone
Flash
Making/answering/
ending calls Short key press Mid tone
Low battery warning
(5 minutes of talk
time remaining)
Return headset
to charging cradle 1 tone every 10 seconds
Out of range warning
– when on an
active call
Move closer to base 2 tones before range limit.
3 tones beyond range limit
and active call will be
suspended. 1 tone will
sound when returning
within range; call will be
re-established if within
15 minutes
Incoming call
notification Press call control
button to answer call 3 repetitive tones
Feature
Key
3 tones every 15 seconds
Press straight in and
hold for more than
2 seconds
Smart button
TROUBLESHOOTING FOR AWH55/65-USB

• Lower the listen volume on your softphone until
the distortion disappears.
• If the distortion is still present, lower the listen
volume control on the computer.
• Adjust volume on headset. See page 12.
• Speak volume is too high. Lower the speak volume
on your softphone until the noise disappears. If the
noise is still present, lower the microphone volume
control on the computer.
• Link to headset is lost. Try to reestablish a link by
pressing the call control button.
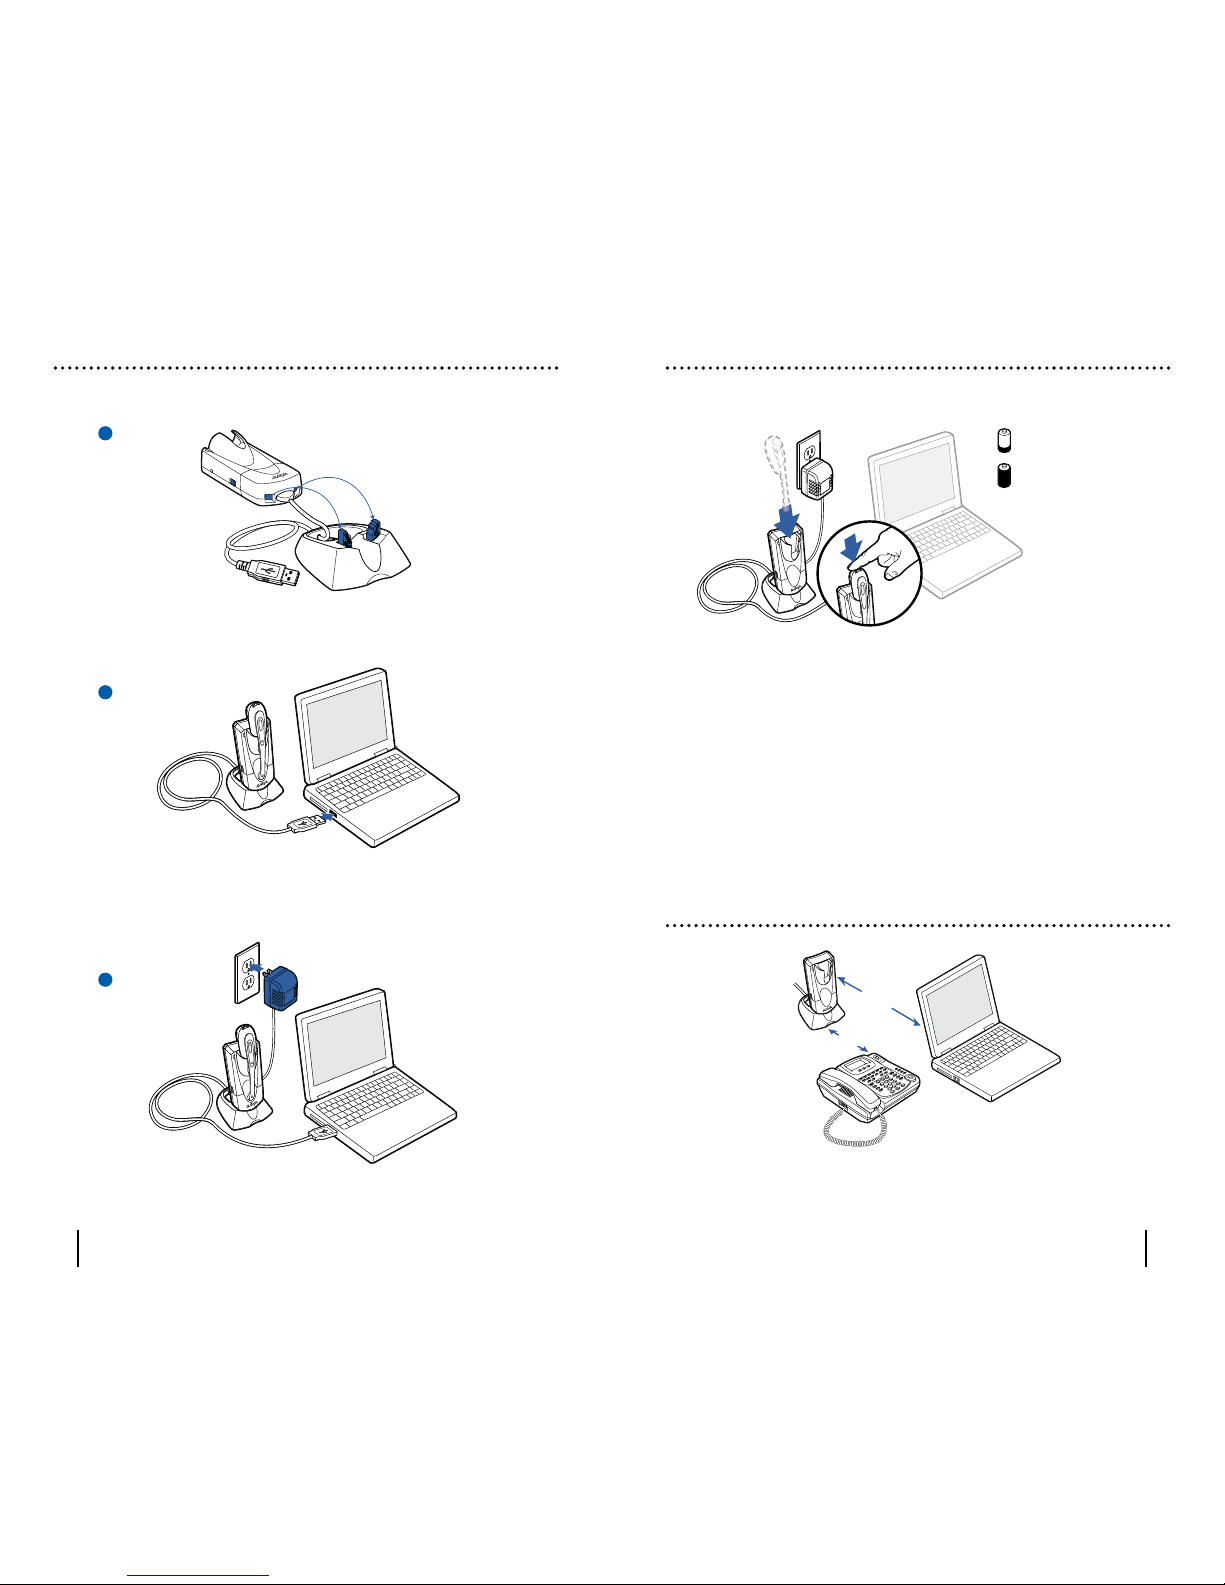
• Unplug the USB charger first, then unplug the AC
charger (if used) from the base for 5 seconds. Plug the
USB charger back in first, then AC adapter (if used)
to power back up.
• Reset the whole system as described on page 18.
• Move the AWH 55/65-USB base further away from your
phone.
• AC charger is plugged into a power strip. Plug the
AC charger into the wall directly.
• The AWH 55/65-USB will set itself as the default audio
device in Windows.
®Use the Audio settings in
Windows®under Sounds and Audio Devices to
change the device used for audio.
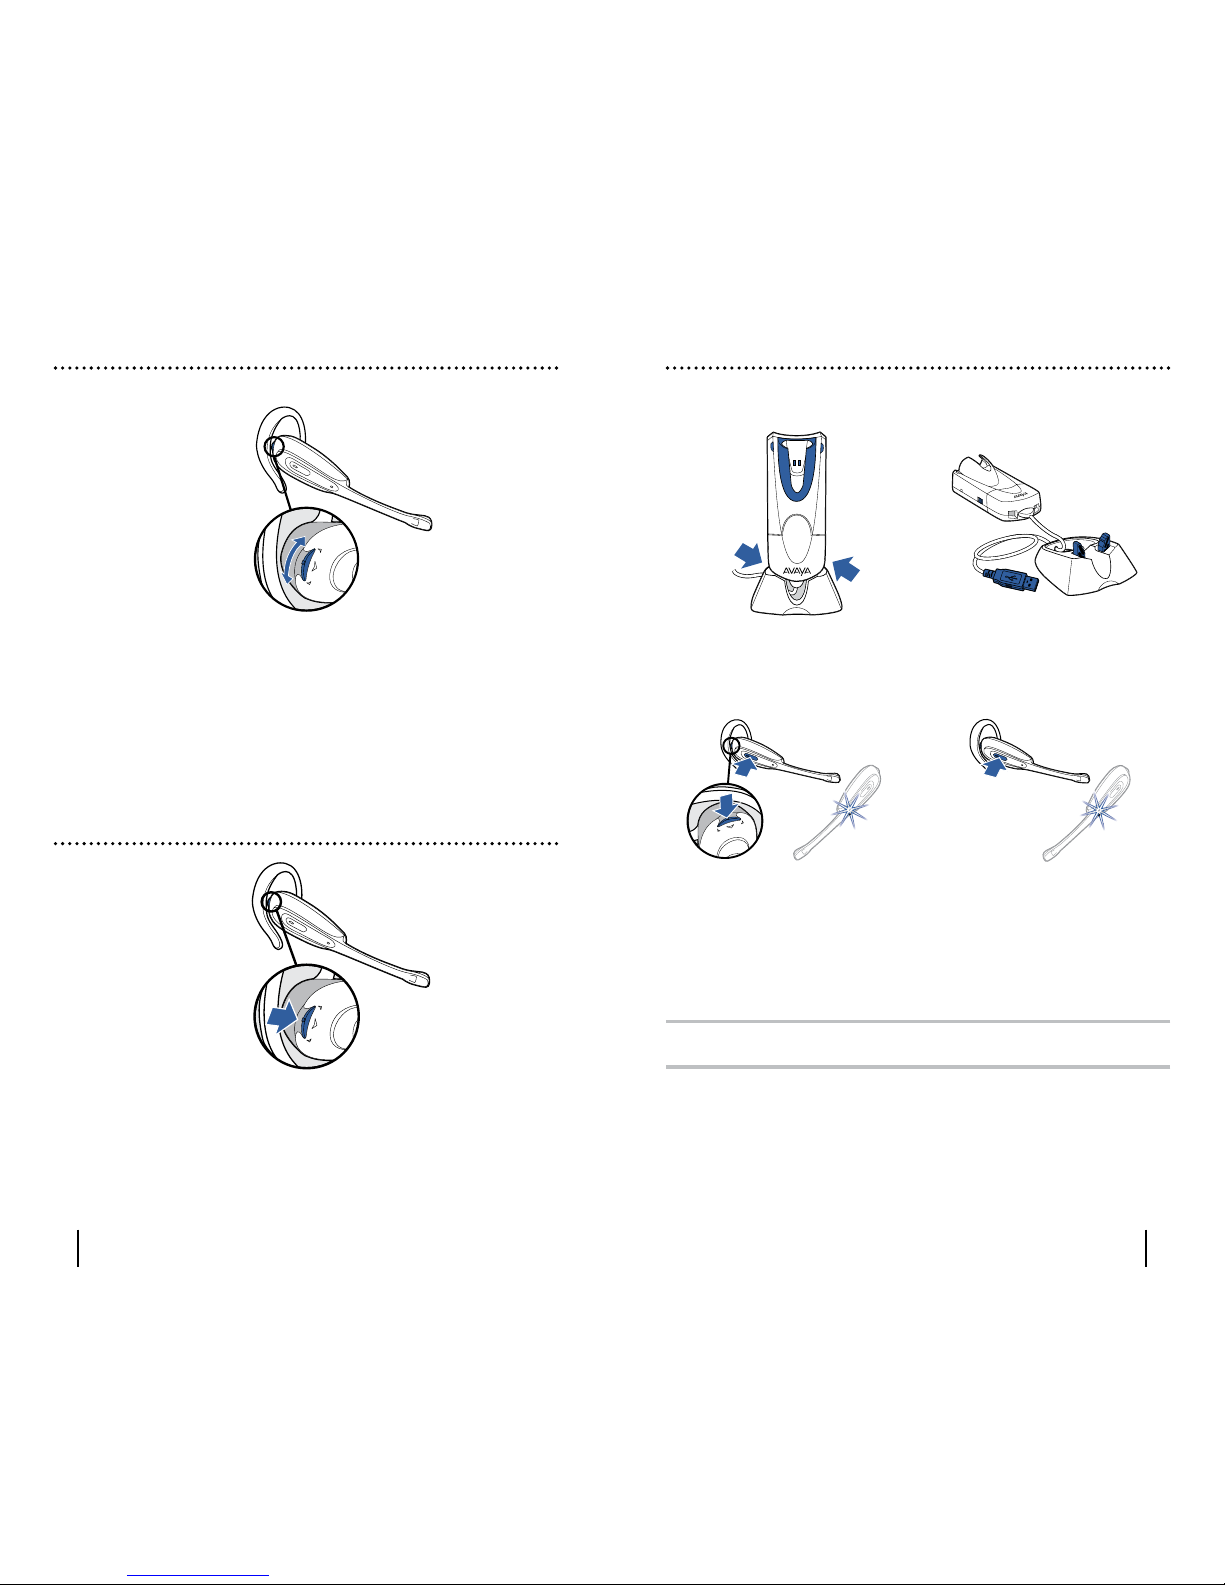
• Headset may require reset. See page 18.
• Headset battery needs to be charged. See page 7.
• If you are using a laptop that regularly goes into
standby or hibernation, the optional AC power
supply is provided to ensure the headset can be
continuously charged.
• Battery is going bad; replace the battery with a
new battery pack. Call Plantronics at 1-800-544-4660
ext. 5538. See page 19.
• Try changing earloop sizes. Experiment to find the
best fit or use the over-the-head band supplied.
• One beep every 10 seconds is caused by a low battery
warning. Recharge battery by returning headset to
the base charging cradle for one to three hours until
charge light stays lit or quits blinking.
• Two beeps is an out of range warning. Move closer
to the base.
• Three beeps every 15 seconds indicate your mute is on.
Press the mute button once to turn mute off.
Sound in headset is distorted.
I can hear echo in headset.
I can hear too much background
conversation or noise.
I hear static that does not allow
me to communicate.
People I talk to can hear a buzz
in the background.
The other headset I was using
to listen to music does not work
any more.
My headset stops responding
to button presses.
Battery talk time performance
is significantly degraded even
after a full charge.
Headset is uncomfortable when
worn in over-the-ear mode.
I hear beeps in the headset.
Problem Solution
TROUBLESHOOTING FOR AWH 55/65-USB
• Headset may be out of range of the base. Move closer
to base unit until the headset is within range. Range
varies with office environment.
• Headset battery needs to be charged. See page 7.
If you are using a laptop that regularly goes into
standby or hibernation, the optional AC power
supply is provided to ensure the headset can be
continuously charged.
• Listening volume is too low. Press the volume up
button on the headset. See page 12.
• You may have to re-subscribe your headset with the
base. See page 18.
• Check compatibility list on www.plantronics.com/
personocall to ensure your softphone is compatible
for remote answer and disconnect.
• Headset battery needs to be charged. If you are
using a laptop that regularly goes into standby or
hibernation, the AC power supply is available to
ensure the headset can be continuously charged.
• AWH 55/65-USB may not be set as the default audio
device in your softphone application.
• Check that all cords are connected correctly.
• Check that the base has power (green indicator light)
and the headset battery is fully charged.
• Headset may be out of range of the base. Move
closer to base unit until the headset is within range.
Range varies with office environment.
• Adjust the listen volume on the headset (see page 12),
softphone and PC audio control.
• Ensure the headset speaker is positioned snugly
over your ear.
• Incorrect softphone model selected. Be sure you
have selected the correct softphone model through
the software.
• You may need to resubscribe the headset. See page 18.
• Headset is muted. Press the mute button on headset
to unmute the microphone. See page 12.
• Headset microphone boom aligned incorrectly.
Align the headset boom with your mouth.
• Speak volume is too low. Increase the speak volume
on your softphone until you can be heard by callers.
If the volume is still too low, increase the microphone
level on your computer.
• Headset battery needs to be charged. See page 7.
My headset does not work with
the base unit.
My headset does not work with
my softphone.
I cannot hear caller.
Callers cannot hear me.
Problem Solution
16 17

0
The custom battery inside the headset should last 2-3 years. When talk time decreases
significantly, you should replace the battery. Call Plantronics at (800) 544-4660 ext.5538 to
order one. Once you receive it, follow directions below to replace.
BATTERY REPLACEMENT
Pinch both sides of the battery cover and lift
to remove. Slide the battery out and gently separate
at the connection. DO NOT pull the battery
out by the wires.
Reconnect and install the new battery. Pinch both sides of the battery cover
and replace.
After replacing the battery, remember to allow 3 hours to fully charge.
The headset and base unit are supplied subscribed to each other. However, if you wish to use
a replacement headset with the base unit, then the units must be re-subscribed as follows:
SYSTEM RESET
SUBSCRIPTION
Return the headset to the charging cradle.
1. Use a paperclip to press and hold the
subscription button through the access
hole on the base unit for a minimum of
5 seconds. The status indicator light will
then flash.
2. Press and hold the headset mute switch
for a minimum of 5 seconds. The headset
indicator light will then illuminate.
Successful re-subscription is indicated when
the status indicator is fully illuminated and
the talk indicator light is off.
3. Disconnect the USB charger first, then
the AC charger (if used) from the AC
charging jack for 5 seconds.
4. Reconnect the USB charger first, then
the AC charger (if used).
If re-subscription fails within 2 minutes,
the headset will return to the un-subscribed
state. Try the re-subscription process again
or call Technical Support.
To recover from some fault conditions (refer to Troubleshooting page), you may need to
perform a system reset.
1. Press both the call control button and
the listening volume/mute button for 5
seconds. When the talk indicator light
blinks, release both buttons.
2. Press the call control button again.
The talk indicator light will again blink
briefly to indicate the headset is back
to normal operation.
3. Disconnect the USB charger first, then
the AC charger (if used) from the AC
charging jack for 5 seconds.
4. Reconnect the USB charger first, then
the AC charger (if used).
The system reset operation is complete.
18 19
123
123
12
34

0
74776-01 (11/06)
20 21
TECHNICAL ASSISTANCE
The Avaya Headset Helpdesk is ready to assist you! Dial (800) 544-4779, or visit the
support section of our website at www.avayaheadsets.com.
REGULATORY NOTICES
FCC REQUIREMENTS PART 15
This device complies with Part 15 of the FCC Rules. Operation is subject to the following two
conditions:
1. This device may not cause harmful interference, and
2. This device must accept any interference received, including interference that may cause
undesired operation.
This equipment has been tested and found to comply with the limits for a Class B digital device,
pursuant to Part 15 of the FCC Rules. These limits are designed to provide reasonable protection
against harmful interference in a residential installation. This equipment generates, uses,
and can radiate radio frequency energy and, if not installed and used in accordance with the
instructions, may cause harmful interference to radio communications.
However, there is no guarantee that interference will not occur in a particular installation. If
this equipment does cause harmful interference to radio or television reception which can be
determined by turning the radio or television off and on, the user is encouraged to try to correct
interference by one or more of the following measures:
1. Reorient or relocate the receiving antenna.
2. Increase the separation between the equipment and receiver.
3. Connect the equipment into an outlet on another circuit.
4. Consult the dealer or an experienced radio/TV technician for help.
NOTE: Modifications not expressly approved by Plantronics, Inc. could void the user’s authority to
operate the equipment.
FCC REGISTRATION INFORMATION - Part 68
This equipment complies with Part 68 of the FCC rules and the requirements adopted by ACTA.
On the exterior of this equipment is a label that contains a product identifier in the format US:
AAAEQ##TXXXX. If requested, this information must be provided to your telephone company.
A plug and jack used to connect this equipment to the premises wiring and telephone network
must comply with the applicable FCC Part 68 rules and requirements adopted by ACTA. A
compliant telephone cord and modular plug is provided with this product. It is designed to be
connected to a compatible jack that is also compliant. See installation instructions for details.
The REN is useful to determine the quantity of devices you may connect to your telephone line.
Excessive RENs on a telephone line may result in the devices not ringing in response to an
incoming call. In most, but not all areas, the sum of the RENs should not exceed five (5.0). To be
certain of the number of devices you may connect to your line, as determined by the REN, contact
your local telephone company. For product approved after July 23, 2001, the REN for this product
is part of the product identifier that has the format US:AAAEQ##TXXXX. The digits represented
by ### are the REN without the decimal point. (For example, 03 represents a REN of 0.3.) For
earlier producers, the REN is separately shown on the label.
If this telephone equipment causes harm to the telephone network, the telephone company will
notify you in advance that temporary discontinuance of service may be required. But if advance
notice isn’t practical, the telephone company will notify the customer as soon as possible. Also,
you will be advised of your right to file a complaint with the FCC if you believe it is necessary.
The telephone company may make changes in its facilities, equipment, operations, or procedures
that could affect the proper functioning of your equipment. If they do, you will be notified in
advance in order for you to make necessary modifications to maintain uninterrupted service.
If trouble is experienced with this unit, for repair or warranty information, please contact
customer service at (800) 544-4660. If the equipment is causing harm to the network, the
telephone company may request that you disconnect the equipment until the problem is resolved.
DO NOT DISASSEMBLE THIS EQUIPMENT: It does not contain any user serviceable components.
We recommend the installation of an AC surge arrester in the AC outlet to which this equipment
is connected. Telephone companies report that electrical surges, typically lighting transients, are
very destructive to customer terminal equipment connected to AC power sources. The antenna
used for this transmitter must not be co-located or operating in conjunction with any other
antenna or transmitter. End-users and installers must be provided with installation instructions
and transmitter operating conditions for satisfying RF exposure compliance.
© 2006 Plantronics, Inc. All rights reserved. Avaya and the Avaya logo are trademarks by Avaya, Inc. and
may be registered in certain jurisdictions. CS60, PerSonoCall and Sound Innovation are trademarks or
registered trademarks of Plantronics, Inc. Microsoft and Windows are either registered trademarks or
trademarks of Microsoft Corporation in the United States and/or other countries. All other trademarks
are the property of their respective owners.
Patents U.S. 5,210,791; 6,923,688; 7,075,270; D512,984; D519,498; D521,492;
Australia 303054; EM 293964-0004-0006; Taiwan D112594 and Patents Pending
Avaya
Corporate Headquarters
211 Mt Airy Road
Basking Ridge, NJ 07920 USA
www.avaya.com
EXPOSURE TO RF RADIATION
The internal wireless radio operates within the guidelines found in radio frequency safety
standards and recommendations, which reflect the consensus of the scientific community.
Independent studies have shown that the internal wireless radio is safe for use by consumers.
Visit www.plantronics.com for more information.
INDUSTRY CANADA NOTICE
Radio Equipment
Operation of this device is subject to the following two conditions: (1) this device may not cause
interference, and (2) this device must accept any interference, including interference that may
cause undesired operation of the device.
This product meets the applicable Industry Canada technical specifications of the RSS-213 Issue 2.
The Ringer Equivalence Number is an indication of the maximum number of devices allowed
to be connected to a telephone interface. The termination on an interface may consist of any
combination of devices subject only to the requirement that the sum of all RENs of all of the
devices does not exceed five.

TRÅDLØST HEADSET-SySTEm
BRUGERVEJLEDNING
AVAYA AWH 55/65-USB

3
INDHOLDSFORTEGNELSE PAKKENS INDHOLD
Pakkens indhold 3
Funktioner 4
Installation 6
Opladning 7
Placering 7
Installation af PerSonoCall-software 8
Konfiguration og status 9
Ændring af pasform 10
Foretage/besvare/afslutte opkald 11
Volumenregulering, Start af Flash 12
Afbrydelse af mikrofonen under et opkald, Start af funktionsknap 12
Rejse med AWH55/65-USB 13
Knapper på headsettet 14
Indikatorlamper på baseenheden 15
Fejlfinding i forbindelse med AWH55/65-USB 15
Abonnement 18
Nulstilling af systemet 18
Udskiftning af batteri 19
Vedligeholdelse 20
Headset og placeringsmuligheder
Baseenhed
Headset
Ørekroge
Hovedbøjle
Software
PerSonoCall®-
software-cd
Læs den separate brochure med sikkerhedsinstruktioner for at få vigtige
sikkerhedsoplysninger inden installation eller brug.
AC Charger
Lysnetoplader

4 5
FUNKTIONER
Bagfra og fra siden
Lysnetoplader-
port
Abonnering
Adganghul til knap
(der kræves en
papirklips)
Forfra
Opladningskontakter
Dockinggaffel til headset
Opladningsindikator (rød) Statusindikator (grøn)
Baseenhed
Kontakt til
ringetone (Tændt = oppe)
(Slukket = nede)
Holderklemmer
Headset
Front:
Lyttevolumen/Mikrofonaf-
bryder/Flash/Funktionsknap
Knap til opkaldsstyring
Indikatorlampe for tale
Bagfra:
Højttaler
Batteridæksel
Mikrofon
USB-stik

6 7
1. Sæt headsettet i opladningsgaflen.
2. Tryk forsigtigt headsettet nedad, for at sikre at det er korrekt placeret. Den røde
opladningsindikator på baseenheden lyser, mens opladningen er i gang, og slukkes
helt, når enheden er fuldt opladet.
Kun ved lysnetopladning:
Når computeren er slukket, bliver AWH55/65-USB ikke opladet, og headsettets standbytid
bliver kortere. Ved at bruge lysnetopladeren, kan du sikre, at headsettet bliver ved med
at være opladet.
Kun ved USB-opladning:
Når computeren er tændt, oplades AWH55/65-USB via USB-forbindelsen.
6“
30CM
15cm
Når du installerer baseenheden, skal du starte med at trække USB-kablet gennem
undersiden af baseenheden, så den sidder på plads i hakket. Monter derefter holderen
ved at indsætte klemmerne i hullerne på undersiden af baseenheden.
Slut USB-stikket til en ledig USB-port på computeren. Du kan anvende en USB-hub, men
kontroller, at den kan levere tilstrækkelig strøm (250 mA) til at kunne oplade headsettet.
Det er også muligt at bruge de medfølgende velcrobånd til at fastgøre baseenheden til en
computerskærm. Hvis der opstår problemer med støj og interferens i forbindelse med
dette, skal du gå til "Placering" på side 7.
Lysnetadapteren (ekstraudstyr) kan bruges.
INSTALLATION OPLADNING
PLACERING
Den anbefalede minimumsafstand er angivet ovenfor.
VIGTIGT: Ved forkert placering kan der opstå problemer med støj og interferens.
1
2
1 time = minimumsoplad-
ning for at kunne fortsætte
installation
3 timer = fuld opladning
3
2
1

8 9
Avaya PerSonoCall®-softwaren fungerer som link mellem AWH55/65-USB-headsettet
og kompatible softphone-programmer på computeren. PerSonoCall-softwaren giver dig
mulighed for at modtage og besvare/afslutte et opkald fra softphone-programmet via
knappen til opkaldsstyring på headsettet.
PerSonoCall kan desuden vise oplysninger om grundlæggende konfiguration og status for
systemet.
Du kan finde de nyeste oplysninger om softphone-kompatibilitet i PerSonoCall-
kompatibilitetslisten på adressen www.plantronics.com/personocall. Hvis din softphone
aktuelt ikke er understøttet af PerSonoCall, henvises du til side 11.
1. Sørg for, at cd'en er isat, og gå derefter til hovedskærmbilledet i PerSonoCall og klik
på "Installer PerSonoCall-softwaren".
2. Din softphone kræver muligvis, at du vælger, hvilken lydenhed du vil bruge.
Se isoftphone-dokumentationen, hvis du vil have yderligere oplysninger.
BEMÆRK: Når AWH55/65-USB er installeret, er den standardlydenheden på computeren.
Du kan angive indstillinger manuelt i Windows®-operativsystemet under Lyde og Lydenheder
i Kontrolpanel under fanen Lyd.
BEMÆRK: Når det er installeret, anbefaler vi, at du indstiller PerSonoCall til at åbne,
når Windows®-operativsystemet starter.
Når du har installeret og kørt softwaren, vises status for headsettets kommunikation
med PerSonoCall ved hjælp af et af de 4 proceslinjeikoner i proceslinjen nederst på
skærmbilledet.
: Intet headset registreret
: Headset blev registreret, intet radiolink til baseenhed
: Headset blev registreret og radiolink til baseenhed er aktivt
: Headset blev registreret, og radiolink til baseenhed er låst som aktivt
Proceslinjeikoner
Højreklik på proceslinjeikonet, og vælg "Indstillinger". Nu vises
PerSonoCall-skærmbillederne Grundlæggende indstillinger og Aktuel status.
Se hjælpen til onlineprogrammet, hvor du finder instruktioner til PerSonoCall-
INSTALLATION AF PERSONOCALL-SOFTWARE
KONFIGURATION OG STATUS

10 11
Sådan foretages et opkald:
Tryk på knappen til opkaldsstyring på headsettet. Statusindikatorlamperne på
baseenheden og headsettet tændes nu for at angive, at der er oprettet et link. Foretag
opkald vha. softphone.
Sådan besvares et opkald:
Tryk på knappen til opkaldsstyring på headsettet for at besvare et opkald. Når kontakten
til ringetone på siden af baseenheden er aktiveret (er oppe), ringer baseenheden ved
indgående opkald – så du kan få besked om opkald, selv hvis du ikke har headsettet på.
Denne funktion er deaktiveret, hvis kontakten til ringetone er nede.
Sådan afsluttes et opkald:
Tryk på knappen til opkaldsstyring på headsettet.
Sådan skiftes mellem opkald:
Nogle softphones understøtter en funktion, der kaldes "flash". Den gør det muligt at slå
venteposition til og fra for et opkald, eller at skifte mellem opkald. For at gøre dette skal
du dreje volumenreguleringen i den ene eller den anden retning i mere end 2 sekunder.
Se diagram under "Volumenregulering, Start af Flash" på side 12.
Når du bruger PerSonoCall, er radiolinket mellem headsettet og baseenheden kun aktivt
under et opkald. Dette er standardindstillingen, som har til hensigt at forlænge levetiden
på headsettets batteri. Det kan alligevel være, du ønsker at have radiolinket aktiveret,
når du ikke ringer, så du kan lytte til andre lydkilder såsom streaming af lyd på din PC.
Du kan når som helst åbne radiolinket ved at trykke på knappen til opkaldsstyring på
headsettet.
BEMÆRK: Hvis du låser radiolinket som aktivt i lang tid ad gangen, reduceres standby- og
taletiden på headsettet betydeligt.
For softphones, der ikke er kompatible med PerSonoCall
Du kan finde de nyeste oplysninger om softphone-kompatibilitet i PerSonoCall-
kompatibilitetslisten på adressen www.plantronics.com/personocall.
Hvis softphonen ikke aktuelt understøttes af PerSonoCall, fungerer fjernmodtagelse
og besvar/afslut ikke via headsettet. Hvis du trykker på knappen til opkaldsstyring på
headsettet, åbnes og lukkes kun det radiolink, som leverer lyden. Du skal besvare
opkaldet via din softphone.
FORETAGE/BESVARE/AFSLUTTE OPKALDÆNDRING AF PASFORM
Tryk højttaleren ind i holderingen,
der bruges ved den valgte
placeringsmulighed (hovedbøjle
eller ørekrog).
1. Ændring af hovedbøjlens pasform.
2. Drej headsettet i holderingen,
indtil mikrofonen peger mod din hage.
1
2
2
Wearing Options
Holdering
1
2

12 13
VOLUMENREGULERING, START
AF FLASH
Major Adjust
Minor Adjust
Drej headsettets volumenknap frem og tilbage for at justere lyttevolumen.
Læs i dokumentationen til softphonen, hvordan du kan justere lytte- eller talevolumen i
din softphone.
For at justere lydudstyrets lytte- og talelydstyrke på computeren, skal du bruge Lyd og
lydenheder i Kontrolpanel i Windows.®
Hvis du vil starte Flash-funktionen (se side 11 "Sådan skiftes mellem opkald"), skal du
dreje volumenknappen til den ene eller anden side i mere end 2 sekunder.
AFBRYDELSE AF MIKROFONEN UNDER
ET OPKALD, START AF FUNKTIONSKNAP
Headset Mute
Hvis du vil afbryde mikrofonen på headsettet, skal du kortvarigt trykke lige ind på knappen
til lyttevolumen/mikrofonafbryder. Tryk igen for at aktivere lyden.
Der lyder 3 hurtige bip hvert 15. sekund for at angive, at mikrofonafbryderen er aktiv.
Hvis du vil starte funktionsknappen, skal du trykke på og holde knappen til lyttevolumen/
mikrofonafbryder nede i mere end 2 sekunder.
REJSE MED AWH55/65-USB
Du kan nemt afmontere AWH55/65-USB, hvis du skal ud at rejse.
Skub forsigtigt
fra side til side
for at afmontere
Afmonteret enhed
For at spare på strømmen til headsettet,
og for at overholde reglementer ved
flyrejser, skal du slukke for headsettet
ved at trykke samtidig på både
knappen til opkaldsstyring og knappen
lyttevolumen/lydløs i 5 sekunder. Slip
begge knapper igen, når den grønne
indikator på headsettet begynder at
blinke.
Tryk på knappen til opkaldsstyring for at
tænde headsettet igen. Indikatorlampen
for tale udsender hurtige grønne blink.
BEMÆRK: Hvis headsettet er slukket, tændes det igen ved tryk på en vilkårlig knap. Vær
opmærksom på, at AWH55/65-USB-headsettet kan tænde utilsigtet, hvis det ikke nedpakkes
på den rigtige måde.

14 15
Drej i én retning i mere
end 2 sekunder
F
Tryk kort lige ind
Lydløs
Stigende/faldende toner,
2 toner ved grænse
Drej frem og tilbage
Lyttevolumen
Handling Tone
Tryk lige ind, og hold i
mere end 2 sekunder
Funktionsknap
Flash
Foretage/besvare/
afslutte opkald Kort tastetryk Mellemhøj tone
Advarsel om fladt
batteri (5 minutters
taletid tilbage)
Anbring headsettet i
opladningsgaflen 1 tone hvert 10. sekund
Advarsel om uden for
rækkevidde – under
et aktivt opkald
Gå tættere på
baseenheden
2 toner lige inden grænsen.
3 toner uden for
rækkevidde, og et aktivt
opkald afsluttes
midlertidigt. Der lyder
1 tone, når der vendes
tilbage inden for
rækkevidde. Opkaldet
genoptages, hvis dette sker
inden for 15 minutter
Meddelelse om opkald Tryk på knappen til
opkaldsstyring for at
besvare opkaldet 3 gentagne toner
Funktion
Tast
3 toner hvert 15. sekund
INDIKATORLAMPER PÅ BASEENHEDEN
Handling Lys
Oplader Kraftigt rødt lys
Fuldt opladet Rødt lys slukkes
Mikrofonafbryder er aktiv Grønt lys blinker hurtigt
Headsettet ikke i baseenhed Svagt rødt lys
Headsetlink aktivt Grønt lys blinker langsomt
Headsetlink inaktivt Grønt lys
Statusindikator (grøn)
Opladningsindikator (rød)
FEJFINDING I FORBINDELSE
MED AWH55/65-USB
• Kontroller, at USB-kablet er tilsluttet en
computer, der får tilført strøm.
• Kontroller, at computeren er tændt, og at den ikke er i
standby- eller dvaletilstand.
• Hvis du bruger en USB-hub, skal du kontrollere,
at vekselstrømsadapteren er tilsluttet korrekt, og
at hub'en kan levere 250 mA til at oplade headsettet.
• Hvis du bruger lysnetopladeren, skal du kontrollere,
at stikket til lysnetopladeren er tilsluttet
baseenheden, at lysnetopladeren er forsvarligt
tilsluttet en stikkontakt, og er af den model, der
leveres af Plantronics.
Jeg har tilsluttet alt, men
indikatorerne lyser ikke.
Problem Løsning
KNAPPER PÅ HEADSETTET

16 17
• Skru ned for lyttevolumen på softphonen, indtil
forvrængningen forsvinder.
• Hvis det ikke får forvrængningen til at forsvinde, skal
du sænke lyttevolumen på computeren.
• Juster headsettets volumen. Se side 12.
• Talelydstyrken er for høj. Sænk talevolumen på
softphonen, indtil støjen forsvinder. Hvis støjen ikke
forsvinder, skal du sænke mikrofonvolumen på
computeren.
• Linket til headsettet er gået tabt. Forsøg at gendanne
et link ved at trykke på knappen til opkaldsstyring.
• Start med at frakoble USB-opladeren, og frakobl
derefter lysnetopladeren (hvis den bruges) fra
baseenheden i 5 sekunder. Start med at tilslutte USB-
opladeren, og tilslut derefter lysnetopladeren (hvis
den bruges), for igen at tilslutte strømmen.
• Nulstil hele systemet som beskrevet på side 18.
• Flyt AWH55/65-USB-baseenheden længere væk fra
telefonen.
• Lysnetopladeren sidder i en stikdåse. Slut
lysnetopladeren direkte til stikkontakten i væggen.
• AWH55/65-USB vil angive sig selv som standard–
lydenheden i Windows.®Anvend lydindstillingerne
i Windows®under Lyd og lydenheder for at ændre
lydenheden.
• Headsettet skal muligvis nulstilles. Se side 18.
• Headsettets batteri skal oplades. Se side 7.
• Hvis du bruger en bærbar computer, der ofte skifter til
standby- eller dvaletilstand, kan lysnetadapteren
bruges til at sikre, at headsettet konstant kan oplades.
• Batteriet er ved at være slidt. Udskift batteriet medet
nyt. Se side 19.
• Prøv med en anden størrelse ørekrog. Prøv dig frem,
indtil du finder den rigtige størrelse, eller brug den
medfølgende bøjle til placering over hovedet.
• Et bip hvert 10. sekund er en advarsel om fladt batteri.
Genoplad batteriet ved at sætte headsettet tilbage i
opladningsgaflen i baseenheden i 1-3 timer, indtil
opladningslampen lyser konstant eller holder op med
at blinke.
• To bip er en "uden for område"-advarsel. Ryk tættere
på baseenheden.
• Tre bip hvert 15. sekund angiver, at mikrofonafbryderen
er aktiveret. Tryk én gang på mikrofonafbryderknappen
for at deaktivere funktionen.
Lyden i headsettet er
forvrænget. Jeg kan høre ekko i
headsettet.
Jeg hører for meget
baggrundskonversation eller
støj.
Der er så meget støj, at man
ikke kan tale sammen.
De personer, jeg taler med,
hører brummen i baggrunden.
Det headset, jeg brugte, når jeg
lyttede til musik, fungerer ikke
længere.
Headsettet reagerer ikke
på knaptryk.
Taletiden ved brug af batteri
er mærkbart reduceret, også
efter en fuld opladning.
Headsettet sidder ikke godt, når
det bæres over øret.
Jeg kan høre bip i headsettet.
Problem Løsning
FEJFINDING I FORBINDELSE MED AWH55/65-USB
• Headsettet er muligvis uden for baseenhedens
rækkevidde. Gå tættere på baseenheden, indtil
headsettet er inden for rækkevidde. Rækkevidden
varierer afhængigt af, hvilket kontormiljø du befinder
dig i.
• Headsettets batteri skal oplades. Se side 7. Hvis
du bruger en bærbar computer, der ofte skifter til
standby- eller dvaletilstand, kan lysnetadapteren
bruges til at sikre, at headsettet konstant kan oplades.
• Lyttevolumen er for lav. Tryk på headsettets knap til
forøgelse af lydstyrken. Se side 12.
• Du skal muligvis tilmelde headsettet til baseenheden
igen. Se side 18.
• Kontroller, at softphonen er kompatibel med fjernmod-
tagelse og -afbrydelse ved at se i kompabilitetslisten på
adressen www.plantronics.com/personocall.
• Headsettets batteri skal oplades. Hvis du bruger en
bærbar computer, der ofte skifter til standby- eller
dvaletilstand, kan lysnetadapteren sikre, at headsettet
konstant kan blive opladet.
• AWH55/65-USB er muligvis ikke angivet som
standardlydenheden i dit softphone-program.
• Kontroller, at alle ledninger er korrekt tilsluttet.
• Kontroller, at der er strøm på baseenheden (grøn
indikator lyser), og at headsettets batteri er fuldt
opladet.
• Headsettet er muligvis uden for baseenhedens
rækkevidde. Gå tættere på baseenheden, indtil
headsettet er inden for rækkevidde. Rækkevidden
varierer afhængigt af, hvilket kontormiljø du befinder
dig i.
• Juster lyttevolumen på headsettet (se side 12),
softphonen og pc'en.
• Sørg for, at headsettets højttaler er placeret lige over øret.
• Forkert valg af softphone-model. Kontroller, at du har
valgt den rigtige softphone-model via softwaren
• Du skal muligvis tilmelde headsettet igen. Se side 18.
• Headset er sat på lydløs. Tryk på mikrofonafbryderen
på headsettet for at aktivere mikrofonen. Se side 12.
• Headsettets mikrofonarm er forkert justeret. Juster
headsettets mikrofonarm, så den er ud for din mund.
• Talelydstyrken er for lav. Øg talevolumenn på
softphonen, indtil vedkommende, der ringer op, kan
høre dig. Hvis volumen stadig er for lav, skal du øge
mikrofonniveauet på computeren.
• Headsettets batteri skal oplades. Se side 7.
Headsettet fungerer ikke med
baseenheden.
Headsettet fungerer ikke med
min softphone.
Jeg kan ikke høre, den der
ringer.
Den, der ringer op, kan ikke
høre mig.
Problem Løsning
This manual suits for next models
1
Table of contents
Languages:
Other Avaya Headset manuals

Avaya
Avaya PhoneTech P20USBM Supplement

Avaya
Avaya AWH65+ User manual

Avaya
Avaya ABT-35H User manual

Avaya
Avaya ABT-35+ User manual

Avaya
Avaya ABT-35S User manual

Avaya
Avaya AWH75N User manual

Avaya
Avaya L149 User manual

Avaya
Avaya IX L100 Series User manual

Avaya
Avaya C500 Series Supplement

Avaya
Avaya AWH-55 User manual

Avaya
Avaya ABT-35 User manual

Avaya
Avaya Supra User manual

Avaya
Avaya SupraElite W450N User manual

Avaya
Avaya LKA10 User manual

Avaya
Avaya L139 User manual

Avaya
Avaya AWH54 User manual

Avaya
Avaya Headsets DA55 User manual

Avaya
Avaya SupraElite User manual

Avaya
Avaya ABT-35 User manual

Avaya
Avaya Starset User manual