Avaya 3735 User manual

Avaya 3735 DECT Handset
Quick Reference Guide
Release 4.6
July 2017
© 2017, Avaya Inc.
All Rights Reserved.
3735 DECT handset overview
The Avaya 3735 DECT handset is a robust DECT handset
designed for medium to high demand environments such
as hospitals, elderly care, retail and enterprise. Its
advanced messaging features make it ideal for
applications where two-way messaging or interaction with
automated equipment is required.
The Avaya 3735 DECT handset streamlines maintenance
or administration and can easily be adapted to fit the
changing needs of large and diversified organizations.
3735 handset physical layout
1
2
3
4
5
6
7
8
9
1011
12
13
14
15
16
17
18
19
Callout number # Name
1 Multifunction/Alarm button
2 Headset connector
3 Shows time and icons
4 Shows date and icons
5 Shows the soft key function
6 Five way navigation key.
7 On hook and On/Off key
8 Alphanumeric keys
9 Sound off key
10 Microphone
11 Space
Table continues…
Callout number # Name
12 Key lock, and Upper and
Lower case
13 Voicemail access
14 Off hook key
15 Confirmation key
16 Soft keys
17 Mute button
18 Color display
19 Volume buttons
Functions
Note:
Some functions are license/system dependent or
require settings in handset via WinPDM/Device
Manager.
Table 1: Functions of 3735 DECT handset
Functions 3735 3735 Alarm
General
Easy registration
Enhanced DECT
Security
Vibrator
Headset connector
Loudspeaking
function
3 Programmable Soft
keys
9 Programmable Hot
keys
Profiles
System profiles
Table continues…
1

Functions 3735 3735 Alarm
Shared phone
Contacts (250
contacts)
Central phonebook
Company phonebook
(1000 contacts)
Downloadable
languages
Multifunction button —
Programmable
Navigation key
Upgradable to
Messenger
— —
Upgradable to
Protector
—
Centralized
management
Personalized menus
Easy replaceable
battery
Easy replacement of
handset
Handset restrictions
Bluetooth
Telephony
Push to Talk (PTT)
Procedure call
Table continues…
Functions 3735 3735 Alarm
Voicemail access
Microphone on/off
during call
Five predefined
emergency numbers
Messaging
Mini messaging (12
characters)
— —
Data Send
Colored messaging
Interactive messaging
Data with prefix
Alarm
Push button alarm —
Acoustic Location
Signal (ALS)
—
Alarm with data —
Location
Location, base
stations
Icons
Icon Name
Signal strength
Full battery
Voicemail message
Microphone off
Table continues…
Icon Name
Loudspeaking
Loudspeaking off
Sound off
Headset
Bluetooth headset
Bluetooth
New message
Read message
Missed call
Incoming call
Outgoing call
System connection
Key lock
Phone lock
2

Handset menu and keys
Menu icons
1
2
3
4
5
6
7
8
Callout number # Name
1Calls
2Shortcuts
3Settings
4Contacts
5Profiles
6Messaging
7My favorites
8Connections
Navigating the menu
1. To move around in the menu structure, use the
Navigation key.
2. To select an option, press the corresponding soft key
located below the display.
Soft keys, Hot keys, and Multifunction
button
The three soft keys below the display can be defined for
specific functions such as dialling a specific number.
A long press on a Hot key can have the same function as
a Soft key and any key between 2 - 9 can be programmed
as a Hot key.
The Multifunction button can also be programmed for
different functions with the use of long press and double
press.
Activating automatic key lock
1. Press Menu.
2. Select Settings.
3. Select Locks > Automatic key lock.
4. Select one of the following:
•On
•On except calls
The system displays the current key lock setting under
Automatic key lock.
5. Press Back to redisplay the Locks menu.
6. Select Auto lock time, and then press Select.
7. Select the required lock time, and then press Select.
The user can configure a locked keypad to unlock
automatically when a call or message is received.
After the user has serviced the call or message, the
keypad is locked again after the specified Auto lock
time expires.
Deactivating automatic key lock
1. Press Menu.
2. Select Settings.
3. Select Locks > Automatic key lock.
4. Select Off to deactivate automatic key lock.
Basic functions
Switching the handset on
1.
Press and hold the On-hook and On/Off ( ) key.
The handset vibrates when it is on and the display
lights up followed by a confirmation message.
2. Press Yes.
Switching the handset off
The handset must be in an idle mode.
1.
Press and hold the On-hook and On/Off ( ) key.
The system displays the Switch off? window.
2. To confirm, press Yes.
If a handset is shared and one of the users logs off
the shared handset, the lock that prevents the
handset from unauthorized use is deactivated.
Charging the battery
To charge the battery, place the handset in any of the
following:
• Desktop charger: In a desktop charger the handset
is fully operational. The handset does not vibrate in
charger.
• Charging rack
You can also charge the handset in a separate
battery pack charger.
Charging below 5°C will harm the battery and
shorten the lifetime.
Replacing the battery
If the standby time for the handset becomes too low,
replace the battery by a new battery.
Contact the system administrator or handset supplier
for information about new batteries.
Making a call
To dial the number and make a call, do any of the
following:
• In standby mode, dial the number and press the
Off-hook key, or the soft key Call.
• Press the Off-hook key and select number from the
Call list.
• Press a pre-programmed Hot key or Soft key.
• Press a soft key.
• To dial a number from the local phone book, enter
Contacts > Call contact. Select the name from the
list and press Call or the Off-hook key.
• To dial a number from the Central phone book,
enter Contacts > Central phonebook. Search by
Name orNumber or Last result, and press Search.
Press Off-hook key, or the soft key Call.
The alpha-numeric keys can be programmed with a
handset number.
Answering a call
When the ring signal sounds, press the Off-hook key.
Ending a call
Some systems or PBXs require that the handset sends a
DTMF in order to end a call.
To end a call, press the On-hook and On/Off ( )
key.
Declining a call
Your handset must ring.
Press the On-hook and On/Off ( ) key or the
Decline soft key.
3

Turning the loudspeaking function on or
off
During a call, press the left soft key to turn the loud
speaking function on or off.
Turning audio signals on or off
Do the following:
• In stand-by mode a long press on the Sound off
key, or a long press on the Mute button changes
between audio signals on or off.
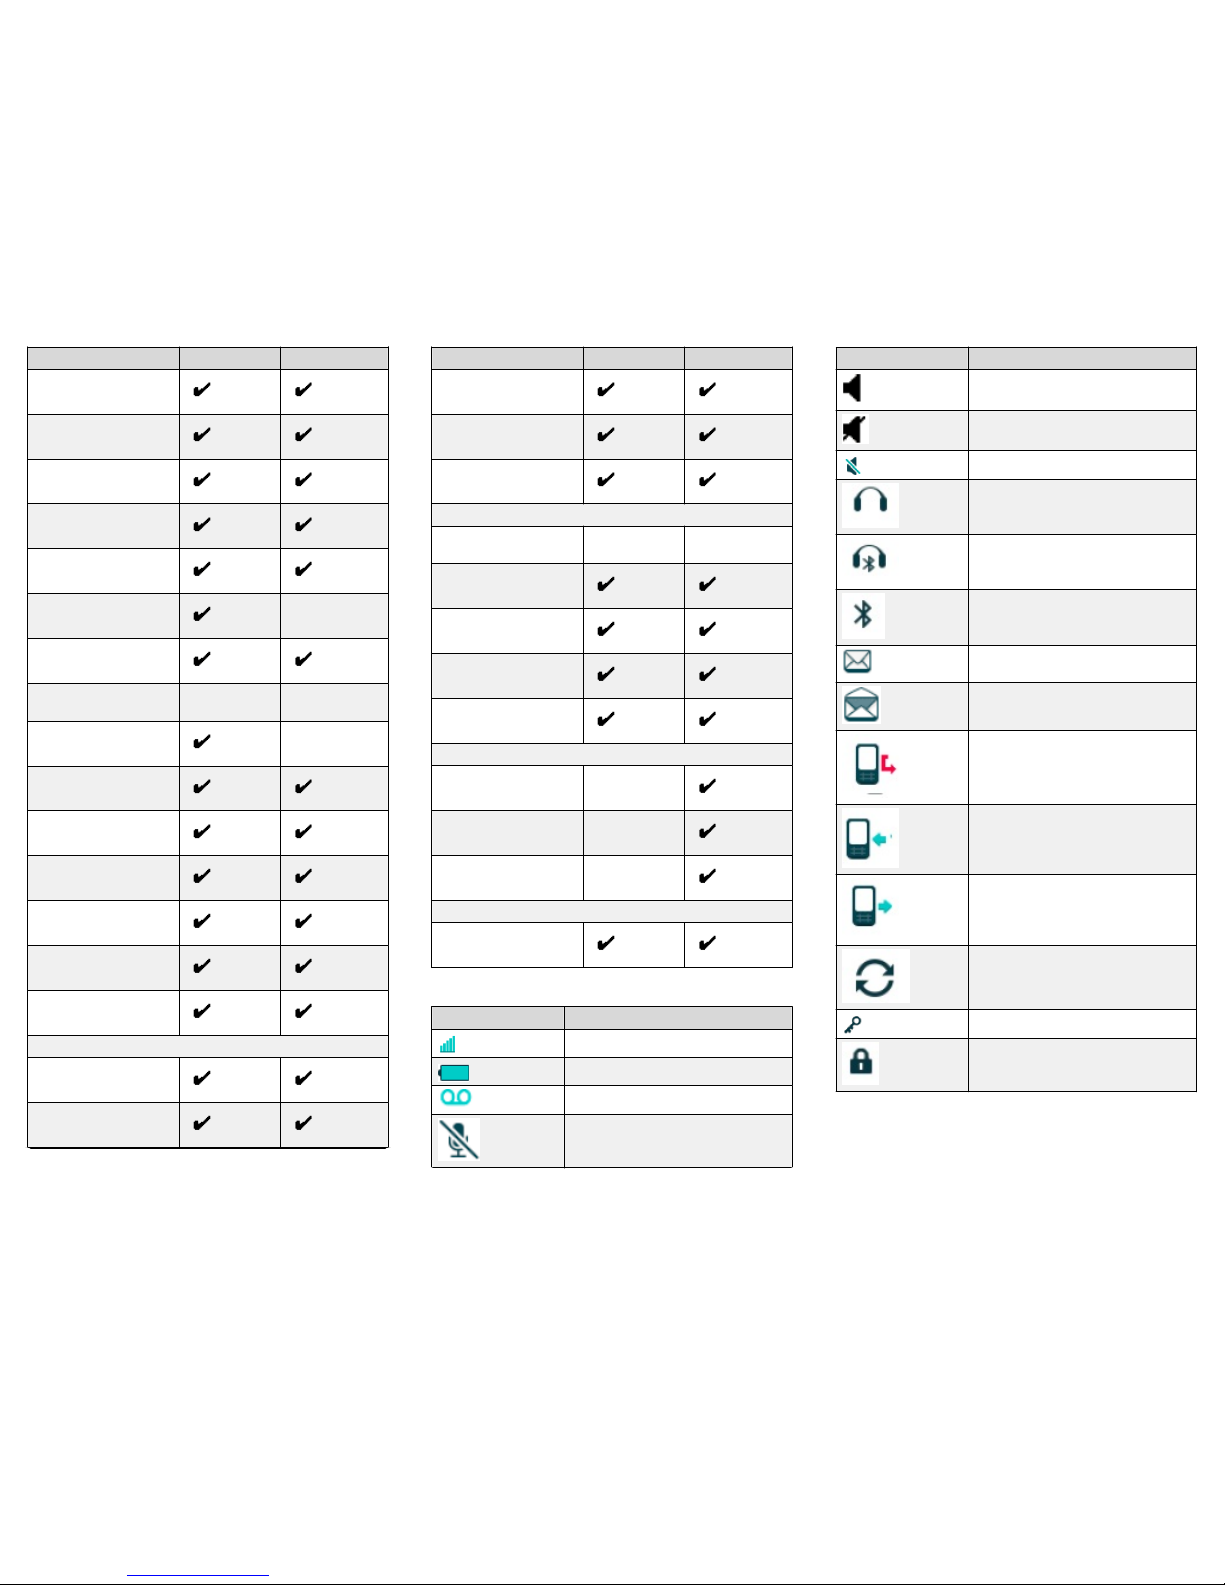
The Sound off icon indicates a silenced handset.
• A short press on the Sound off key or a press on
the Mute button before answering a call, silences
the ring signal.
Setting the vibrator alert
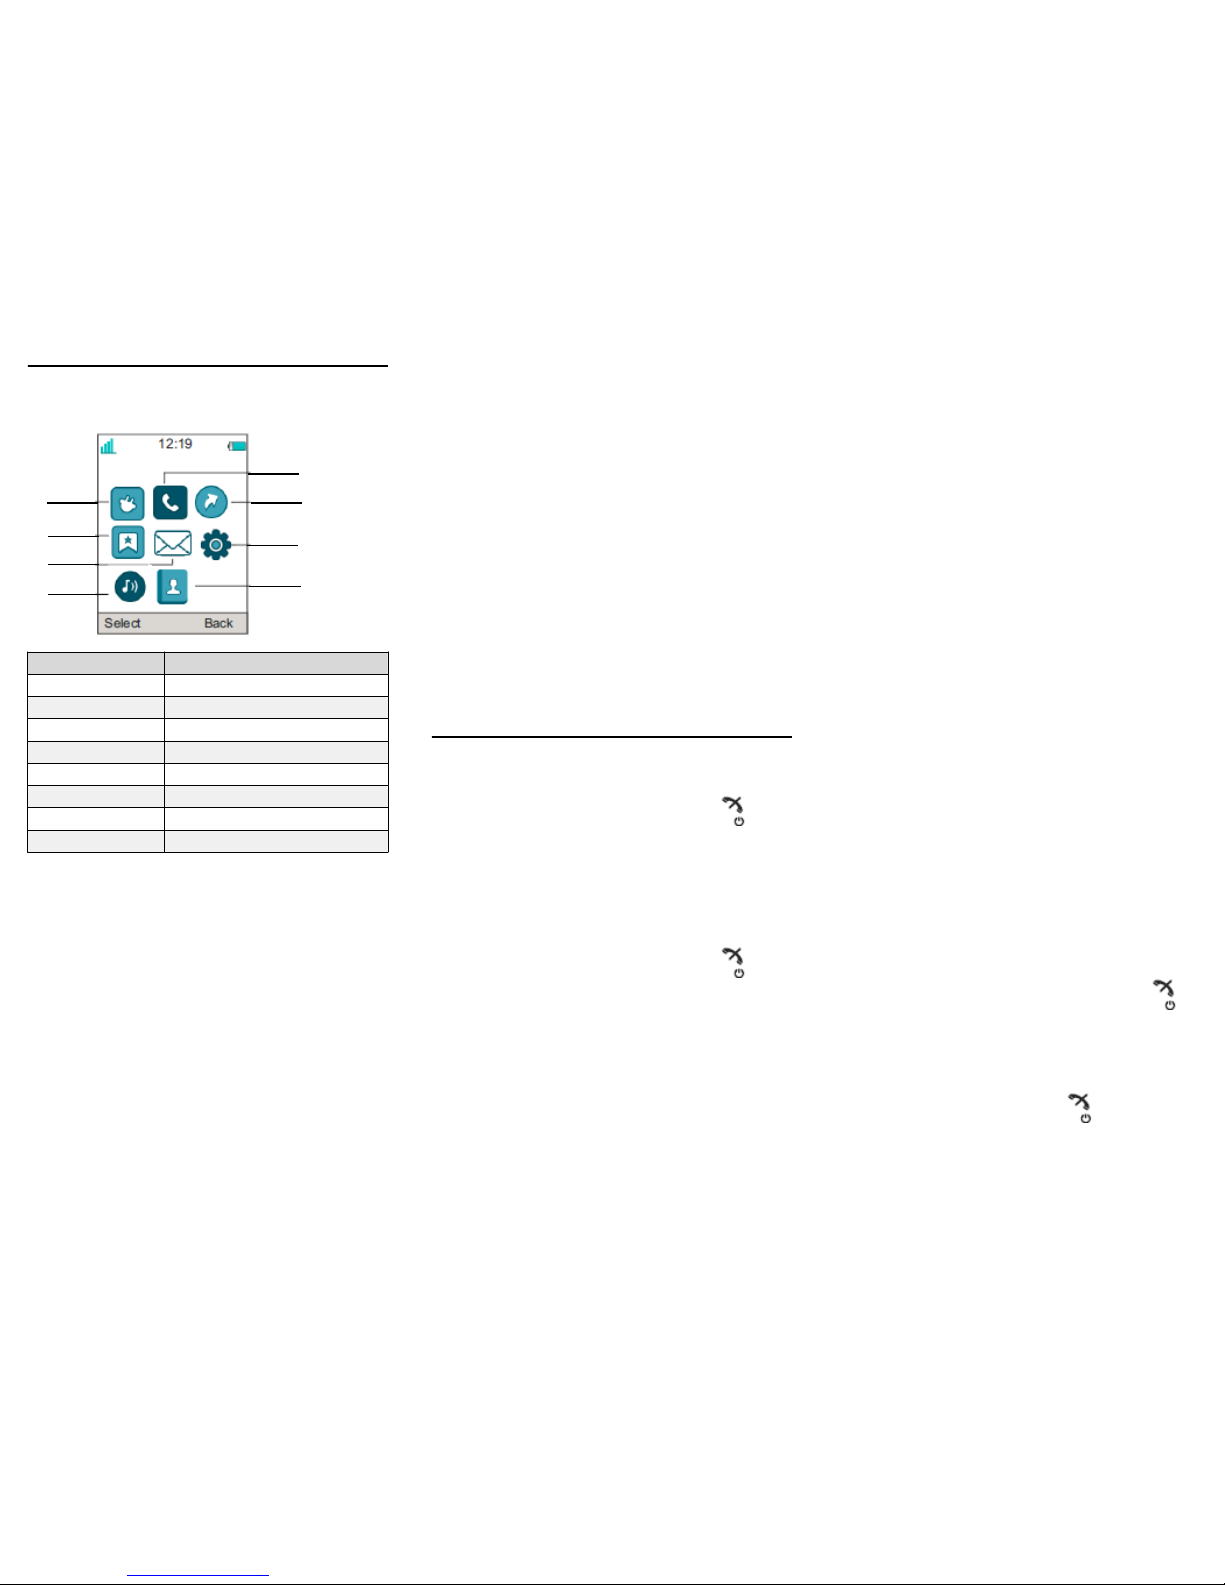
1. Press Menu.
2. Select Settings.
3. Select Sound & Alerts > Vibrator alert.
4. Select one of the following:
•On
•On if silent: The vibrator is on when the handset is
muted.
•Off
5. Select vibrating alert.
6. Press Back to save the settings.
Note:
If the vibrator is activated, it vibrates for incoming
calls and messages. The vibrator can also be
activated when receiving a message during a call.
Changing the volume during a call
Do any of the following:
• Press the Volume button upwards to increase the
volume and downwards to decrease the volume.
• Use the Navigation key to adjust the volume.
Locking or unlocking the keypad
manually
Press the * key to lock or unlock and then press the
soft key Lock or Yes.
The Locked keypad icon indicates a locked keypad.
Text messages on 3735 DECT handset
When a text message is received, a message tone
sounds. The message is displayed immediately and the
New message icon is shown in the display.
If the message is received during a call, the user is
notified by a beep and the message is displayed. The
message is stored in the message list.
Messaging availability is dependent on handset variant.
Reading a stored message
1. Press Menu.
2. Select Messaging.
3. Select Inbox to view the message list.
4. Select a message, and then press View.
You can scroll the message list with the up and down
arrows on the navigation key.
Writing a new message
1. Press Menu.
2. Select Messaging.
3. Select Write new message.
4. Write the message from scratch or select a message
template by pressing the More soft key and, if
required, edit the message.
Note:
The More key is not displayed if no message
templates have been defined.
5. When the message is complete, press Send.
6. Enter the call number.
7. Press Send to send the message.
Deleting a message
1. Press Menu.
2. Select Messaging.
3. Select Inbox to view the message list.
4. Select a message that you want to delete, and then
press More.
You can scroll the message list with the up and down
arrows on the navigation key.
5. Select Delete, and then press Yes.
The system deletes the message.
6. (Optional) To delete all messages in the list, select
Delete all and press Yes.
Checking the voicemail
Do any of the following:
• When you receive a new voicemail, it is indicated
by the New voice mail icon, and an automatically
displayed voice mail notification, then press Call to
call your voice mail and listen to the message.
• In standby mode, call your voicemail by long
pressing on the digit key 1.
• Select Messaging > Inbox. Select the voicemail
message, press View, and then press Call.
If the extension number is not available, the system
displays the Voice mail number not defined dialogue
window.
All voice mail are indicated with one icon only, in the
message list.
Using the local phone book
Use the phone book to:
• Find and call a name.
• Add a contact.
• Edit a contact.
• Delete a contact.
1. To find and call a name, do the following:
a. Select Contacts > Call contact.
b. Do one of the following:
• Enter the first few letters in the name or the
whole name. While entering the text,
suggestions that match the entry are displayed
in the Search field.
• Go to the contact list.
c. Select the name, and press Call.
2. To add a new contact, do the following:
a. Select Contacts > Add contact.
b. Select New or From call list.
c. Press Add.
d. Enter the name, and press OK.
e. Select Number, enter the number, and press OK.
f. Press Save.
3. To edit a contact, do the following:
a. Select Contacts > Edit contact.
b. Select the name, and press Edit twice.
c. Make the required changes, press OK, and then
press Save.
A contact from the company phone book is marked
with the , which means that it is not editable.
4. To delete a contact, do the following:
a. Select Contacts > Delete contact.
b. Select the name, press Delete, and then press
Yes.
Using the central phone book
The central phone book looks for contacts in central
company phone book database.
1. Select Contacts > Central phonebook.
4

2. Select any of the following:
•Search by name
•Search by number
•Last result
3. Enter the first letter(s) in the first name, and/or the first
letter(s) in the family name.
4. Press Search.
The system searches the central phone book and
displays a list of matching names.
5. (Optional) You can step to the next entry in alphabetic
order by pressing the Navigation key.
6. Press More to add contact, or press Call or the Off-
hook key to make the call.
Alarm functions
Activating an alarm
You can always trigger the alarm when you are speaking,
editing your settings, or while the handset is locked.
To activate the alarm, press the alarm button twice
within two seconds.
The system displays an information text Personal
alarm.
The alarm is sent to the alarm central that distributes it
further. After that the handset returns to stand-by
mode.
Acoustic location signal
An alarm can be followed by an Acoustic Location Signal
(ALS). The ALS is a signal from the handset that sounds
for a predefined period of time. The signal is silenced by
pressing the Mute button on the handset.
Testing the alarm
Press and hold the alarm button until the system
displays the information text Test Alarm.
Alarm with data
The data must manually be defined and stored by the
user. To use the function, one Soft or Hot key or
Navigation key in the handset must be defined as a
shortcut to the menu Edit alarm data. The stored data is
added to all types of alarm at transmission.
Automatic call after alarm
A handset can be configured to call a predefined number
after an alarm has been sent. If configured, it is also
possible to call the predefined number without sending an
alarm by pressing the push-button. Depending on the
settings, the call can be established in the following
modes:
• Loudspeaking mode
• Normal mode
• Monitor mode
Chemical resistance
The alpha and numeric characters printed on the exterior
of the handset have been tested and found resistant to
chipping, fading, or wearing off when the handset is
treated with common cleaners and disinfectants or
perspiration. Do not immerse the handset in any solutions;
use a damp rag for cleaning application. The following
chemicals have shown no harmful effect:
• Ethanol 85%
• Aseptix, H2O2
• Sodium hypochlorite 5%
• Chlorhexidin 60% 0,5 mg/ml
• Actichlor plus, 1000 ppm chlorine
• Virkon S 1%
Note:
Acetone can be damaging to the plastic casing of the
handset and should not be used.
Support
Go to the Avaya Support website at http://
support.avaya.com for the most up-to-date
documentation, product notices, and knowledge articles.
You can also search for release notes, downloads, and
resolutions to issues. Use the online service request
system to create a service request. Chat with live agents
to get answers to questions, or request an agent to
connect you to a support team if an issue requires
additional expertise.
5
Other manuals for 3735
2
Table of contents
Other Avaya IP Phone manuals

Avaya
Avaya Norstar Mode M7100 User manual

Avaya
Avaya 03-600759 User manual

Avaya
Avaya Vantage K155 User manual

Avaya
Avaya 5620 User manual

Avaya
Avaya 3606 User manual

Avaya
Avaya 9620 Deskphone Edition User manual

Avaya
Avaya J189 User manual

Avaya
Avaya Cloud Office-J159 User manual

Avaya
Avaya J169 Manual

Avaya
Avaya 4625SW User manual

Avaya
Avaya IP Office 5610 User manual

Avaya
Avaya 4600 Series Service manual

Avaya
Avaya one-X 1603 Service manual

Avaya
Avaya IP Office 9641 User manual

Avaya
Avaya 1120E User manual

Avaya
Avaya IP Office 5402 User manual

Avaya
Avaya DEFINITY 4606 User manual

Avaya
Avaya J169 Instruction Manual

Avaya
Avaya IP Office 5410 User manual

Avaya
Avaya J129 User manual