2
AA 1.5V
1
AA 1.5V
AA 1.5V
Close / Fermer /
Schließen
Cerrado /Chiuso
Open / Ouvrir / Önen
Abierto / Aperto
(EN): BATTERY ADVICE
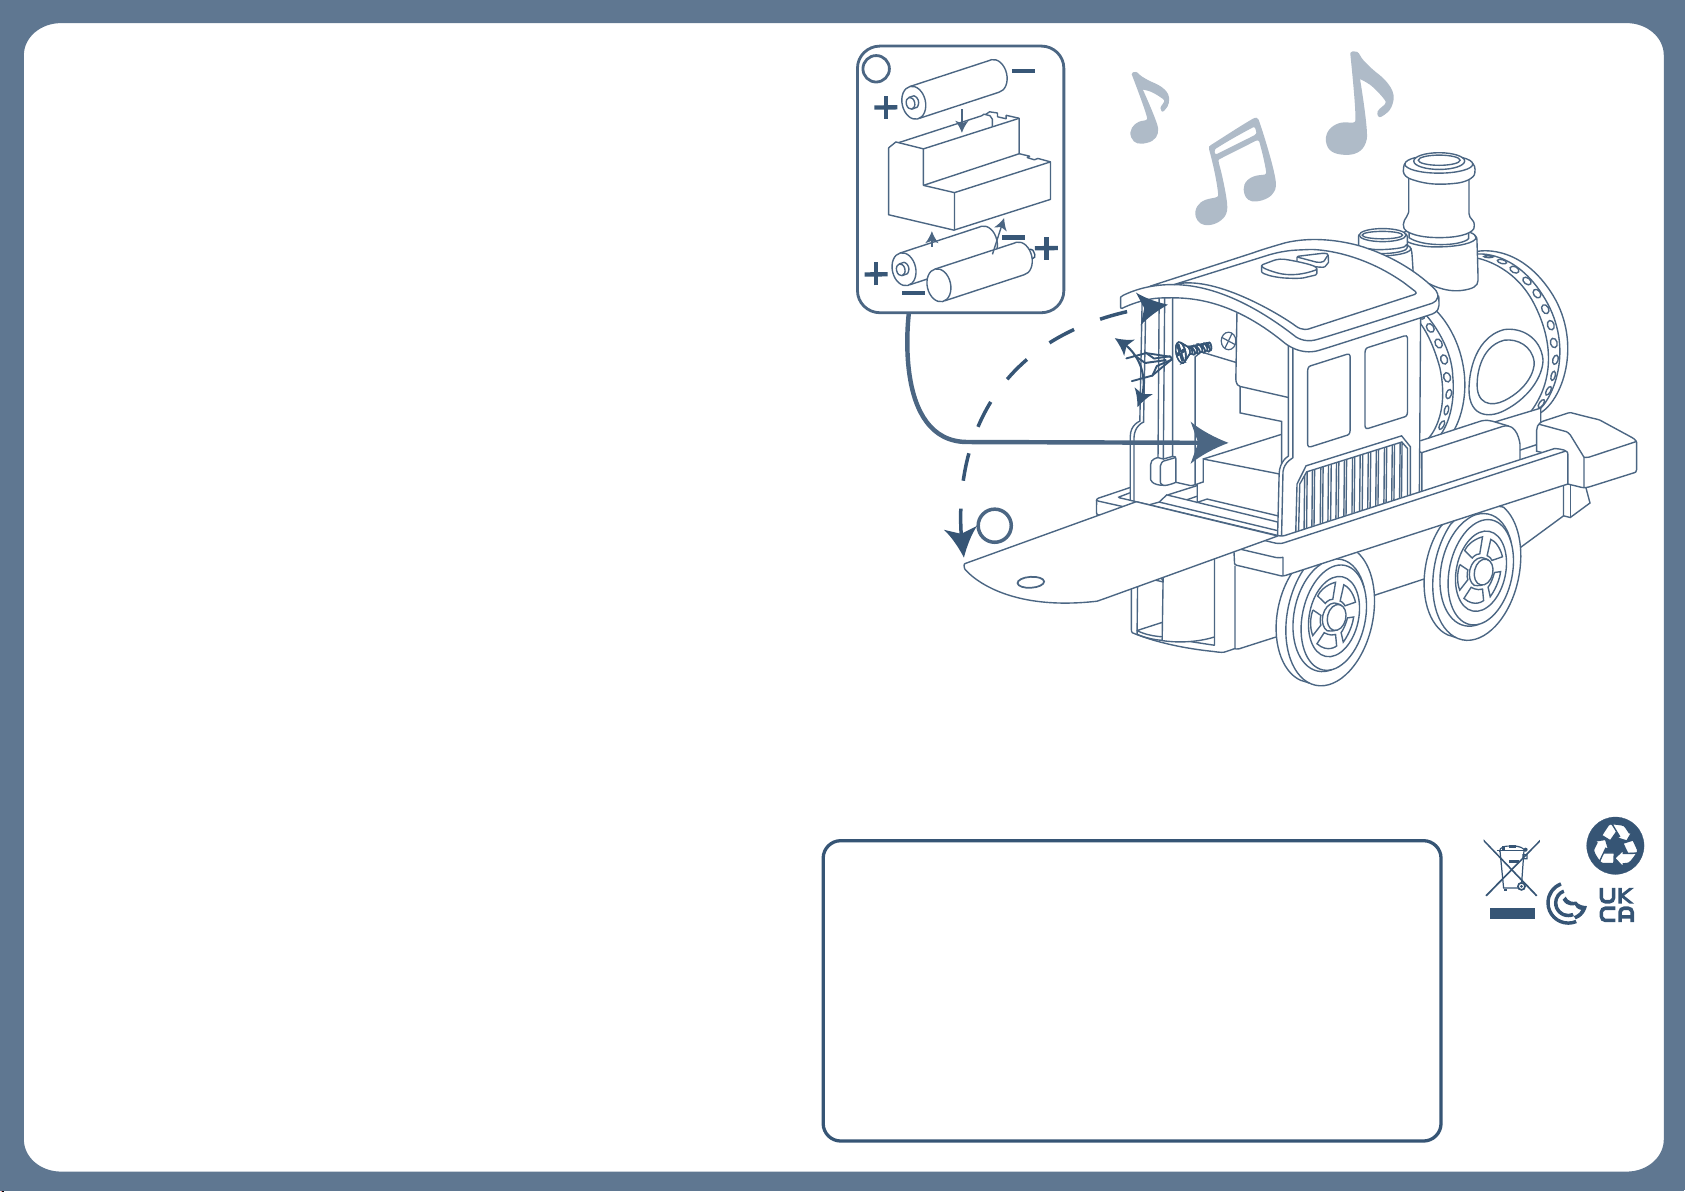
1) Uses 3 x AA (1.5V) size batteries – Included. 2) Batteries should only be replaced by an adult. 3) Do not mix old and new batteries. 4) Do not
mix alkaline, standard or rechargeable batteries. 5) Do not re-charge non-rechargeable batteries. 6) Rechargeable batteries are only to be
charged under adult supervision. 7) Rechargeable batteries are to be removed from the product before being charged. 8) Ensure batteries
are inserted with the correct polarity. 9) Exhausted batteries should always be removed. 10) The terminals should not be short circuited.
ATTENTION: When the module’s functions lose performance, follow instructions carefully to install new batteries.
(FR): CONSEILS D’UTILISATION DES PILES
1) Fonctionne avec 3 x AA (1.5V) piles requises incluses. 2) Les piles ne doivent être remplacées que par un adulte. 3) Ne pas mélanger piles
usagées et piles neuves. 4) Ne pas mélanger les piles de type alcalin, les piles standard et les piles rechargeables. 5) Ne pas recharger les piles
non rechargeables. 6) Recharger les piles rechargeables seulement en présence d’un adulte qui surveille. 7) Enlever les piles rechargeables du
produit avant de les recharger. 8) S’assurer que les piles sont mises en place en respectant la polarité. 9) Toujours enlever les piles usées. 10) Ne
pas court-circuiter les bornes. ATTENTION: Lorsque les fonctions du module cessent de fonctionner correctement, suivre les instructions
attentivement.
(DE): BATTERIEINFORMATIONEN
1) Benötigt 3 x AA (1.5V) Batterien enthalten. 2) Batterien sollten nurvon Erwachsenen ersetzt werden. 3) Alte und neue Batterien nicht
vermischen. 4) Alkalische, normale und aufladbare Batterien nicht vermischen. 5) Nicht aufladbare Batterien nicht wiederaufladen.
6) Wiederaufladbare Batterien nur unter Aufsicht eines Erwachsenen laden. 7) Wiederaufladbare Batterien müssen aus dem Produkt entfernt
werden, bevor sie geladen werden. 8) Batterien müssen mit richtiger Polarität eingelegt werden. 9) Leere Batterien sollten sofort entfernt
werden. 10) Pole sollten nicht kurzgeschlossen werden. ACHTUNG: Wenn die Funktionen des Moduls nachlassen, befolgen Sie sorgfältig die
Anweisungen zum Einlegen neuer Batterien.
(ES): CONSEJOS DE UTILIZACIÓN DE LAS PILAS
1) Funciona con 3 x AA (1.5V) pilas requeridas - incluidas. 2) Las pilas han de ser reemplazadas por un adulto. 3) No mezclar las pilas nuevas con
las pilas usadas. 4) No mezclar pilas alcalinas con pilas estándar o con pilas recargables. 5) No recargue pilas no recargables. 6) Las pilas
recargables sólo deberán ser recargadas bajo la supervisión de un adulto. 7) Las pilas recargables deben extraerse del artículo antes de ser
recargadas. 8) Asegurarse de que las pilas están insertadas con la polaridad correcta. 9) Siempre retirar las pilas gastadas. 10) No
cortocircuitar los terminales. ATENCIÓN: Cuando es reducido el rendimiento de las funciones del módulo, sigue las instrucciones con cuidado
para instalar nuevas pilas.
(IT): CONSIGLI PER LA BATTERIA
1) Richiede 3 x AA (1.5V) batterie incluse. 2) Le pile dovrebbero essere sostituite solamente da un adulto. 3) Non mescolare le vecchie pile con le
nuove. 4) Non mescolare pile alcaline, standard o ricaricabili. 5) Non ri-ricaricare pile non-ricaricabili. 6) Le pile ricaricabili devono essere
ricaricate solamente sotto soprintendenza adulta. 7) Le pile ricaricabili saranno rimosse dal prodotto prima di essere ricaricate. 8) Assicurati
che le pile siano inserite con la giusta polarità. 9) Le pile scariche dovrebbero essere sempre rimosse. 10) I terminali non dovrebbero essere
messi in corte circuito. ATTENZIONE: Quando è ridotto il rendimento delle funzioni del modulo, segue attentamente le istruzioni per istallare
nuove pile.
(NL): INFORMATIE OVER DE BATTERIJEN
1) Gebruik 3 AA (1.5V) batterijen bijgesloten. 2) Batterijen mogen alleen door een volwassene aangebracht worden. 3) Oude en nieuwe
batterijen niet door elkaar gebruiken. 4) Gebruik geen alkaline, normale of oplaadbare batterijen door elkaar. 5) Batterijen die niet
oplaadbaar zijn niet opladen! 6) Oplaadbare batterijen mogen alleen onder toezicht van een volwassene worden opgeladen. 7) Oplaadbare
batterijen eerst uit het product halen voordat deze opnieuw worden opgeladen. 8) Batterijen dienen met de goede polariteit ( + / - )
aangebracht te worden. 9) Lege batterijen dienen onmiddellijk verwijderd te worden. 10) De polen ( b.v. + / +) mogen geen kortsluiting
veroorzaken. VOORZICHTIG: Als de functies van de module niet meer werken, volgt u de instructies zorgvuldig om nieuwe batterijen te
installeren.
(DK): BATTERIERÅDGIVNING
1) Bruger 3 x AA (1,5V) batterier i størrelse - Inkluderet. 2) Batterier bør kun udskiftes af en voksen. 3) Bland ikke gamle og nye batterier.
4) Bland ikke alkaliske, standard- eller genopladelige batterier. 5) Genoplad ikke genopladelige batterier. 6) Genopladelige batterier må kun
oplades under opsyn af voksne. 7) Genopladelige batterier skal ernes fra produktet, inden de oplades. 8) Sørg for, at batterierne er isat med
den korrekte polaritet. 9) Udtjente batterier skal altid ernes. 10) Terminalerne bør ikke kortsluttes. ORSIGTIG: Når modulets funktioner falder i
eekt, følg da instruktionerne omhyggeligt for at installere nye batterier.
(SE): BATTERIERÅDGIVNING
1) Använder 3 x AA (1,5 V) batterier - Ingår. 2) Batterier bör endast bytas ut av en vuxen. 3) Blanda inte gamla och nya batterier. 4) Blanda inte
alkaliska, standardbatterier eller uppladdningsbara batterier. 5) Ladda inte icke-uppladdningsbara batterier igen. 6) Uppladdningsbara
batterier får endast laddas under övervakning av vuxna. 7) Uppladdningsbara batterier ska tas ur produkten innan de laddas. 8) Se till att
batterierna sitter i med rätt polaritet. 9) Tömda batterier ska alltid tas bort. 10) Terminalerna bör inte kortslutas. OBS! När modulens funktioner
tappar prestanda, följ instruktionerna noggrant för att installera nya batterier.
(PL): WYMIANA BATERII
1) Wmontowano 3 baterie AA (1.5V). 2) Wymiany baterii może dokonywać wyłącznie osoba dorosła. 3) Nie należy mieszać ze sobą baterii
nowych i używanych, ani też różnych typów baterii (alkalicznych, standardowych czy przeznaczonych do ładowania). 4)Baterie nie
przewidziane do ładowania nie mogą być ładowane. 5) Baterie przewidziane do ładowania mogą być ładowane jedynie pod nadzorem
osoby dorosłej. 6) Należy je przed ładowaniem wyjąć z zabawki. 7) Baterie należy zakładać z zachowaniem prawidłowej biegunowości.
8) Wyczerpane baterie należy zawsze wyjąć z zabawki. 9) Nie wolno zwierać zacisków zasilania. UWAGA: W przypadku spadku wydajności
funkcji postępować ścisle zgodnie z instrukcjami w celu wymiany baterii.
(GR): ΣΥΜΒΟΥΛΕΣ ΜΠΑΤΑΡΙΩΝ
1) Απαιτούνται 3 x AA (1,5V) μπαταρίες. Περιλαμβάνονται μπαταρίες. 2) Οι μηεπαναφορτιζόμενες μπαταρίες δεν πρέπει να επαναφορτιστούν. 3) Οι
επαναφορτιζόμενες μπαταρίες πρέπει να αφαιρεθούν απότο παιχνίδι πριν φορτιστούν. 4) Οι επαναφορτιζόμενες μπαταρίες πρέπει να φορτίζονται μόνο υπό
την επίβλεψη ενηλίκων. 5) Δεν πρέπει να αναμειγνύονται διαφορετικοί τύποι μπαταριών ήνέες και μεταχειρισμένες μπαταρίες. 6) Πρέπει να χρησιμοποιούνται
μόνο μπαταρίες του ίδιου ήισοδύναμου τύπου όπως συνιστάται. 7) Οι μπαταρίες πρέπει να τοποθετούνται μετη σωστή πολικότητα. 8) Οι εξαντλημένες
μπαταρίες πρέπει να αφαιρεθούν απότο παιχνίδι. 9)Τα τερματικά τροφοδοσίας δεν πρέπει να βραχυκυκλώνονται. ΠΡΟΣΟΧΗ: Όταν οι λειτουργίες της μονάδας
χάσουν την απόδοση, ακολουθήστε προσεκτικά τις οδηγίες για την εγκατάσταση νέων μπαταριών.
This device complies with Part 15 of the FCC Rules. Operation is subject to the following two conditions: (1) this device may not cause
harmful interference, and (2) this device must accept any interference received, including interference that may cause undesired
operation. Caution: changes or modifications not expressly approved by the party responsible for compliance could void the user's
authority to operate the equipment. NOTE: This equipment has been tested and found to comply with the limits for a Class B digital
device, pursuant to Part 15 of the FCC Rules. These limits are designed to provide reasonable protection against harmful interference
in a residential installation. This equipment generates, uses and can radiate radio frequency energy and, if not installed and used in
accordance with the instructions, may cause harmful interference to radio communications. However, there is no guarantee that
interference will not occur in a particular installation. If this equipment does cause harmful interference to radio or television reception,
which can be determined by turning the equipment o and on, the user is encouraged to try to correct the interference by one or
more of the following measures:
• Reorient or relocate the receiving antenna.
• Increase the separation between the equipment and receiver.
• Connect the equipment into an outlet on a circuit dierent from that to which the receiver is connected.
• Consult the dealer or an experienced radio/TV technician for help.
Ce dispositif est conforme à l’article 15 des règlements du FCC. La manoeuvre est sujette à ces 2 conditions : (1) ce dispositif ne causerait
pas d’interférence et (2) ce dispositif devrait accepter toute interférence reçue, incluant l’interférence qui causerait une manoeuvre
non voulue. Mise en garde : les changements ou modifications qui ne sont pas expressément approuvés par le responsable des
conformités pourraient annuler. Le droit de l’utilisateur de manœuvrer cet appareil. NOTE : Cet appareil a été testé et trouvé conforme
aux limites de dispositifs digitaux de classe B selon l’article 15 des règlements de FCC. Ces limites sont conçues pour donner une
protection raisonnable contre les interférences nocives dans une demeure résidentielle. Cet appareil génère, utilise et peut émettre
des radiations d’énergie de fréquences radios et, s’il n’est pas installé et utilisé selon les instructions, pourrait endommager
l’interférence des communications de radio. Il n’est cependant pas garanti de ne pas avoir d’interférence dans une installation
particulière. Si cet appareil cause une interférence à la réception d’une radio ou télévision et qui peut être déterminé en allumant out
éteignant l’appareil, l’utilisateur peut prendre les mesures suivantes pour le corriger :
• Orienter ou localiser de nouveau l’antenne réceptrice.
• Augmenter l’espace entre l’appareil et le récepteur.
• Connecter l’appareil à une prise diérente de celle du circuit du récepteur.
• Consulter un concessionnaire ou un technicien de radio ou télévision pour obtenir de l’aide .
Visit us at / Visitez-nous au
www.mybtoys.com
BX1742/BX1742Z
BX2184/BX2184Z
© 2022 Maison Battat Inc.
B. toys & The Critter Express &
Just B. Just You. B. You
are registered trademarks of /
sont des marques déposées de /
Maison Battat Inc.
Manufactured for / Fabriqué pour
Maison Battat Inc.
8440 Darnley Road,
Montreal, P.Q. H4T 1M4
Designed by / Conçu par
Maison Battat Inc.
تﺎﻳرﺎﻄﺒﻟا ﺖﻠﻤﺷ و x 3 ﺔﻳرﺎﻄﺒﻟا ﺔﺤﻴﺼﻧ ﺐﻠﻄﺘﺗ :(AR)
ﺔﻠﺑﺎﻘﻟا تﺎﻳرﺎﻄﺒﻟا ﺔﻟازإ ﺐﺠﻳ .ﺎﻬﻨﺤﺷ ةدﺎﻋإ ﺐﺠﻳ ﻻ ﻦﺤﺸﻟا ةدﺎﻋﻹ ﺔﻠﺑﺎﻘﻟا ﻏ تﺎﻳرﺎﻄﺒﻟا
ﺖﺤﺗ ﻂﻘﻓ ﻦﺤﺸﻟا ةدﺎﻋﻹ ﺔﻠﺑﺎﻘﻟا تﺎﻳرﺎﻄﺒﻟا ﻦﺤﺷ ﻢﺘﻳ .ﺎﻬﻨﺤﺷ ﻞﺒﻗ ﺔﺒﻌﻠﻟا ﻦﻣ ﻦﺤﺸﻟا ةدﺎﻋﻹ
.ﺔﻠﻤﻌﺘﺴﳌاو ةﺪﻳﺪﺠﻟا تﺎﻳرﺎﻄﺒﻟا وأ تﺎﻳرﺎﻄﺒﻟا ﻦﻣ ﺔﻔﻠﺘﺨﻣ عاﻮﻧأ ﻂﻠﺧ زﻮﺠﻳ ﻻ .رﺎﺒﻜﻟا فاﴍإ
ﻢﺘﻳ .ﻂﻘﻓ ﻪﺑ ﴅﻮﳌا ﻮﺤﻨﻟا ﲆﻋ ﺊﻓﺎﻜﻣ عﻮﻧ وأ عﻮﻨﻟا ﺲﻔﻧ ﻦﻣ تﺎﻳرﺎﻄﺒﻟا ماﺪﺨﺘﺳا ﻢﺘﻳ
ﺐﺠﻳ ﻻ .ﺔﺒﻌﻠﻟا ﻦﻣ ةﺪﻔﻨﺘﺴﳌا تﺎﻳرﺎﻄﺒﻟا ﺔﻟازإ ﺐﺠﻳ .ﺔﺤﻴﺤﺼﻟا ﺔﻴﺒﻄﻘﻟﺎﺑ تﺎﻳرﺎﻄﺒﻟا لﺎﺧدإ
ﻊﺒﺗا ، ءادﻷا ةﺪﺣﻮﻟا ﻒﺋﺎﻇو ﺪﻘﻔﺗ ﺎﻣﺪﻨﻋ :ﻪﻴﺒﻨﺗ .ةﺮﺋاﺪﻟا ةﺼﻗ داﺪﻣﻹا تﺎﻄﺤﻣ نﻮﻜﺗ نأ
ةﺪﻳﺪﺟ تﺎﻳرﺎﻄﺑ ﺐﻴﻛﱰﻟ ﺔﻳﺎﻨﻌﺑ. تﻴﻠﻌﺘﻟا
AA
( 1.5)
ﺖﻟﻮﻓ (EN): Please remove all packaging materials before giving to children.
(FR): Veuillez retirer tout l'emballage avant de donner le produit à des enfants.
(DE): Vor Übergabe an Kinder bitte sämtliches Verpackungsmaterial entfernen.
(ES): Por favor quita todos los materiales del embalaje antes de darlo a los niños.
(IT): Per favore rimuovi tutti i materiali dell’imballaggio prima di darlo ai bambini.
(NL): Verwijder de verpakking voordat het product aan een kind wordt gegeven.
(DK): Fjern alt emballagemateriale, inden det gives til børn.
(SE): Ta bort allt förpackningsmaterial innan du ger till barn.
(PL): Przed podaniem dzieciom należy usunąć wszystkie materiały opakowaniowe.
(GR): Αφαιρέστε όλα τα υλικά συσκευασίας πριν τα δώσετε σε παιδιά.
لﺎﻔﻃﻸﻟ ﺎﻬﺋﺎﻄﻋإ ﻞﺒﻗ ﻒﻴﻠﻐﺘﻟاو ﺔﺌﺒﻌﺘﻟا داﻮﻣ ﻊﻴﻤﺟ ﺔﻟازإ ﻰﺟﺮﻳ :(AR)


