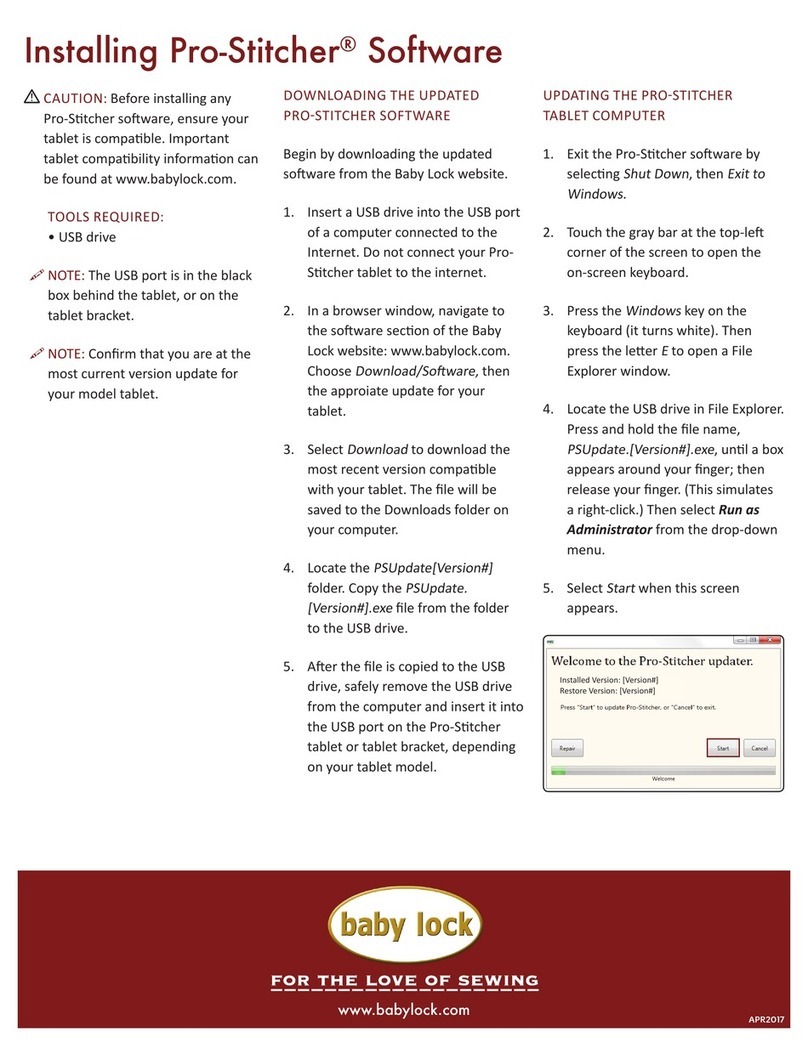
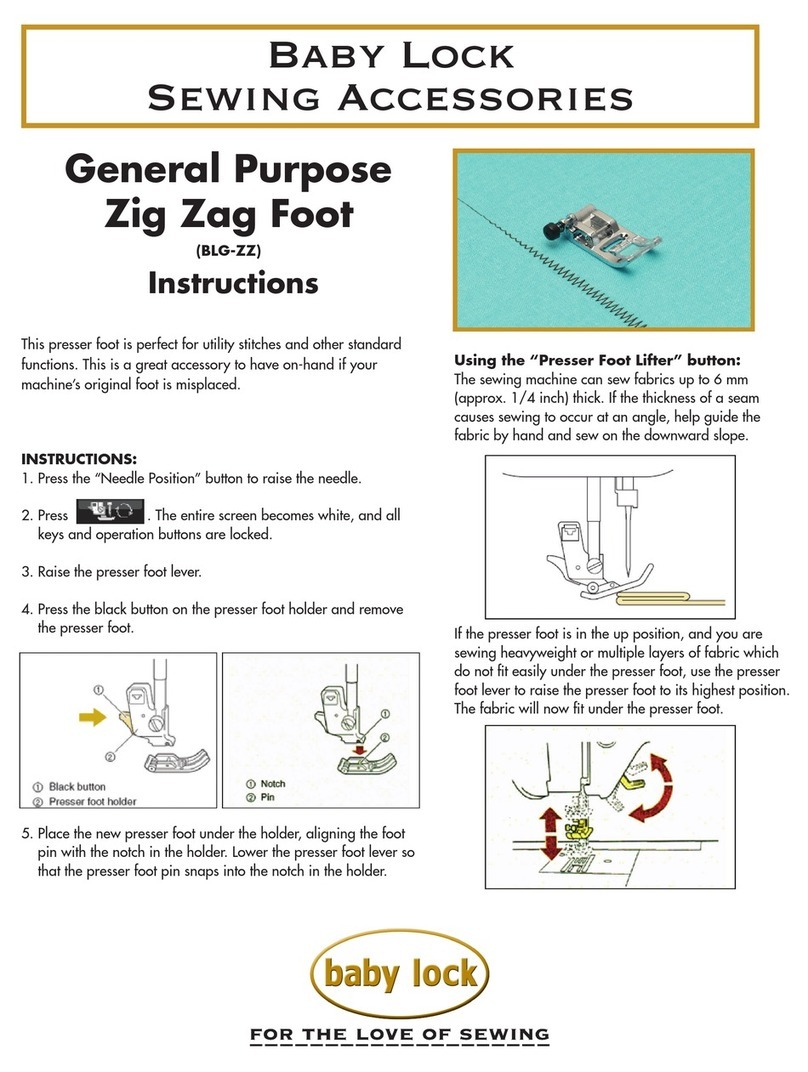
Baby Lock BLRG20ST Technical manual

Instruction and
Reference Guide
Model BLRG20ST
To register your machine warranty and receive Baby Lock product updates and offers, go to
babylock.com/login. If you have questions with registration, visit your Authorized Baby Lock Retailer.
Baby Lock Consumer Helpline: 800-313-4110
www.BabyLock.com
Brought to You by Tacony Corporation®

2 | www.BabyLock.com
How to Use this Manual
Special Information
NOTE: A NOTE indicates important information that helps you make better use
of your Baby Lock product.
ÂIMPORTANT: An IMPORTANT note provides information that is essential to
properly using your Baby Lock product.
UCAUTION: A CAUTION indicates a potential for causing harm to your quilting
machine, the quilt, or to yourself.
QUILTING TIP: Baby Lock educators share tips to get you started quilting.
Finding Information
What are you looking for? ................................................................................... Find it here
Warranty Information ..........................................................................................User manual
Safety Information ...............................................................................................User manual
Regulatory Information .......................................................................................User manual
What’s Included with Your Machine ..................................................................User manual
Machine Specifications........................................................................................User manual
Table Setup Information................................................................ Table installation manual
Machine Setup Information.................................................................................User manual
How to Thread your Machine...............................................................Quick reference card
Needle System for your Machine ........................................................Quick reference card

Regalia Stationary User Manual | 3
Contents
How to Use this Manual ..................................................................................... 2
Special Information .............................................................................................................2
Finding Information ............................................................................................................2
Package Contents/Included Accessories ....................................................... 5
Important Safety Information........................................................................... 6
Recommended Use and Storage .................................................................................. 9
About Your Machine .........................................................................................................10
Get to Know Your Regalia ST........................................................................................ 12
Installation and Setup.......................................................................................15
Installing the Power Cord................................................................................................ 15
Installing the Foot Pedal ................................................................................................ 15
Installing the Thread Mast .............................................................................................. 15
Installing the Color Touchscreen.................................................................................. 16
Using Your Machine...........................................................................................18
Power Switch....................................................................................................................... 18
Lighting.................................................................................................................................. 18
Machine Needle ..................................................................................................................19
Hopping Feet....................................................................................................................... 21
Bobbin and Bobbin Tension.......................................................................................... 22
Tension .................................................................................................................................. 24
Tension Quick Start Guide............................................................................................. 26
Threading the Machine .................................................................................................. 26
Quilting with the Regalia ST........................................................................... 28
Preparing to Quilt ............................................................................................................. 28
Using the Touchscreen Displays.....................................................................30
Overview of the Main Screen .......................................................................................30
Stitching Modes.................................................................................................................34

4 | www.BabyLock.com
Toolbar Options................................................................................................39
Controlling the Lights......................................................................................................39
Machine Tools .................................................................................................................... 40
Machine Settings............................................................................................................... 47
Information Screens......................................................................................................... 53
Machine Maintenance ......................................................................................56
Clean and Oil Your Regalia............................................................................................56
Maintenance Schedule .................................................................................................... 57
Troubleshooting ............................................................................................... 58

Regalia Stationary User Manual | 5
Package Contents/Included Accessories
Part Name Part Code
Regalia ST Quilting Machine BLRG20ST
Bobbins (5) BLJ-BOB
Bobbin case JW000586/
QM00586
Needle (134) size 100/16 (pack of 10) 134FG-100
Needle (134) size 110/18 (pack of 10) 134FG-110
Thread tray and thread mast QM00302
Oiler QM10271
Power cord JW020277
Screwdriver JW010269
2 mm hex wrench QM10284
2.5 mm hex wrench QM10286
3 mm hex wrench JW010287
5 mm hex wrench JW010289
Open-toe foot (closed-toe foot installed) QM10510
Touchscreen display QM29302-0101
Quick Reference Card QRC BLRGST20
Baby Lock Bobbin Winder BLQBW
USB Flash Drive QM30293-02-BL

6 | www.BabyLock.com
Important Safety Information
This device complies with Part 15 of the FCC Rules. Operation is subject to the
following two conditions: (1) This device may not cause harmful interference, and (2)
this device must accept any interference received, including interference that may
cause undesired operation. See the full Declaration of Conformity in the Appendix.
ÂIMPORTANT: Do not operate your Regalia quilting machine until you have
completely read the information contained in this manual. Please keep all
packaging and order information for warranty purposes.
IMPORTANT SAFETY INSTRUCTIONS
Read all instructions before using this machine.
When using this machine, basic safety precauons should always be followed, including the following:
DANGER — To reduce the risk of electric shock:
• A quilting machine should never be left unattended when plugged in. Always
unplug the machine from the electrical outlet immediately after using and before
cleaning.
WARNING — To reduce the risk of burns, re, electric shock, or injury to persons:
• The Regalia ST is heavy. Never attempt to lift it alone. Always use two people when
lifting and always lift from the throat of the machine. Always lift from the throat of
the machine.
• Always unplug the Regalia from the electrical outlet when performing any
maintenance, changing the needle, removing thread locks, or when left unattended.
• Do not unplug by pulling on cord. To unplug, grasp the plug, not the cord.
• Keep fingers away from all moving parts. Use caution around the needle or sharp
external components.
• Change the needle often. Do not use bent or dull needles. “Every quilt deserves a
new needle”.
• Switch the machine to the symbol o, or 0, position to turn it o when making
any adjustments in the needle area, such as threading needle, changing needle,
threading bobbin, changing hopping foot, and so forth.
• Never drop or insert foreign objects into any opening.
• The Regalia ST should only be used indoors away from moisture.
Regalia Stationary User Manual | 7
• The Regalia ST should not be stored or used in extreme temperatures.
• Use the Regalia ST only for its intended use as described in this manual.
• To disconnect from the wall outlet, push the switch to the o position, then
remove the plug from outlet pulling from the plug, not the cord. Never operate
the RegaliaST if the cord is damaged or not working correctly. If a mechanical or
electrical problem is encountered, return the Regalia ST to the nearest authorized
Baby Lock Retailer for examination, repair, electrical, or mechanical adjustment.
• It is not recommended that the Regalia ST quilting machine be used with any table
other than those recommended by Baby Lock.
• Use this quilting machine only for its intended use as described in this manual. Use
only attachments recommended by Baby Lock as contained in this manual.
• Never operate the machine with any air openings blocked. Keep ventilation
openings of the machine free from the accumulation of lint, dust, and fabric.
• Do not operate where aerosol (spray) products are being used or where oxygen is
being administered.
• Do not pull or push the fabric under the machine excessively while stitching. It may
deflect the needle, causing it to break.
• Use only needles designed for free-motion quilting and recommended by Baby
Lock for this machine. Other types of needles may be break during normal quilting.
• Baby Lock strongly advises against children playing with the machine. Close
attention is necessary when this machine is used by or near children.
• This machine is not intended for use by persons (including children) with reduced
physical, sensory, or mental capabilities, or lack of experience and knowledge,
unless they have been given supervision or instruction on the use of this machine by
a person responsible for their safety.
• Children should be supervised to ensure that they do not play with this machine.
• Cleaning and user maintenance shall not be done by children without supervision.

8 | www.BabyLock.com
Save These Instructions
This machine is intended for household or commercial use only.
Disclaimer
Baby Lock and its Retailers are in no way legally responsible or liable for damage to the
Regalia ST when used improperly or not in accordance with the guidelines stated in this
manual or when used on machine quilting tables not recommended by Baby Lock.
To use the machine safely
1. Carefully watch the needle when sewing. Do not touch the handwheel, take-up
lever, needle, or other moving parts while stitching.
2. Turn the machine o and unplug the cord in the following cases:
• when you have stopped using the machine
• when you replace or remove the needle or any other part
• when you check or clean the machine
• when you leave the machine unattended
3. Connect the machine directly to the wall outlet or to a surge protector that
connects directly to the wall outlet. Do not use extension cords.
To increase the life of your machine
1. Do not store this machine in areas exposed to direct sunlight or high humidity.
Never use or store the machine near a heater, an iron, a halogen lamp or other
high heat producing appliances.
2. Use only neutral soaps or detergents to clean the machine. Benzene, solvents and
scouring powders can damage the case and the machine and therefore should
never be used.
3. Do not drop or bump the machine.
4. Always consult the manual to replace or attach the hopping foot, needle or any
other part of the machine. If necessary, contact an authorized Baby Lock Retailer
or Baby Lock Product Support.

Regalia Stationary User Manual | 9
To repair or adjust the machine
If the machine breaks down or needs adjustment, first check the troubleshooting chart
in the appendix to inspecting and adjusting the machine yourself.
For more product information and updates, visit our website at www.BabyLock.com.
The contents of this manual and product specifications are subject to change without
prior notice. Check for updated manuals and machine information at
https://babylock.com/support/.
Recommended Use and Storage
1. It is recommended that our products be operated within in a temperature range
of 60°F to 90°F.
2. Store products in a climate-controlled environment with the following provisions:
• Store machine in the original packaging, which contains the internal
supports designed specifically to maintain and protect the machine during
transport or storage.
• Detach cables and accessories before packing.
• To best protect your electronics, store them in the original packaging,
especially any that arrived in antistatic containers.
3. Storage or use in an environment other than what is recommended may result in
• Damaging condensation
• Rust
• Premature wear
• Overheating
• Poor performance
• Shortened battery life
4. The tablet warranty, if applicable, is VOID if the tablet is stored in temperatures
below 32°F or above 110°F. Do not leave the tablet in a vehicle or other enclosed
space where the temperature may exceed 110°F.
5. If the product is stored at a temperature above or below the recommended
operating range, allow the machine to acclimate to the room temperature prior to
use.

10 | www.BabyLock.com
About Your Machine
General Specifications
The Baby Lock Regalia ST uses high-tech electronics and an innovative touchscreen
user interface to oer greater functionality and ease of operation to quilters than ever
before conceived in the quilting industry. The Regalia ST quilting machine is a high-
quality machine that incorporates robust design features, making it easy to service.
Sewing Opening
Dimensions
(228 mm X 521 mm) 9 inches X 20.5 inches
Sewing Speed Manual Mode: from 25 stitches per minute to 2500 stitches
per minute
Regulated Mode: from 0 stitches per minute to full speed
Stitches Per Inch 5 stitches per inch to 24 stitches per inch
Basting mode: one stitch per quarter inch, one stitch per
half inch, one stitch per inch, one stitch every two inches,
and one stitch every four inches
Needle System 134
Needle Sizes
(recommended)
From 80/12 to 130/21
Hook System Rotary, Horizontal Axis, M-class bobbin
Bobbin Type Aluminum, Class M
Bobbin Case Type MF
Motor Type Brushless DC
Needle Positioning Up and down, walking stitch, onscreen handwheel
Electrical Power 100-240 VAC, 50-60Hz, 1.5-3.3A
This machine conforms to UL and international safety
standards for sewing machines and US and international
laws for electromagnetic compliance.

Regalia Stationary User Manual | 11
Outlet Power 120 watts maximum
Sew Foot Stroke/Lift 5 mm
Needle Bar Stroke 35.3 mm
Take-Up Stroke 73 mm
Lubrication, main
components
Kluber Lube, permanent
Lubrication of hook Velocite 10, Texaco 22

12 | www.BabyLock.com
Get to Know Your Regalia ST
Side View
1. Handwheel
2. Thread mast
3. Touchscreen display
4. Front on/o switch
5. Front Base
6. Rear Base
Close-up View of Needle Area
7. Needle stop/sight hole
8. Needle bar clamp screw
9. Needle
10. Hopping foot
11. Needle plate
12
3
4
78
9
10
11
5
6

Regalia Stationary User Manual | 13
14
13
12
17
18
19
20
16
21
22
Right Side
12. Thread guide
13. Thread mast
14. Thread spool posts
15. Thread tray
Close-up of Tension Assembly
16. Thread take-up lever
17. Three-hole thread guide
18. Thread guide
19. Top tension assembly with
take-up spring
20. Thread stirrup
21. Thread break sensor
22.Lower thread guide
15

14 | www.BabyLock.com
Machine Connections
23. Machine rear display connection (not used)
24. Machine auxiliary power connection (not used)
25. Machine to handlebar connection (not used)
26. Machine to Pro-Stitcher communication (not used)
27. Main power connection
28. Main on/o power switch connection
26
23
24
25
27 28

Regalia Stationary User Manual | 15
Installation and Setup
Installing the Power Cord
Check that the On/O switch is turned o
(the 0 setting). Plug the power cord into the
side power outlet on the back of the machine.
Do not plug the power cord into a power
source at this time.
The top power connector is available for
powering future attachments (not available
at this time) as they are developed by Baby
Lock.
Installing the Foot Pedal
1. Plug in the foot pedal cord end into the foot pedal connector that is attached to
the table.
2. Place the foot pedal under the table at the front, under the machine, for easy
operation.
Installing the Thread Mast
1. Locate the two small M4x10mm hex button head screws and the thread mast
assembly.
2. Align the screws in the thread mast
bracket with the two holes in the
side of the machine (top tension
side). Use a 2.5mm hex tool to
tighten the bracket firmly to the
side of the machine.

16 | www.BabyLock.com
Machine Head USB Port (included)
To b e used to power accessories, NOT for programming, which is done through the
USB port on the front display.
Horizontal Spool Pin (oponal accessory, part #BLJ18-HS)
For certain thread types, it's recommended that you use a horizontal spool pin for
better tension results.
Installing the Color Touchscreen
The Regalia ST comes with a touchscreen front display.
To install the front display
1. For the front display, locate the four 4-40 screws and a small Phillips
screwdriver (not provided). You’ll also need the display with the hinges
attached to the bottom row of connectors on the back of the display.
2. Insert the 4-40 screws into the
openings on the display’s metal
hinge. Align the screws in the
hinge with the holes on the display
bracket. Use the small Phillips
screwdriver to fully tighten the
screws.

Regalia Stationary User Manual | 17
3. Plug the USB mini B cable (with
90° connection), coming out of the
top front cover, into the back of the
display. This cable provides power
and signal connection from the
machine to the display.
NOTE: The USB connection on
the right of the display is used
for updating the display and
the machine software.
ÂIMPORTANT: Note the other
connections on the bottom of
the display for power and audio
are not functional. Also, the
SD card slot on the left of the
display is not used at this time.

18 | www.BabyLock.com
Using Your Machine
Power Switch
There are two power switches on the Regalia ST. The main power switch is at the rear
of the machine, and the secondary switch is at the front of the machine for added
convenience.
The machine is turned on when both switches are turned on. The machine is turned
o when both switches are o. However, you may turn o the machine functions by
turning o only the front switch if you will be returning to quilting within a day.
Turn on the back switch first by toggling the switch from the "○" position to the "|"
position. Then press the front power button. The front power button will not turn on the
machine unless the back switch is on.
ÂIMPORTANT: If you will not be using the machine for more than a day, we
recommend that both switches are turned o and the power cord is unplugged
from the power source.
ÂIMPORTANT: Refer to the safety instructions.
Lighting
The Regalia ST is equipped with several lights for better visibility when quilting. There
are two lights under the throat of the machine providing light to the quilting area and
a light ring that illuminates the needle and stitching area. There is also a bobbin area
light. For additional lighting, consider a task light.
Turning the lights on and o is controlled through the touchscreen display. For more
information about turning on the machine lights, see "To control the lights on the
machine" in the Toolbar Options section of this manual.

Regalia Stationary User Manual | 19
Machine Needle
Use only the recommended needle system for your Regalia ST quilting machine. The
machine was timed to use this specific type of needle (System 134) and it is designed
to work with the high quilting speeds and multi-directional stitching the Regalia oers.
The Regalia ST uses the 134 needle system. This needle
type has a round shank rather than a shank with a flat
side like home sewing machines use.
Using the recommended needle type, you will
experience
• Fewer skipped stitches
• Less needle breakage
• Less thread breakage, especially at high speeds
• Less thread splicing or shredding
• Optimum fabric protection
ÂIMPORTANT: Change the needle regularly. Baby Lock recommends using a new
needle for each new quilt and any time the needle becomes bent, dull, or burred.
UCAUTION: A damaged needle may result in poor stitching quality and/or may
even damage the machine or your quilt.
To change the needle
1. Move the needle bar to the up position by pressing the needle up/down control
on the touchscreen.
2. Turn o all power to the machine.
3. Loosen the needle bar clamp
screw with the 2.5mm hex
wrench. Needle bar
clamp screw
Sight hole

20 | www.BabyLock.com
4. Remove the old needle by pulling it down. Safely discard the old needle.
5. With the scarf of the needle
(indentation at the back of the
needle just above the needle eye)
facing the rear of the machine
and the long groove down the
front of the needle facing the
front of the machine, push the
needle all the way up into the
needle bar until it stops. Check
the sight hole in the needle
clamp to verify that the top of
the needle can go no farther up.
UCAUTION: Check the needle to confirm it is fully inserted. The needle bar has
a sight opening above the needle bar clamp screw. Make sure the needle is
touching the top of the sight opening. If it isn’t, the machine timing will be o
and it may be possible for the needle to collide with internal parts, causing
damage not covered by warranty.
6. Carefully tighten the needle bar clamp screw.
UCAUTION: Although you can use your fingers to tighten the needle bar clamp
screw, we recommend that after finger-tightening the screw, use the 2.5mm hex
wrench to tighten it a bit more. The Regalia ST runs at very high speeds and this
ensures the needle will not loosen while quilting. However, do not over tighten
the needle clamp screw, as this may strip the threads of the screw. Stripped
threads are not covered under the warranty. It may also become dicult to
insert the needle properly into the needle bar. Once the screw no longer turns
freely by hand, gently turn the screwdriver until the screw is tightened snuggly.
Needle Size Thread Size
12 and 14 monofilament, 100 wt. silk, 60 wt. polyester, mylar
16 monofilament, mylar, 100 wt., 80 wt., 60 wt., 50 wt., 40 wt. silk,
polyester and cotton thread
18 40 wt. cotton and polyester, 30 wt. cotton and polyester
19 and 21 Any thread 30 wt. and heavier such as 12 wt., 19 wt., 30 wt.
Scarf at back of needle just above eye
Long groove at front of needle - shoulder to eye
Other manuals for BLRG20ST
1
Table of contents
Other Baby Lock Sewing Machine Accessories manuals

Baby Lock
Baby Lock BLQ2-AGF User manual

Baby Lock
Baby Lock Pro-Stitcher Premium BLPS6 User manual

Baby Lock
Baby Lock Solaris BLSAU User manual

Baby Lock
Baby Lock BLES8-CST User manual

Baby Lock
Baby Lock Momentum BLQM Quick setup guide

Baby Lock
Baby Lock BLQ2-QGF User manual

Baby Lock
Baby Lock General Purpose Zig Zag Foot User manual

Baby Lock
Baby Lock GALLANT BLGT15-RH User manual

Baby Lock
Baby Lock BLQ2-OT User manual

Baby Lock
Baby Lock Pro-Stitcher Instruction Manual