BANDELIN SONOREX TECHNIK RM 112 UH User manual

Instructions for Use !
165 years of experience in ultrasound
23146 GB/2014-11
3 4
Ultrasonic and rinsing baths for aqueous fluids
Valid for:
RM 112 UH, RM 112 U, RM 112 H, RM 112
RM 182 UH, RM 182 U, RM 182 H, RM 182
RM 212 UH, RM 212 U, RM 212 H, RM 212

2
Copyright & limit of liability
This document may not be reproduced, either in full or in extracts, without prior approval of BANDELIN electronic GmbH & Co.
KG, hereinafter referred to as BANDELIN.
The German original is the binding version of this document. Any differences in the translation are not binding and have no legal
effect. In case of any discrepancies between the translation and the original of this document, the original version will take prec-
edence.
BANDELIN accepts no responsibility or liability for damages caused by improper handling or usage contrary to the intended
purpose.
The documentation was prepared with great care. Liability for indirect or direct damages arising because of incomplete or errone-
ous information in this documentation, as well as in its delivery and usage, is excluded.
© 2014
1 2 GmbH & Co. KG, Heinrichstrasse 3 – 4, Germany, 12207 Berlin,

3
General
The equipment, the accessories and the preparations are to be used in accordance
with the Instructions for Use and/or the product information.
The instructions are part of the scope of delivery and are to be stored in the vicinity
of the device for later reference. This also applies if possession of the device is
transferred elsewhere.
Before the device is put into operation, these Instructions for Use are to be read
carefully and completely in order for the user to become familiarised with all functions.
The warnings and safety precautions (chapter 1.5) must always be heeded during use.
The manufacturer will not assume any responsibility for the device's safety or functional
ability in the event of improper handling or usage contrary to the intended purpose. In
the event of unauthorised alterations/modifications, both the warranty claim and the !
conformity will no longer be valid.
If service is required, please contact the specialist dealer in charge or the manufacturer.
Symbols used:
Symbol Significance Explanation
Danger Identifies information that could signify a risk to life and limb,
especially through electric shock, if not observed.
Caution
Identifies information that is to be observed and adhered to
without fail, to prevent damage to the device and danger to
the user.
Warning Warning of hot surface.
Important Identifies information that is important for execution.
Note Identifies information provided for explanatory purposes.
Do not grip inside For health reasons, touching the oscillating fluid is prohibited.
Wear ear protectors For health reasons, standing for long periods of time in the
vicinity of the device without ear protectors is prohibited.
Operating sequence
instructions
Identifies instructions that are to be followed in the described
sequence.

4
Table of Contents
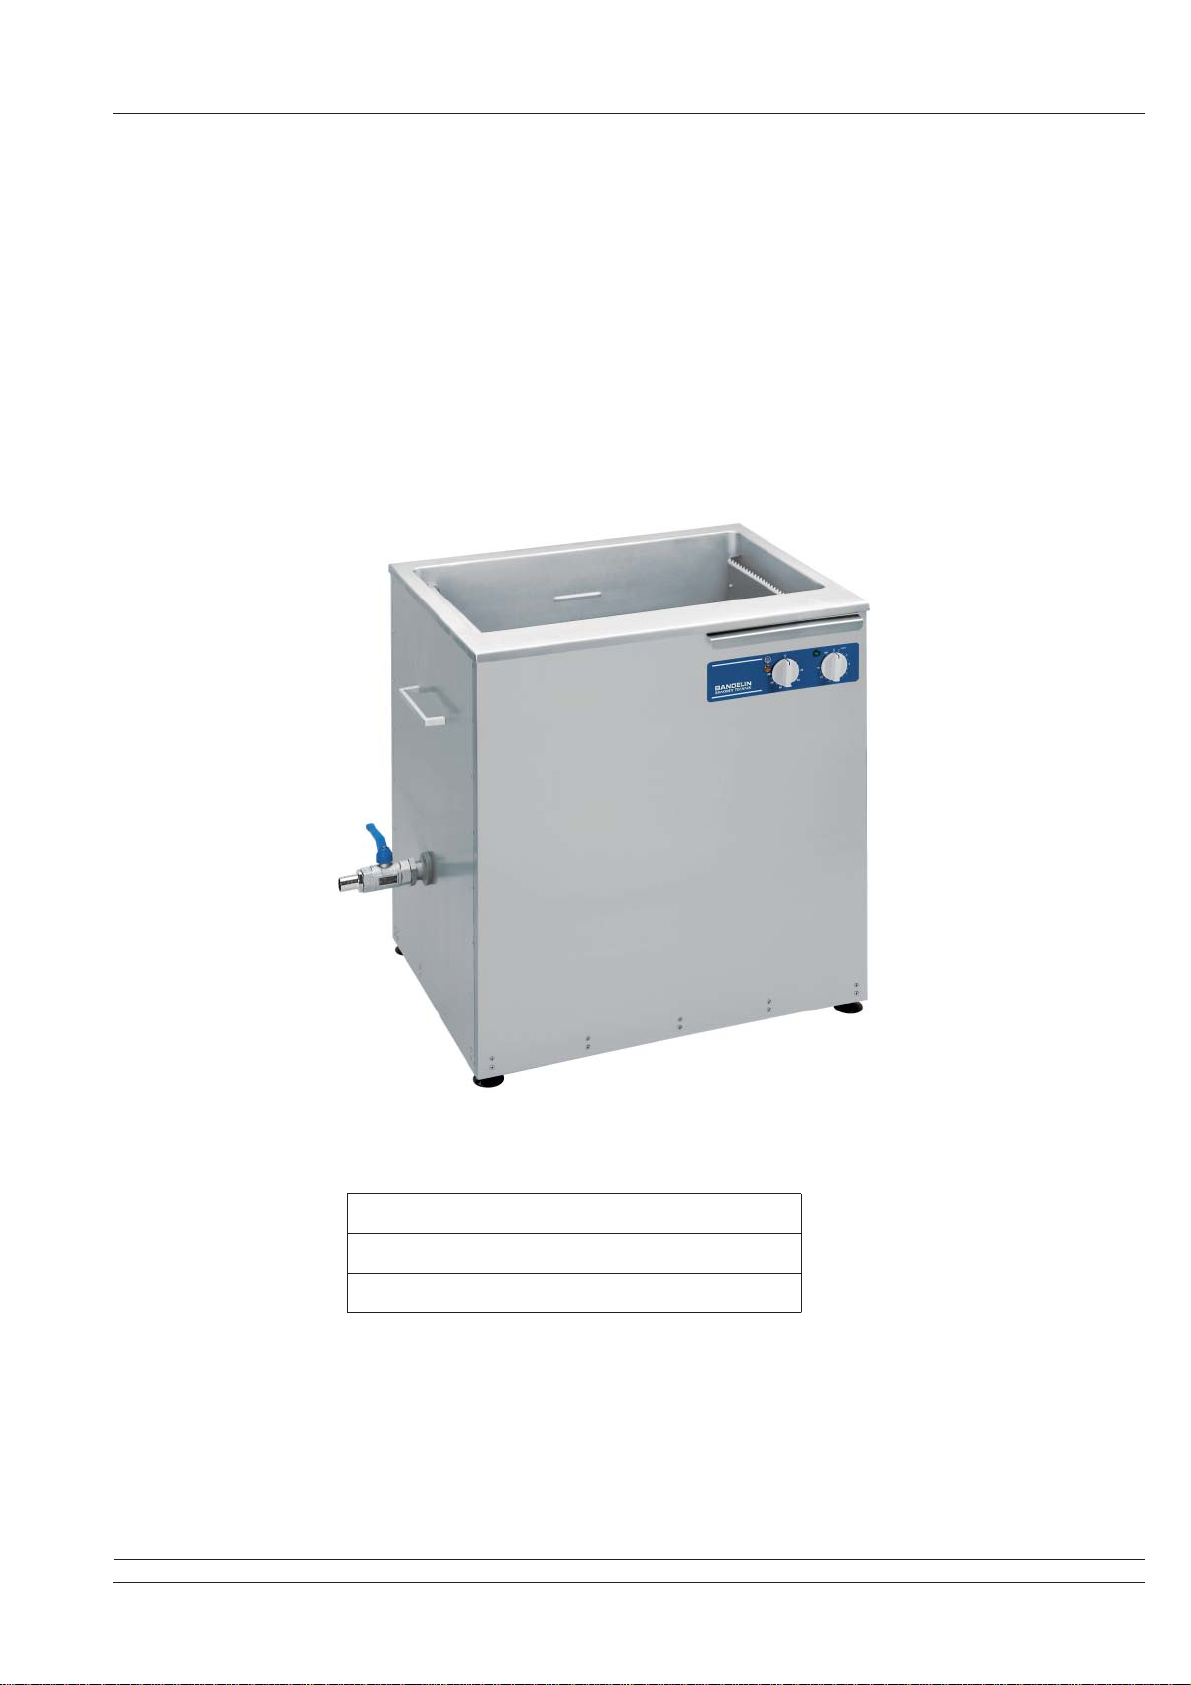
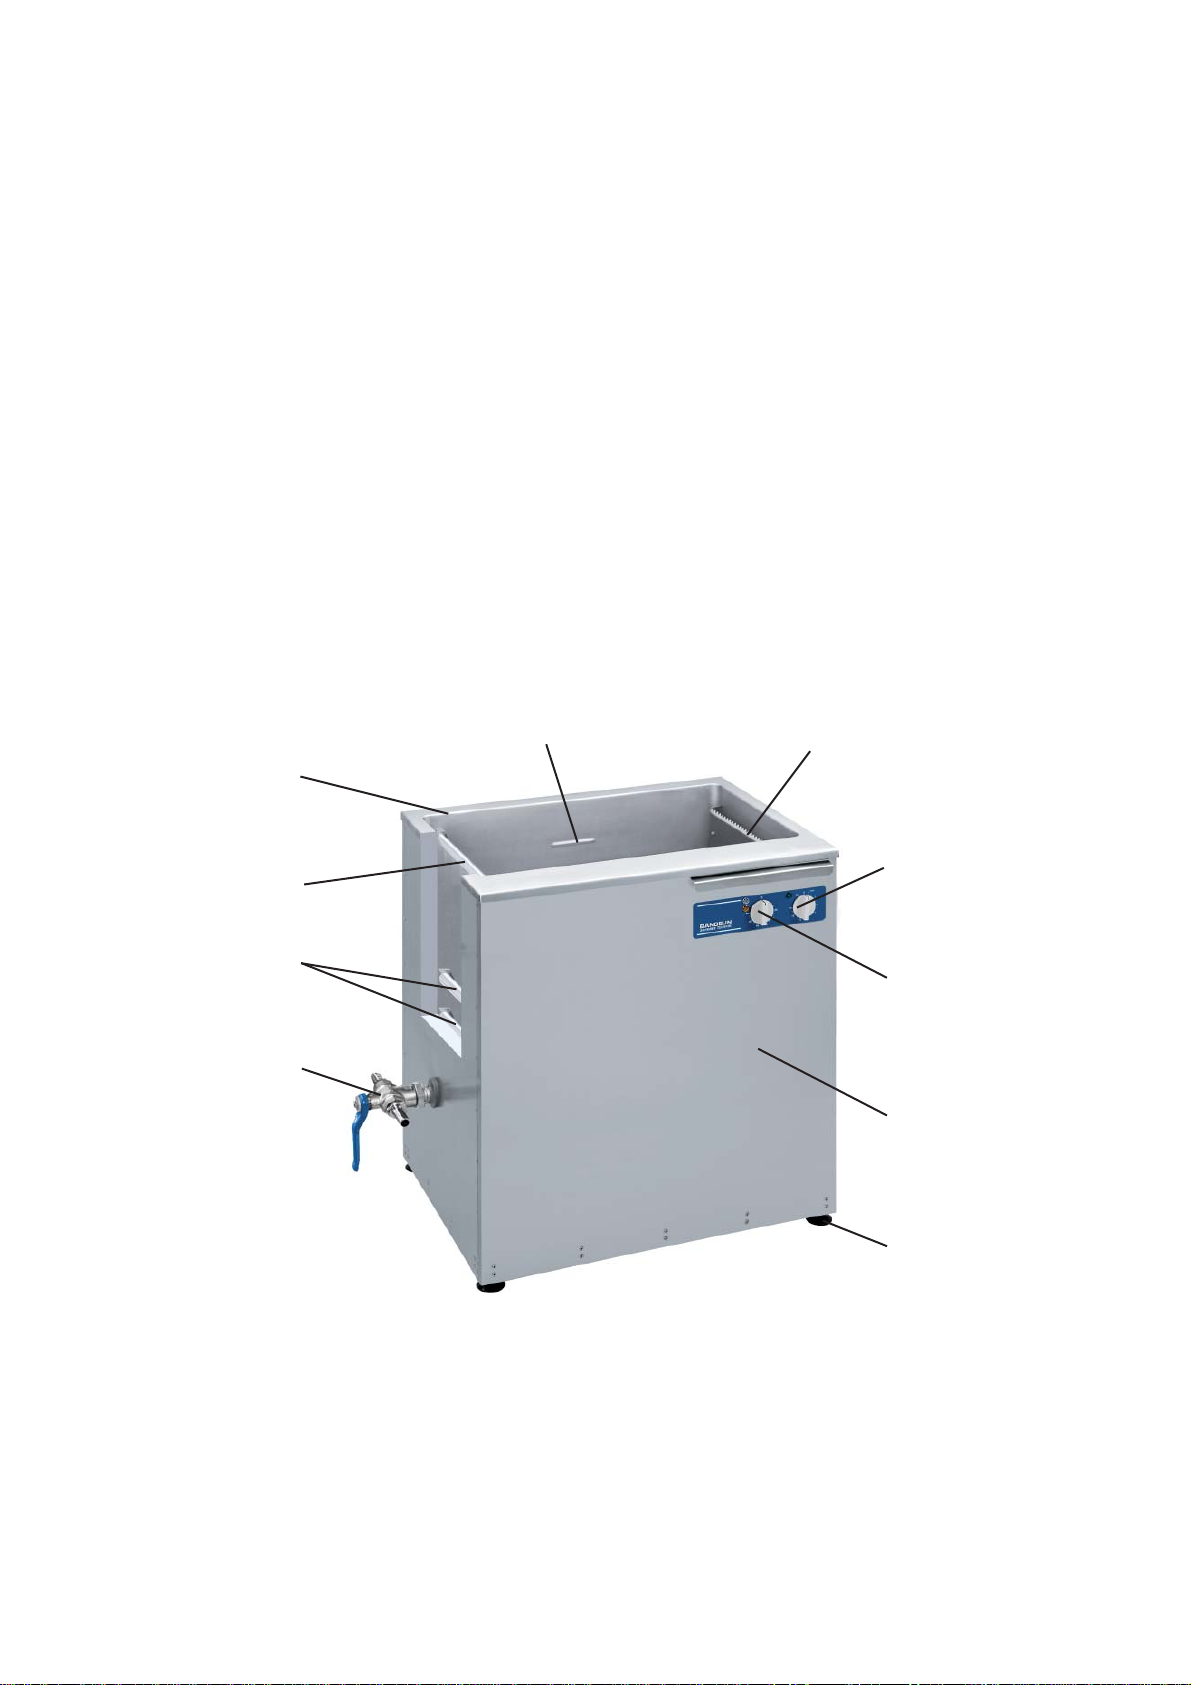
1 Product description ......................................................................................................6
1.1 Mode of operation ........................................................................................................7
1.2 Purpose ........................................................................................................................7
1.3 CE conformity ...............................................................................................................7
1.4 Technical data, general ................................................................................................8
1.4.1 Tank size RM 112 .........................................................................................................9
1.4.2 Tank size RM 182 .......................................................................................................10
1.4.3 Tank size RM 212 .......................................................................................................11
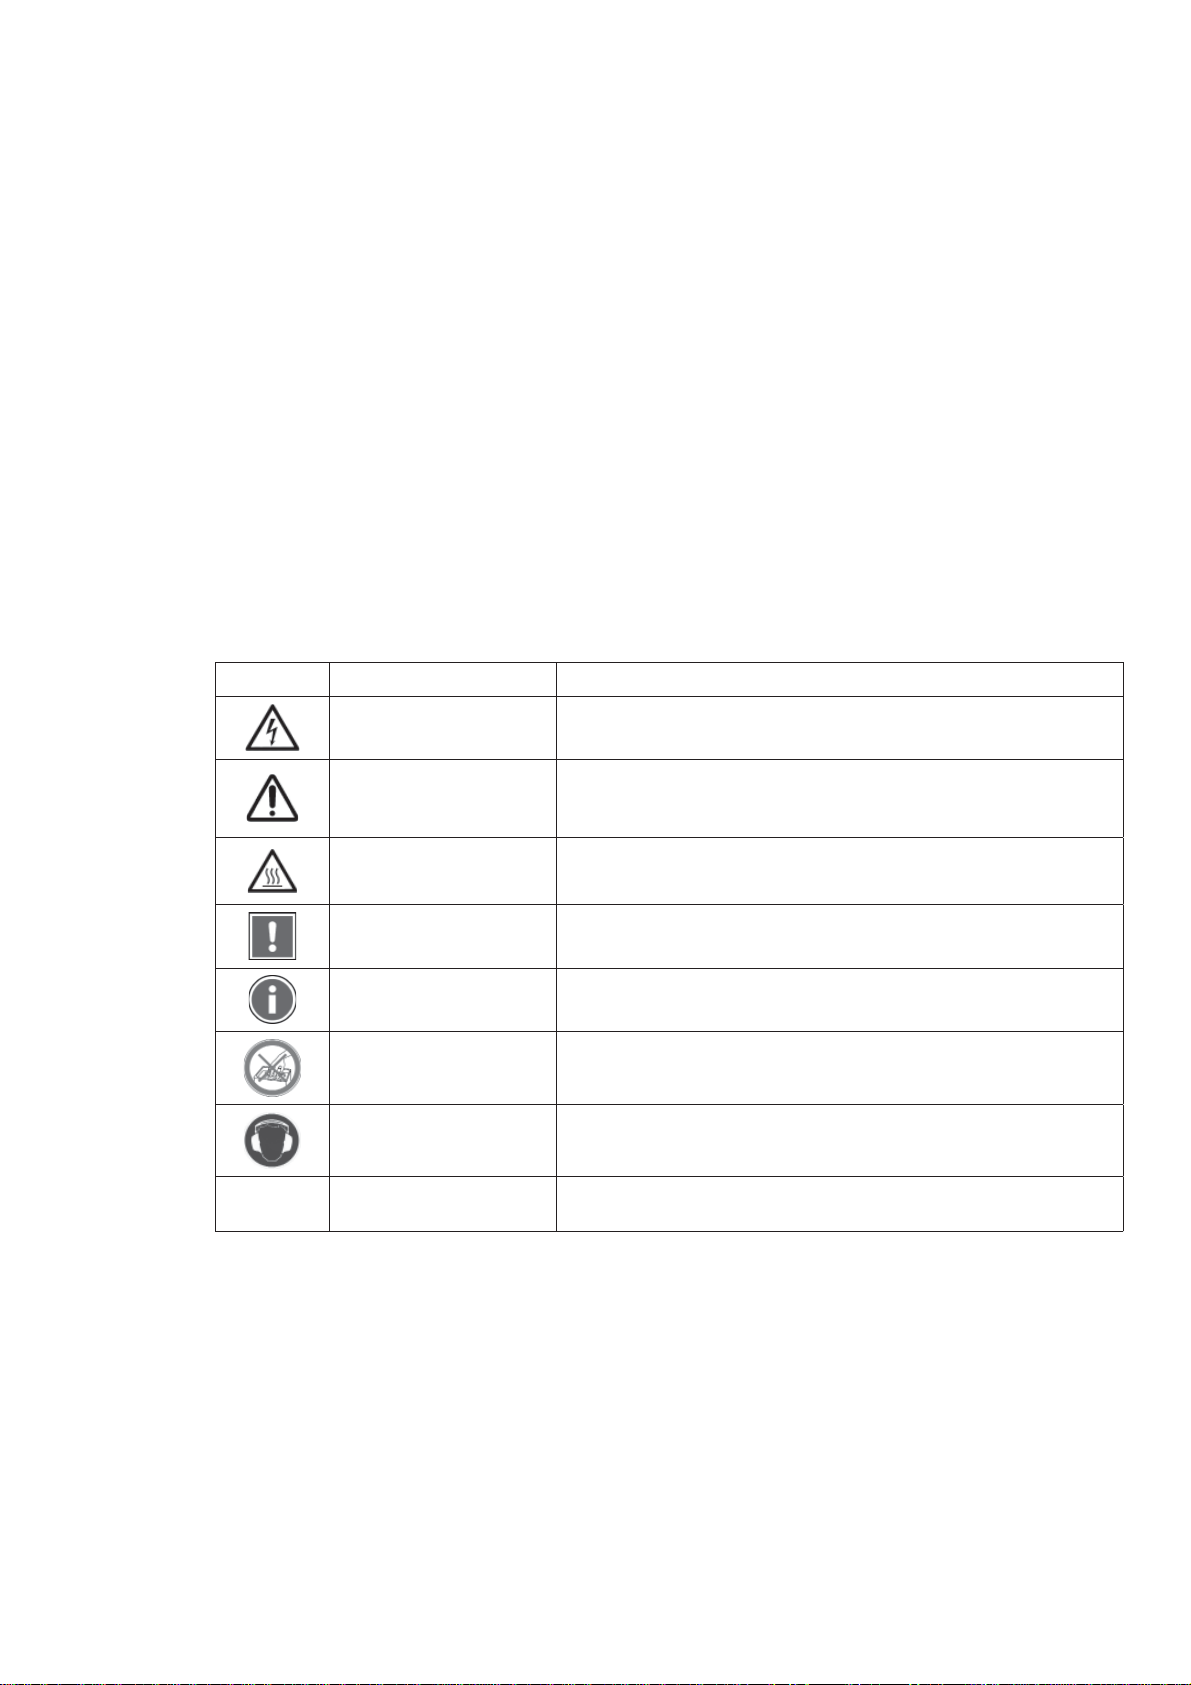
1.5 Warnings and safety precautions ...............................................................................12
2 Preparation .................................................................................................................13
2.1 Scope of delivery ........................................................................................................13
2.2 Set-up / assembly ......................................................................................................13
2.3 Start-up ......................................................................................................................14
3 Operation ...................................................................................................................15
3.1 Operating elements ....................................................................................................15
3.1.1 Ultrasound ..................................................................................................................15
3.1.2 Heating .......................................................................................................................16
3.2 Miscellaneous functions - not applicable - ...................................................................16
3.3 Device signals - not applicable - ..................................................................................16
4 Use .............................................................................................................................17
4.1 Instructions for use .....................................................................................................17
4.2 General use ................................................................................................................18
4.3 Further information .....................................................................................................21
4.3.1 Degassing ..................................................................................................................21
4.3.2 Disposal of sonication fluids .......................................................................................21

5
5 Maintenance and cleaning .........................................................................................22
5.1 Cleaning and care ......................................................................................................22
5.2 Warehousing / storage ...............................................................................................22
6 Maintenance and repair .............................................................................................23
6.1 Maintenance ...............................................................................................................23
6.2 Functional checks ......................................................................................................23
6.3 Error analysis .............................................................................................................24
6.4 Customer service .......................................................................................................24
6.4.1 Repairs and service ...................................................................................................24
6.4.2 Decontamination certificate ........................................................................................25
6.4.3 Replacing fuses ..........................................................................................................25
7 Accessories ................................................................................................................26
7.1 Required accessories .................................................................................................26
7.2 Optional accessories ..................................................................................................27
7.3 Chemical preparations - Recommendations ..............................................................29
8 Consumable materials - not applicable - .....................................................................32
9 Taking the unit out of service ......................................................................................32
10 Key words - not applicable - ................................................................................................ 32
Informative appendices
A Example of a possible cleaning sequence using peripheral devices
B Decontamination - sample copy

6
1 Product description
Ultrasonic and rinsing bath, type SONOREX TECHNIK RM ... .
The exact type specification and serial number are found on the type plate, on the rear
side of the ultrasonic bath.
Product features:
• Stainless steel oscillating tank (1) with rounded tank corners and high-grade PZT
high-performance ultrasonic systems, ultrasound frequency 25 or 40 kHz
• Easy-to-clean stainless steel housing (2)
• Filling level mark for safe filling (3)
• Sprinkle tube (4) and weir/overflow (5) with ball valve to produce a liquid circuit.
• Height-adjustable legs (6) for a secure and level position
• Outlet with 3-way ball valve (7) for easy draining/filling of the bath fluid
• Depending on the model, with time switch (type "U") for 1 - 15 min or continuous
operation (8) and/or with heating (type "H") (9). The heating elements (10) lie directly
in the liquid.
35
9
6
2
8
1
10
7
4
SONOREX TECHNIK RM 112 UH

7
1.1 Mode of operation
SONOREX ultrasonic baths use the effect of cavitation. Under their oscillating tank
bottoms they contain piezoelectric transducers, the energy of which is transferred
to the bath liquid with ultrasound frequency as mechanical oscillations. As a result,
microscopically small bubbles are continuously formed in the bath liquid, which release
energy upon imploding and generate local microcurrents. This process is called
cavitation. During the cleaning process, it causes contamination to be "blasted" from
the hard surfaces of the objects being treated. At the same time, dirt particles are
removed and fresh bath liquid flows in.
During sonochemical processes, cavitation may have a catalytic effect, e.g. with the
production of stable emulsions or the rapid degasification of fluids with a high gas
content.
1.2 Purpose
SONOREX TECHNIK ultrasonic baths are intended for the sonication of aqueous
liquids. They work on the basis of low-frequency ultrasound and can be used in
versatile ways. Their main application is the gentle and intensive cleaning of objects of
diverse shapes, types and sizes.
Sonication is always carried out together with a suitable preparation that is added to
the bath fluid. In order to use the device as intended, a basket or other inset beaker is
required, into which objects are placed during sonication. An optimum diffusion of the
ultrasound can only be guaranteed in this manner.
The unit is operated from the front. SONOREX TECHNIK ultrasonic baths are designed
as floor-standing units.
1.3 CE conformity
The units fulfill the CE marking criteria of the following European Directives:
- "Low-voltage directive"
- "Electromagnetic compatibility" directive
in their currently valid versions.
A declaration of conformity can be requested from the manufacturer by providing the
serial number.

8
1.4 Technical data, general
The ultrasonic and rinsing baths are interference-free and marked with a !
.
Compliance with limit values pursuant to EN 61010... .
Nominal voltage: 400 V 3N~ (± 10 %) 50/60 Hz, cable length 3 m
HF frequency: 40 kHz, or 25 kHz upon request
Tanks: Stainless steel 1.4571 (V4A), 2 mm, welded, with weir on the
right-hand side and sprinkle tube for surface skimming on the
left-hand side of the tank
Serial number: see type plate on rear of device
Degree of protection: IP 32 according to DIN
EN 60529
Environmental conditions pursuant to EN 61 010-1
Overvoltage category: II
Degree of contamination: 1
Permissible ambient temperature: 5 to 40 °C
Permissible relative humidity up to 31 °C: 80 %
Permissible relative humidity up to 40 °C: 50 %
Condensation not allowed.
Only for indoor operation.
Protected against access
to hazardous parts with
tools; protected against solid
objects with a diameter
of 2.5 mm or larger
Protected from dripping
water up to 15° from its
vertical axis

9
1.4.1 Tank size RM 112
RM 112 UH RM 112 H RM 112 U RM 112
Exterior dimensions
(l × w × h) mm 780 × 610 × 800
Interior dimensions
(l × w × d) mm 600 × 450 × 450 / 470
Capacity l 145
Filling volume l 130
Operating volume l 115
Inlet and outlet G 1 outside
Sprinkle tube inlet
Weir outlet
G ½ inside
G 1 outside
Heating power W 4800 4800 - -
Fuses (heating) T12A T12A - -
HF frequency kHz 25 or 40 - 25 or 40 -
Fuses (generator) T6A - T6A -
Peak ultrasonic
output* W 4000 - 4000 -
HF power Weff 1000 - 1000 -
Weight (net) kg 74.0 62.0 69.0 57.0
Order No. (40 kHz) 9102 - 9104 -
Order No. (25 kHz) 9101 - 9103 -
Order No. (without ultrasound) - 9105 - 9106
* In order to improve the effect, the ultrasound is modulated, resulting in the HF power value increasing 4-fold as peak
ultrasonic power.

10
1.4.2 Tank size RM 182
RM 182 UH RM 182 H RM 182 U RM 182
Exterior dimensions
(l × w × h) mm 1180 × 660 × 800
Interior dimensions
(l × w × d) mm 1000 × 500 × 400 / 420
Capacity l 225
Filling volume l 200
Operating volume l 170
Inlet and outlet G 1 outside
Sprinkle tube inlet
Weir outlet
G ½ inside
G 1 outside
Heating power W 7200 7200 - -
Fuses (heating) T12A T12A - -
HF frequency kHz 25 or 40 - 25 or 40 -
Fuses (generator) T6A - T6A -
Peak ultrasonic
output* W 2 × 4000 - 2 × 4000 -
HF power Weff 2 × 1000 - 2 × 1000 -
Weight (net) kg 138.0 118.0 130.0 110.0
Order No. (40 kHz) 9202 - 9204 -
Order No. (25 kHz) 9201 - 9203 -
Order No. (without ultrasound) - 9205 - 9206
* In order to improve the effect, the ultrasound is modulated, resulting in the HF power value being increased 4-fold as
peak ultrasonic power.

11
1.4.3 Tank size RM 212
RM 212 UH RM 212 H RM 212 U RM 212
Exterior dimensions
(l × w × h) mm 930 × 810 × 800
Interior dimensions
(l × w × d) mm 750 × 650 × 500 / 520
Capacity l 285
Filling volume l 260
Operating volume l 230
Inlet and outlet G 1 outside
Sprinkle tube inlet
Weir outlet
G ½ inside
G 1 outside
Heating power W 7200 7200 - -
Fuses (heating) T12A T12A - -
HF frequency kHz 25 or 40 - 25 or 40 -
Fuses (generator) T6A - T6A -
Peak ultrasonic
output* W 2 × 4000 - 2 × 4000 -
HF power Weff 2 × 1000 - 2 × 1000 -
Weight (net) kg 112.0 92.0 104.0 84.0
Order No. (40 kHz) 9302 - 9304 -
Order No. (25 kHz) 9301 - 9303 -
Order No. (without ultrasound) - 9305 - 9306
* In order to improve the effect, the ultrasound is modulated, resulting in the HF power value being increased 4-fold as
peak ultrasonic power.

12
1.5 Warnings and safety precautions
General
• Keep the ultrasonic/rinsing bath out of the reach of children and of persons who have
not been instructed in its operation by reference to these instructions.
• We do not guarantee against damage to the ultrasonic/rinsing bath or oscillating
tank, or to the objects to be treated, as a result of use of inadequate disinfection
agents or detergents.
• Keep the surface of the ultrasonic/rinsing bath and operating elements clean and dry.
• Do not expose the ultrasonic/rinsing bath to corroding influences.
• Only move the ultrasonic/rinsing bath when it is empty.
• Empty the ultrasonic/rinsing bath only while turned off.
The tank is emptied with no peripheral devices connected, using the three-way ball
valve. To do so, turn the handle in the direction of the outlet.
• Ultrasonic baths adhere to prescribed EMC limit values, such that it can be assumed
that the electromagnetic radiation emanating from the units is harmless to humans.
A binding statement for wearers of implants can only be made at the place of work
and together with the implant manufacturer. In case of doubt, information regarding
the allowable electromagnetic exposure level is to be obtained from the implant
manufacturer.
• If the unit is passed on to others, the operating instructions with the safety
instructions must also be handed over.
Operation and transport
• Observe ambient and set-up conditions, see chapter 1.4.
• Only plug in the ultrasonic/rinsing bath to an outlet with a grounded socket.
• Do not operate the ultrasonic/rinsing bath without fluids.
• Do not stand or lay any objects on the tank bottom, accessories must be used, see
chapter 7.
• Do not immerse any parts of the body (e.g. hands, feet) or living beings (animals or
plants) in the tank; in particular, do not immerse them in the ultrasonic fluid during
ultrasound operation. Danger: Ultrasound has a cell-destroying effect.
• In the event of continuous activity within a 5 m radius, adequate hearing protection
must be used. Danger: Hearing loss possible if not wearing hearing protection
during operation – the typical ultrasound cavitation noise can be perceived as very
unpleasant.
• When preheating the bath liquid, stir at least every 30 min. or switch on the
ultrasound. Danger: Scalding due to retardation of boiling.
• Do not leave the ultrasonic/rinsing bath unattended while in operation.
Damages and defects
• If damage to the ultrasonic/rinsing bath is detected, do not connect the ultrasonic/
rinsing bath to the mains.
• In the event of defects, disconnect the power plug immediately.
• Repairs must only be conducted by authorised skilled personnel or by the
manufacturer.
• Defective parts may only be replaced with original SONOREX parts.

13
2 Preparation
Carefully unpack the ultrasonic/rinsing bath and accessories and inspect them for
completeness or possible transportation damages. If any damages or defects are
found, these must be immediately notified in writing to the transportation company and
to the supplier.
Before startup, the ultrasonic bath is to be left to stand at its operating location for
2 hours so that it may adapt to the ambient conditions.
2.1 Scope of delivery
1 Ultrasonic/rising bath, see delivery note
1 Accessories kit
1 Instructions for Use manual
Additional accessories according to order - see delivery note
2.2 Set-up / assembly
• Place the ultrasonic/rinsing bath on a firm, level and dry surface. In doing so
- observe the maximum weight of the tank, including liquids.
For net weight, see technical data, chapters 1.4.1 to 1.4.3.
- do not block the air supply below the tank.
- guard against moisture and wetness - risk of electric shock.
• Operation is not permitted if the legs are not screwed on, this will cause the built-in
fan cooling on the bottom of the device to become inoperable.
Minimum distance to the ground: 30 mm!
The ultrasonic/rinsing bath will become critically damaged without cooling.
Set-up
Fully remove transportation aids (pallets, transport safety devices).
The height-adjustable legs provided should be mounted on the bottom of the tank.
The tank must then be horizontally levelled.
Set up the ultrasonic/rinsing bath in a dry room.

14
Mount the separately-packaged ball valves for each tank as follows:
1. Screw the counter nut onto the threaded sleeves 1 at the
tank outlet (3-way ball valve) and tank overflow (ball valve),
then seal with the white PTFE tape provided, applying
several turns of tape to the right.
2. Tape the hose socket threads 2 with PTFE sealing tape.
3. Screw the hose sockets 2 into the ball valve outlets 3, use
the appropriate spanner.
4. Screw the ball valve 3 onto the threaded sleeves and
tighten with the counter nut 4.
Caution: Do not screw the ball valve up to the limit stop
or back it off by rotating it slightly to the left, this will cause
the PTFE tape to lose its sealing effect.
5. Close ball valve, turn the lever 5 upwards.
2.3 Start-up
Thoroughly rinse the ultrasonic or rinsing bath's oscillating tank with water before its
first use.
Verify that the control buttons are in the "off" position, i.e. the switch indicator is at
the top, then connect the bath to the mains.
Conduct function test on the ultrasonic bath – briefly plug in the ultrasound
(maximum of 1 to 2 seconds), a hissing noise should be heard. Set to "0" once
again.
Hang accessories in the ultrasonic bath and place lid on top.
Connect peripheral devices if required – see additional documentation.
View from above:
4
13
25
openopen closed
2
screwed-in

15
3 Operation
3.1 Operating elements
The ultrasound and the heating system are operated from the front:
3.1.1 Ultrasound
The ultrasound is operated through the turning knob (time switch).
Timed operation:
• Turn knob to the right
range of time 1 - 15 minutes
- Green control light is illuminated.
- Once the time has elapsed, the time switch
automatically turns off.
• By turning the knob back, the operating time is
shortened or the ultrasonic bath is turned off.
Continuous operation:
• Turn knob to the left
Setting ∞
- Green control light is illuminated.
- The ultrasonic bath does not turn off automatically;
to switch it off turn the knob to the right, back to "0".
Notes
• Even while turned off, the ultrasonic bath may remain connected to the mains.
It can be disconnected by pulling out the mains plug.
• An “engaging” of the time switch is barely felt if mains voltage is not present, e.g. if
the mains plug is disconnected or the fuse is blown.
The time switch only works if mains voltage is present.
1 Turning knob for Heating ON / OFF incl. adjustment control
2 Turning knob for Ultrasound ON / OFF with preset time
3 White control light (Heating is activated)
4 Yellow control light (Heating in operation)
5 Green control light (Ultrasound in operation)
green
34 5
12
The layout of the turning knobs depends on
the bath.

16
3.1.2 Heating
The heating is operated through the turning knob (heating).
• Turn knob to the right
Temperature range 30-80 °C:
- The yellow and white control lights are
illuminated.
- The yellow control light goes out when the set
temperature is reached.
- To turn it off, turn the knob left back to "°C".
Notes:
• The heating system works independently from the ultrasound.
• The heating automatically turns on every time that the bath temperature drops below
the set temperature.
3.2 Miscellaneous functions - not applicable -
3.3 Device signals - not applicable -
yellow
white

17
4 Use
Sonication or rinsing always take place directly in the tank. For
this purpose, the objects are placed in a basket and hung inside
the tank which is filled with bath fluid.
4.1 Instructions for use
Instructions – filling
• Check that all ball valves are closed.
• Ultrasound and heating must be turned off.
• Do not fill ultrasonic tank with hot water. Maximum filling temperature: 50 °C.
• At least drinking-quality water must be used to fill the oscillating tank.
• Water without additives is not suited for sonication. BANDELIN recommends the
TICKOPUR or STAMMOPUR preparations.
• The fill level must always be at or slightly above the filling level mark.
A low fill level will damage the ultrasonic bath!
As a precaution, the ultrasonic bath is equipped with a float switch that protects
heaters and ultrasound systems from dry operation. Operation is not possible if the
level of liquid in the tank is too low.
When used for extended periods, the device may switch off as a result of
evaporation, for example. In such cases, the ultrasound and possibly the heating
must be switched off (controller on 0). Once the tank is filled up, the ultrasound and
the heating, if applicable, can be switched back on.
• When using with a liquid circuit (with FA, OX, WA or cascade pipes) the additional fill
volume of the peripheral devices must be taken into account:
Fill the ultrasonic bath with water and cleaning concentrate (in the appropriate dose!)
up to the weir's toothed edge Follow the dosing instructions for the concentrate
used. Also fill all additional tanks up to the weir with municipal or DI water.
• Do not use any combustible fluids (e.g. benzine, solvents) or chemicals that
contain or separate out chloride ions (some disinfectants, household cleaners and
dishwashing detergents) for sonication in the stainless steel tank.
• When using preparations, the safety instructions included in the product leaflets must
strictly be adhered to.
• Replace used sonication fluids, do not refresh by adding fluids.
Notes - Inserting objects
• Fully remove air bubbles
from cavities (e.g. blind
holes).
Sonication fluid
Insert basket

18
Notes - Temperature and heating
• Heated fluids intensify the ultrasound effect. Experience has shown that the best
results are obtained with a bath temperature of 50 to 60 °C. At higher temperatures,
the effect of the ultrasound cavitation decreases again, however1.
• In order to save time during use, the bath fluid may be preheated during degassing.
• Ultrasound energy warms up the sonication fluid (even without additional heating).
Through continuous sonication and/or by covering the oscillating tank, the fluid
temperature may increase faster and even rise above the maximum adjustable value
of the thermostat (80 °C). For this reason, check the temperature when treating
temperature-sensitive components.
• For an optimum bath temperature, observe the specifications from the preparation
manufacturer!
• To protect the electronic components inside the ultrasonic bath, the ultrasound
output is reduced upon reaching a critical temperature in order to inhibit a further
increase in the interior temperature.
• The fluid in the oscillating tank may not exceed a maximum operating temperature of
100 °C.
• Cover the ultrasonic bath when in continuous operation so that not too much bath
liquid evaporates.
• For safety reasons ultrasonic cleaning baths and rinsing baths should be
covered when not in operation, to prevent operating and external personnel from
inadvertently coming into contact with the bath liquid or being injured by liquids that
are still hot.
4.2 General use
Step 1: Fill oscillating tank
The oscillating tank is filled with water and a suitable preparation to reduce the surface
tension, see chapter 7.3.
Fill 1/3 of oscillating tank with water.
Add dosed preparation to the oscillating tank.
Fill carefully up to the filling level mark, avoid the formation of foam as much as
possible.
Step 2: Degassing the fluid
Freshly-filled bath fluid or fluid that has remained in the oscillating tank for a longer
period of time must be degassed prior to use. See also chapter 4.3.1.
Remove basket and other accessories from the oscillating tank.
Place lid on top.
Turn on the ultrasound with the turning knob and sonicate for 30 min for degassing,
see chapter 3.1.1.
1 MILLNER, R.: Wissenspeicher Ultraschalltechnik, Fachbuchverlag publishing house, Leipzig 1987

19
Step 3: Preheat fluid
In ultrasonic baths with integral heating, the fluid may be preheated independently of
the ultrasound. This increases the ultrasound effect, especially when removing fats, oils
and polishing paste residue, and shortens the duration of the subsequent ultrasound.
Remove basket and other accessories from the oscillating tank.
Place lid on top.
Using the turning knob, set the desired temperature, see chapter 3.1.2.
For an even warming of fluids, stir the fluids or switch on the ultrasound for a few
minutes now and then, otherwise there will be a retardation of boiling – risk of
scalding!
Step 4: Insert objects to be treated
Before every sonication it is necessary to check whether the sonication fluid needs to
be cleaned or replaced.
Hang the insert basket with the items to be sonicated.
Check that the objects to be treated are fully covered with fluid.
With every object inserted, the fill level is to be controlled.
For cleaning tasks
Place the objects to be cleaned in the appropriate accessories, in doing so please note:
• Evenly distribute parts, do not stack them.
• Overloading the basket will reduce the ultrasound effect (the ultrasound is
absorbed).
• Place the more heavily soiled side facing downward.
• Parts with joints are to be fully opened before placing inside.
• Fragile parts may not touch each other.
• Due to the design, the ultrasound effect is weaker on the outlet side. Heavily
contaminated objects should not be placed in the basket over the outlet.
Step 5: Ultrasound - Operation
Fundamentally, the sonication time is to be as short as possible in order to protect the
objects to be treated and the oscillating tank.
In the case of stubborn residue, conduct sonication for a longer time if necessary.
Place lid on top.
Using the turning knob, set the desired sonication time, see chapter 3.1.1.

20
Step 6: Remove treated objects
After sonication, the objects are to be removed from the ultrasonic bath. Allowing them
to remain any longer in the bath fluid may damage them.
Switch off the ultrasound.
Remove the basket from the tank and place it securely on a horizontal surface.
Depending upon the set temperature or the duration of sonication, the baskets and
objects may be hot!
After the cleaning processes, rinse the treated objects with water of at least drinking
quality. Visually review the sonication results.
Before the next sonication, verify the service life (see chapter 4.3.2) of the bath
fluid. Heed the specifications of the preparation manufacturer. If necessary, empty
the oscillating tank.
Step 7: Empty the oscillating tank.
Layers of contamination on the tank bottom reduce the ultrasonic output.
The oscillating tank is to be emptied after a long period of use or sonication of heavily
soiled objects, see chapter 4.3.2.
Switch off the ultrasound.
Empty the oscillating tank by pointing the 3-way ball valve handle in the direction of
the outlet to open it.
After emptying the oscillating tank, thoroughly rinse it. Wipe dry with a soft cloth.
For additional care instructions, see chapter 5.
This manual suits for next models
11
Table of contents
Other BANDELIN Ultrasonic Jewelry Cleaner manuals
Popular Ultrasonic Jewelry Cleaner manuals by other brands

Tunap
Tunap Injecto Clean System operating manual

Meec tools
Meec tools 011436 operating instructions

Ryobi
Ryobi RY18PCA Original instructions

Uni-ram
Uni-ram UG4000D Operating procedures

Zodiac
Zodiac SpaBot Instructions for installation and use

Flexco
Flexco MHCP Installation, operation and maintenance guide

Makita
Makita DVC560 instruction manual

Shenzhen Langee Ultrasonic Electric Appliance
Shenzhen Langee Ultrasonic Electric Appliance UC-6106 user guide

GT SONIC
GT SONIC VGT-6250 user manual

Ultrawave
Ultrawave Hygea 2850VM Operator's instruction manual

ScienTECH
ScienTECH 701 Installation operation and care

Makita
Makita DCL282F instruction manual