B&G h1000 pilot User manual

h1000 pilot introduction
www.bandgservice.co.uk Page 1
overview
Congratulations on your purchase of the
h1000 Pilot
from B&G. The
h1000 Pilot
is the latest in
autopilots from B&G and represents B&G’s commitment to providing our customers with the finest
marine navigation systems. The
h1000 Pilot
is an easy to use, state-of-the-art computerised
electronic autopilot system designed as a sophisticated navigation aid and provides many useful
features.
Before you begin using your new
h1000 Pilot
, please take the time to read this manual to help you
achieve the full potential from your new system.
features
features
featuresfeatures
features
The
h1000 Pilot
is a fully functional autopilot which can be used either as a stand-alone system or
integrated into an instrument system.
• Steer to Compass heading, COMP Mode
• Steer to Wind angle, Wind Mode, when connected to the h1000 Wind Interface
• Steer to Waypoint, Nav Mode, either from the
h1000 CND
or NMEA via the Universal Interface
• Advanced Control Processor (ACP) with self-learning capabilities
• Red background illumination level in 3 steps from zero to full brightness

introduction h1000 pilot
Page 2
certification
warnings & precautions:
WARNING:
WARNING:WARNING:
WARNING:
DO NOT USE AN ALCOHOL BASED CLEANER ON THIS DISPLAY.
DO NOT USE AN ALCOHOL BASED CLEANER ON THIS DISPLAY.DO NOT USE AN ALCOHOL BASED CLEANER ON THIS DISPLAY.
DO NOT USE AN ALCOHOL BASED CLEANER ON THIS DISPLAY.
Note:
Note:Note:
Note:
This equipment generates, uses, and can radiate radio frequency energy and, if not installed and
used in accordance with the instructions, may cause harmful interference to radio
communications. However, there is no guarantee that interference will not occur in a particular
installation. If this equipment does cause harmful interference, the user is encouraged to try to
correct the interference by relocating the equipment or connecting the equipment to a different
circuit. Consult an authorised dealer or other qualified technician for additional help if these
remedies do not correct the problem.
This device meets requirements for CFR47 Part 15 of the FCC limits for Class B equipment.
The
h1000 Pilot
meets the standards set out in European Standard EN 60945: 1997 IEC 945: 1996
for maritime navigation and radiocommunication equipment and systems.
The
h1000
contains no user-serviceable parts. An authorised service centre should only make
repairs. Unauthorised repairs or modifications will void your warranty.
trademarks
All rights reserved. No part of this manual may be reproduced or transmitted in any form or by any
means including photocopying and recording, for any purpose without the express written
permission of B&G.
Information in this document is subject to change without notice. B&G reserves the right to change
or improve its products and to make changes in the content without obligation to notify any person
or organisation of such changes.
B&G and
h1000
are all trademarks of Brookes & Gatehouse Ltd. and may not be used without the
express permission of B&G.

h1000 pilot contents
Page 3
contents
Overview
OverviewOverview
Overview
1
11
1
Features
FeaturesFeatures
Features
1
11
1
Certification
CertificationCertification
Certification
2
22
2
Trademarks
TrademarksTrademarks
Trademarks
2
22
2
Contents
ContentsContents
Contents
3
33
3
Controls
ControlsControls
Controls
5
55
5
Getting Started
Getting StartedGetting Started
Getting Started
5
55
5
Engaging Pilot 6
Disengaging Pilot 6
Pilot mode selection
Pilot mode selectionPilot mode selection
Pilot mode selection
6
66
6
Compass Mode 7
Navigate Mode 9
Wind Mode 10
Main menu
Main menuMain menu
Main menu
11
1111
11
Main Menu 11
Tack 11
Memories 11
Pilot Memories 11
Resume 11
Tack 12
TWA Mode 12
Speed Source 12
Memories Menu
Memories MenuMemories Menu
Memories Menu
13
1313
13
Compass 13
Reset trip log 13
Alarms 13
Lighting 14
Timer 15
Calibration
CalibrationCalibration
Calibration
16
1616
16
Entering Secure Mode 16
Installation
InstallationInstallation
Installation
17
1717
17
Precautions 17
Panel mounting 17
Electrical Connections
Electrical ConnectionsElectrical Connections
Electrical Connections
18
1818
18
External Connections 18
Accessories
AccessoriesAccessories
Accessories
19
1919
19
Hand-Held Contoller 19
Joystick 20
Engaging the Pilot in Joystick Mode 20
Disengaging the Pilot in Joystick Mode 21

contents h1000 pilot
Page 4
contents
Man Overboard (MOB) Mode
Man Overboard (MOB) ModeMan Overboard (MOB) Mode
Man Overboard (MOB) Mode
22
2222
22
Man Overboard Key 22
Power Boats 22
Sail Boats 22
MOB Manual Recovery: For All Boats, Pilot OFF 23
Manual Recovery: for all Boats, Pilot ON 23
MOB Automatic Recovery: Power Only, Pilot ON 24
Technical Specifications
Technical SpecificationsTechnical Specifications
Technical Specifications
25
2525
25
Warranty
WarrantyWarranty
Warranty
26
2626
26

h1000 Pilot controls
Page 5
controls
Light control
The lighting level can be changed at any time by pressing the LIGHTS key.
This causes the lighting level to cycle in the sequence high – medium –
low – off and then back to high.
The UP/DOWN keys are used to move through data pages, scroll through
items in a list, and alter numerical values.
Press the ENTER key to select the Main Menu from a data page, select
items from a list entry, and store values to memory.
ON engages the Pilot in the selected mode.
OFF disengages the Pilot from all modes.
The rotary knob is used to alter the Pilot course in 1°increments, scroll
through items in a list, and alter numerical values.
Alters the Pilot course by 10°to port. Multiple key presses are used for
large course changes.
Alters the Pilot course by 10°to starboard. Multiple key presses are used
for large course changes.
Successively cycles through Compass, Wind and Nav modes if available.

getting started h1000 pilot
Page 6
getting started
Before switching the
Pilot
on for the first
time, check that the installation has been
wired according to the instructions
contained in the
h1000 Pilot
Installation
Manual.
After initial power-up the Pilot displays
Comp Mode and shows the Pilot status as
OFF.
Pressing the MODE key with the Pilot OFF
scrolls through the available Pilot modes
Comp, Wind and Nav providing the data is
available on the system.
Pressing the UP/DOWN keys with the Pilot
OFF the display scrolls through the six user
pages returning to OFF Comp Mode.
engaging pilot
Pressing the ON key activates the Pilot in the selected mode.
Pressing the UP/DOWN keys with the Pilot ON, the display scrolls through the fixed Pilot pages for
the selected mode.
Note
NoteNote
Note: Compass Mode shown above. Wind and Navigation modes are similar (see Pages 7 to 10).
disengaging pilot
Disengages the Pilot.
compass mode

h1000 pilot pilot mode selection
Page 7
compass mode
With Compass Mode selected and the Pilot
switched OFF, steer the boat onto the desired
heading and allow the boat to settle. Engage the
Pilot in Compass Mode by pressing the ON key
once.
The display changes to Heading and Set CRS
(Course). A rudder position indicator bar is also
displayed at the bottom of the screen.
Course changes can now be made by turning
the rotary knob, or by pressing the –10°and
+10°increment keys.
dodging
Press the -10°,
,,, key or turn the rotary knob
anti-clockwise to alter course to port in 100or
10 increments.
Press the +10 key or turn the rotary knob
clockwise to alter course to starboard in 100or
10increments.
Multiple presses of the keys are added together
to give the required course change; e.g. for 200
to port press -10°twice, for 110 to starboard
press +10°then one “click” of the rotary knob
clockwise. Alternatively, the rotary knob can be
used exclusively to dodge around objects.
The previous autopilot course is automatically
stored in memory. Press the ON
key twice within
four seconds to resume the previous course.
memorising the new course
Press and hold the ON key for two seconds to
update and store the new course in the
autopilot course memory. Itis suggestedthat
this be carried out after every permanent course
change; i.e. not when you have just dodged
around an obstacle.

pilot mode selection h1000 pilot
Page 8
compass mode
2nd page
3rd page
additional compass pages
With the pilot ON pressing the UP/DOWN keys
will scroll the display to a second and third
Compass Mode page.
Page 2 displays boat speed, course and rudder
position.
Page 3 displays a track screen of the current
data, if position information is available.

h1000 pilot pilot mode selection
Page 9
wind mode
wind mode
In Wind Mode, the Pilot will steer a course that
maintains a set target Apparent Wind Angle
(Set AWA) or True Wind Angle (Set TWA). If the
wind shifts, the Pilot will alter course so that
the actual wind angle to the boat remains the
same.
With Wind Mode selected, steer the boat until
the desired AWA is displayed and allow the boat
to settle. Activate the Pilot in Wind Mode by
pressing the ON key once. Wind angle changes
are made by turning the rotary knob the
desired number of degrees, or by pressing the
10°keys to achieve the desired correction.
true wind angle
If a boat speed input from a paddlewheel sensor
is available, the Pilot has the added facility to
steer to TWA. This gives increased steering
stability, particularly downwind. Steer to TWA is
selected by setting TWA Mode to ON, which is
found in the Pilot Memories menu. Refer to
Page 11 of this manual.
automatic tack
The
h1000 Pilot
has the ability to perform an
automatic tack, which is particularly useful
when sailing short-handed
The auto tack function is selected by pressing
the ENTER key once, choosing Tack, and
selecting now or after delay. Selecting now will
immediately tack the boat whilst after delay
will tack the boat after a pre-set countdown
period. The Tack Countdown time can be
adjusted within the Pilot Memories menu.
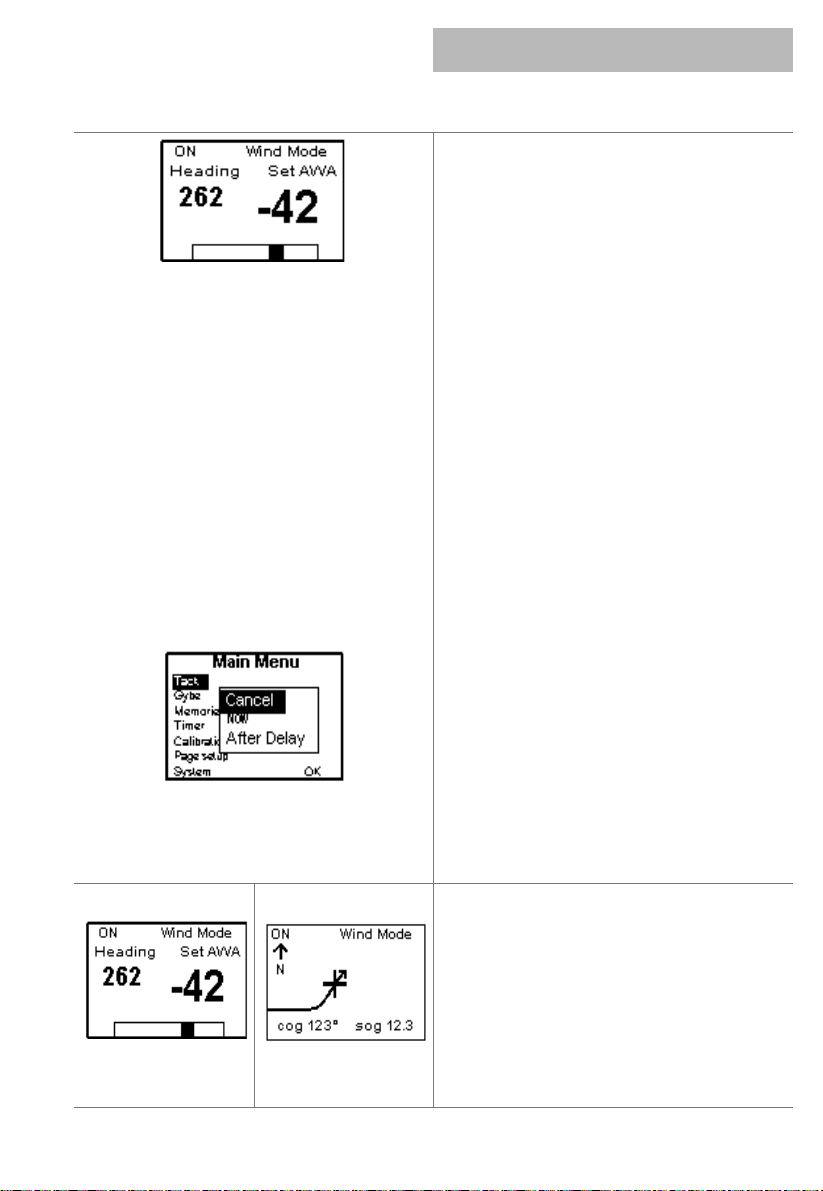
2nd page
3rd page
additional wind mode pages
With the pilot ON pressing the UP/DOWN keys
will scroll the display to a second and third
Wind Mode page.
Page 2 displays actual wind angle, target wind
angle and rudder position.
Page 3 displays a track screen of the current
data, provided that position information is
available.

pilot mode selection h1000 pilot
Page 10
navigate mode
navigate mode
In Nav Mode, the Pilot can be used to steer to a
waypoint created by the
h1000 CND (Central
Navigation Display
) or from an external source
via NMEA.
With Nav Mode selected and the Pilot switched
OFF, steer the boat onto the Bearing to
Waypoint (BTW), ensure that the cross track
error is less than 0.1Nm, and allow the boat to
settle. Activate the Pilot in Nav Mode by
pressing the ON key once. When engaged in
Nav Mode, the Pilot will steer a course that
aims to keep the cross track error to a
minimum and will allow the boat to safely arrive
at the next waypoint.
automatic waypoint advance
Many position fixers will automatically switch to
the next waypoint in a sail plan. For reasons of
safety however, the
h1000 Pilot
will not
automatically steer to the next waypoint until
instructed by the user. If the position fixer is
transmitting valid waypoint route information,
and automatically switches to the next waypoint
in a route, the Pilot will prompt the user with
the message Next Waypoint
?. When it is safe
to do so, press the ENTER key within four
seconds to instruct the Pilot to start navigating
to the next waypoint in the route.
2nd page
3rd page
additional navigate mode pages
With the pilot ON pressing the UP/DOWN keys
will scroll the display to a second and third Nav
Mode page.
Page 2 displays navigation information relative
to the selected Waypoint.
Page 3 displays a track screen of the current
data. A circle on the screen indicates the active
waypoint.

h1000 pilot main menu
Page 11
main menu
main menu
The Main menu is accessed by pressing the
ENTER key. The items listed in this menu differ
slightly dependent upon the boat type and units
connected to the system. The ‘tack’ item will
only be listed if the wind interface is connected
and the Pilot configured for sail in Dockside
Calibration.
Tack (see also Page 9 of this manual)
cancel aborts the tack function
now will immediately start the automatic tack
function
after delay starts the automatic tack function
after an adjustable time period.
memories
The Memories menu contains functions which
are accessed more frequently and can be
changed with the Pilot OFF or ON.
The memories menu may be accessed to
configure the settings for the Pilot, Compass,
Alarms and Lighting, and to reset the trip log.

main menu h1000 pilot
Page 12
pilot memories
Pilot Memories
Pressing the ENTER key with Pilot
highlighted takes the user into the
Pilot Memories pages.
Tack (see also Page 9 of this
manual)
Pressing the ENTER key with this
option highlighted displays the auto
tack function delay time setting,
adjustable between 0 and 99
seconds. The default setting is 10
seconds.
TWA mode (see also Page 9 of this
manual)
Pressing the ENTER key displays
the status for TWA mode.
... Selecting
ON configures the Pilot to use TWA
information when steering in Wind
Mode. This function is particularly
useful for optimising downwind
steering performance
Speed source
The speed source option allows the
source for speed data to be
selected. Pressing the ENTER key
displays the three options available,
paddle, SOG (from a GPS) and
manual. Pressing the UP/DOWN
key toggles between the options.
Selecting the manual option
activates a further screen, which
allows adjustment of the three
manual speed settings, slow,
medium and fast. Alter these
settings to the most appropriate
values for the particular boat.

h1000 pilot main menu
Page 13
memories menu
Compass
The compass memory allows a pre-set heading to be defined and any deviation from that course
will be shown as an error on the Tactical Compass page. This course can be updated by one of
three methods. The first method, is simply by pressing the ENTER key whilst the display is showing
the Tactical Compass page. The second is by using the drop down box in the Memories →
Compass →Course, drop down menu. The drop down box offers Use heading which sets the
course to the heading the boat is presently steering to and User defined which allows a pre-set
value to be entered.
PORT and STBD courses (sailboats only) are retained and updated at each press of the ENTER key
whilst in the Tactical Compass page. When OK is selected, control returns to the Memories Menu.
reset trip log (this function is only available if a speed input is present)
Reset trip log clears the trip log value back to zero. The stored log however is unaffected by this
operation. Pressing the UP/DOWN
key toggles between OK and Cancel.
alarms
Alarm levels for various measured functions can be set, or inhibited. All the alarms default to OFF
on a factory reset.
If available on the system, the Wind speed, Shallow depth, and Off course alarms can be set from
the Alarms menu. Selecting Pilot activates the Pilot Alarms screen where the Watch timer and
Pilot off course alarms can be set.
It should be noted that two Off course alarms are available with the
h1000 Pilot
system. The first,
which is located directly on the Alarms menu, is triggered from the Tactical Compass page. The
second Off course alarm, located within the Pilot Alarms menu triggers only when the Pilot
deviates from the Pilot Set Course.

main menu h1000 pilot
Page 14
alarms
The setting procedure for the wind speed alarm is shown. The other alarms are set in a similar
manner.
Note: The low battery alarm is pre-set at 10.5 volts, and can only
be turned ON or OFF.
lighting
lighting
Display lighting levels are controlled by the lights key in normal operation, but the exact level of
illumination can be adjusted for each of the three settings from this menu.
The levels are numbered in the order they appear when the lights key is pressed, and each level
can be set as a percentage from 00% (off) to 99% (maximum).
This menu page also allows the lighting control to be applied either as local (this display unit only),
or system (the entire system) and is useful when zoning particular displays on the boat. For
example, cockpit display lighting can be isolated from a display located down below.
The OK command returns to the Main Menu.

h1000 pilot main menu
Page 15
timer
timer
The timer can be used for counting down to the start of a race and to record elapsed time. The
timer can be set to countdown anywhere from 1 minute to a maximum of 59 minutes in 1-minute
increments. Once started, the timer will continue to run in the background, even if the timer
configuration page is exited. The Timer function can be displayed in any of the User Pages.

calibration h1000 pilot
Page 16
calibration
Note: For full details of calibrations foryour h1000 pilot referto the Installation
Manual supplied with your unit.
Calibration
Calibration values take time and effort to
set up and it is often necessary to perform
various manoeuvres with the boat. For this
reason, an optional security check is
provided before entry into the calibration
menus to save accidental resets. Refer to
the h1000 Pilot Installation Manual for full
details covering Compass, Dockside and
Sea trial calibrations.
entering secure mode
This feature is optional and can be disabled.
The security check uses a four digit Personal Identification Number or PIN. If security has been
activated, this PIN must be entered every time to access the Calibrations menu.
After a factory reset the PIN is set to 0000 and in this condition security checking is disabled.
Security is an option on the Calibrations menu, which allows a new PIN to be set. Once a non-zero
PIN has been set the security checking is enabled, and all subsequent access to the Calibration
menu is restricted.
Note: Once the PIN has been entered for any given session the PIN entry screen is
automatically by-passed when re-entering the calibration menu. Upon cycling the power,
the PIN is once again required to enter the calibration menu.
Security
disabled
Security
enabled

h1000 pilot installation
Page 17
installation
precautions
To avoid electromagnetic interference, it is
recommended that the Pilot display be installed
no less than 0.3 metres from a compass and 1
metre from a GPS.
The Pilot is water resistant, but not waterproof.
Use the cover when not in use. The rear
connectors that are not connected to cables
must remain protected by their appropriate
caps.
panel mounting
Ensure there is sufficient room behind the panel to accommodate the fixings and connections, and
using the template supplied, cut a hole in the panel in the desired position.
Fix the mounting bracket into the hole using the screws supplied.
Note: The sealing ring is fitted to the unit during manufacture. Its purpose is to prevent moisture
penetration and reduce the effects of any vibration transmitted through the instrument panel.
Press the Pilot Display firmly into the mounting bracket; an audible ‘click’ will indicate that the
case is correctly located.
Secure the unit to the instrument panel by fitting the studs and thumbnuts supplied.
Caution: To avoid damaging the casing, fixing studs must only be tightened ‘finger-tight’.
Mounting
Bracket
Sealing Ring
(Fitted at Manufacture)
Pilot Display
Unit
Protective
Cover

installation h1000 pilot
Page 18
electrical connections
external connections
Two Fastnet² connectors are provided at the
rear of the unit.
The table below shows pin functions.
5
2 3
41
Front view of
male connector pins
Pin Number Signal
1 12 volts
2 Busy
3 Fastnet²-
4 Fastnet²+
5 0 volts

h1000 pilot accessories
Page 19
accessories
Hand-held controller
The Hand-Held Controller provides remote
control over the
h1000
Pilot
. The functions of
the six dedicated keys are as follows:
(a) 10o>Ten degree turn to
Starboard
(b) <10oTen degree turn to Port
(c) 1o>One degree turn to
Starboard
(d) <1oOne degree turn to Port
(e) auto/resume Switch the Pilot ON/
Resume the previous
course
(f) off
Switch OFF the Pilot
The Hand-Held Controller has an LED indicator
that flashes to indicate the
h1000
Pilot
is
operating correctly.

accessories h1000 pilot
Page 20
accessories
Jojstick Control
joystick control
The Joystick allows direct control of the rudder
via the autopilot computer for quick and
responsive steering. The Joystick has two
modes of operation available to the helmsman,
giving different steering control as follows:
normal
In this mode the rudder moves in the direction
of the joystick movement, when the joystick is
returned to the central position, the rudder
movement stops. The greater the movement of
the joystick, the faster the response of the
rudder.
proportional
In this mode the position of the rudder imitates
the position of the joystick. When the joystick is
returned to the central position the rudder
returns to its initial position.
engaging the pilot in joystick mode
To engage the Pilot:
• Turn rudder to amidships position
• Press the joystick key to engage the
Pilot
• Move the joystick to Port or Starboard
to move the rudder
Note that when the Pilot is engaged using the
joystick key, the rudder position at the moment
of engaging will be the central position of the
joystick.
Other manuals for h1000 pilot
4
Table of contents
Other B&G Marine Equipment manuals

B&G
B&G Network Series User manual

B&G
B&G RAM T2 User manual

B&G
B&G HB-1000I User manual

B&G
B&G Triton Edge User manual

B&G
B&G Hydra 2000 User manual

B&G
B&G h1000 pilot User manual

B&G
B&G Vulcan R Series User manual

B&G
B&G Zeus Touch User manual

B&G
B&G H5000 Pilot User manual

B&G
B&G Zeus3 Glass Helm User manual

B&G
B&G Zeus2 series User manual

B&G
B&G Zeus 3S User manual

B&G
B&G Network Series User manual

B&G
B&G RAM T3 User manual

B&G
B&G h3000 User manual

B&G
B&G Hydra Pilot Instruction Manual

B&G
B&G RAM T0 User manual

B&G
B&G Network Series User manual

B&G
B&G Zeus3 Glass Helm User manual

B&G
B&G H5000 Pilot Use and care manual