Ocean Sonics Processing Buoy User manual

Ocean Sonics Processing Buoy
User Guide
April 2020
Version 1.1

Ocean Sonics Processing Buoy User Guide April 2020 P.1
Table of Contents
Introduction..............................................................................................................................................................2
Important Notes.................................................................................................................................................2
Specifications......................................................................................................................................................2
Buoy Power .............................................................................................................................................................3
Power Switch......................................................................................................................................................3
Charging the Buoy............................................................................................................................................3
Battery Charger Indication Light.............................................................................................................4
Charging Precautions..................................................................................................................................4
Buoy Communication...........................................................................................................................................4
Opening the Top Hat .......................................................................................................................................4
Development on the CuBox...........................................................................................................................5
Deployment Guide.................................................................................................................................................6
Connect to Ocean Sonics Buoy....................................................................................................................6
Assemble Buoy Configuration......................................................................................................................6
Setup Hydrophone............................................................................................................................................6
Deploy Buoy into the Water..........................................................................................................................6
Recovery ...................................................................................................................................................................7
Maintenance............................................................................................................................................................7
Battery Information...............................................................................................................................................8
Battery Charger Information.........................................................................................................................8
Contact Ocean Sonics Ltd..................................................................................................................................9
Appendix A ........................................................................................................................................................... 10
Confirming Voltages................................................................................................................................. 10
Appendix B ........................................................................................................................................................... 11
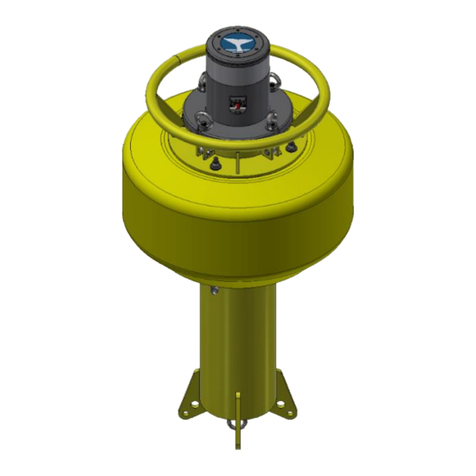
Technical Drawing......................................................................................................................................... 11

Ocean Sonics Processing Buoy User Guide April 2020 P.2
Introduction
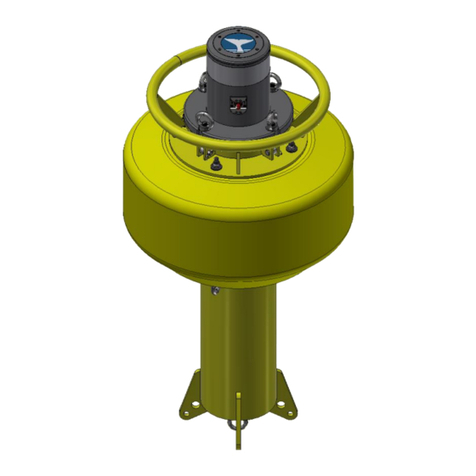
The Ocean Sonics Processing Buoy is an easy way to deploy one or more icListen Smart
Hydrophones while keeping them synchronized. Users can create a custom array using the
extension cables and Smart Cables as building blocks. The setup and configuration of the
hydrophones can be done with the buoy’s internal access point. The Processing Buoy allows
users the ability to customize their buoy and add features based on their deployment.
The yellow drifting buoy is small and lightweight, so it can be deployed from a small vessel.
This solution combines power and processing with a hydrophone array.
Important Notes
•Buoy battery life will depend on set-up of deployment,
number of hydrophones and smart cables.
•To confirm the battery voltage, see Appendix A.
•Turn the buoy OFF when not in use.
•Recharge batteries after each 6 to 8-hour deployment.
•Store the buoy upright or laying on side.
•Do NOT flip the buoy or turn upside down.
oBattery positioning is ballasted for upright position.
oTurning the buoy upside down could result in damage to batteries.
Specifications
WEIGHT
25 kg in air
DIMENSIONS
1 m x 0.5 m

Ocean Sonics Processing Buoy User Guide April 2020 P.3
Buoy Power
The buoy power is provided by sealed lead acid batteries inside the buoy. The batteries can
be recharged using the battery charger provided with the buoy. Please read all instructions
in this guide and in the battery charger manual (see USB drive) prior to charging batteries.
Notes
1.
The manual for the battery charger is in the charger box and should be read prior to
charging the buoy.
2.
The buoy should be charged in the OFF (0) position.
The charger should be disconnected prior to turning the switch to the ON (1) position.
Power Switch
The external switch has two positions.
0
OFF and CHARGE
position
All internal electronics are turned off and downstream
power at the MCBH is turned off.
When the supplied battery charger is plugged in, it will
automatically charge the batteries.
1
ON position
All internal electronics are turned on and downstream
power is present at the MCBH. The charger should be
disconnected prior to turning the buoy on.
Charging the Buoy
1. Switch the buoy to the 0 (OFF/CHARGE) position.
2. Ensure the buoy is in a secure, dry location for charging.
3. Place the buoy on its side with MCBH8 plug in accessible position.
(Do NOT turn upside down or flip buoy onto top hat.)
4. Insert power cord into wall plug (120VAC power source).
5. Mate connector and secure locking sleeve (see below).
Figure 1. Power Adapter connecting to Buoy.
6. The charge cycle should be displayed by the LED battery on the charger.

Ocean Sonics Processing Buoy User Guide April 2020 P.4
Battery Charger Indication Light
Red Light
Charging
Green Light
Charge Complete, Float
Please see the Charger Manual for more information (located on the USB drive).
7. Charging should take approximately 8-10 hours per buoy.
8. To Check Battery Voltage, see Appendix D.
9. Charge time will vary depending on discharge state of batteries.
Charging Precautions
•Operate in an environment with proper ventilation.
•Do not operate charger in a damp or wet environment.
•Charger is fully automatic and can be left on the battery indefinitely.
•Refer to Operation Manual included with charger.
•Batteries should be stored fully charged between 15°C to 20°C.
•Batteries should be charged every 6 months or when open circuit battery voltage
drops to 12.0 VDC.
Buoy Communication
Opening the Top Hat
Notes
1.
When the electronics enclosure (top hat) is opened by the user to access the CuBox,
extreme care should be taken to ensure there is no damage to cables or electronics.
Opening the top hat should only be done in a clean and dry environment.
2.
Inside the electronics enclosure is a low voltage disconnect (LVD) module that is
factory set at 22.4V. This setting should not be altered by the user and altering this
cut-off will void warranty on the buoy.
1. Place the buoy on its side.
2. Remove any chain or rope tied in the eye hooks.
3. Unscrew eye bolts holding top hat in place.

Ocean Sonics Processing Buoy User Guide April 2020 P.5
4. Unscrew 6 Phillips screws to access the electronics.
5. Slowly lift the top hat and place on a flat surface while accessing inside of the end
cap.
6. CuBox ports can be accessed from this position or the CuBox can be removed from
the Velcro strap and connectors for programming.
a. The 5V power adapter can be used to power the CuBox outside of the buoy.
Development on the CuBox
The development package can be accessed on the USB drive included with buoys.
The archive can be extracted and read, starting at readme_top.txt.
All the sub-folders in the archive should have their own readme file associated.
The package can also be accessed online by contacting daniel.kehsler@oceansonics.com or
support@oceansonics.com.

Ocean Sonics Processing Buoy User Guide April 2020 P.6
Deployment Guide
OSL Tip:
For a quick setup install Ocean Sonics’ Software Programs
Marco and Lucy on your PC prior to setting up your Ocean Sonics Buoy.
Connect to Ocean Sonics Buoy
1. Use a connector to communicate to internal computer in the buoy hardhat.
2. Setup Processing for deployment. (See Buoy Communication for more detail).
3. Ensure all configurations are setup before returning hardhat for deployment.
Assemble Buoy Configuration
4. Ensure the buoy is fully charged and in the OFF position (OFF Position: 0).
Figure 2. Top Hat of Buoy, Off (0) Position
5. Attach cables, smart cables and hydrophones in configuration for deployment.
It is recommended to use a cable and padlock to secure eye hooks, so they do not
unscrew during the deployment.
6. Turn on Ocean Sonics Buoy (ON Position: 1).
Setup Hydrophone
7. Setup hydrophone sampling for deployment.
Deploy Buoy into the Water
Note
For safe deployment ensure the vessel engine is stopped during deployment.
1. Start deployment with bottom of array cables.
a. Lower the bottom weight on end of cables into water.
b. Slowly feed in the hydrophones and cables of the array.
Special care should be taken with the heave plates and hydrophones.
c. The Buoy should be the last instrument lowered to the water.

Ocean Sonics Processing Buoy User Guide April 2020 P.7
Recovery
Note
The recovery requires 2-3 individuals. It is best to have 1-2 people retrieving the
equipment from the water while another person is laying the equipment out on the deck
as it is retrieved taking care of fragile hydrophones and minimizing tangling of the array.
1. Transit to buoy.
2. Use gaff hook to secure buoy.
3. Tie a rope around the top ring to secure buoy.
4. Retrieve the buoy from the water.
a. Place the buoy on deck while holding onto the rope attached to the cabled
array below.
A winch can be used to allow easier retrieval of buoy on deck.
b. Slowly pull out the heave plate and recover the remaining array by hand, with
special care handling hydrophones.
5. Turn off Ocean Sonics Buoy (OFF Position: 0).
6. Turn off recording on all hydrophones using a test cable and a PC.
7. Hydrophones can be Powered Down to retain battery at 100%.
For each hydrophone:
a. Attach test cable.
b. Insert reset tool to power down.
8. Rinse the Buoy, hydrophones and equipment with fresh water.
Maintenance
•The buoy should be thoroughly rinsed with fresh water after each deployment to
remove saltwater and debris.
•The buoy should only be opened when it is safe to do so in a clean environment
without chance of water entering the inside.
•The buoy should be recharged after each deployment.
•Batteries should be charged every 6 months or when open circuit battery voltage
drops to 12.0 VDC.

Ocean Sonics Processing Buoy User Guide April 2020 P.8
Battery Information
OCEAN SONICS PART NUMBER
11662
TYPE
RECHARGEABLE,
SEALED LEAD ACID
NOMINAL VOLTAGE
12.0 V
NOMINAL CAPACITY
10Ah
Battery Charger Information
Model: JAC0224-C
More information on the charger can be found on the Charger Manual in the charger box
and a copy is also on the USB drive provided with the buoy.

Ocean Sonics Processing Buoy User Guide April 2020 P.9
Contact Ocean Sonics Ltd.
To download Ocean Sonics Software please visit:
https://sites.google.com/a/oceansonics.com/ocean-sonics-resource-site/
Service
To request an RMA or technical support
Email: support@oceansonics.com
Phone: 1-902-655-3000
Sales
For general sales inquiries
Email: sales@oceansonics.com
Phone: 1-902-655-3000
Website
https://OceanSonics.com
Mailing and Shipping Address
Ocean Sonics
110 Parkway Dr.
Truro Heights, NS Canada
B6L 1N8

Ocean Sonics Processing Buoy User Guide April 2020 P.10
Appendix A
Confirming Voltages
A voltmeter can be used to confirm the proper voltage is being supplied to the array on the
buoy.
1. Place the negative voltmeter lead (black) into pin 1 of the MCBH8F bulkhead.
connector on the battery pack end cap for the common connection (pinout below).
2. Place the positive voltmeter lead (red) into pin 7 (pinout below).
Fully Charged Batteries should measure approximately ~25 V.
Batteries should not be discharged past 21 V.
MCBH8F Bulkhead Connector Pinout

Ocean Sonics Processing Buoy User Guide April 2020 P.11
Appendix B
Technical Drawing
Table of contents
Other Ocean Sonics Marine Equipment manuals

Ocean Sonics
Ocean Sonics BL-B4-GPS-B User manual

Ocean Sonics
Ocean Sonics Launch Box User manual

Ocean Sonics
Ocean Sonics icListen HF User manual

Ocean Sonics
Ocean Sonics Recorder Buoy User manual

Ocean Sonics
Ocean Sonics Coastal Acoustic Drifting Buoy User manual

Ocean Sonics
Ocean Sonics Tow Fish User manual