Beurer DM 49 User manual

EN Speaking upper arm blood pressure monitor
Instructions for use .........................................................2
ES Tensiómetro de brazo con voz
Instrucciones de uso ....................................................19
RU Прибор для измерения кровяного давления
вплечевой артерии сголосовым оповещением
Инструкция по применению.......................................37
EL Ομιλούσα συσκευή μέτρησης αρτηριακής
πίεσης βραχίονα
Οδηγίες χρήσης ............................................................55
BM 49

2
1. Included in delivery
Check that the exterior of the delivery cardboard packaging is intact and
make sure that all contents are present. Before use, ensure that there is
no visible damage to the device or accessories and that all packaging
material has been removed. If you have any doubts, do not use the
device and contact your retailer or the specified Customer Service
address.
1 x blood pressure monitor
1 x upper arm cuff
4 x 1.5 V LR6 AA batteries
1 x storage bag
1 x instructions for use
ENGLISH
Table of contents
1. Included in delivery.............................................................................. 2
2. Signs and symbols .............................................................................. 3
3. Intended use........................................................................................ 3
4. Warnings and safety notes.................................................................. 4
5. Device description............................................................................... 6
6. Initial use.............................................................................................. 7
7. Usage .................................................................................................. 9
8. Cleaning and maintenance................................................................ 14
9. Accessories and replacement parts.................................................. 15
10. What if there are problems? .............................................................. 15
11. Disposal............................................................................................. 15
12. Technical specifications .................................................................... 16
13. Warranty/service................................................................................ 17
Read these instructions for use carefully and keep them for later use, be sure to make
them accessible to other users and observe the information they contain.
Dear customer,
Our name stands for high-quality, thoroughly tested products for
applications in the areas of heat, weight, blood pressure, body
temperature, pulse, gentle therapy, massage, beauty, baby and air.
With kind regards,
Your Beurer team

3
2. Signs and symbols
The following symbols are used on the device, in these instructions
for use, on the packaging and on the type plate for the device:
WARNING
Warning notice indicating a risk of injury or damage
to health
IMPORTANT
Safety note indicating possible damage
to the device/accessory
Note
Note on important information
Observe the instructions for use
Application part, type BF
Direct current
Disposal in accordance with the Waste Electrical
and Electronic Equipment EC Directive – WEEE
Do not dispose of batteries containing hazardous
substances with household waste
21
PAP
Dispose of packaging in an environmentally friendly
manner
Manufacturer
Storage/Transport
Permissible storage and transport temperature
and humidity
Operating
Permissible operating temperature and humidity
IP21
Protected against solid foreign objects 12.5 mm in
diameter and larger, and against vertically falling
drops of water
S
N
Serial number
The CE labelling certifies that the product complies
with the essential requirements of Directive
93/42/EEC on medical devices.
3. Intended use
The BM 49 upper arm blood pressure monitor is intended for home
use and serves as a non-invasive way of measuring and monitoring
arterial blood pressure and pulse values in adults with an upper arm
circumference of 22-36 cm.

4
As a result, you can quickly and easily measure your blood pressure and
pulse and view various average values from previous measurements.
The recorded measurements are classified and evaluated graphically.
A symbol in the display also warns of possible existing cardiac
arrhythmia.
4. Warnings and safety notes
Notes on use
•To ensure comparable values, always measure your blood pressure
at the same time of day.
•Do not take a measurement within 30 minutes of eating, drinking,
smoking or exercising.
•Before the initial blood pressure measurement, always make sure to
rest for about 5 minutes!
•
Furthermore, if you want to take several measurements in succession,
make sure to always wait at least 1 minute between individual
measurements.
•
Repeat the measurement if you are unsure of the measured value.
•
The measured values taken by you are for your information only –
they are no substitute for a medical examination.
Discuss the measured values with your doctor and never base any
medical decisions on them (e.g. medicines and their dosages).
•
This device is not intended for use by people (including children) with
restricted physical, sensory or mental skills or a lack of experience
and/or a lack of knowledge, unless they are supervised by a person
who is responsible for their safety or are instructed by such a person in
how to use the device. Supervise children around the device to ensure
they do not play with it.
•
Using the blood pressure monitor outside your home environment
or whilst on the move (e.g. whilst travelling in a car, ambulance or
helicopter, or whilst undertaking physical activity such as playing
sport) can influence the measurement accuracy and cause incorrect
measurements.
•Do not use the blood pressure monitor on newborns or patients with
pre-eclampsia. We recommend consulting a doctor before using the
blood pressure monitor during pregnancy.
•Cardiovascular diseases may lead to incorrect measurements or
have a detrimental effect on measurement accuracy. The same also
applies to very low blood pressure, diabetes, circulatory disorders
and arrhythmias as well as chills or shaking.
•The blood pressure monitor must not be used in connection with a
high-frequency surgical unit.
•Only use the device on people that have the upper arm circumference
specified for the device.
•Please note that when inflating, the functions of the limb in question
may be impaired.
•During the blood pressure measurement, the blood circulation must not
be stopped for an unnecessarily long time. If the device malfunctions
remove the cuff from the arm.
•Avoid any mechanical restriction, compression or bending of the cuff
line.
•Do not allow sustained pressure in the cuff or frequent measurements.
The resulting restriction of the blood flow may cause injury.

5
•Make sure that the cuff is not placed on an arm in which the arteries
or veins are undergoing medical treatment, e.g. intravascular access
or intravascular therapy, or an arteriovenous (AV) shunt.
•Do not use the cuff on people who have undergone a mastectomy.
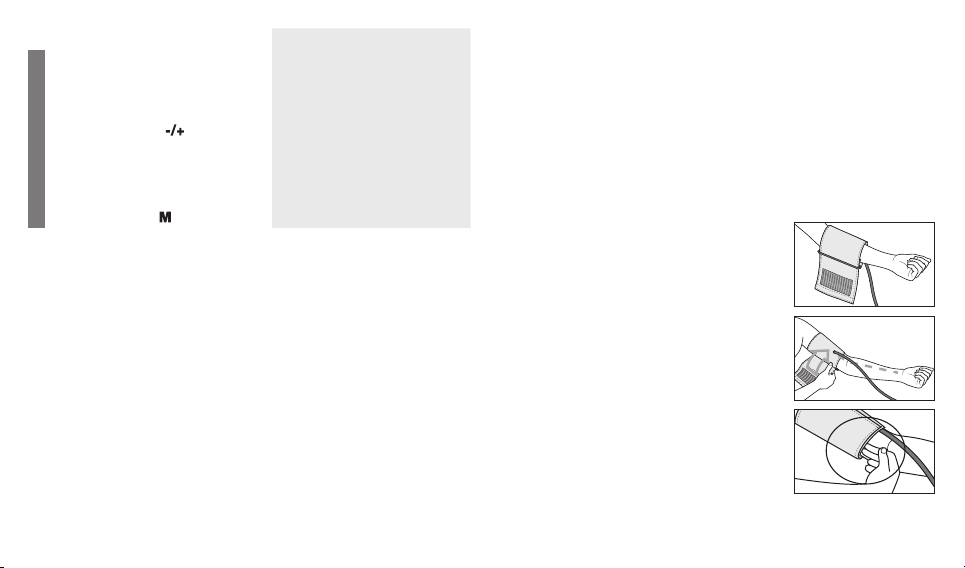
•Do not place the cuff over wounds as this may cause further injury.
•Place the cuff on your upper arm only. Do not place the cuff on other
parts of the body.
•
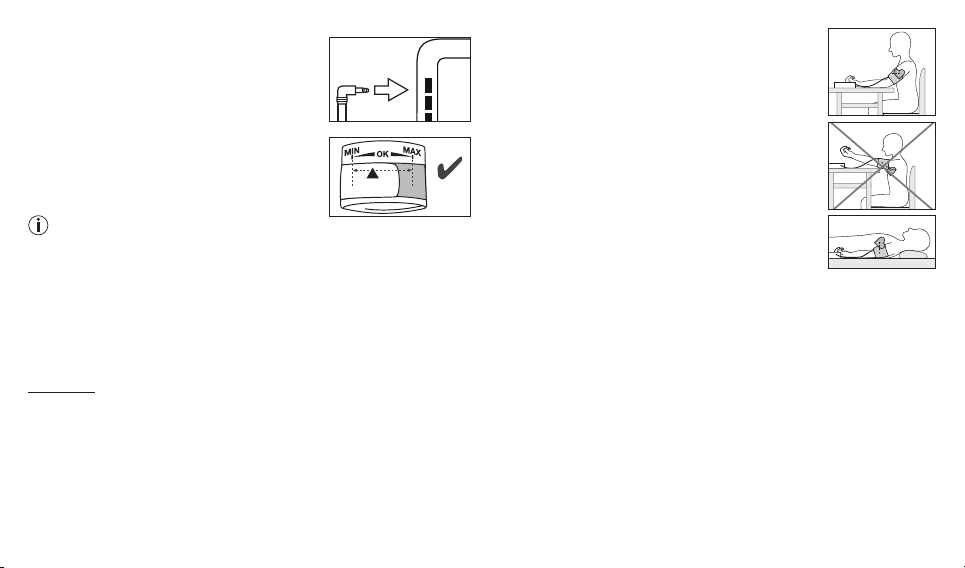
You can either use the blood pressure monitor with batteries or with
the supplied mains part. Please note that data can only be transferred
and stored when your blood pressure monitor is supplied with power.
As soon as the batteries are empty or the mains part is disconnected
from the power supply, the blood pressure monitor loses the date
and time.
•To conserve the batteries, the blood pressure monitor switches off
automatically if no buttons are pressed for 1 minute.
•The device is only intended for the purpose described in these
instructions for use. The manufacturer is not liable for damage resulting
from improper or incorrect use.
Notes on storage
•The blood pressure monitor is made from precision and electronic
components. The accuracy of the measured values and service life
of the device depend on its careful handling:
– Protect the device from impacts, humidity, dirt, marked temperature
fluctuations and direct sunlight.
– Do not drop the device.
– Do not use the device in the vicinity of strong electromagnetic fields
and keep it away from radio systems or mobile telephones.
– Only use the cuff included with the delivery or original replacement
cuffs. Otherwise, incorrect measured values will be recorded.
•We recommend that the batteries be removed if the device will not be
used for a prolonged period of time.
Notes on handling batteries
• If your skin or eyes come into contact with battery fluid, rinse the
affected areas with water and seek medical assistance.
• Choking hazard! Small children may swallow and choke on
batteries. Therefore, store batteries out of the reach of small children.
• Observe the plus (+) and minus (-) polarity signs.
• If a battery has leaked, put on protective gloves and clean the battery
compartment with a dry cloth.
• Protect batteries from excessive heat.
• Risk of explosion! Do not throw batteries into a fire.
•Do not charge or short-circuit batteries.
•If the device is not to be used for a relatively long period, take the
batteries out of the battery compartment.
•Use identical or equivalent battery types only.
• Always replace all batteries at the same time.
•Do not use rechargeable batteries.
•Do not disassemble, split or crush the batteries.
Notes on electromagnetic compatibility
•The device is suitable for use in all environments listed in these
instructions for use, including domestic environments.

6
•The use of the device may be limited in the presence of
electromagnetic disturbances. This could result in issues such as error
messages or the failure of the display/device.
•Avoid using this device directly next to other devices or stacked on top
of other devices, as this could lead to faulty operation. If, however, it is
necessary to use the device in the manner stated, this device as well
as the other devices must be monitored to ensure they are working
properly.
•The use of accessories other than those specified or provided by the
manufacturer of this device can lead to an increase in electromagnetic
emissions or a decrease in the device’s electromagnetic immunity; this
can result in faulty operation.
•Failure to comply with the above can impair the performance of the
device.
5. Device description
1. Cuff
2. Cuff line
3. Cuff connector
4. Display
5. Connection for mains part
6. Memory button
7. START/STOP button
8. Function buttons
9. Risk indicator
10. Connection for cuff connector
2
1
3
10
9
8
7
6
4
5

7
Information on the display:
1. Inflate ,
release air
2. Systolic pressure
3. Memory display: average
value ( ), morning ( ),
evening ( )
4. Diastolic pressure
5. User memory
6. Calculated pulse rate
7. Cardiac arrhythmia symbol
8. Time and date
9. Risk indicator
10. Memory space number
11. Battery replacement symbol
6. Initial use
6.1 Inserting the batteries
•Open the battery compartment lid.
•Insert four 1.5 V AA (alkaline type LR6)
batteries. Make sure that the batteries
are inserted the correct way round in
accordance with the markings. Do not
use rechargeable batteries.
• The device announces that it is ready to use and that you can start
taking the measurement. This voice output is in the language that was
pre-set when the device was supplied to the customer – in this case
English.
You can change the language at any time in the settings. To do so,
follow the instructions in the “Setting the date, time and language”
section of this chapter.
•Carefully close the battery compartment lid again.
•With inserted batteries, the device permanently displays the date and
time, even when in standby mode.
If the low battery indicator and appear, no further measurements
can be performed. The device will announce: “Battery low.” Please
replace all batteries. Once the batteries have been removed from the unit,
the date, time and language must be set again.
6.2 Setting the date, time and language
It is essential that you set the date and time. Otherwise, you will not be
able to save your measured values correctly with a date and time and
access them again later.
The time is displayed in the 24-hour format.
The device also has a voice output function, which is available in
4 languages. The device language is set to English when supplied
to the customer.
11
10
9
78
2
3
1
4
5
6
4 x AA (LR6) 1,5 V

8
There are two different ways to access the menu from which you can
adjust the settings:
• Before initial use and after each time you replace the battery:
When you insert new batteries into the device, the display lights up and
the announcement described in the "6.1 Inserting the batteries" section
sounds in the relevant pre-set language. Press and hold the memory
button for approx. 5 seconds.
• If the batteries have already been inserted:
When the device is in standby mode, press the START/STOP button
(date and time is displayed permanently).
All display segments light up briefly; immediately following this, the
announcement sounds in the language set by you. Press and hold
the memory button for approx. 5 seconds.
In this menu you can adjust the following settings in succession:
Date ➔Time ➔Language ➔Volume
Voice output
Date/time
The year flashes on the display. The device is ready for use.
You may start measuring.
•Set the year with the function
buttons and confirm with the
memory button .
•Next, set the month, day, hour
and minute in the same way and
confirm each setting with the
memory button .
Language
The language will flash on the
display .
•You can select the following lan-
guages with the function buttons
:
= English
= Spanish
= Russian
= Greek
= Language off
English
Español
Русский
Ελληνικά
Confirm your selection with
the memory button .
= Language off means
that there is no voice output
and therefore no acoustic
playback.

9
Voice output
Volume
Volume level Vo1 flashes on the
display.
•You can set the volume of the
selected language using the
function buttons :
Vo3 = loud
Vo2 = medium
Vo1 = quiet
Confirm your selection with the
memory button .
6.3 Operation with the mains part
You can also operate this device with a mains part (not included in
delivery). The mains part can be obtained from specialist retailers or
from the service address using order number 071.95. However, before
connecting the device with the mains part, please ensure that you have
removed the batteries from the device. During mains operation, there
must not be any batteries in the battery compartment, as this could
damage the device.
•To avoid any potential damage, the device may only be operated
with a mains part that meets the specifications described in section
“12. Technical specifications”.
•
Furthermore, the mains part must only be connected to the mains
voltage that is specified on the type plate.
•Insert the mains part into the connection provided for this purpose on
the right-hand side of the blood pressure monitor.
•
Then insert the mains plug of the mains part into the mains socket.
•After using the blood pressure monitor, unplug the mains part from
the mains socket first and then disconnect it from the blood pressure
monitor. As soon as you unplug the mains part, the blood pressure
monitor loses the date and time setting but the saved measured values
are retained.
7. Usage
Ensure the device is at room temperature before measuring.
The measurement can be performed on the left or right arm.
7.1 Attaching the cuff
Place the cuff onto the bare upper arm. The
circulation of the arm must not be hindered by
tight clothing or similar.
The cuff must be placed on the upper arm so
that the bottom edge is positioned 2 – 3 cm
above the elbow and above the artery. The
line should point to the centre of the palm.
Tighten the free end of the cuff, but make sure
that it is not too tight around the arm and close
the hook-and-loop fastener. The cuff should
be fastened so that two fingers can still fit
under the cuff.

10
Now insert the cuff line into the connection
for the cuff connector.
The cuff is suitable for you if the index mark (▼)
is within the OK range after fitting the cuff.
If the measurement is performed on the
right upper arm, the line should be located on the inside of your
elbow. Ensure that your arm is not pressing on the line.
Blood pressure may vary between the right and left arm, which may
mean that the measured blood pressure values are different. Always
perform the measurement on the same arm.
If the values between the two arms are significantly different, please
consult your doctor to determine which arm should be used for the
measurement.
Important: The unit may only be operated with the original cuff.
The cuff is suitable for an arm circumference of 22 to 36 cm.
A larger cuff for upper-arm circumferences of 35 to 44 cm can be
obtained from specialist retailers or from the service address using
order number 163.387.
7.2 Adopting the correct posture
•Before the initial blood pressure measurement,
always make sure to rest for about 5 minutes!
Otherwise discrepancies can occur.
•
You can take the measurement while sitting or
lying. Always make sure that the cuff is at heart
level.
•
To carry out a blood pressure measurement, make
sure you are sitting comfortably, with your arms
and back leaning on something. Do not cross your
legs. Place your feet flat on the ground.
•
To avoid distorting the measurement, it is important
to remain still during the measurement and not to
speak.
•Wait for at least 1 minute before taking another
measurement.

11
7.3 Selecting the memory Voice output when voice function
is active
User memory
•Switch on the device with the
START/STOP button .
When the device is switched
off, the time and date are
permanently displayed.
The device is ready for use.
You may start measuring.
•Select the desired user memory
by pressing the function
buttons .
User memory 1
User memory 2
You have 2 memories, each with
60 memory spaces to store the
measurements of 2 different people
separately.
7.4 Taking a blood pressure measurement
Voice output when voice function
is active
Measurement
•As described above, attach the
cuff and adopt the posture in
which you want to perform the
measurement.
Voice output when voice function
is active
Measurement
•Switch on the device with the
START/STOP button .
•A display check is performed,
during which all display segments
light up.
•Start the device with the
START/STOP button
. The memory space that will
be used is displayed.
The device is ready for use.
You may start measuring.
The cuff is inflated to 190 mmHg.
The cuff’s air pressure is slowly
released. If you already recognise
a tendency for high blood pres-
sure, you should reinflate the cuff
and increase the cuff’s pressure
again. As soon as a pulse is de-
tected, the symbol flashes.
You can cancel the measure-
ment at any time by pressing
the START/STOP button .

12
Voice output when voice function
is active
Measurement
•The systolic pressure, diastolic
pressure and pulse rate
measurements are displayed.
Systole ... mmHg
Diastole ... mmHg
Heart rate ... beats per minute
According to the WHO
guidelines your blood pressure
is– optimal
– normal
– high to normal
– shows slight hypertension
– shows medium hypertension
– shows strong hypertension
Whilst the message is being
announced, the volume can
be adjusted with the function
buttons .
• appears if the measurement
could not be performed properly.
Observe the chapter on error
messages/troubleshooting in
these instructions for use and
repeat the measurement.
Voice output when voice function
is active
Measurement
•The measurement is
automatically stored.
•
The device switches off
automatically after 1 minute.
Wait for at least 1 minute before taking another measurement.
7.5 Evaluating the results
Cardiac arrhythmia:
This device can identify potential disruptions of the heart rhythm when
measuring and, if necessary, indicates this after the measurement
with the symbol . If the voice function is activated, the device will
announce: “A possible cardiac arrhythmia was found.” This can be an
indicator for arrhythmia. Arrhythmia is an illness in which the heart rhythm
is abnormal because of flaws in the bioelectrical system that regulates the
heartbeat. The symptoms (skipped or premature heart beats, pulse being
slow or too fast) can be caused by factors such as heart disease, age,
physical make-up, excess stimulants, stress or lack of sleep. Arrhythmia
can only be determined through an examination by your doctor. If the
symbol is shown on the display after the measurement has been
taken, repeat the measurement. Please ensure that you rest for 5 minutes
beforehand and do not speak or move during the measurement. If
the symbol appears frequently, please consult your doctor. Self-
diagnosis and treatment based on the measurements can be dangerous.
Always follow your doctor’s instructions.

13
Risk indicator:
The measurements can be classified and evaluated in accordance with
the following table. However, these standard values serve only as a
general guideline, as the individual blood pressure varies in different
people and different age groups etc. It is important to consult your doctor
regularly for advice. Your doctor will tell you your individual values for
normal blood pressure as well as the value above which your blood
pressure is classified as dangerous. The bar chart on the display and the
scale on the device show which category the recorded blood pressure
values fall into. If the values of systole and diastole fall into two different
categories (e.g. systole in the high normal category and diastole in the
normal category), the graphical classification on the device always shows
the higher category; for the example given this would be high normal.
Blood pressure value
category Systole
(in mmHg) Diastole
(in mmHg) Action
Level 3: severe
hypertension red ≥180 ≥110 Seek medical
attention
Level 2: moder-
ate hypertension orange 160–179 100–109 Seek medical
attention
Level 1: mild
hypertension yellow 140– 159 90–99 Regular monitoring
by doctor
High normal green 130–139 85– 89 Regular monitoring
by doctor
Normal green 120–129 80– 84 Self-monitoring
Optimal green <120 <80 Self-monitoring
Source: WHO, 1999 (World Health Organization)
7.6. Saving, displaying and deleting measured values
Whilst the message is being announced, the volume can be adjusted
with the function buttons .
Voice output when voice function
is active
User memory
The results of every successful
measurement are stored together
with the date and time. If there are
more than 60 measurements, the
oldest measurements are lost.
•Switch on the device with the
START/STOP button .The device is ready for use.
You may start measuring.
•Select the desired user memory
( … ) by pressing the
function buttons .
User memory 1
User memory 2

14
Voice output when voice function
is active
Average values
•Press the memory button .
The average value of all saved
measured values in this user
memory is displayed first .
•If you press the memory button
again, the average value of
the morning measurements for
the last 7 days will be displayed
(morning: 5 a.m. – 9 a.m.,
display ).
•If you press the memory button
again, the average value of
the evening measurements for
the last 7 days will be displayed
(evening: 6 p.m. – 8 p.m.,
display ).
Average count:
Systole ... mmHg
Diastole ... mmHg
Heart rate ... beats per minute
According to the WHO
guidelines your blood pressure
is...
Individual measured values
•If you continue to press the
memory button , the most
recent individual measured
values are displayed in turn
with the date and time.
Memory space ...
Systole ... mmHg
Diastole ... mmHg
Heart rate ... beats per minute
According to the WHO
guidelines your blood pressure
is...
Voice output when voice function
is active
Deleting measured values
•The measured values of the
relevant user memory can be
deleted by switching on the
device, selecting the desired
user memory and pressing and
holding the function buttons
and for 5 seconds at the same
time.
All the counts in the memory
have been erased.
•The device will then switch
directly into standby mode
(time mode).
8. Cleaning and maintenance
•Clean the device and cuff carefully using only a slightly damp cloth.
•Do not use any cleaning agents or solvents.
•Under no circumstances hold the device and cuff under water, as this
can cause liquid to enter and damage the device and cuff.
•If you store the device and cuff, do not place heavy objects on the
device and cuff. Remove the batteries. The cuff line should not be bent
sharply.

15
9. Accessories and replacement parts
Accessories and replacement parts are available from the corresponding
service address (according to the service address list). Please state the
corresponding order number.
Designation Item number and/or
order number
Standard cuff (22-36 cm) 163.388
XL cuff (35-44 cm) 163.387
Mains part (EU) 071.95
Mains part (UK) 072.05
10. What if there are problems?
Error
message Possible cause Solution
Unable to record a
pulse. Please wait one minute and
repeat the measurement.
Ensure that you do not
speak or move during the
measurement.
You moved or
spoke during the
measurement.
The cuff was not
attached correctly. Please observe the information
in chapter 7.1 under the
heading “Attaching the cuff”.
Error
message Possible cause Solution
An error occurred
during measurement. Please wait one minute and
repeat the measurement.
Ensure that you do not
speak or move during the
measurement.
The inflation pressure
is higher than
300 mmHg.
Please take another
measurement to check
whether the cuff can be
correctly inflated.
Make sure that neither your
arm nor other heavy objects
are pressing on the line, and
that the line is not bent.
The batteries are
almost empty. Insert new batteries into the
device.
11. Disposal
Disposing of the batteries
•The empty, completely flat batteries must be disposed of through
specially designated collection boxes, recycling points or electronics
retailers. You are legally required to dispose of the batteries.

16
•The codes below are printed on batteries containing harmful
substances:
Pb = Battery contains lead,
Cd = Battery contains cadmium,
Hg = Battery contains mercury
Repairing and disposing of the device
•Do not open the device. Failure to comply with this instruction will void
the warranty.
•Do not repair or adjust the device yourself. Proper operation can no
longer be guaranteed in this case.
•Repairs must only be carried out by Customer Services or authorised
suppliers. Before making a claim, please check the batteries first and
replace them if necessary.
•Please dispose of the device in accordance with EC Directive –
WEEE (Waste Electrical and Electronic Equipment). If you have
any questions, please contact the local authorities responsible
for waste disposal.
12. Technical specifications
12.1 Device
Model no. BM 49
Measurement method Oscillometric, non-invasive blood pressure
measurement on the upper arm
Measurement range Cuff pressure 0-300mmHg,
systolic 50-250mmHg,
diastolic 30-200mmHg,
pulse 40-180 beats/minute
Display accuracy Systolic ± 3 mmHg, diastolic ± 3 mmHg,
pulse ±5% of the value shown
Measurement uncertainty Max. permissible standard deviation
according to clinical testing: systolic 8 mmHg/
diastolic 8 mmHg
Memory 2x60 memory spaces
Dimensions L 96 mm x W 146 mm x H 59 mm
Weight Approximately 264 g (without batteries)
Cuff size 22 to 36 cm
Permissible operating
conditions +5°C to +40°C, 15%-90% relative humidity
(non-condensing)
Permissible storage and
transport conditions -25°C to +70°C, ≤93% relative humidity,
700 – 1060 hPa ambient pressure
Power supply 4 x 1.5 V AA batteries (alkaline type LR6)
Battery life For approx. 250measurements, depending on
levels of blood pressure and pump pressure
Classification Internal supply, IP21, no AP or APG,
continuous operation, application part type BF
The serial number is located on the device or in the battery compartment.
Technical information is subject to change without notification to allow for
updates.

17
•This device complies with the European standard EN60601 1-2
(in compliance with CISPR 11, IEC 61000-4-2, IEC 61000-4-3,
IEC61000-4-4, IEC61000-4-5, IEC 61000-4-6, IEC 61000-4-8,
IEC61000-4-11) and is subject to special precautionary measures with
regard to electromagnetic compatibility. Please note that portable and
mobile HF communication systems may interfere with this device.
•The device complies with the EU Medical Devices Directive 93/42/
EEC, the German Medical Devices Act (Medizinproduktgesetz) and
the standards EN1060-1 (Non-invasive sphygmomanometers – Part 1:
General requirements), EN1060-3 (Non-invasive sphygmomanometers
– Part 3: Supplementary requirements for electro-mechanical
blood pressure measuring systems) and IEC80601-2-30 (Medical
electrical equipment – Part 2 – 30: Particular requirements for the
basic safety and essential performance of automated non-invasive
sphygmomanometers).
•The accuracy of this blood pressure monitor has been carefully
checked and developed with regard to a long useful life. If the device
is used for commercial medical purposes, it must be regularly tested
for accuracy by appropriate means. Precise instructions for checking
accuracy may be requested from the service address.
12.2 Mains part
Model no. LXCP12-006060BEH
Input 100–240V, 50–60 Hz, 0.5A max
Output 6 V DC, 600 mA, in conjunction with Beurer blood
pressure monitors only
Manufacturer Shenzhen Iongxc power supply co., ltd.
Protection This device is double protected and has a primary-
side cutout switch which disconnects the device from
the mains in case of malfunction.
Ensure that you have removed the batteries from the
battery compartment before you use the mains part.
Polarity of the DC voltage connection
Insulated/protection class 2
Housing and pro-
tective covers The housing of the mains part protects users
from touching live parts or parts that could be live
(for example with their fingers, or with a needle or
checking hook).
The user must not touch the patient and the output
connector of the AC/DC mains part at the same time.
13. Warranty/service
Beurer GmbH, Söflinger Straße 218, 89077 Ulm, Germany
(hereinafter referred to as “Beurer”) provides a warranty for this
product, subject to the requirements below and to the extent
described as follows.
The warranty conditions below shall not affect the seller’s statutory
warranty obligations which ensue from the sales agreement with the
buyer.
The warranty shall apply without prejudice to any mandatory
statutory provisions on liability.

18
Beurer guarantees the perfect functionality and completeness
of this product.
The worldwide warranty period is 5 years, commencing from the
purchase of the new, unused product from the seller.
The warranty only applies to products purchased by the buyer
as a consumer and used exclusively for personal purposes in the
context of domestic use.
German law shall apply.
During the warranty period, should this product prove to be
incomplete or defective in functionality in accordance with the
following provisions, Beurer shall carry out a repair or a replacement
delivery free of charge, in accordance with these warranty
conditions.
If the buyer wishes to make a warranty claim, they should
approach their local retailer in the first instance: see the attached
“International Service” list of service addresses.
The buyer will then receive further information about the processing
of the warranty claim, e.g. where they can send the product and
what documentation is required.
A warranty claim shall only be considered if the buyer can provide
Beurer, or an authorised Beurer partner, with
- a copy of the invoice/purchase receipt, and
- the original product.
The following are explicitly excluded from this warranty:
- deterioration due to normal use or consumption of the product;
- accessories supplied with this product which are worn out
or used up through proper use (e.g. batteries, rechargeable
batteries, cuffs, seals, electrodes, light sources, attachments and
nebuliser accessories);
- products that are used, cleaned, stored or maintained improperly
and/or contrary to the provisions of the instructions for use, as
well as products that have been opened, repaired or modified
by the buyer or by a service centre not authorised by Beurer;
- damage that arises during transport between manufacturer
and customer, or between service centre and customer;
- products purchased as seconds or as used goods;
- consequential damage arising from a fault in this product
(however, in this case, claims may exist arising from product
liability or other compulsory statutory liability provisions).
Repairs or an exchange in full do not extend the warranty period
under any circumstances.
Subject to errors and changes

19
1. Artículos suministrados
Compruebe que el embalaje de los artículos suministrados esté intacto
y que su contenido esté completo. Antes de utilizar el aparato deberá
asegurarse de que ni este ni los accesorios presentan daños visibles y de
que se retira el material de embalaje correspondiente. En caso de duda,
no lo use y póngase en contacto con su distribuidor o con la dirección de
atención al cliente indicada.
1 tensiómetro
1 brazalete
4 pilas de 1,5V AA LR6
1 bolsa para guardar
1 instrucciones de uso
ESPAÑOL
Índice
1. Artículos suministrados..................................................................... 19
2. Explicación de los símbolos.............................................................. 20
3. Uso correcto...................................................................................... 20
4. Indicaciones de advertencia y de seguridad..................................... 21
5. Descripción del aparato .................................................................... 23
6. Puesta en funcionamiento................................................................. 24
7. Aplicación.......................................................................................... 26
8. Limpieza y cuidado ........................................................................... 31
9. Accesorios y piezas de repuesto....................................................... 32
10. Resolución de problemas.................................................................. 32
11. Eliminación ........................................................................................ 32
12. Datos técnicos................................................................................... 33
13. Garantía/asistencia............................................................................ 35
Lea atentamente estas instrucciones de uso, consérvelas para su futura utilización, pón-
galas a disposición de otros usuarios y respete las indicaciones.
Estimada clienta, estimado cliente:
Nuestro nombre es sinónimo de productos de alta y comprobada calidad
en el ámbito de aplicación de calor, peso, presión arterial, temperatura
corporal, pulso, tratamiento suave, masaje, belleza, bebés y aire.
Atentamente,
El equipo de Beurer

20
2. Explicación de los símbolos
En el aparato, en las instrucciones de uso, en el embalaje y en la placa
de características del aparato se utilizan los siguientes símbolos:
ADVERTENCIA
Indicación de advertencia sobre peligro de lesiones
u otros peligros para la salud
ATENCIÓN
Indicación de seguridad sobre posibles daños del
aparato o de los accesorios
Nota
Indicación de información importante
Respetar las instrucciones de uso
Pieza de aplicación tipo BF
Corriente continua
Eliminación según la Directiva europea sobre resi-
duos de aparatos eléctricos y electrónicos WEEE
(Waste Electrical and Electronic Equipment)
No desechar con la basura doméstica pilas que con-
tengan sustancias tóxicas
21
PAP
Eliminar el embalaje respetando el medio ambiente
Fabricante
Storage/Transport
Temperatura y humedad de almacenamiento y trans-
porte admisibles
Operating
Temperatura y humedad de funcionamiento admi-
sibles
IP21
Protección contra cuerpos extraños sólidos con
un diámetro de 12,5 mm y superior y contra goteo
vertical de agua
S
N
Número de serie
El sello CE certifica que este aparato cumple los
requisitos establecidos en la Directiva 93/42/EEC
relativa a los productos sanitarios.
3. Uso correcto
El tensiómetro de brazo BM 49 está destinado al uso doméstico y sirve
para la medición no invasiva y la supervisión de los valores de presión
arterial y pulso de personas adultas con un perímetro de brazo de 22 a
36 cm.
Table of contents
Languages:
Other Beurer Blood Pressure Monitor manuals

Beurer
Beurer BGL60 User manual

Beurer
Beurer BM 75 User manual

Beurer
Beurer BC 28 User manual

Beurer
Beurer BC 16 User manual

Beurer
Beurer BC 32 User manual

Beurer
Beurer BC 16 User manual

Beurer
Beurer BM 28 User manual

Beurer
Beurer BM 75 User manual

Beurer
Beurer BM 20 User manual

Beurer
Beurer BM 44 User manual